background image

Basic Adjustment Settings (Continued)

18

3

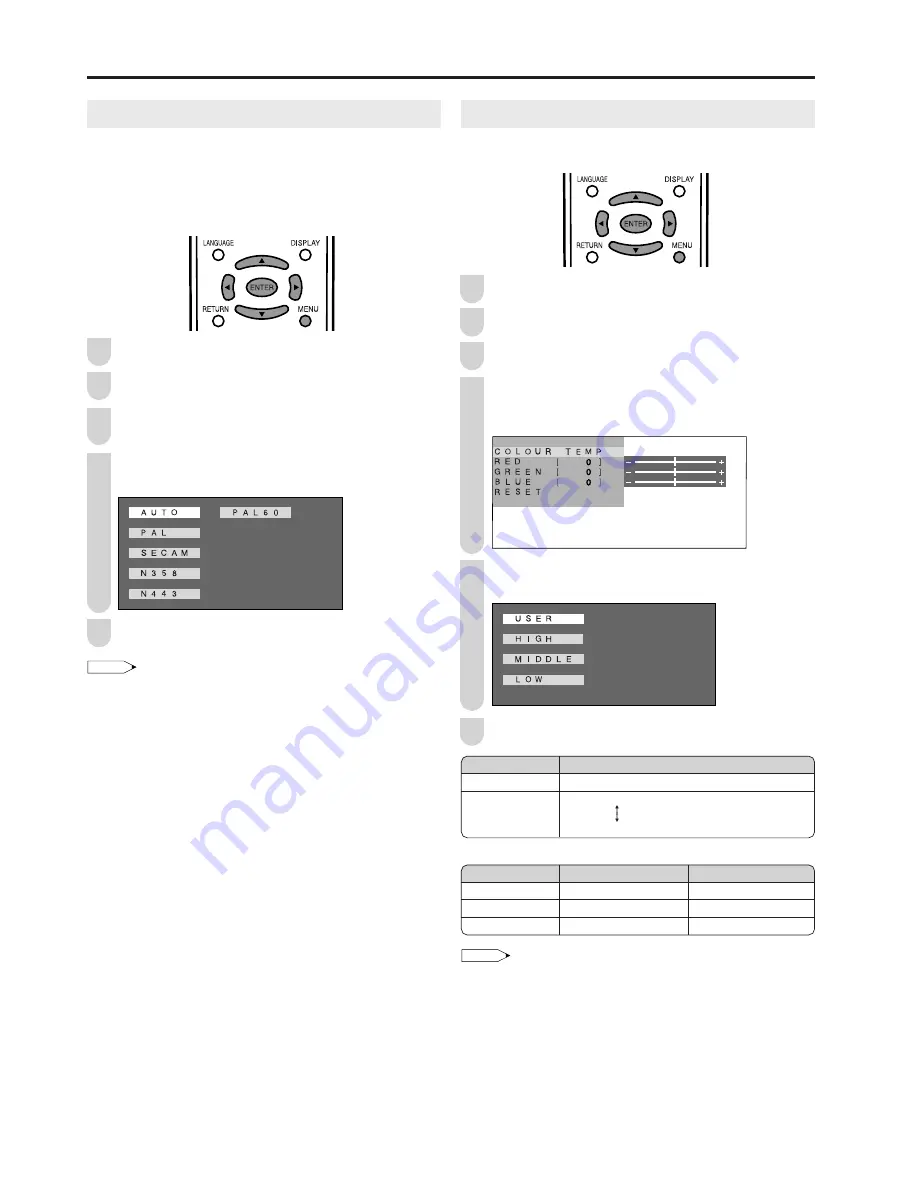
COLOUR SYSTEM (AV2 or AV3 Mode)

Set the system to “AUTO” for normal reception. The “AUTO”
mode automatically detects the receiving signal system and
changes the reception system of the set. When the picture or
sound is not stable, switching to an appropriate system may
improve the picture or sound quality.

Press 

MENU 

to display the Menu screen.

Press 

\

/

|

 to select “PICTURE”.

Press 

'

/

"

 to select “COLOUR SYSTEM”, and press

ENTER

.

Press 

'

/

"

/

\

/

|

 to select “AUTO”, “PAL”, “SECAM”,

“N358”, “N443” or “PAL60” and press 

ENTER

.

Press 

MENU

 to exit.

NOTE

 “COLOUR SYSTEM” is available only in the AV2 and AV3 modes.

Colour Temperature

Adjust the colour temperature to give a better white balance.

Press 

MENU 

to display the Menu screen.

Press 

\

/

|

 to select “PICTURE”.

Press 

'

/

"

 to select “ADVANCED”, and press 

ENTER

.

Press 

'

/

"

 to select “COLOUR TEMP.”, and press

ENTER

.

(Example: “USER” is selected)

Press 

'

/

"

 to select the desired item, and press

ENTER

.

Press 

MENU

 to exit.

* When you select “USER”, the following items are adjustable.

NOTE

• When resetting “RED”, “GREEN” and “BLUE” to factory preset

values, perform the following procedure.

1

Press 

'

/

"

 to select “RESET” in the “ADVANCED” menu, and

press 

ENTER

.

2

Press 

'

/

"

 to select “YES”, and press 

ENTER

.

Selected item

USER

HIGH
MIDDLE
LOW

Description

Can set your desired color*

White with Bluish tone

White with Reddish tone

Selected item

RED

GREEN

BLUE

button

Weaker red

Weaker green

Weaker blue

2

5

4

1

2

5

6

3

1

4

button

Stronger red

Stronger green

Stronger blue

Summary of Contents for Aquos LC-15S5H

Page 1: ...LC 15S5H TINS C917WJZZ Printed in China ...

Page 2: ...reen Display Language Selection 12 Presetting the Channels AUTO 12 Presetting the Channels MANUAL 13 Channel Setting AUTO 14 Channel Setting MANUAL 14 Selecting Menu Items 15 Basic Adjustment Settings 16 AV MODE 16 OPC 16 BACKLIGHT 17 Picture Adjustments 17 COLOUR SYSTEM AV2 or AV3 Mode 18 Colour Temperature 18 Useful Features 19 Sound Adjustments 19 SURROUND 19 DISPLAY MODE 20 AV3 IN OUT 20 On Sc...

Page 3: ... not place the product on a bed sofa rug or other similar surface since they can block ventilation openings This product is not designed for built in installation do not place the product in an enclosed place such as a bookcase or rack unless proper ventilation is provided or the manufacturer s instructions are followed The LCD panel used in this product is made of glass Therefore it can break whe...

Page 4: ... compartment Connect the antenna cable See page 5 Connect with external devices See page 9 Connect the AC cord to the AC INPUT terminal of the LCD TV set and plug in the AC cord to the power outlet See page 5 Turn on the main power See page 10 1 Press POWER on the upper side of the main unit 2 The POWER indicator located on the front of the main unit changes from red to green Start Preset settings...

Page 5: ...re depleted Chemicals that leak from batteries can cause a rash If chemical leakage is found wipe it off with a cloth The batteries supplied with the LCD TV set may have a shorter operating time due to storage conditions If the remote control is not to be used for an extended period of time remove the batteries from the remote control Preparation Engaging the lower claw with the remote control clo...

Page 6: ...set using the AC cord supplied NOTE Headphones are not included in the supplied accessories No sound is heard from the main unit speakers when a headphone mini plug is connected into the headphone jack Do not set the volume at a high level Hearing experts advise against extended listening at high volume levels NOTE Unplug the AC cord from the LCD TV set and power outlet when the LCD TV set is not ...

Page 7: ...al angle of the LCD TV set tilt the screen up to 2 5 degrees forward or 10 degrees backward Please adjust the angle so that the LCD TV set can be watched most comfortably Plug the headphone mini plug into the headphone jack located on the front of the main unit See page 5 The OPC indicator lights up green when OPC is set to ON See page 16 POWER indicator lights up when the power is on and red when...

Page 8: ...et from Falling Over To prevent the LCD TV set from falling over in case of earthquakes and so on strap it onto the wall by threading one end of the string through the loop of the carrying handle 1 and fastening the LCD TV set with the string attached to the hook on the wall or the post etc 2 An example of strapping the LCD TV set onto the wall is shown below The string and hook are commer cially ...

Page 9: ...8 Part Names of the Remote Control ...

Page 10: ...d S VIDEO terminals If your external device has an S VIDEO terminal S VIDEO connection is recommended S VIDEO provides a finer more detailed picture If both terminals are connected S VIDEO terminal takes a priority For the AV1 mode picture can be displayed only when 480I 480P 576I 576P 720P or 1080I signal is received Outputting Video and Audio Video Output You can output video and audio data from...

Page 11: ...input source The screen changes in order of AV1 AV2 AV3 and TV mode each time TV VIDEO is pressed NOTE AV1 COMPONENT Select this mode when viewing the signals from the video equipment connected to the AV1 IN terminal AV2 Select this mode when viewing the signals from the video equipment connected to the AV2 IN terminal The S VIDEO terminal is additionally provided for the AV2 IN terminal If both S...

Page 12: ...within 4 seconds otherwise the selection will not be made Changing channels with CH on the remote control Press CH and the channels change in the order shown below 1 2 3 98 99 0 1 2 3 Press CH and the channels change in the order shown below 3 2 1 0 99 98 3 2 1 Using A A A A A Flashback Press A A A A A to switch the currently tuned channel to the previously tuned channel Press A A A A A again to s...

Page 13: ...nes in and presets receivable TV stations Make sure the antenna cable is properly connected Upper control panel Press MENU PRESET 1 on the upper part of the LCD TV set for more than 2 seconds to display the AUTO mode screen NOTE When starting PRESET after setting SOUND SYSTEM with MENU on the remote control SOUND SYSTEM for all channels are stored into memory Press VOL PRESET 2 on the upper part o...

Page 14: ...MENU PRESET 1 twice to return to the normal screen NOTE System may not have been set correctly if noise can be heard or if there is no sound In such a case adjust SOUND SYSTEM See page 14 Presetting the Channels MANUAL In a weak reception area or under bad reception conditions Upper control panel Press MENU PRESET 1 on the upper part of the LCD TV set for more than 2 seconds to display the AUTO mo...

Page 15: ...e upper or lower number The mode changes in the following order The mode changes in the following order The mode changes in the following order ON OFF Channel numbers with a RED mark on the left are set to Skip To turn off Skip press Channel Select to select the desired channel and then set the Skip mode on the CH setup menu to OFF The frequency changes to allow fine tuning The broadcast sound sys...

Page 16: ... set some items In such cases the alert message Example CANNOT OPERATE is displayed on the menu setting screen Page AV MODE 16 OPC 16 BACKLIGHT 17 CONTRAST 17 BRIGHTNESS 17 COLOUR 17 TINT 17 SHARPNESS 17 COLOUR SYSTEM 18 ADVANCED 18 RESET 17 Page TREBLE 19 BASS 19 BALANCE 19 SURROUND 19 RESET 19 The bar above is an operational guide for the remote control The bar will change in accordance with eac...

Page 17: ...s to select PICTURE Press to select OPC and press ENTER Press to select ON or OFF and press ENTER Press MENU to exit NOTE When setting to ON the OPC indicator lights up green senses the surrounding light and automatically adjusts the backlight brightness Make sure no object obstructs the OPC sensor which could affect its ability to sense surrounding light OPC Automatically adjusts the brightness o...

Page 18: ...OPC OFF BACKLIGHT DARK OPC ON BACKLIGHT AUTO OPC OFF BACKLIGHT USER NOTE BRIGHT Maximum brightness NORMAL Suitable for viewing in a well lit area Saves energy DARK Sufficiently bright when viewing in dim areas USER The brightness can be adjusted to suit your preference using AUTO Screen brightness adjusts according to the ambient light of the room to conserve power consumption The OPC indicator li...

Page 19: ... Adjust the colour temperature to give a better white balance Press MENU to display the Menu screen Press to select PICTURE Press to select ADVANCED and press ENTER Press to select COLOUR TEMP and press ENTER Example USER is selected Press to select the desired item and press ENTER Press MENU to exit When you select USER the following items are adjustable NOTE When resetting RED GREEN and BLUE to ...

Page 20: ...URROUND to OFF may give you more faithful sound Sound Adjustments You can adjust the sound quality to your preference with the following settings Press MENU to display the Menu screen Press to select SOUND Press to select a specific adjustment item Press to adjust the item to your desired position Press MENU to exit NOTE When OUT is selected in AV3 IN OUT you cannot adjust sound settings When rese...

Page 21: ...isplay the Menu screen Press to select SETUP Press to select DISPLAY MODE and press ENTER Press to select the desired mode and press ENTER Press MENU to exit AV3 IN OUT You can select the AV3 IN OUT terminal as input terminals or output terminals Perform steps 1 and 2 in DISPLAY MODE to display the Setup menu screen Press to select AV3 IN OUT and press ENTER Press to select the desired mode and pr...

Page 22: ... ENTER Press to select the desired setting and press ENTER Press MENU to exit NOTE The 4 3 image will be distorted on the screen when the WIDE MODE is set to 16 9 1 2 5 Description Displays the image in a 4 3 size Stretches the image horizontally to display it in a 16 9 size Displays the centre part of the image by enlarging it in the horizontal and vertical directions Stretches the image horizont...

Page 23: ...nd press ENTER Press MENU to exit NOTE AUTO POWER OFF can work only in the TV mode NO OPERATION OFF You can set the power to automatically shut down if there is no operation for 3 hours Perform steps 1 and 2 in SLEEP TIMER to display the Features Menu screen Press to select No operation off and press ENTER Press to select ON and press ENTER Press MENU to exit BLUE SCREEN Automatically turns the sc...

Page 24: ...ONO NOTE The setting can be selected individually for each channel number When stereo sound is received When monaural sound is received When monaural sound is received If the sound quality is poor due to a weak signal or other problems during NICAM broadcast reception set the OFF position of the NICAM to change the TV sound to monaural Press MENU to display the Menu screen Press to select SETUP Pr...

Page 25: ...s poor due to a weak signal or other problems during A2 stereo broadcast reception set the Off position of the A2 to change the TV sound to monaural Press MENU to display the Menu screen Press to select SETUP Press to select CH SETUP and press ENTER Press to select MANUAL and press ENTER Press to select A2 and press to select OFF When the A2 sound is set to the Off position the TV sound is output ...

Page 26: ...fluences such as lightning static electricity etc may cause improper operation In this case operate the unit after first turning the power off or unplugging the AC cord and re plugging it in after 1 or 2 minutes Reference page There is no picture or sound There is no picture There is no picture from AV1 2 3 There is no sound The picture is not clear The picture is too light or improp erly tinted T...

Page 27: ...ghting and brightness conditions As a part of policy of continuous improvement SHARP reserves the right to make design and specification changes for the LCD TV set improvement without prior notice The performance specification figures indicated are nominal values of production units There may be some deviations from these values in individual units Problem Check item The reception may be weak The ...

Page 28: ...27 Unit mm Dimensional Drawings ...

Reviews: