background image

 39

Pr
eparations and Basic Operations

Before Starting Playback

Speaker Settings

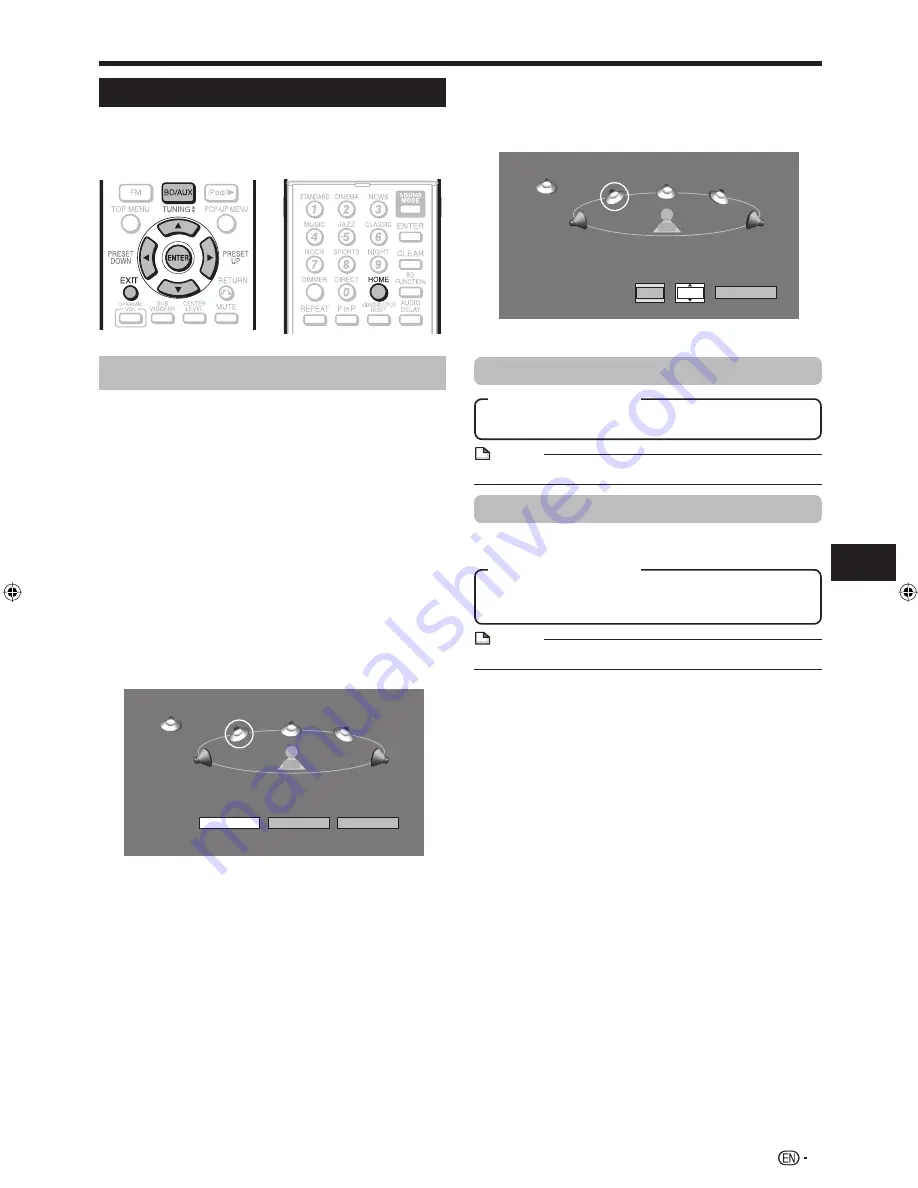
To ensure optimal sound, configure the speaker 
settings according to the speaker position.

Buttons under the cover

Setting configuration

Press 

BD/AUX

 repeatedly to select DISC 

function.

The same operation can be performed by pressing 

SELECTOR

 repeatedly on the main unit.

Press 

HOME

 to display the menu screen.

The same operation can be performed by pressing 

ENTER

 after selecting the HOME icon on the Wall 

paper screen.

Press 

a

/

b

 to select “Settings”, then press 

d

 or 

ENTER

.

Press 

a

/

b

 to select “Speaker Settings”, then 

press 

d

 or 

ENTER

.

Press 

a

/

b

 to select “Yes”, then press 

d

 or 

ENTER

.

Press 

c

/

d

/

a

/

b

 to select the speaker, then 

press 

ENTER

.

0dB
SW

10ft/0dB
   L

LS

8ft/0dB

RS

8ft/0dB

10ft/0dB

   C

10ft/0dB

   R

Test Start

Finish

Return

L: 

Front speaker (left)

C: Center 

speaker

R: 

Front speaker (right)

RS:  Surround speaker (right)

LS:  Surround speaker (left)

SW: Subwoofer

Press 

c

/

d

 to select a specific adjustment item.

1

2

3

4

5

6

7

Press 

a

/

b

 to adjust the item to the desired 

setting, then press 

ENTER

.

See the information on the right column for details on 
each adjustment item.

10ft/0dB
   L

RS

8ft/0dB

10ft/0dB

   C

10ft/0dB

   R

0dB
SW

LS

8ft/0dB

10ft

0dB

Distance

Level

Return

Repeat from steps 6 to 8 for each speaker.

Distance

Select from 1 feet to 29 feet in 1 feet increments.

Selectable Range

 NOTE

You cannot specify Distance for the subwoofer.

Level

The level that can be specified varies depending on the 
speaker.

-6 dB to +6 dB: The selectable range for L, R, C, RS, LS, 
and SW.

Selectable Range

 NOTE

You can specify the level in 1 dB increments.

8

9

(Continued on the next page)

BD-MPC41U̲E.indb   39

BD-MPC41U̲E.indb   39

2010/02/04   16:14:40

2010/02/04   16:14:40

Summary of Contents for Aquos 10P02-MA-NM

Page 1: ...MODE D EMPLOI HOME THEATER WITH BLU RAY DISC DVD PLAYER SISTEMA DE TEATRO EN CASA CON REPRODUCTOR DE BLU RAY Y DVD CINÉMA MAISON AVEC LECTEUR DE DISQUE BLU RAY DVD OPERATION MANUAL MANUAL DE OPERACIÓN MODE D EMPLOI BD MPC41U ENGLISH ESPAÑOL FRANÇAIS ...

Page 2: ......

Page 3: ...gain access to the inside of the product Refer all servicing to qualified personnel Note to CATV system installer This reminder is provided to call the CATV system installer s attention to Article 820 40 of the National Electrical Code that provides guidelines for proper grounding and in particular specifies that the cable ground shall be connected to the grounding system of the building as close t...

Page 4: ...of the remote control 35 Setting the remote control code of the system 35 Turning the Power On 36 Turning the power on 36 Entering standby 36 Indicators on the Main Unit 36 Language Setting 37 Changing the on screen display language 37 RSS Reader function 37 Control Panel 38 Speaker Settings 39 40 Setting configuration 39 Testing the speaker settings 40 Adjusting the level 40 Completing the settin...

Page 5: ...cting the iPod 60 iPod Playback 61 Listening to the FM Broadcast 62 Tuning 62 Receiving Stereo FM Broadcasts 62 Presetting a Station 62 Recalling a preset station 62 Clearing all preset stations 62 Audio Settings and Operations 63 66 Audio Setting Display 63 Various Audio Settings 63 Changing the audio setting 63 Audio delay setting 63 Enjoying Multi Channel Mode 64 Audyssey Technology 64 Enjoying...

Page 6: ... cord or plug is damaged liquid has been spilled or objects have fallen into the apparatus the apparatus has been exposed to rain or moisture does not operate normally or has been dropped Additional Safety Information Power Sources This product should be operated only from the type of power source indicated on the marking label If you are not sure of the type of power supply to your home consult y...

Page 7: ...uilt in installation do not place the product in an enclosed place such as a bookcase or rack unless proper ventilation is provided or the manufacturer s instructions are followed Heat The product should be situated away from heat sources such as radiators heat registers stoves or other products including amplifiers that produce heat Lightning For added protection for this product during a lightni...

Page 8: ...t with a higher voltage than that specified is dangerous and may result in a fire or other types of accident causing damage SHARP will not be held responsible for any damage resulting from the use of this unit with a voltage other than that specified Ventilation This unit is fitted with a cooling fan at the rear for improved cooling To allow for proper ventilation and to maintain good airflow arou...

Page 9: ...nd Philip Hilmes The resulting groundbreaking acoustical correction technologies provided the basis for Audyssey which continues to develop new breakthrough technologies in audio signal processing room acoustics and psychoacoustics 3 Uses select high performance parts to achieve high image and sound quality 1 Extra thick power cord with a 3 prong grounded plug 2 Electrolytic capacitor to control t...

Page 10: ... AQUOS LINK Control p 43 44 Enjoying BD LIVE functions through the Internet This system is compatible with BD LIVE You can enjoy bonus content such as movie trailers through the Internet when playing back BD Video discs compatible with BD LIVE Enjoying BONUSVIEW or BD LIVE pp 47 48 What would you like to do with this system Enjoy movies streamed from Netflix Instantly watch movies streaming via th...

Page 11: ... a disc can be played This system s region code is A for BD and 1 for DVD Discs marked ALL will play in any player BD DVD video operations and functions may be different from the explanations in this manual and some operations may be prohibited due to disc manufacturer s settings If a menu screen or operating instructions are displayed during playback of a disc follow the operating procedure displ...

Page 12: ...ssed in the MPEG1 2 Audio layer 3 file format MP3 files have mp3 as extensions Some files that have mp3 extensions or files that have not been recorded in MP3 format will produce noise or cannot be played Playing the MP3 file format The MP3 files are not played in the order they were recorded It is recommended to record data at a lower speed as data recorded at a fast speed can produce noise and m...

Page 13: ...USB memory devices About Disc Contents BD Video Enjoy BD specific functions including BONUSVIEW BD ROM Profile 1 Version 1 1 such as picture in picture and BD LIVE pages 47 and 48 For the BD video discs compatible with BONUSVIEW BD LIVE you can enjoy additional contents by copying the data from the discs or downloading it via the internet For instance this function is capable of playing the origin...

Page 14: ...stem with the power off until the condensation disappears Using the system when there is condensation may cause malfunction Copyright Audio visual material may consist of copyrighted works which must not be recorded without the authority of the owner of the copyright Refer to relevant laws in your country This product incorporates copyright protection technology that is protected by U S patents an...

Page 15: ...er left approx 8 feet 2 5m Green for Sound bar speaker center approx 8 feet 2 5m Red for Sound bar speaker right approx 8 feet 2 5m Purple for subwoofer approx 8 feet 2 5m Blue for left surround speaker approx 29 feet 9m Grey for right surround speaker approx 29 feet 9m Wall mount angle x 2 iPod cable x 1 Pattern paper x 1 Foot cushion x 2 For Sound Bar Speaker Foot cushion x 8 For Surround Speake...

Page 16: ...k video picture music content and listening to FM broadcasts You can use this system to play back video picture or music content from the desired media source such as Blu ray disc DVD iPod etc or via Internet Refer to Video Picture Music Playback Pages 45 54 and Listening to the iPod Pages 60 and 61 You can also set or use various functions during playback Refer to Playback Functions Pages 55 57 a...

Page 17: ...ator p 36 VOLUME p 41 OPEN CLOSE p 41 Disc Tray p 41 7 8 9 10 11 12 13 14 15 16 Main Unit Rear 1 3 2 5 4 7 8 9 13 11 12 6 10 Cooling fan The cooling fan operates while the power to this system is on Speaker terminals p 22 AC IN terminal p 34 HDMI OUT terminal p 24 ETHERNET terminal p 32 USB1 terminal p 47 When you insert or remove a USB memory device be sure to turn the main power off Also be sure...

Page 18: ...ck time etc 6 5 4 1 2 3 Light up when the following decoders are active Dolby Digital Dolby Digital EX Dolby Digital Plus Dolby TrueHD Dolby ProLogic DTS HD Master Audio DTS High Resolution Audio DTS ES DTS 96 24 PCM MP3 Audyssey indicator p 64 FM function indicator p 62 Main display area MAIN SUB indicator p 63 Repeat indicator p 56 1 2 3 4 5 6 Mounting slot for wall mount angle Speaker terminals...

Page 19: ...9 Direct sound mode buttons p 65 DIMMER p 42 REPEAT p 56 PinP p 47 SOUND MODE p 65 ENTER p 59 This button is same operation as 5 ENTER CLEAR pp 59 62 HOME pp 37 67 BD FUNCTION p 58 AUDIO DELAY p 63 VIDEO OUTPUT RESET p 68 NOTE This remote control is equipped with two ENTER buttons 5 and 38 listed above The ENTER button is useful when using with the Number buttons 1 2 3 4 5 6 7 8 9 10 11 12 13 14 1...

Page 20: ...entify the direction of low bass tones the subwoofer can usually be placed freely in the room for the best sound result Bass sound is easily affected by the position of the subwoofer If the bass tones in the listening position seem much too low or too high try changing your listening position If the bass tone level changes when you change the listening position try relocating the subwoofer Sound B...

Page 21: ...hat they are engaged in the speakers Mount the speakers on the wall using 2 screws each position Select a good location If not accidents may occur or the speaker may get damaged Avoid placing on a bed sofa water tank sink and hallway wall To avoid accidents fix the speaker wires to the wall You may trip over them SHARP is not responsible for accidents resulting from improper installation The follo...

Page 22: ...mer until it is flush with the wall surface 1 9 16 40 mm 3 8 8 9 mm Wall surface Screw the wall mount angle to the wall as shown in the illustration Total screw is 8 pieces Wall surface Wall mount angle Wall mount angle screws x 4 screws x 4 Wall surface Wall surface Wall mount angle NOTE Make sure all screws are fully tighten screws are not supplied 1 2 3 4 Installing the Sound Bar Speaker Before...

Page 23: ...n step1 1 9 16 40 mm 3 8 8 9 mm Wall surface Fix a wall mount plug into the hole using a hammer until it is flush with the wall surface 1 9 16 40 mm 3 8 8 9 mm Wall surface Tighten the screws Wall surface Wall surface Screw commercially available 1 4 6 mm 1 2 3 4 Installing the Surround Speaker Before installing the speaker connect the speaker connection cords to the speaker See pages 22 23 Hook t...

Page 24: ...and the unit by matching the colors Subwoofer Surround speaker right Purple Black Red Speaker terminals Sound Bar Speaker right center left Red right Black Red Green center Black Red Red White left Black Red Speaker terminals Gray Black Red Surround speaker left Blue Black Red Purple Gray Blue Green Red White Green White Purple Gray Blue Speaker Connections ...

Page 25: ...ther speakers to BD MPC41U It may cause malfunction Do not mistake the and m and n right and left terminals of the speaker leads The right speaker is placed on the right when you face the unit Do not let the bare speaker wires touch each other Do not stand or sit on the speakers You may be injured Insert the speaker plug fully with the rising side facing up Hold the speaker plug when removing it f...

Page 26: ... the TV directly to the main unit When connecting the main unit and the AQUOS LINK compatible TV connect the AQUOS optical output to the DIGITAL AUDIO IN terminal on the main unit Do not connect the system to the AQUOS LINK compatible audio system Main Unit TV Control signal and connection for viewing video from the main unit on a TV This cable provides both audio and video to the TV Plays back th...

Page 27: ...the resolutions of the HDMI video output HDMI cable holder on the rear of the main unit Do not pull the HDMI cable when connected to the terminal as this can damage the terminal or cause a poor connection The system comes with a dedicated cable holder so that the HDMI cable does not place a direct load on the terminal When connecting the HDMI cable be sure to pass the cable through the cable holde...

Page 28: ...y video output in Settings Audio Video Settings Video Out Select See page 68 When the priority video output is set to HDMI in Video Out Select the video resolution which is output from the COMPONENT VIDEO OUT jacks is the one set in HDMI Video Out When the output from the COMPONENT VIDEO OUT jacks is prioritized set the priority video output to Component NOTE Connect the system to LCD TV directly ...

Page 29: ...e commercially available Connection for listening to TV audio on the system Yellow Yellow TV with a VIDEO input jack and ANALOG AUDIO IN Jacks VCR This System LCD TV Connect directly NOTE Connect the system to LCD TV directly If you play back the image via VCR the image may deteriorate due to the copy guard function When you record the program where copyright is protected the copy guard function i...

Page 30: ...ng any connections 2 Firmly insert the cables all the way into the terminal connector 1 and 2 Main Unit Optical digital cable commercially available To DIGITAL AUDIO IN terminal 1 To digital audio output terminal 2 Audio equipment Audio equipment with a digital audio output terminal Play back the audio on the connected equipment and enjoy multi channel mode page 64 or preset sound mode page 65 Aft...

Page 31: ... making any connections 2 Firmly insert the cable all the way into the terminal connector 1 and 2 Main Unit Audio equipment Red White Red White Audio cable commercially available White Red To audio output jacks 2 Red White To ANALOG AUDIO IN jacks 1 Audio equipment with audio jacks Play back the audio on the connected equipment and enjoy preset sound mode page 65 After connecting Audio Connections...

Page 32: ...the equipment before making any connections 2 Firmly connect an iPod cable to the iPod terminal Main Unit To iPod Refer to Connecting the iPod on page 60 To iPod terminal iPod cable supplied Connect to an iPod cable to the iPod and playback the iPod Refer to Listening to the iPod pages 60 and 61 then enjoy preset sound mode page 65 etc After connecting ...

Page 33: ... system and the equipment before making any connections 2 Firmly insert the cable all the way into the terminal connector 1 and 2 Main Unit Red White Red White Audio cable commercially available White Red To audio input jacks 2 Red White To 2CH AUDIO output jacks 1 Plays back the audio from BD DVD CD or USB memory device Audio recorder etc Audio equipment with audio jacks ...

Page 34: ...C To ETHERNET terminal 1 To LAN terminal 2 Example of a Broadband Internet Connection Perform the communication settings Pages 71 73 When enjoying online service BD LIVE RSS Netflix refer to BD LIVE function pages 47 48 the RSS reader function page 37 or Netflix pages 53 54 To update the software via the Internet perform Software Update Settings Pages 75 76 After connecting CAUTION When using a br...

Page 35: ...NT jack and position the FM antenna wire in the direction where the strongest signal can be received Main Unit FM antenna wire supplied NOTE Placing the FM antenna wire on the unit or near the AC power cord may cause noise Place the FM antenna wire away from the unit for better reception Connecting an external FM antenna Use an outdoor FM antenna if you require better reception Consult your dealer...

Page 36: ...atteries in direct sunlight or other excessively hot place such as inside a car or near a heater This can cause batteries to leak overheat explode or catch fire It can also reduce the life or performance of batteries 1 2 3 Approximate operating range of remote control Remote control sensor Remote control 30º 30º approx 22 feet 7 m Connecting the Power Cord WARNING Plug the supplied AC cord into th...

Page 37: ...irst and then POWER on the remote control together for more than 5 seconds Press POWER on the main unit to turn off the system POWER 1 2 Before Starting Playback Setting the remote control code of the system Point the remote control at the main unit then press and hold the ON SCREEN for more than 10 seconds Remote control sensor Press POWER on the remote control to turn on the system NOTE If the b...

Page 38: ...se perform the language setting see step 4 of page 37 Entering standby Press POWER on the remote control or on the main unit to enter standby If you press POWER again immediately after entering standby the system may not turn on If this happens wait for 10 seconds or more and then turn on the power again NOTE When the STANDBY indicator is blinking may take some time the system cannot be turned on ...

Page 39: ...lowing operation NOTE The information displayed varies periodically However the updating period is not constant depending on the content The operation and text display may not be possible depending on the status of the player When the main feature of a disc is played and the menu screen is displayed this function cannot be displayed When loading a disc this function sometimes cannot be displayed P...

Page 40: ...rol panel appears on the TV screen Control Panel TOP MENU TITLE LIST FUNC POP UP MENU SKIP SEARCH PANEL OFF INSTANT REPLAY Select Enter When there is no operation for approximately 10 seconds the control panel disappears automatically To display the control panel press the PLAY button on the TV remote control Press c d a b on the TV remote control to select the desired button icon then press ENTER...

Page 41: ...0dB SW 10ft 0dB L LS 8ft 0dB RS 8ft 0dB 10ft 0dB C 10ft 0dB R Test Start Finish Return L Front speaker left C Center speaker R Front speaker right RS Surround speaker right LS Surround speaker left SW Subwoofer Press c d to select a specific adjustment item 1 2 3 4 5 6 7 Press a b to adjust the item to the desired setting then press ENTER See the information on the right column for details on each...

Page 42: ...select Test Tone Stop Adjusting the level When the sound volume level of each speaker is uneven adjusting the level separately Press a b c d to select the speaker with the setting you want to adjust then press ENTER To select the speaker outputting the test tone press ENTER Press c d to select Level Press a b to adjust the desired level then press ENTER Repeat from steps 11 to 13 for each speaker ...

Page 43: ...ation buttons vary depending on the input mode Pressing BD AUX changes the input mode as follows DISC DIGITAL 1 DIGITAL 2 ANALOG To change the FM input mode press FM FM STEREO FM MONO To select the iPod mode press iPod Volume Adjustment Adjusting the volume Main unit operation When the VOLUME control is turned clockwise the volume will increase When it is turned counterclockwise the volume will de...

Page 44: ...mm diameter plug and are between 16 ohms and 50 ohms impedance The recommended impedance is 32 ohms While headphones are connected sound is not produced from the speakers You cannot use the surround feature with headphones To Dim the Display If you feel that the display on the main unit is too bright when watching movies you can dim the display Buttons under the cover Press DIMMER to dim the displ...

Page 45: ...n off the AQUOS TV when this system is in stop mode the power of this system will be turned off automatically In the case while playing back a disc the power does not turn off Automatic power on function When you switch to the AQUOS TV input terminal connected to this system the power of this system will be turned on automatically Use the remote control system of the AQUOS TV and point it towards ...

Page 46: ...5 Listening to the sound through the AQUOS TV sound reproduction You can opt to listen to the TV sound only from the AQUOS TV Select By AQUOS SP in Step 4 above then press ENTER This system goes into mute mode Using this system to enjoy the sound of your AQUOS TV Turning on off the system Pressing TV POWER to turn on off the AQUOS TV also turns on off the system Adjusting the audio You can use VOL...

Page 47: ... Refer to pages 75 78 for more information regarding software updates for the system To stop playback Press STOP Resume playback function If you press d PLAY next playback will resume from the point where the system was previously stopped To playback from the beginning cancel resume mode by pressing STOP then press d PLAY This may not work depending on the type of disc In this case open the disc t...

Page 48: ...iscs the top menu may be referred to as the Title Menu Use TOP MENU on the remote control when the instructions refer to Title Menu If no top menu is available the TOP MENU button will have no effect 1 2 Using the disc menu DVD VIDEO Example Select SUBTITLE LANGUAGE Press TOP MENU The disc menu screen is displayed if present on the DVD video disc Press a b to select SUBTITLE LANGUAGE then press EN...

Page 49: ...e BD LIVE data playback of the disc will stop Some time may be required for the data to load read write Refer to USB Memory Management on page 74 for erasing the Virtual Package data and the BD LIVE data in the USB memory device NOTE SHARP cannot guarantee that all brands USB memory devices will operate with this system Only USB memory devices formatted with FAT 32 16 are compatible When formattin...

Page 50: ...layback Functions on pages 55 57 NOTE Finalize refers to a recorder processing a recorded disc so that it will play in other DVD players recorders as well as this system Only finalized DVD discs will play back in this system This system does not have a function to finalize discs Some discs cannot be played back depending on the audio format Playback by selecting a title Press BD AUX repeatedly to ...

Page 51: ...n to the Thumbnail screen press B Green Press a b c d to select the desired chapter then press ENTER to start playback You can playback by pressing d PLAY instead of pressing ENTER Press STOP to stop playback 1 2 3 1 2 3 Sorting the titles Each time you press B Green while the Title Name screen is displayed the Title Name display changes between displaying the newest title first and the oldest tit...

Page 52: ...by selecting a track Press a b to select the track then press ENTER during playback or when playback is stopped Playback of the selected track will begin 1 Track 01 5 16 2 Track 02 5 10 3 Track 03 5 23 4 Track 04 5 03 5 Track 05 4 44 6 Track 06 5 08 00 00 11 3 12 3 12 Off 3 L R 5 23 0 00 Track 03 Functions Press STOP to stop playback Operation procedure for the Functions menu Press D Yellow Functi...

Page 53: ...ss d or ENTER 1 2 3 4 Press a b to select DVD CD or USB Memory Device then press d or ENTER Display name varies depending on the type of media inserted If only a DVD CD or a USB memory device is inserted the DVD CD or USB Memory Device selection screen does not appear In such cases after step 4 proceed to step 6 Press a b to select a folder or file When you select a folder press ENTER to open it a...

Page 54: ...e is inserted the DVD CD or USB Memory Device selection screen does not appear In such cases after step 4 proceed to step 6 1 2 3 4 5 Press a b to select a folder or file When you select a folder press ENTER to open it and then press a b to select a file in the folder 5 Image 01 jpg 6 Image 02 jpg 1 Folder 1 2 Folder 2 3 Folder 3 4 Folder 4 1 ALL 14 files and folders Folder 1 CD Press ENTER to dis...

Page 55: ...Help at the top of the page Netflix is only available in the US Illustrations are examples and may differ from the actual Netflix screens The buttons which can be used Settings for watching Netflix content on your TV Press BD AUX repeatedly to select DISC function The same operation can be performed by pressing SELECTOR repeatedly on the main unit Press HOME to display the menu screen The same ope...

Page 56: ...our TV Press c d to select the desired title then press ENTER Once this function is set and the registration is completed the next time this service is used instant Queue screens such as the following can be displayed directly by pressing ENTER after selecting the NETFLIX icon on the Wall Paper screen The screen of this system shown on the TV 7 8 9 10 The title you selected is displayed To return ...

Page 57: ... VIDEO BD R BD RE DVD VIDEO DVD R DVD RW The Pause function is enabled when PAUSE is pressed during playback If you are playing back an audio CD audio data MP3 files or still images JPEG files these will also pause The Frame Advance Playback function is enabled when SKIP is pressed during pause Frame Advance Playback may not function properly with discs other than DVD RW R VR format NOTE Some BD D...

Page 58: ... DVD R DVD RW AUDIO CD Press REPEAT during playback Press a b to select Scene Selection then press ENTER Set Start Point displays Set Start Point Scene Selection Playback Chapter Playback Title Press ENTER at the scene where you want to set the start point Set End Point displays Press ENTER at the scene where you want to set the end point indicator lights on the front panel display You can press 9...

Page 59: ...and the subtitles appear Each time SUBTITLE is pressed the subtitles change is displayed if a disc has no subtitles You can also select Off NOTE Setting for subtitle can be changed in Function Control screen Page 58 The operation of subtitles differs according to each disc You may need to refer to the operation manual of the disc The display for subtitles automatically disappears after 5 seconds P...

Page 60: ...peration guide display Provides help on remote control button operations 1 2 3 Function Control operation procedure Buttons under the cover Press BD FUNCTION during playback The Function Control screen is displayed on the TV Press a b to select the desired setting then press ENTER For a description of each setting see Functions which can be set Page 59 BD VIDEO 00 20 30 1 1 3 5 1ch 5 5 2 2 English...

Page 61: ...e or track This lets you skip to a specific time Press c d to select the Hour Minute or Second then press a b or the Number buttons to set the time Press ENTER to start playback at the set time Playback Elapsed Time Direct Time Skip NOTE ENTER button under the Cover Enter the input number CLEAR button under the Cover Clears the input number Shows the currently selected subtitle language If subtitl...

Page 62: ...n for your iPod Unplug all accessories for the iPod before connected to the main unit Once connected to the main unit the iPod will begin the charging The iPod unit cannot be charged while the main unit is in the stand by mode System on operation When the main unit is powered on the iPod unit will automatically power on when connected to the unit Invalid for 3rd iPod Generation System off stand by...

Page 63: ... and playback begins automatically Press PAUSE on the remote control to enter pause mode 1 2 3 1 2 SELECTOR PAUSE PLAY Various iPod functions Function Main unit Remote control Operation Play Press in the pause mode Pause Press in the playback mode Track up down Press in the playback or pause mode If you press the button in the pause mode press the d button to start the desired track Fast forward r...

Page 64: ...ption is weak press FM to turn off the STEREO indicator The reception changes to monaural and the sound becomes clearer FM stereo receiving indicator FM stereo mode indicator 1 2 Presetting a Station You can preset up to 20 FM stations and recall them by pressing PRESET c d Perform Steps 1 to 2 in Tuning on the left Press ENTER to enter the channel presetting mode Within 3 seconds press PRESET c d...

Page 65: ...a dual mono disc Press AUDIO Pressing AUDIO changes the mode as follows MAIN SUB MAIN SUB MAIN SUB outputs the main audio and sub audio from different speakers Audio delay setting If the playback image on the TV is not synched with the audio output from the system when playing back a Blu Ray disc or DVD you can delay the output of the audio from the system for better synched audio and video Press ...

Page 66: ...ons Audyssey Technology Audyssey EQ Audyssey EQ is based on the same core technology as Audyssey MultEQ that is used for automatic correction of room acoustics Audyssey EQ uses time domain filters to correct problems that arise from speaker drivers and enclosures and is calibrated to account for the acoustical problems in a typical listening environment Audyssey Dynamic EQ Audyssey Dynamic EQ solv...

Page 67: ...easy to listen to regardless of the volume level Appropriate for listening to the news MUSIC Creates a natural spacious sound Appropriate for various kinds of music sources JAZZ Slightly emphasizes both the low frequency and high frequency range resulting in transparent sound Appropriate for listening to jazz and similar music CLASSIC Slightly emphasizes the low frequency range and creates an exte...

Page 68: ...urrent Dynamic EQ offset level is displayed Press a b within 3 seconds to adjust the desired offset as the below indicated 0 dB 5 dB 10 dB 15 dB 0 dB Film Ref This is the default setting and should be used when listening to movies 5 dB Select this setting for content that has a very wide dynamic range such as classical music 10 dB Select this setting for jazz or other music that has a wider dynami...

Page 69: ...set the password for the first time press a b to select Yes to enter the password setting menu then press d or ENTER Enter a 4 digit number for the password then the same 4 digit number for confirmation Press ENTER to complete the password setting procedure and move to the next setting screen Press c d to select the parental control level for DVD VIDEO BD ROM and then select the country code Press...

Page 70: ... HDMI Video Out will be reset to Auto factory preset value Auto 1080p 1080i 720p 480p NOTE When the system is connected to a 1080p 24Hz compatible TV and the HDMI Video Out is set to Auto 1080p 24Hz will automatically be displayed when compatible discs are played back At 1080p 24Hz 1080p 60Hz there is no output from the COMPONENT VIDEO OUT jacks and VIDEO output jack HDMI Component When the priori...

Page 71: ... This lets you adjust the range between the loudest and softest sounds dynamic range for playback at average volume Use this when it is hard to hear dialog Normal The same audio output range is played as the original recorded audio output range Shift When Dolby Digital audio is played back the dynamic range of the audio is adjusted so that the dialog portion can be heard easily If the audio sounds...

Page 72: ...ered before the Parental Control Levels and the Country Code are set The Parental Control Levels and the Country Code cannot be set if a password has not been created or the password is not entered 8 and Off All DVD video can be played 1 7 Prohibits play of DVD video with corresponding ratings recorded on them No Limit All BD video can be played 0 99 year s Prohibits play of BD video with correspo...

Page 73: ... Auto Setup Auto Setup Auto Setup Auto Setup Not Use IP Address Netmask Gateway DNS Proxy Change Initialize For initializing the current setting select Initialize then press ENTER 1 2 3 4 5 For setting the IP address press c d to select Yes or No then press ENTER Do you obtain the IP address automatically IP Address Netmask Gateway Next Yes No If selecting Yes The IP address is automatically obtai...

Page 74: ...s ENTER Option Ethernet Connection Speeds Next Auto Detection 10M Half Duplex 100M Half Duplex 10M Full Duplex 100M Full Duplex For testing the connection to the Internet after confirming the settings press a b to select Test then press ENTER Test is available only when setting to obtain the IP address automatically Test cannot be selected if the IP address has not been obtained automatically Conf...

Page 75: ...NO M N O m n o PQRS P Q R S p q r s TUV T U V t u v WXYZ W X Y Z w x y z Spc space Numeric 1 2 3 4 5 6 7 8 9 0 Sign _ ˆ Spc _ _ ˆ ˆ Spc space Edit Cancel Left Right Complete Del Char The same operation as the colored buttons and Q RETURN can be performed by selecting each of the items and pressing ENTER Del Char stands for deleting characters Press c d to select a number character then press ENTER...

Page 76: ...ons for USB Memory Management or Software Update Manual Update from USB memory device are being performed Do not use a USB extension cable when connecting a USB memory device to the USB1 or USB2 terminal on this system Using a USB extension cable may prevent the system from performing correctly NOTE SHARP cannot guarantee that all brands USB memory devices will operate with this system Only USB me...

Page 77: ... be made automatically every time this system is turned on 1 2 3 4 5 6 Update process When this system is turned on the internet connection starts automatically Accessing blinks on the screen The current version of this unit software and the latest version of the update file on the network are displayed when latest version of firmware has been found To update this system software with update file ...

Page 78: ...em software with update file select Yes and go to step 8 Latest version of firmware has been found Firmware update is available Proceed with update If Yes will be selected version update will start Current Version Latest Version xxxxxxxxxx yyyyyyyyyy Yes No If the firmware has already been updated to the latest version the following message appears Present version of firmware is latest version You...

Page 79: ...ons under the cover CAUTION Do not remove the USB memory device or unplug the AC cord while the software is being updated When you insert or remove a USB memory device be sure to turn the main power off and make sure that Quick Start is set to No See page 69 Insert the USB memory device with the update file into the USB1 or USB2 terminal on this system It is recommended that the USB memory device ...

Page 80: ...at only the software update file is in the USB memory device OK Press ENTER to start updating The screen becomes dark for a while until the update screen can be displayed Please wait for the update screen to appear Do not unplug the AC cord The picture will temporarily go dark until the software update display appears Wait several minutes and do not unplug the AC cord OK Now updating Do not unplug...

Page 81: ...IA Interlingua IE Interlingue IK Inupiak IN Indonesian IS Icelandic IT Italian IW Hebrew JA Japanese JI Yiddish JW Javanese KA Georgian KK Kazakh KL Greenlandic KM Cambodian KN Kannada KO Korean KS Kashmiri KU Kurdish KY Kirghiz LA Latin LN Lingala LO Laothian LT Lithuanian LV Latvian Lettish MG Malagasy MI Maori MK Macedonian ML Malayalam MN Mongolian MO Moldavian MR Marathi MS Malay MT Maltese M...

Page 82: ...Check that the disc is recorded in the compatible TV system PAL or NTSC The system cannot play back video which was not recorded normally Page 9 Proper playback may be impossible due to the state of the disc recording a scratched warped or dirty disc the state of the pick up or compatibility issues between this system and the disc being used Pages 9 12 When the recorded time of a disc is unusually...

Page 83: ... playback Pages 26 27 Audio is not output or images are not played back properly The audio may not be output or the images may not be played back properly for some discs in which copyright protected contents are recorded Sound Problem Possible causes and solutions No sound is heard Is input switching selection proper Page 41 Is muting activated Page 41 Is the volume level set to 0 Page 41 Is power...

Page 84: ... Page 83 Do not connect or disconnect an HDMI cable while power is on This may lead to operation problems and can cause the picture to disappear Power turns off suddenly Is the HDMI cable connected correctly Connect the HDMI cable correctly and then perform the reset procedure Page 83 Switching on this system does not turn on AQUOS TV Try setting this system to the playback condition When playback...

Page 85: ...or more Then check the operation Should the same message appear even if the system is unplugged and plugged in or is set to the stand by mode and on again contact your local dealer where you purchased the system To Reset this System If this system receives strong interference from a source such as excessive static electricity strong external noise malfunction of power supply or voltage caused by l...

Page 86: ...ntenna 75 ohms Output terminals HDMI output 19 pin standard connector 1080p 24Hz output x 1 HDMI V 1 3 with Deep Color x v Color Dolby TrueHD DTS HD Master Audio Essential Component video output RCA type x 1 Output level Y 1 Vp p 75 ohms PB CB PR CR 0 7 Vp p 75 ohms Video output RCA type x 1 Output level 1Vp p 75 ohms Audio output RCA type x 1 L R Output level 2V rms 1K ohms Front speakers Center ...

Page 87: ...ions using pop up menus selection of subtitle display and slide shows Although a BD ROM may contain any form of data most BD ROM discs will contain movies in High Definition format for playback on Blu ray Disc players Blu ray Disc BD page 9 A disc format developed for recording playing high definition HD video for HDTV etc and for storing large amounts of data A single layer Blu ray Disc holds up ...

Page 88: ...age 24 HDMI High Definition Multimedia Interface is an interface that supports both video and audio on a single digital connection The HDMI connection carries standard to high definition video signals and multi channel audio signals to AV components such as HDMI equipped TVs in digital form without degradation Interlace format Interlace format shows every other line of an image as a single field a...

Page 89: ...e Control No 2 RC 2 and Remote Control No 3 RC 3 Resume playback page 45 If you stop playback while it is in progress the system stores the stop position in memory and this function lets you playback from that point RSS page 37 Really Simple Syndication Rich Site Summary is a web feed formats used to publish frequently updated information in a scrolling text format from a web Skip pages 51 55 This...

Page 90: ...mited to power failure other Internet connection or failure to configure your device properly Sharp its directors officers employees agents contractors and affiliates shall not be liable to you or any third party with respect to such failures or maintenance outages regardless of cause or whether or not it could have been avoided ALL THIRD PARTY CONTENT OR SERVICES ACCESSIBLE VIA THIS DEVICE IS PRO...

Page 91: ...quirements For information on obtaining the source code for the open source software and for obtaining the GPL LGPL and other license agreement information visit the following website http www sharpusa com gpl We are unable to answer any questions about the source code for the open source software The source code for the software components whose copyrights are held by SHARP is not distributed Ack...

Page 92: ...ds set forth herein No other representations or prom ises made by anyone are permitted Correction of defects in the manner and for the period of time described herein shall constitute complete fulfillment of all liabilities and responsibilities of Sharp to the purchaser with respect to the Product and shall constitute full satisfaction of all claims whether based on contract negligence strict liab...

Page 93: ...91 ...

Page 94: ...92 Memo ...

Page 95: ......

Page 96: ...ia Imprimé en Malaisie Impreso en Malasia TINS E595WJQZ 10P04 MA NM BD MPC41U OPERATION MANUAL MANUAL DE OPERACIÓN MODE D EMPLOI SHARP ELECTRONICS CORPORATION Sharp Plaza Mahwah New Jersey 07495 1163 SHARP CORPORATION A ...

Reviews: