background image

19

    VOL +

MENU

CH

(On the Set)

VOL (+) /

CHANNEL
DOWN (

9

)

buttons

    VOL +

MENU

CH

(On the Set)

VOL (+) /

CHANNEL
DOWN (

9

)

buttons

—   —   —   —

1

2

3

4

5

6

7

8

9

0

100

ENTER

1

2

3

4

5

6

7

8

9

0

100

ENTER

*   *   *   *

CH 

CH 

VOL

VOL

+

CH 

CH 

VOL

VOL

+

CH 

CH 

VOL

VOL

+

CH 

CH 

CH 

CH 

VOL

VOL

+

VOL

VOL

+

VOL

VOL

+

L

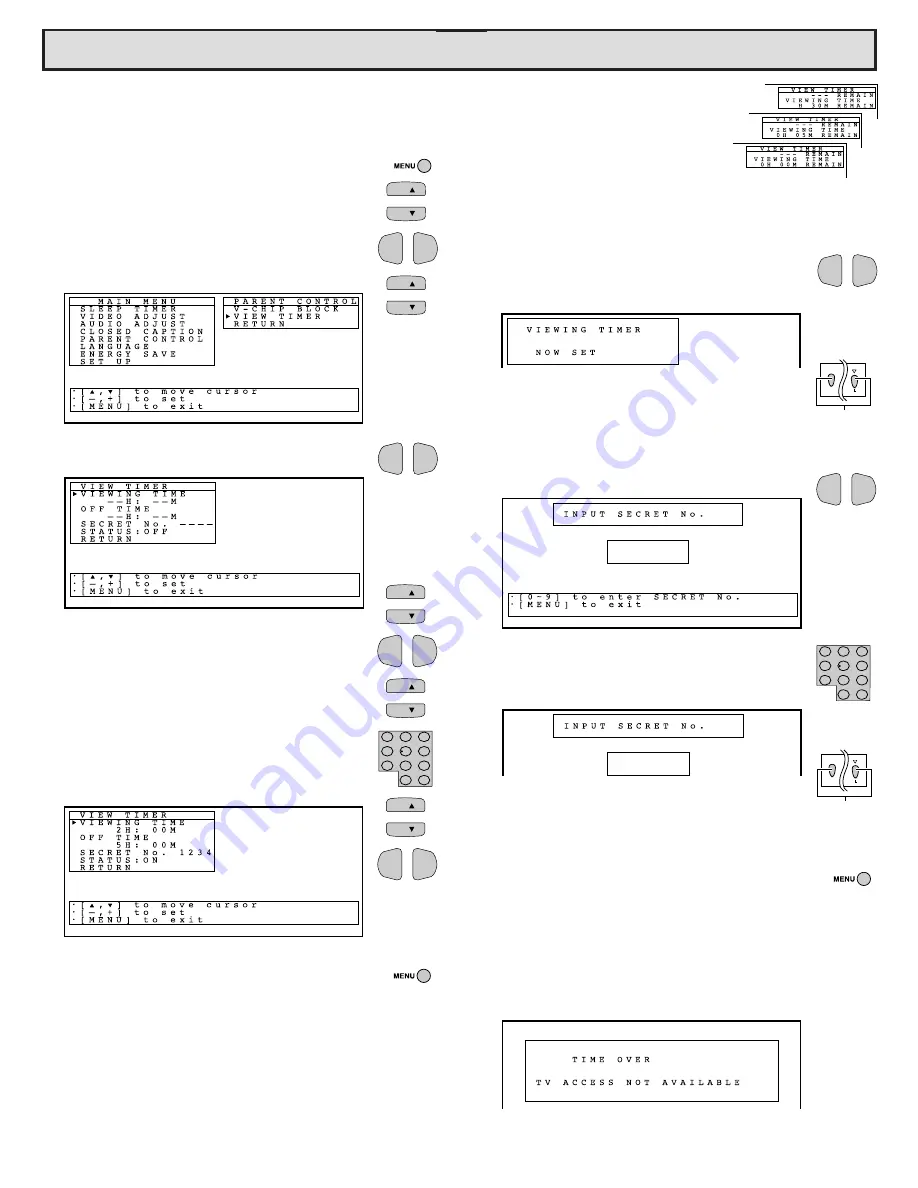
Notice of Remaining VIEWING TIME

• For every 30 minute interval, the

“remaining time” will be displayed for
four seconds. For the last 5 minutes,
the “remaining time” will be displayed
every minute.

• “0H 00M REMAIN” will be displayed for

10 seconds just before the VIEWING
TIME is completed.

L

To cancel the VIEW TIMER setting or change the SECRET
No.(When you forget the SECRET No.)

1

Repeat steps 1 to 3 of “How to set VIEW TIMER.”
During Step 3, Press 

VOL (+) or (–), and the

message “VIEWING TIMER NOW SET” will be
displayed.

2

Press and hold both 

VOL (+) and CH DOWN (

9

) on

the TV set simultaneously until the message
“VIEWING TIMER NOW SET” disappears. The
VIEW TIMER is now off.

3

Now repeat again Steps 1 to 3 of “How to set VIEW
TIMER."  During Step 3, press the 

VOL (+) or (–),

and the message “INPUT SECRET No.” is
displayed.

4

Enter the 4-digit SECRET No. using 

REMOTE

KEYPAD, and the VIEW TIMER mode will be
displayed. Repeat Steps 5 - 7 of “How to set VIEW
TIMER”.

5

If in Step 4 above you have forgotten your SECRET
No., press and hold both 

VOL (+) and CH DOWN

(

9

) on the TV set simultaneously until the message

“INPUT SECRET No.” disappears and the VIEW
TIMER mode will be displayed. Then repeat Steps
5 - 7 of “How to set VIEW TIMER”.

6

Press 

MENU to exit.

• When you choose the correct SECRET No., VIEW TIMER mode

is displayed. If the wrong SECRET No. is chosen, the screen
message is not displayed. Input the SECRET No. again in this
case.

• While the TV set is OFF but the VIEW TIMER is set: Turn on TV;

the screen message “TIME OVER” will appear. If you do nothing,
the TV will turn off in approximately 30 seconds.

• To cancel VIEW TIMER while the TV set is OFF but the VIEW

TIMER is set: Turn on the TV; the screen message “TIME OVER”
will appear. Repeat “To cancel VIEW TIMER” Steps 2 - 6.

(VIEW TIMER mode)

L

VIEW TIMER
This function allows you to restrict TV viewing time and also
allows you to control TV usage. This function is to prevent
your children from watching too much TV.

L

How to set VIEW TIMER.

1

Press 

MENU to access MAIN screen.

2

Press 

CH UP (

8

) or 

DOWN (

9

) to move the “

:

mark to “PARENT CONTROL”.

3

Press 

VOL (+) or (–) to access PARENT CONTROL

mode.

4

Press 

CH UP (

8

) or 

DOWN (

9

) to move the “

:

mark to “VIEW TIMER”.

5

Press 

VOL (+) or (–) to access VIEW TIMER mode.

6

Press 

CH UP (

8

) or 

DOWN (

9

) to select “VIEWING

TIME” and “OFF TIME”. For each selection, press
the 

VOL (+) or (–) to set the time duration.

7

Press 

CH UP (

8

) or 

DOWN (

9

) to select “SECRET

No.” and then enter the 4-digit no. using the 

REMOTE

KEYPAD.

8

Press 

CH UP (

8

) or 

DOWN (

9

) to select “STATUS”.

Press the 

VOL (+) or (–) to turn ON the “VIEWING

TIMER”. (If STATUS is OFF, VIEW TIMER is not
operated)

9

Press 

MENU to exit.

Example

• To restrict anybody from watching the TV for 5 hours, after

watching the TV for 2 hours, your settings would look like the
settings in Step 8.

• They can choose to watch the 2 hours of TV however they wish.

For example, they could watch 1 hour of TV, turn TV off for 30
minutes, then turn TV on and watch the remaining 1 hour on the
VIEWING TIMER.

(PARENT CONTROL mode)

Parent Control (VIEW TIMER)

(VIEW TIMER mode; before setting)

(VIEW TIMER mode; after setting)

NOTE:

NOTE:

Summary of Contents for 32N-S500

Page 1: ...11 Language 11 Sleep Timer 12 Closed Caption 12 Video Adjust 13 Audio Adjust 13 14 This operating manual includes basic operating instructions in Spanish and French SPANISH is on page 8 32 FRENCH is on page 9 PAGE Parent Control 15 19 V Chip 15 19 View Timer 19 Energy Save 20 Set Up 20 23 EZ Setup 20 21 Channel Setting 21 22 Universal Plus Function 22 Personal Preference 23 Blue Screen 23 PIP 2 Tu...

Page 2: ...spection modification or recall that SHARP may be required to give under the 1972 Consumer Product Safety Act PLEASE READ CAREFULLY THE IMPORTANT LIMITED WARRANTY CLAUSE ON THE LAST PAGE WHAT IS ENERGY STAR TVs and VCRs use energy both when they are on and when they are off Americans spend more than 1 billion a year on energy consumed by TVs and VCRs when they are not in use The new ENERGY STAR mo...

Page 3: ...r source indicated on the marking label If you are not sure of the type of power supplied to your home consult your television dealer or local power company For television equipment designed to operate from battery power refer to the operating instructions 11 As a safety feature television equipment is equipped with a 2 wire polarized plug one plug blade bigger than the other The 2 wire polarized ...

Page 4: ... scenes that are harmful to youth PICTURE IN PICTURE The two built in tuners enable you to watch two TV programs at the same time one on the main picture and one on an inset while commercial messages are on the screen DARKER TINTED PICTURE TUBE The darker tint makes black look blacker for greater contrasts and richer colors These features combine to provide you with a beautiful easily viewed pictu...

Page 5: ... fail to fit contact an electrician Do not defeat the safety feature of the polarized plug If the set will not be used for a long period such as during a vacation unplug the set from the wall outlet to economize power If the TV set is plugged in slight current still flows even with the POWER BUTTON in the OFF position Lines and other noise may appear in TV broadcast images when an FM tuner or radi...

Page 6: ...descrambler provided by your cable TV company is explained below Please note RF switch equipped with position A B not provided is required A position on the RF switch not supplied You can view all unscrambled channels using the TV s channel keys B position on the RF switch not supplied You can view the scrambled channels via the converter descrambler using the converter s channel keys Consult your...

Page 7: ... In TV position sends power and channel select commands Channel up down and Random Access buttons to the TV In CATV position sends power and channel select commands to a cable TV converter VCR CONTROL See page 27 DISPLAY Press Display receiving channel for four seconds Press again Displays remaining time of SLEEP TIMER and VIEW TIMER Press again Temporarily displays receiving channel when in Close...

Page 8: ...idad colocarlo bajo una luz fluorescente u otra fuente luminosa El material fosforescente no contiene elementos radiactivos ni tóxicos de modo que su uso no representa ningún peligro El grado de iluminación variará de acuerdo con la potencia de la luz utilizada El grado de iluminación irá decayendo con el tiempo y dependiendo de la temperatura El tiempo necesario para cargar el visor fosforescente...

Page 9: ... Grâce aux touches de préférence personnelle vous pouvez programmer vos programmes préférés à l aide des 4 catégories A B C et D Ces touches vous permettent d accéder rapidement à ces canaux AUGMENTATION RÉDUCTION DU VOLUME SONORE VOLUME UP DOWN Pour augmenter le volume du son Pour diminuer le volume du son Pour changer ou sélectionner les réglages du téléviseur en mode menu SÉLECTEUR DE MODE TÉLÉ...

Page 10: ...from TV memory See pages 21 22 SET UP mode VOLUME CHANNEL UP 8 DOWN 9 MENU L MENU SUMMARY 1 SLEEP TIMER You can set the number of minutes for your TV to automati cally turn off See page 12 2 VIDEO ADJUST You can adjust the settings of PICTURE TINT COLOR BRIGHTNESS SHARPNESS COLOR TEMP FLESH TONE and NOISE REDUCT See page 13 3 AUDIO ADJUST You can adjust the AUDIO settings such as the BASS TREBLE a...

Page 11: ...se when it appears If you want to stop the EZ SETUP process once it has started press VOL and it will be canceled If you want to SETUP again please refer to pages 20 23 on SETUP PressVOL to cancel EZ SETUP 8 Once EZ SETUP is completed the lowest channel number memorized will be displayed Ex 2 CH SELECT LANGUAGE screen SET AIR CABLE mode Language L The language for the ON SCREEN DISPLAY can be set ...

Page 12: ... CAPTION mode subscripts dialogues and commentaries of TV dramas and news programs while allowing clear view of the picture The TEXT mode displays over the picture other various information such as TV program schedule weather forecast etc that is independent of the TV programs 1 Press MENU to access MAIN MENU screen 2 Press CH UP 8 or DOWN 9 to move the mark to CLOSED CAPTION 3 Press VOL or to acc...

Page 13: ...educes overall video noise RESET To return all adjustments to factory preset levels VOL VOL CH CH VOL VOL VOL VOL LOW M L MID LOW M H MID HIGH HIGH VOL VOL Audio Adjust CH CH VOL VOL MTS EQUISOUND STEREO SAP MONO STEREO ON OFF SPEAKER ON OFF SRS OFF 3D MONO L MTS MULTICHANNEL TV SOUND This circuit allows reception of stereo or bilingual TV sound L EQUISOUND This function keeps the volume level con...

Page 14: ...sound SAP broadcasts Television broadcast can be received with either MAIN or SAP sound MAIN sound The normal program soundtrack Monaural or stereo where available SAP sound Second language supplementary commentaries etc SAP sound is monaural L If stereo sound is difficult to hear You can obtain clearer sound by manually switching to fixed monaural mode Once MONO mode is selected the TV sound rema...

Page 15: ...is BLOCK then this will automatically block the higher ratings TV G TV PG TV 14 and TV MA Furthermore the D L S V and FV in CONTENT are automatically blocked for TV Y7 as well unless you choose to unblock each one Age based ratings can be modified by the content based ratings but only in the combinations indicated by an X in the table above Choosing a lower age based rating blocks the higher age b...

Page 16: ...ct Controlling only by the CONTENT rating works best if each AGE rating is unblocked Refer to example 2 in TV PARENTAL GUIDELINES section of V CHIP operation on page 15 Parent Control V CHIP operation Continued L HOW TO SET V CHIP 1 MPAA RATING 1 Press MENU to access MAIN MENU screen 2 Press CH UP 8 or DOWN 9 to move the mark to PARENT CONTROL 3 Press VOL or to access PARENT CONTROL mode The mark ...

Page 17: ...ollows Subsequently the new rating system will setup automatically 1 Repeat steps 1 to 4 of 1 MPAA RATING to access V CHIP select mode 2 Press CH UP 8 or DOWN 9 to move the mark to OPTION then press VOL or Parent Control V CHIP operation Continued 3 TURN ON V CHIP BLOCK 1 Repeat steps 1 to 4 of 1 MPAA RATING to access V CHIP select mode 2 Press CH UP 8 or DOWN 9 to select SECRET No Enter the 4 dig...

Page 18: ...age will remain the same on the screen Cancel the V CHIP BLOCK temporarily at the V CHIP TIMER mode or change to other channel in this case V CHIP TIMER mode during PIP ON 3 Press CH UP 8 or DOWN 9 to select DOWNLOAD press VOL or to activate ON 4 Press MENU to exit L DOWNLOAD V CHIP DATA 1 If you watch the program with New Rating System Data DOWNLOAD screen will be displayed 2 DOWNLOAD screen will...

Page 19: ...T No is chosen the screen message is not displayed Input the SECRET No again in this case While the TV set is OFF but the VIEW TIMER is set Turn on TV the screen message TIME OVER will appear If you do nothing the TV will turn off in approximately 30 seconds To cancel VIEW TIMER while the TV set is OFF but the VIEW TIMER is set Turn on the TV the screen message TIME OVER will appear Repeat To canc...

Page 20: ... MENU to access MAIN MENU screen 2 Press CH UP 8 or DOWN 9 to move the mark to ENERGY SAVE 3 Press VOL or to access ENERGY SAVE select mode 4 Press VOL or to select ON 5 Press MENU to exit MAIN MENU screen ENERGY SAVE select mode L EZ SETUP By operating the channel presetting functions you can preset your TV to the desired channels for viewing 1 Press MENU to access MAIN MENU screen 2 Press CH UP ...

Page 21: ...t 3 Adding weak or additional channels or erasing unwanted channels from TV memory 1 Repeat steps 1 to 3 of EZ SETUP 2 Press CH UP 8 or DOWN 9 to move the mark to CHANNEL MEMORY SET UP mode REMOTE KEYPAD VOLUME CHANNEL UP 8 DOWN 9 MENU 7 Once EZ SETUP is completed the lowest channel number memorized will be displayed Ex 2CH L CHANNEL SETTING If EZ SETUP does not memorize all the channels in your r...

Page 22: ... to set ON 6 Press MENU to exit UNIVERSAL PLUS mode VCR Setting mode 1 2 3 4 5 6 7 8 9 0 100 POWER TV VCR MENU FLASHBACK INPUT VOL CH CH VOL ENTER A B C D PERSONAL PREFERENCE 1 2 3 4 5 6 7 8 9 0 100 ENTER VOL VOL VOL VOL CH CH VOL VOL 1 2 3 4 5 6 7 8 9 0 100 ENTER CH CH VOL VOL CH CH 3 Press VOL or to access CH MEMORY mode 4 Use CH UP 8 or DOWN 9 or REMOTE KEYPAD to select each desired channel to ...

Page 23: ...LUE SCREEN Automatically turns the screen blue if a broadcast signal is not received 1 Repeat steps 1 to 3 of EZ SETUP 2 Press CH UP 8 or DOWN 9 to move the mark to BLUE SCREEN 3 Press VOL or to access BLUE SCREEN mode 4 Press VOL or to turn STATUS ON 5 Press MENU to exit Poor reception due to weak signals or too much noise might activate the BLUE SCREEN function despite the presence of a broadcas...

Page 24: ...re Main Picture n 12CH Inset Picture n INPUT1 Main Picture n INPUT1 Inset Picture n 12CH L To move the Inset Picture Press MOVE Press the button again to move the Inset Picture to another position L Freeze Frame Inset Pictures When the Inset Picture is on the screen press the FREEZE to freeze the Inset Picture Only when the Main Picture is on the screen press the FREEZE to inset a freeze frame of ...

Page 25: ...VIDEO INPUT mode to which the video equipment you want to playback is connected The external VIDEO INPUT mode will change as follows each time the INPUT is pressed INPUT mode can be selected by pressing either the CH UP 8 on the TV remote control when the TV is set to the highest channel stored in memory or by pressing the CH DOWN 9 when it is set to the lowest channel When connecting video or aud...

Page 26: ...nd adjust the VOLUME control on the TV for a moderate listening level 2 Turn off the TV and connect the audio cord to the AUDIO LINE OUTPUT JACKS on the TV 3 Turn the TV set and stereo amplifier on 4 If you desire you can turn off the sound to the TV s internal speakers by SPEAKER mode See pages 13 14 5 Adjust the VOLUME control on the stereo amplifier for a moderate listening level 6 Control of t...

Page 27: ...e sends the proper remote signals to operate your accessory This identify step will not have to be repeated until power to the Remote is interrupted due to a battery failure L USING YOUR REMOTE CONTROL WITH A VCR Once you make certain the Remote Control has identified your remote controlled VCR the Remote Control is ready to operate your unit The various VCR function buttons on the Remote Control ...

Page 28: ...refer to list The remote control is now ready to send commands to your VCR Some brands have more than one remote code listed due to changes in the remote codes from early to later model years or due to format differences VHS BETA In such cases you may have to try more than one code to find the code your VCR accepts Depending on the model year produced brand and type of VCR some models may not be c...

Page 29: ...OTE KEYPAD 1 2 3 4 5 6 7 8 9 0 100 POWER TV VCR MENU CATV PAUSE PIP TV FLASHBACK INPUT STOP REC REW PLAY FF VCR CH SWAP FREEZE MOVE SELECT CMSKIP DISPLAY MUTE VOL CH CH VOL ENTER A B C D PERSONAL PREFERENCE VCR BRAND REMOTE CONTROL CODE NUMBER Akai _______________ Audio Dynamics ______ Broksonic ___________ Canon _____________ Capehart ___________ Craig ______________ Curtis Mathis ________ Daewoo...

Page 30: ...ful not to let the CATV converter scan more than five channels when the indicator starts to move up If you continue holding down the DISPLAY and CH UP 8 after five channel scans the proper remote code can be passed up and the two minutes identify cycle will have to be repeated If a channel change does not occur on the cable converter within two minutes read the identifying instructions again and r...

Page 31: ...sition Are audio cables connected firmly Check the volume level Is SPEAKER ON See page 13 14 Change Closed Caption mode to OFF Energy Save mode to OFF Unplug the TV and plug it in again after two minutes No Playback of VCR and DIsk Player No Picture or Sound from External Video Audio Products Remote Control Doesn t Work Bars On Screen Picture Distorted Picture Rolls Vertically No Color Poor Recept...

Page 32: ...a situarlo sobre la posición TV Están bien conectados los cables de sonido Compruebe el nivel del volumen Está conectado el altavoz Desactive OFF el modo CLOSED CAPTION Desactive OFF el modo Ahorro de Energía Energy Save Desenchufe el televisor y vuelva a enchufarlo despúes de dos minutos El vídeo o el reproductor de discos de video no reproducen imágenes El equipo de video audio externo no produc...

Page 33: ...33 Notes ...

Page 34: ...34 Notes ...

Page 35: ...35 Notes ...

Page 36: ...36 Notes ...

Page 37: ...37 Notes ...

Page 38: ...38 Notes ...

Page 39: ...39 Notes ...

Page 40: ...respect to the Product and shall constitute full satisfaction of all claims whether based on contract negligence strict liability or otherwise In no event shall Sharp be liable or in any way responsible for any damages or defects in the Product which were caused by repairs or attempted repairs performed by anyone other than an authorized servicer Nor shall Sharp be liable or in any way responsible...

Reviews: