background image

26

1-800-798-7398

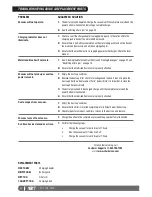
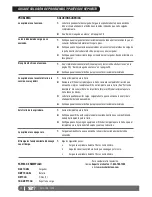
TROUBLESHOOTING GUIDE & REPLACEMENT PARTS

PROBLEM

Vacuum will not operate.

Charging indicator does not 
illuminate.

Motorized brush will not work.

Vacuum will not pick up or suction 
power is weak.

Dust escapes from vacuum.

Vacuum turns off on its own.

Run time has decreased over time.

SUGGESTED SOLUTION

1

   The battery may be depleted. Charge the vacuum until the complete oval around the 

power button is illuminated, indicating a complete charge.

2

  See “Restarting after a jam” on page 24.

1

   Check to see if the charge adapter is plugged in properly to the outlet and to the 

charging jack in back of the motorized floor nozzle.

2

   Ensure there is no debris accumulated on the metal charge contacts on the back of 

the motorized floor nozzle and on the charging adaptor.

3

   Ensure that the electrical outlet is supplying power to the charger. Check the fuse/

breaker.

1

   See “Cleaning the Motorized Floor Nozzle and Clearing Blockages” on page 22 and 

“Restarting after a jam” on page 14.

2

  Ensure that the motorized floor nozzle is properly attached.

1

  Empty the dust cup container.

2

   Remove the dust cup filter, check for blockages and remove. Clean or replace the 

dust cup filter (See “Replacement Parts” below). Note: It is important to clean the 
dust cup filter every month.

3

   The battery may need to be charged, charge until the complete oval around the 

power button is illuminated.

4

  Ensure that the motorized floor nozzle is properly attached.

1

  Empty the dust cup container.

2

   Ensure that the filter is inserted completely into its holder below the dust cup.

3

   Check for punctures in dust cup filter or cracks in the dust cup and replace.

1

   Charge the unit until the complete oval around the power button is illuminated.

1

   Perform the following steps:


Charge the vacuum for a minimum of 7 hours.


Run the vacuum until it turns itself off.


Charge the vacuum for a minimum of 7 hours.

REPLACEMENT PARTS

XA1106N


Charging Adapter

XBT1106N 


Battery pack

XF1100 


Filters (2) 

1066FT1106 


Charging Stand

For any other servicing, call  

Customer Support at 1-800-798-7398  

or visit 

www.sharkclean.com

Summary of Contents for SV1106 N

Page 1: ...OWNER S GUIDE MANUEL DU PROPRIÉTAIRE GUÍA DEL USUARIO SV1106 N www sharkclean com ...

Page 2: ... off before connecting or disconnecting the motorized floor brush GENERAL USE 14 Use only on dry indoor surfaces 15 Store the cordless vacuum indoors Put the cordless vacuum away after use to prevent accidents 16 Use only as described in this manual DO NOT use for any purpose other than described in this user s guide 17 Use only cleaning attachments supplied with this unit 18 Keep your work area w...

Page 3: ...ges or modifications to this unit not expressly approved by the party responsible for compliance could void the user s authority to operate the equipment Note This equipment has been tested and found to comply with the limits for a Class B digital device pursuant to Part 15 of the FCC Rules These limits are designed to provide reasonable protection against harmful interference in a residential ins...

Page 4: ...m of 7 hours BATTERY REMOVAL REPLACEMENT AND DISPOSAL The cordless vacuum is powered by Ni Mh batteries which must be recycled or disposed of properly in accordance with state federal and local laws If uncertain as to how to remove the battery pack we suggest that you take your vacuum to a reputable small appliance service technician to have this service performed BATTERY REMOVAL 1 Ensure that the...

Page 5: ...rations to the product or any of its parts which have been performed by a repair person not authorized by EURO PRO Operating LLC This warranty is extended to the original purchaser of the unit and excludes all other legal and or conventional warranties The responsibility of EURO PRO Operating LLC if any is limited to the specific obligations expressly assumed by it under the terms of the limited w...

Page 6: ... fourni avec l aspirateur Il porte l inscription pour les modèles de série SV1106 N seulement 13 Éteignez toujours l aspirateur avant de brancher ou d enlever la brosse à planchers motorisée UTILISATION GÉNÉRALE 14 Utilisez l appareil uniquement à l intérieur sur des surfaces sèches 15 Rangez l aspirateur sans fil à l intérieur Rangez le après l avoir utilisé afin d éviter les accidents 16 Utilise...

Page 7: ...t complètement secs après le nettoyage de routine Utilisez seulement les filtres et accessoires fournis par EURO PRO Operating LLC À défaut de quoi la garantie sera annulée Mise en garde Tout changement et toute modification apportés à cet appareil sans l approbation expresse de la partie responsable de sa conformité peuvent entraîner l annulation de l autorisation d utiliser l appareil Remarque C...

Page 8: ...ez l aspirateur pendant au moins sept heures RETRAIT REMPLACEMENT ET ÉLIMINATION DES PILES Votre aspirateur sans fil pour tapis et planchers est alimenté par des piles NiMH qui doivent être recyclées ou éliminées correctement selon la réglementation fédérale provinciale ou municipale Si vous n êtes pas certain de la façon de retirer votre bloc pile nous vous suggérons d apporter votre aspirateur à...

Page 9: ...ffectués par un réparateur non autorisé par EURO PRO Operating LLC Cette garantie limitée s applique à l acheteur original de l appareil et exclut toutes les autres garanties juridiques implicites ou conventionnelles Le cas échéant EURO PRO Operating LLC n est tenue qu aux obligations spécifiques assumées de façon expresse en vertu des conditions de cette garantie limitée En aucun cas EURO PRO Ope...

Page 10: ...conectar o desconectar el cepillo eléctrico para pisos USO GENERAL 14 Úsela solamente en superficies secas en interiores 15 Guarde la aspiradora inalámbrica dentro de su casa Guarde la aspiradora inalámbrica luego de cada uso para evitar accidentes 16 Utilícela solamente como se indica en este manual NO la utilice con ningún propósito que no esté descrito en este manual del usuario 17 Use únicamen...

Page 11: ...os proporcionados por EURO PRO Operating LLC El no hacerlo invalidará la garantía Advertencia Los cambios o modificaciones a esta unidad no aprobadas expresamente por la parte responsable del cumplimiento pueden hacer que el usuario pierda el derecho de utilizar el equipo Nota Este equipo ha sido probado y cumple con los límites de la Clase B de dispositivos digitales de acuerdo con la Parte 15 de...

Page 12: ...asta que se apague por sí sola 3 Deje que su aspiradora se cargue durante 7 horas como mínimo EXTRACCIÓN REEMPLAZO Y DESECHO DE LA BATERÍA La aspiradora inalámbrica se alimenta con baterías de Ni Mh las que deben reciclarse o desecharse de acuerdo con las reglamentaciones estatales federales y locales Si no está seguro de cómo extraer la batería le sugerimos que lleve su aspiradora a un técnico ca...

Page 13: ...persona no autorizada por EURO PRO Operating LLC Esta garantía limitada es válida para el comprador original del producto y excluye cualquier otra garantía legal implícita y o convencional La responsabilidad de EURO PRO Operating LLC de existir se limita a las obligaciones específicas asumidas expresamente bajo los términos de esta garantía limitada Bajo ninguna circunstancia EURO PRO Operating LL...

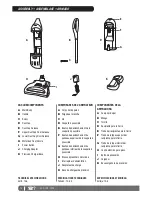
Page 14: ...érieur de la coupelle à poussière G Bouton de déclenchement du panneau inférieur de la coupelle à poussière H Brosse à planchers motorisée I Interrupteur d alimentation J Adaptateur de charge K Base du chargeur de précision COMPONENTES DE LA ASPIRADORA A Cuerpo principal B Mango C Tornillo D Recipiente para la tierra E Traba del recipiente para la tierra F Traba de la tapa superior del recipiente ...

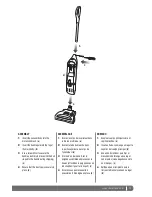
Page 15: ...manche dans la partie supérieure du corps de l aspirateur b 3 À l aide d un tournevis fixez la poignée assemblée en place avec le boulon attachée à la poignée avec un ruban adhésif pour le transport c 4 Assurez vous que la coupelle à poussière est bien logée en place d ARMADO 1 Acople el cuerpo principal sobre el cepillo eléctrico a 2 Inserte el tubo con mango en la parte superior del cuerpo princ...

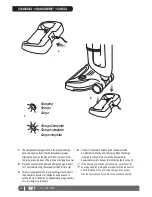
Page 16: ...o ensure a full charge for every use and to extend the life of the batteries Depending on usage the time for a full charge is 4 to 7 hours a b c Charging Charge Carga Charge Complete Charge complète Carga completa 4 One half of the blue LED light around the power button will illuminate while the unit is charging When the charge is complete the complete oval will be illuminated c Approximately afte...

Page 17: ...rise électrique et à l arrière du chargeur de précision De plus assurez vous que l aspirateur est bien logé dans le chargeur de précision 1 El enchufe del cargador se puede conectar a la base cargadora de precisión de una sola forma Inserte el enchufe del cargador alineando la flecha del enchufe con la flecha que está junto al conector de carga en la parte de atrás de la base cargadora de precisió...

Page 18: ...his setting the vacuum will run for approximately 12 minutes Press the button again to switch to a lower speed optimized for bare floor cleaning c On this setting the vacuum will run for approximately 17 minutes The LED lights around the power button will indicate your speed Press the button again to turn the unit off IMPORTANT The indicator light around the power button will flash if the brush ro...

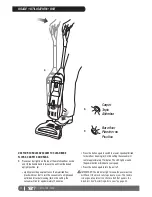
Page 19: ...osse s immobilise à cause d un blocage Cette fonction est conçue pour protéger la courroie permanente qui actionne la brosse à planchers motorisée Consultez la section Redémarrage à la suite d un blocage à la page 25 USE SU ASPIRADORA INALÁMBRICA PARA LIMPIAR PISOS LISOS ALFOMBRAS Y TAPETES 1 Coloque suavemente su pie sobre el cepillo eléctrico e incline el mango hacia atrás para destrabar la unid...

Page 20: ...ust cup door release button Gently tap the dust cup to dislodge and release dust and debris b Important If the Dust Cup Door does not swing open after pressing the release button push the door open using the bottom door tabs 4 Snap the door back in place 5 If you notice hair or other debris wrapped around the metal screen in the upper chamber of the dust cup press the upper dust cup door release t...

Page 21: ... inférieure de la coupelle puis enfoncez la partie supérieure jusqu à ce qu elle s enclenche d MISE EN GARDE Enlevez l appareil du socle de recharge avant tout entretien VACIANDO EL RECIPIENTE DE LA TIERRA Para mantener el mejor rendimiento del su aspiradora vacíe el recipiente de la tierra luego de cada uso o cuando la tierra se acerque a la línea de MAX FILL Nunca use la aspiradora sin el recipi...

Page 22: ...NOTE It is normal for your foam filter to discolor over time it will not affect the filter performance CLEANING THE MOTORIZED FLOOR NOZZLE AND CLEARING BLOCKAGES An accumulation of hair string and other debris may sometimes become lodged in the flexible air hose of the motorized floor nozzle in the air inlet of the dustcup or wrapped around the brush roll These areas must be free from debris for m...

Page 23: ...élicatement les débris logés dans le tuyau N UTILISEZ PAS DES CISEAUX OU D AUTRES OBJETS POINTUS QUI POURRAIENT ENDOMMAGER LE TUYAU suite sur page 25 LIMPIEZA DEL FILTRO Su aspiradora tiene un recipiente para la tierra de alta eficiencia para mantener una gran succión evitando que los desechos se acumulen en el filtro Para mantener una gran succión es importante limpiar el filtro de espuma todos l...

Page 24: ...the nozzle Using a coin turn the dial next to the brush roll access door to the unlock position f Remove the brush roll access door g 2 Slip the black belt off of the white gear and lift out the brush roll h BRUSH BAR INSERTION 1 To reinsert the brush roll first slip the black belt onto the white gear i then align the white square on the opposite side of the brush roll into the square slot j 2 Ali...

Page 25: ...ant dix secondes 2 Assurez vous que la brosse motorisée n est pas bloquée et qu aucun débris n est enroulé autour du rouleau de la brosse 3 Mettez l aspirateur en marche il devrait fonctionner normalement 4 Inspeccione el cepillo giratorio para verificar que no tenga acumulación de residuos Remueva todo lo que encuentre alrededor del cepillo cortándolo cuidadosamente con unas tijeras El cepillo es...

Page 26: ...page 22 and Restarting after a jam on page 14 2 Ensure that the motorized floor nozzle is properly attached 1 Empty the dust cup container 2 Remove the dust cup filter check for blockages and remove Clean or replace the dust cup filter See Replacement Parts below Note It is important to clean the dust cup filter every month 3 The battery may need to be charged charge until the complete oval around...

Page 27: ...osse à planchers motorisée est bien fixée 1 Videz le récipient de la coupelle à poussière 2 Enlevez le filtre de la coupelle à poussière et vérifiez s il est obstrué Si c est le cas nettoyez le filtre Nettoyez ou remplacez le filtre de la coupelle à poussière consultez la section Pièces de rechange ci dessous Remarque Il est important de nettoyer le filtre de la coupelle à poussière une fois par m...

Page 28: ...bstrucciones en la página 23 y Reinicio luego de un atasco en la página 25 2 Verifique que el cabezal eléctrico para pisos esté correctamente instalado 1 Vacíe el recipiente para la tierra 2 Remueva el filtro del recipiente para la tierra remueva cualquier obstrucción que encuentre Limpie o reemplace el filtro del recipiente para la tierra Vea Partes de reemplazo más abajo Nota Es importante limpi...

Page 29: ...29 www sharkclean com NOTES ...

Page 30: ...30 1 800 798 7398 NOTES ...

Page 31: ...31 www sharkclean com ...

Page 32: ...ir respective owners Euro Pro et Shark sont des marques de commerce d Euro Pro Operating LLC Toutes les autres marques sont des marques de commerce de leurs propriétaires respectifs Euro Pro y Shark son marcas registradas de Euro Pro Operating LLC Todas las otras marcas pueden ser marcas registradas de sus respectivos propietarios Illustrations may differ from actual product Les illustrations peuv...

Reviews: