background image

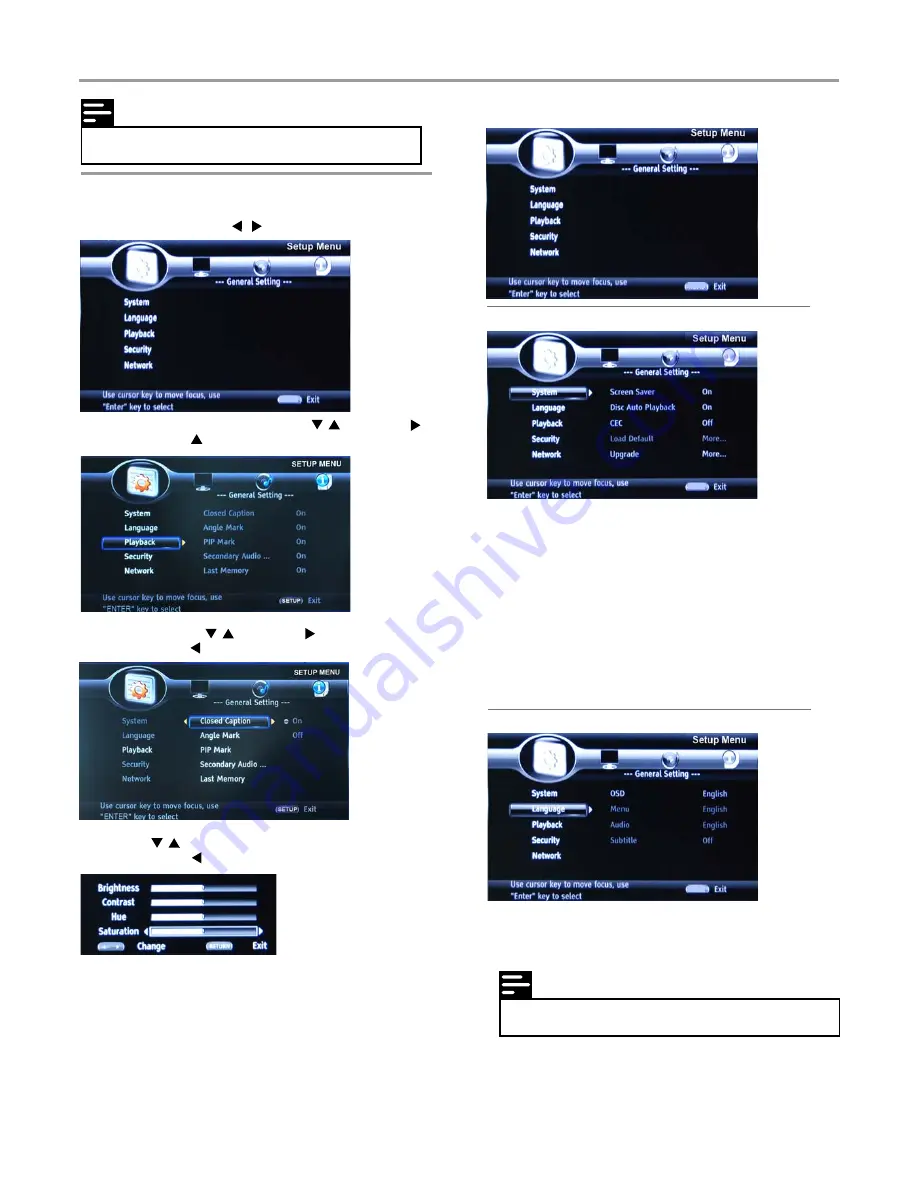
4 Select the option by          , and press     .
   • You could press     to return to the previous menu.

3 Select the menu you want to setting by          , and press     .
   • You could press     up to mains menu.

1 Press 

SETUP

.

2 Select a mains menu by          .

Settings

11

Note

• You have to select the audio and subtitle language 
  according to the disc.

Note

• If the setup option is grayed out, it means the setting
  cannot be changed at the current state.

General Setting

Basic operation for the menu

System

1

Screen Saver: 

Turn on/off the sceen saver.

   The screen saver will display in 3 mins without any 
   operation when the function’s on.
2

Disc Auto Playback: 

Turn on/off the disc auto playback

   function.
3

CEC:

Turn on/off the CEC function.

   The settings in TV will be changed as the DVD change 
   when the function’s on.
4

Load Default: 

Return to defaultsettings.

5

Upgrade:

Select the device that you want to upgrade from.

6

Easy Setup

: Make default settings fast.

7

BUDA

: Difine memary for BD-Live.

Language

1

OSD:

Select the OSD language.

2

Menu:

Select the menu language of the disc.

3

Audio:

Select the audio language for the program.

4

Subtitle:

Select the subtitle language for the program.

5 Select  by          , and press

 ENTER

 to confirm.

   • You could press     to return to the previous menu.

6 To return to the mains menu from the submenu, press

   RETURN

.

7 To exit the menu, press 

SETUP

.

SETUP

SETUP

SETUP

SETUP

Summary of Contents for K-BD5106

Page 1: ...Model No K BD5106 Read all of the instructions before using this bluray player and keep the instruction manual in a safe place for future reference Blu Ray Disc Player Instruction Manual...

Page 2: ......

Page 3: ...nnect power Getting Started Prepare the remote control Find the correct viewing channel Use the Setup menu Navigate the menu Select menu display language Play Play a disc Play video Play music Play ph...

Page 4: ...duct is covered by the European Directive 2002 96 EC Please inform yourself about the local separate collection system for electrical and electronic products Please act according to your local rules a...

Page 5: ...ccess a variety of up to date content e g refreshed previews and exclusive special features You can also enjoy next generation possibilities such as ringtone wallpaper downloads peer to peer interacti...

Page 6: ...lay the previous program 7 Play the next program 8 Start resume pause play 2 IR sensor Point the remote control at the IR sensor 9 Stop play 10 Turn on this product or switch to standby mode Front pan...

Page 7: ...backward or forward 18 19 PREV NEXT Skip to the previous or next title chapter or track 20 STOP Stop play 21 GOTO Jump to a user specified time during playback 22 HDMI Press to change the display mode...

Page 8: ...1 Connect to the HDMI jack HDTV Connect an HDMI cable not supplied to the HDMI jack on this product the HDMI input jack on the TV Tip You can optimize the video output Press the HDMI button repeatedly...

Page 9: ...omposite video jack To enhance audio play you can route the audio from this product to other devices This type of connection provides good picture quality Connect to digital amplifier receiver COAXIAL...

Page 10: ...r discard batteries in fire Always follow the instructions in this chapter in sequence Prepare the remote control 1 Open the battery compartment 2 Insert 2xAAA batteries with correct polarity as indic...

Page 11: ...DVD track track refers to the contents on an audio CD folder file folder file refers to the contents on a disc in MP3 WMA JPEG format Play video Control video play 1 Play a title 2 Use the remote cont...

Page 12: ...ternet Services and functions to be provided vary from discs OSC Access options relating to the current activity or selection and control the video playing BONUSVIEW Turn on or off the secondary video...

Page 13: ...h some discs or files Note To create a musical slideshow you must store the MP3 WMA and JPEG files on the same disc Play photo Play photo as slideshow You can play JPEG photos files with jpeg or jpg e...

Page 14: ...he function s on 2 Disc Auto Playback Turn on off the disc auto playback function 3 CEC Turn on off the CEC function The settings in TV will be changed as the DVD change when the function s on 4 Load...

Page 15: ...Enable disable HDMI 1080P 24Hz setting 1 Change Password Change the password for parental control menu 2 Parental Control Enter to set the parental control 3 Country Code Select the Country code Playb...

Page 16: ...isplay the system information The information on the picture above is for reference only 1 Video Adjust Enter the submenu to adjust the video display Adjust the Brightness Contrast Hue Saturation of t...

Page 17: ...Clean discs Wipe the disc with a micro fibre cleaning cloth from the centre to the edge in a straight line movement Specifications Play media DVD Video DVD R RW DVD R RW DVD R R DL CD R CD RW Audio C...

Page 18: ...V to the corresponding video input See the TV user manual for details No audio output from the loudspeakers of the audio device stereo system amplifier receiver Ensure that the audio cables are connec...

Page 19: ...uncompressed high definition video and digital multichannel audio It delivers high quality picture and sound quality completely free from noise HDMI is fully backward compatible with DVI As required...

Reviews: