background image

Setup Unit

Upon initial installation, the Setup Unit screen should be used to define installation 

parameters specific to the job site. 

The SRCM can take as input, the signal from two separate pressure transducers. These 

are configured for either Primary Room or Secondary Room (an anteroom is an exam-

ple of a secondary room). When two transducers are used, the Home screen display of 

the SRCM can toggle between each space to indicate the status of each room momen-

tarily, cycling from one to the other a few seconds apart.


*If Ch1 is selected for the Primary room, it will not be an available option for the    

Secondary room.

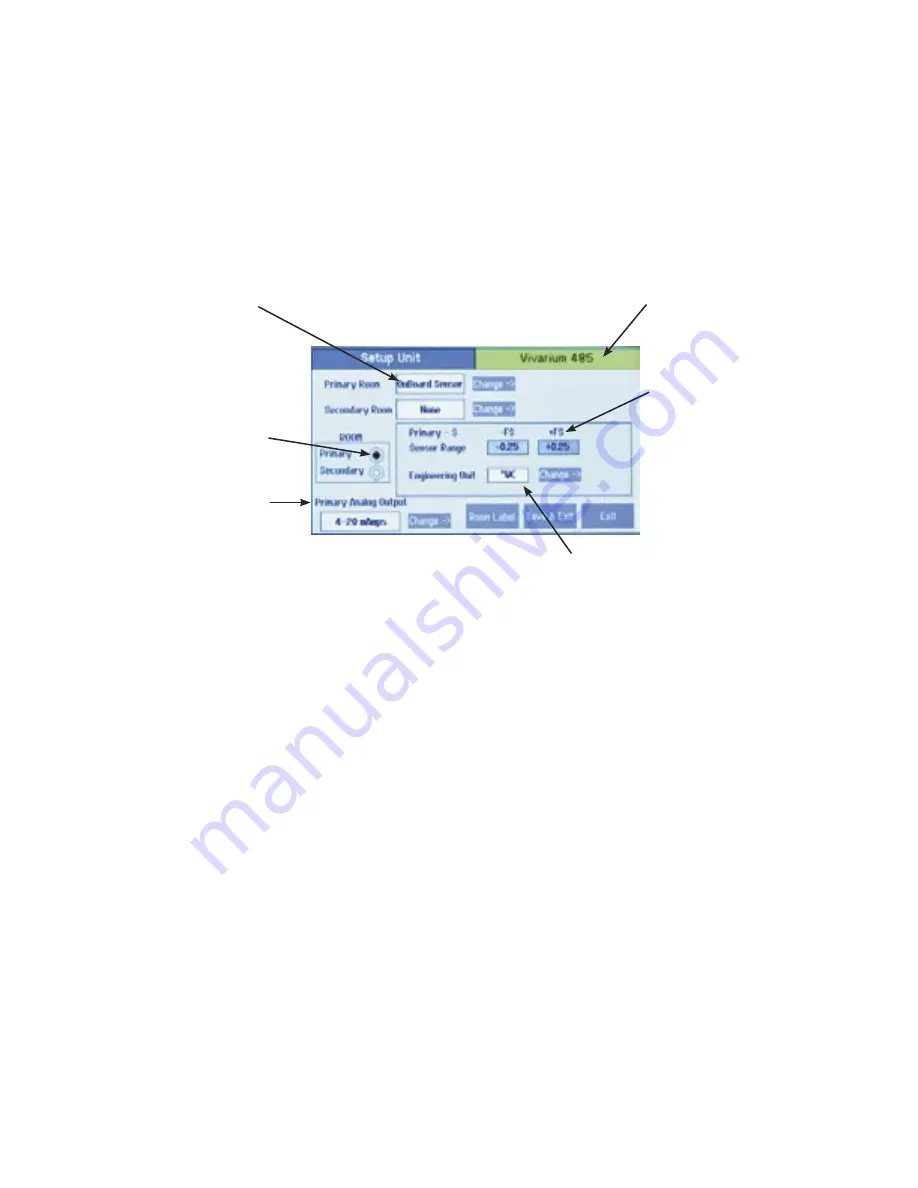
Change, if necessary, to match sensor being used. OnBoard is the default, which uses 

the sensor manufactured on-board the unit. Alternatively, an external sensor (also 

known as “external transducer” such as a Setra 264 or Setra 267) may be used. If an 

external sensor is used, change this selection to Analog Ch1. The FS output and range  

of the external sensor will need to be entered.

Change, if necessary, to match sensor being used, if there is one present. None is the 

default. An external sensor (also known as “external transducer” such as a Setra 264 or 

Setra 267) may be used for the secondary room, or anteroom. If an external sensor is 

used, change this selection to Analog Ch1. The FS output and range of the external sen-

sor will need to be entered.

Use the radio button to select the setup parameters for either the Primary Room or   

Secondary Room.

Primary Room sensor:

•   OnBoard Sensor

•   External Ch1

Secondary Room sensor:

•   External Ch1* 

•   External Ch2

Setup selection to configure 

either Primary or Secondary 

Room

Pressure signal output (AO) 

scale and units:

•   4-20 mA

•   0-5 Vdc

•   0-10 Vdc

Room label of selected room, 

either Primary or Secondary 

depending on ROOM radio 

button
Full Scale (FS) range of 

transducer selected, Primary           

or Secondary

Pressure  units, either “ WC or Pa

Primary Room 

Sensor

Secondary Room 

Sensor

ROOM - Primary 

Secondary

-8-

Summary of Contents for SRCM

Page 1: ...Model SRCM Operation...

Page 2: ...Sensor Range 9 Changing Room Name 10 Setup Display 11 General Tab Customizing the Condition Banner 11 Advanced Tab Customizing the Operating Condition Screen 12 Display Averaging tenths of seconds 12...

Page 3: ......

Page 4: ...s the end user pressure values messages text and other data intended for visual pressure veri cation in the facility The second mode of operation is the Ad ministrative Menu Menu screen which permits...

Page 5: ...of message desired The Condition Banner does not affect or respond to pressure in the space Banner screens are only messages intended to be communicated to staff personnel and other people out side t...

Page 6: ...ms will occur See Section Setup Dis play page 11 for more information on STANDBY mode Green Condition Banner shows En try Permitted graphic and user de ned text above and below graphic image Use the G...

Page 7: ...ration is within alarm thresholds a green NORMAL indica tion is shown If operation is near either high or low alarm threshold limits a yellow WARNING indication is shown If operation is at or beyond h...

Page 8: ...ayed The blue banner below the pressure value shows where the current pressure reading is in relation to alarm setpoints The value at the left of the blue banner is the low setpoint value and the valu...

Page 9: ...nu appears to enable selection If passwords are enabled the user must rst enter a password to proceed with the change In OCCUPIED mode the full function of the SRCM is active In STANDBY mode the SRCM...

Page 10: ...re zero or calibrate internal sensor Room Label that settings apply to global unless Secondary is shown Serial number and other system information Alarm setpoint values Save Settings and Exit Setup Al...

Page 11: ...al sensor is used change this selection to Analog Ch1 The FS output and range of the external sensor will need to be entered Change if necessary to match sensor being used if there is one present None...

Page 12: ...t above the positive value or below the negative value If a wider or narrower sensor range is required for the project an external pressure transducer such as a Setra 264 or Setra 267 may be chosen to...

Page 13: ...Name selection box to bring up the on screen keyboard to enter the room label text desired Be sure to press the Save button under the text entered before leaving this screen Changing Room Name Touch...

Page 14: ...between GREEN YELLOW and RED By pressing on the col ored region of text the on screen keyboard pops up enabling data entry If User De ned Text is Disabled then data entry on the Condition Banner will...

Page 15: ...es to the display reaching nal value in 1 second Entering 2 equates to nal value in 200 ms Display Averaging does not affect the Analog Output response time only the apparent stability of the pressure...

Page 16: ...alarm then the alarm condition and pressure values will toggle Supervisor and Operator Passwords The password function provides security against changed con gurations by un authorized users This is a...

Page 17: ...ore noticeable to staff concerned with room pressurization status Alarm Blink De nes the behavior of the red ALARM indicator on the Home screen Normal Blink is used for the green NORMAL indicator Warn...

Page 18: ...arm will be silenced when the pressure returns to normal range without requir ing acknowledgement When a Latch Alarm occurs the Home screen displays a RESET button to the right of the Menu button Pres...

Page 19: ...ut DI Used for monitoring the door status open or closed The DI is a Normally Closed dry contact A door jamb or valve pressure switch must be wired to the terminals la beled DOOR in the rear of the un...

Page 20: ...Primary Room or Secondary Room this screen is used to de ne the alarm setpoints When the room is then set to Positive Neutral or Negative the setpoints and conditions con gured here are in effect for...

Page 21: ...Normal Green Displays primary pressure or secondary pressure based on the selection Disabled N A Alarm Red Disabled N A Alarm Red Pressure has higher priority Disabled N A Alarm Red Pressure has high...

Page 22: ...m Red Pressure has high priority Pri mary Alarm Stop toggling Enabled A N Alarm Red Pressure has high priority Pri mary Alarm Stop toggling Enabled A N Alarm Red Pressure has high priority Pri mary Al...

Page 23: ...ary or Secondary room When selected the gray box to the right will indicate if the calibration will be applied to the on board sensor or the external sensor Analog Ch1 or Analog Ch2 The indicated pres...

Page 24: ...nect tub ing from the Calibrator to the low and high ports identi ed near the PCBA markings Apply Full Range pressure for example 0 1 WC range use 0 1 WC When pressure reaches Full Range pres sure pre...

Page 25: ...anywhere in the white text entry box to enable the pop up keyboard Enter an email address name or phone number as needed Restore Factory Default Restores the default settings for all con guration and...

Page 26: ...ith out formatting Sandisk Cruzer 2 To make Sandisk work format as Fat 32 Must have volume label Do not use quick format 4 16 To access the USB port rst remove the faceplate cover and set it aside The...

Page 27: ...gured With power applied to that unit connect the thumb drive and cable Select Write and START to write the master con guration to the new slave unit A Write Process Successful message will appear if...

Page 28: ...d and d examination discloses in the judgment of SETRA the defect in materials or workmanship developed under normal installation use and service e SETRA is noti ed in advance of and the product is re...

Reviews: