SERVER EDGE 4K2K User Manual Download Page 12


10

6.  Factory Default Setting 

In case your settings are misbehaving, resetting it to the factory default might be just the way you are looking 

for. To return all settings to factory state, you can press and hold the buttons 1 and 2, and then press and 

hold 3 and 4. Next, release 3 and 4, and then release 1 and 2. 

Tip: Press and hold 1 + 2 

  Press and hold 3 + 4 


Release 3 + 4 

       Release 1 + 2 


7. EDID Setting 

In  some  cases  display  problems  may  occur  due  to  incorrect  EDID  communication  between  the  display 

monitor and the unit or inappropriate EDID data programmed by display manufactures. This function allows 

the system either to read the necessary EDID information from the unit or to copy EDID from EDID compliant 

displays. For more details and functions, please consult the following statements.   
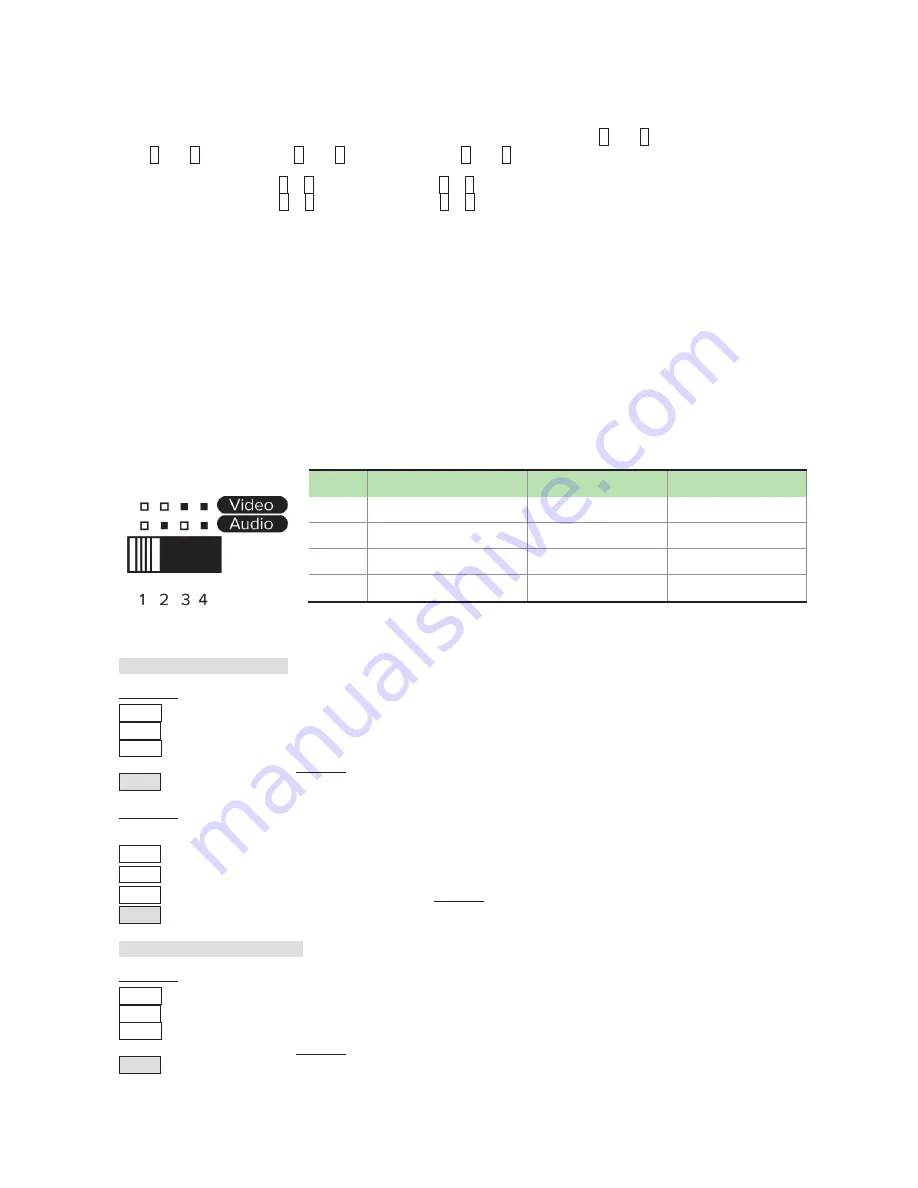
 

7-1. EDID Copy 

If the unit is insufficient for EDID of the attached displays, it is suggested to copy EDID from the displays. 

Before starting, slide EDID Setting Switch to the desired position. 


Copy Local Monitor EDID 

Method 1 

Step 1. Apply power to the unit. 

Step 2. Connect the (EDID compliant) monitor to local output port of the Unit and power on the monitor. 

Step 3. Press and hold the button “

L EDID COPY

” for 3~5 sec. and release the button RIGHT AFTER the 

Status LED flashes GREEN. 

Result. If the Status LED returns to normal status, indicating that the EDID Copy is completed.   

Method 2 

NOTE: Before starting, power off the unit and connect monitor to local output port of the Unit 

Step 1. Press and hold the button “

L EDID COPY

” 

Step 2. Apply power to the unit. 
Step 3. Release right after the Status LED flashes GREEN. (3~4 sec.) 
Result. If the Status LED returns to normal status, it indicates that the EDID Copy is completed.   

Copy Remote Monitor EDID 

Method 1 

Step 1. Apply power to the unit. 

Step 2. Connect the (EDID compliant) receive side monitor to “OUT1” of the Unit and power on the monitor. 

Step 3. Press and hold the button “

R EDID COPY

” for 3~5 sec. and release the button RIGHT AFTER the 

Status LED flashes GREEN. 

Result. If the Status LED returns to normal status, indicating that the EDID Copy is completed.   

Mode 

Video 

Audio 


Auto 

Auto (Min.) 

-- 

Auto 

Inventory 

Copy Audio EDID 

Inventory 

Auto (Min.) 

Copy Video EDID 

Inventory 

Inventory 

Copy all EDID 

Summary of Contents for 4K2K

Page 1: ...res and functions may be added or changed after the manual was written Please visit our website to download the latest version of manual for reference HDBaseT 4K2K 4 Input HDMI CATx Gate Repeater User...

Page 2: ...ection 15 II GUI over Serial 17 A Installing Application 17 B Uninstalling Application 17 C Description Operation 18 Specification 24 Please read this manual thoroughly and follow the Installation pro...

Page 3: ...g or point to point applications Exclusive EDID Function Multiple functions for EDID setting like EDID Copy and EDID Pre setting ensuring accurate output display Enable separately learn Audio and Vide...

Page 4: ...III Package Content Content Quantity SW4I 03457 100 1 Power Adapter Set 1 IR Remote Controller 1 CD User s Manual Software Utility 1 Quick Start Guide 1 CATx Cable 1 5M 1 Grounding Wire 1 Foot Pad Set...

Page 5: ...raight type male female Other transmitter and repeater Other repeater s Optional IR Sensor Kit RJ12 Cable RJ12 to RS232 Adapter Note If users want to use other RJ12 to RS 232 converter please make sur...

Page 6: ...put Port Connect to an HDMI source I Connect to HDMI sources depend on model Ro Remote Output Port Connect to a receiver Lo Local Output Port Connect to an HDMI display S1 EDID Setting Switch See the...

Page 7: ...ource detected in Source 1 the system will automatically display the latest video source Priority R Remote input source CATx IN R has the highest priority Priority Source 1 CATx IN R Source 2 Source 3...

Page 8: ...mage to the product or any connecting devices and to improve audio video signal quality it is important to make sure that the extender systems are properly grounded Device Connection 1 Use CATx cables...

Page 9: ...7 Connection Pattern HDMI RJ 45 Cable CAT 5e 6 6a IR Cable VGA RJ 12 Cable...

Page 10: ...port ON blue y d a e r t u p n i e c r u o s o e d i V F F O The LED emits blue and go off once per 2 sec t u p n i e c r u o s o e d i v o N F F O Output LED Indicator STATUS Output device ready Outp...

Page 11: ...the setting Double click F Press 1 Press 1 Toggle ON OFF Remote Output Port Press F to exit 3 EQ Adjustment To optimize video quality users can adjust the video equalization sharpness for all video in...

Page 12: ...tep 1 Apply power to the unit Step 2 Connect the EDID compliant monitor to local output port of the Unit and power on the monitor Step 3 Press and hold the button L EDID COPY for 3 5 sec and release t...

Page 13: ...r is not applicable d The CATx cable is not well connected 7 2 EDID Emulation After EDID Copy you may slide EDID Setting Switch to the desired position and apply the copied EDID to the display Va Vide...

Page 14: ...video quality users can adjust the video equalization sharpness for all video output ports through push button configuration Since 4 levels for EQ adjustment are provided the output LED flashes blue...

Page 15: ...hin a second or two press VIDEO of IR remote controller 4 2 ID Operation via IR Remote Controller Each unit will respond to the same signal from the IR remote controller whenever the units are powered...

Page 16: ...Simple Serial Connection Connect and power on the Unit and then set up serial configuration such as correct baud rate and com port After that you can directly enter the serial commands All the valid...

Page 17: ...TS HD 7 1 ch AVI n AV Input Port n 1 max OLE Enable Local Output AV OLD Disable Local Output AV ORE Enable Remote Output AV ORD Disable Remote Output AV w e i V S V settings t c u d o r P I P informat...

Page 18: ...owse There are two ways to install the driver a Manually copy the file TuApp exe to the Windows platform and run it directly b Run Setup exe to automatically install the program on the Windows platfor...

Page 19: ...After software installation connect the DB9 RS 232 serial cable straight type male female to the serial port of Gate Repeater and connect the other end to the serial port COM1 COM2 of your computer N...

Page 20: ...ngement of a network including its nodes and connecting lines Saving a topology file is highly recommended 2 1 Option Function 1 Open Existing Topology Open pre stored topology file 2 Save Current Top...

Page 21: ...as shown below 3 2 Option Function 1 Auto apply Automatically apply settings It is not suggested checking this option for it may result in loading down the system 2 Apply To implement the current set...

Page 22: ...ommonly used icons Built in Icons as shown on the upper side of the pop up window b User s Icon Reset the button to null As shown on the lower side of the pop up window double click the icon 01 12 and...

Page 23: ...EDID into inventory for future use As for Built In EDID it provides multiple options for all connected output ports 3 5 Option Function 1 Inventory EDID Make EDID Copy EDID to the selected input port...

Page 24: ...ID binary file A file that store EDID information Step 1 Check the desired input port s or check All input ports to select all Step 2 Click Make EDID Step 3 Select the desired binary file Copy selecte...

Page 25: ...x 2160 Extension Distance 100M LED Indicator Status LED 1 Input LED 4 Output LED 2 Slide Switch Audio Video EDID Setting Audio Video Inventory EGO Advanced Auto sensing Setting Switch Auto Priority R...

Page 26: ...e product or documentation without obligation to notify any user of such revisions or updates For further information please contact your direct vendor All the brand names and registered trademarks ar...

Reviews: