LISST-SL V2.1
User’s Guide
13
Files to delete
CALIBRATE
Clean Water Calibration
although all associated files have also been saved.
There are no options to change the list of files saved.
Again, press CANCEL to return to the SETUP menu.
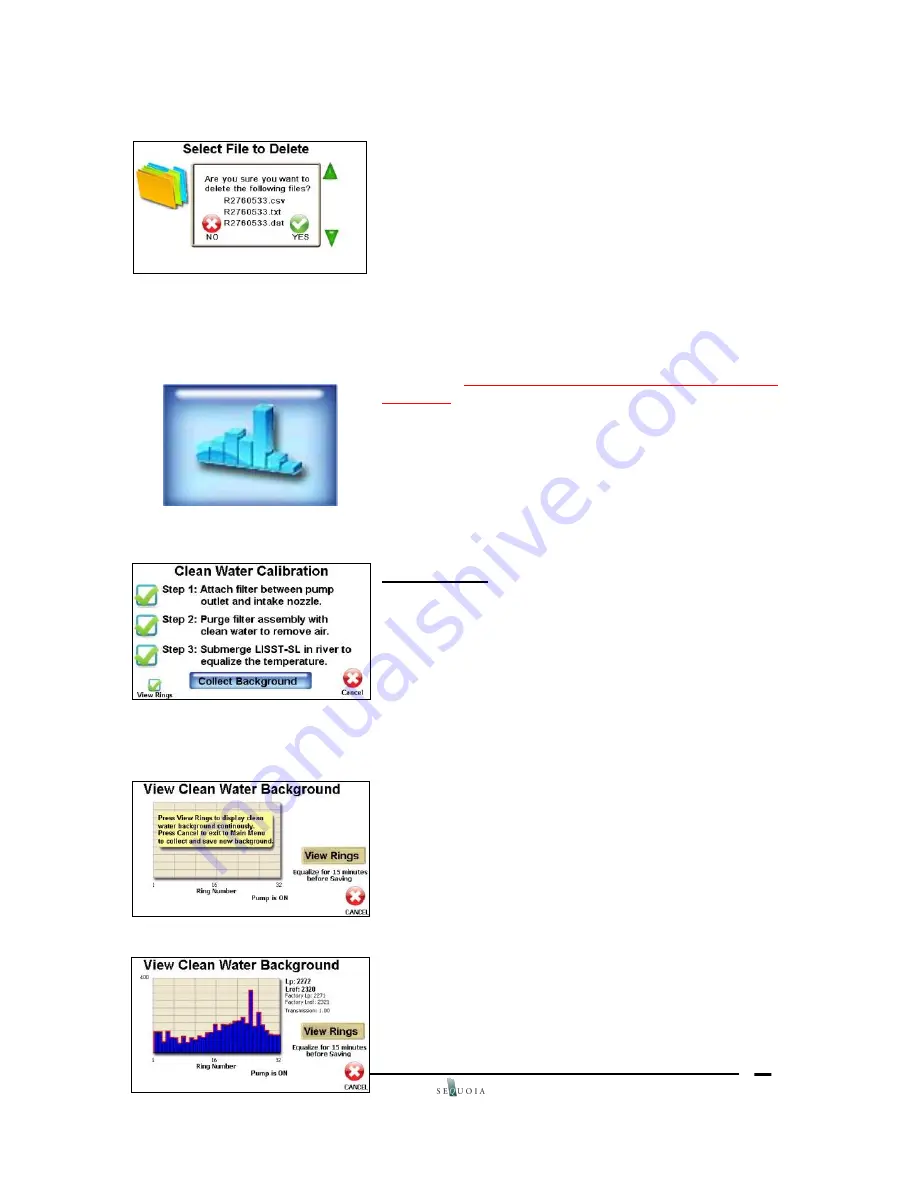
Selecting the DELETE FILES button from the Set Up
menu opens a window with a list of all saved files. You
may now select the file that you wish to delete. You may
select only one file at a time to delete by using your Pen
and by pressing on the file name. The next panel shows
all files with the same root name that will be deleted.
Whether you select yes or no, you will return to the
SETUP menu. To delete more than one file at a time, you
must use the Windows program provided separately for
your PC.
CAUTION
: Once the files are deleted, they can not be
recovered.
Press CANCEL again to return to the MAIN MENU. You
have completed the SET UP of the TCB. You are now
ready to learn the next 2 operations: capturing a
Background file, and then the real thing
– river data (or
data from a laboratory system).
CALIBRATION:
Recall that the Calibrate function
records
a
Background
file.
This
file
contains
measurements of light scattered from imperfections of
optics on the 32 ring detectors. A few other parameters
are also stored.
This file is CRITICAL to the quality of
data you will obtain with the MEASURE function. You
must never skip the Calibrate step
. Preparing the LISST-
SL sensor for the Calibrate step is described in the next
sections. Here we describe TCB operation only.
To record the Background file for a particular experiment,
open the MAIN MENU. Recall that you enter the MAIN
MENU by either turning on power, or by hitting CANCEL
button from any menu a few times. Once on the MAIN
MENU panel, press the CALIBRATE button.
A new window opens titled Clean Water Calibration. It is
a helpful guide to remind the user to perform 3 steps to
prepare the LISST-SL instrument to acquire a
background file. These steps are fairly intuitive, but will
be described in more detail in the section Field
Experiment. After each step is performed, press the
check box. After checking all boxes, press View Rings
button on bottom left. This button enables you to view the
background in comparison to its ideal, factory value (red
line).


