background image

15

Using the operating menu

Working with the operating menu

By way of example of the “

Sensitivity

” menu, this section describes how to

use the operating menu. 

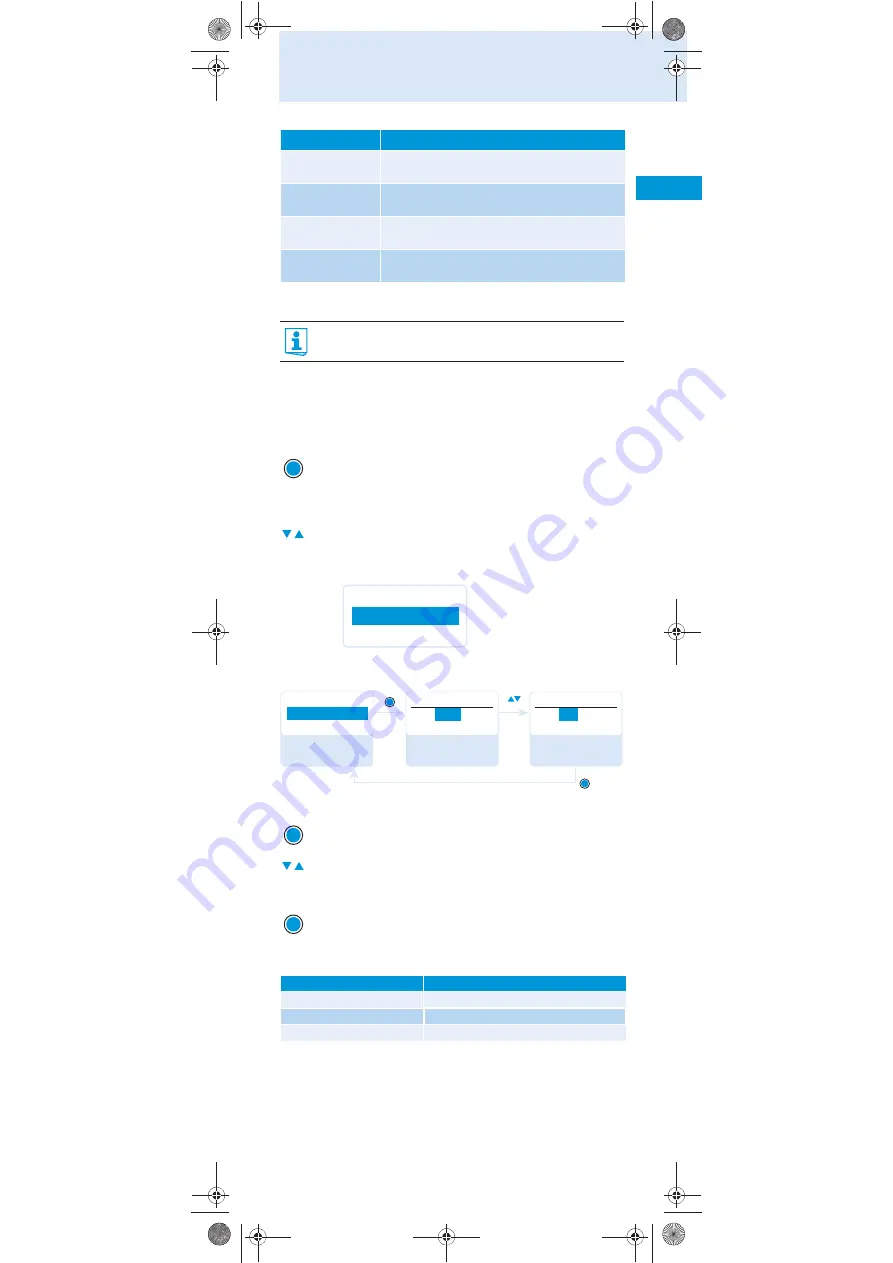
Changing from the current standard display to the operating 
menu

Selecting a menu item

Changing and storing settings

The rocker button features a “fast search” function:

LCD Contrast

Adjusts the contrast of the display panel
(see page 21)

Reset

Resets the bodypack transmitter
(see page 21)

Software Revision

Displays the current software revision
(see page 21)

Exit

Exits the extended menu “

Advanced Menu

” and 

returns to the main menu

If the lock mode is activated, you have to deactivate it In order to
be able to work with the operating menu (see page 12).

Press the 

SET

 button. 

The current standard display is replaced by the main menu. 
The last selected menu item is displayed.

Press the rocker button to change to the “

Sensitivity

” menu

item.
The current setting of the selected menu item is displayed:

Press the 

SET

 button to call up the menu item.

Press the rocker button to adjust the input sensitivity.

Press the 

SET

 button to store the setting.

Rocker button 

Display

Press the UP button

jumps to the previous menu item/setting

Press the DOWN button

jumps to the next menu item/setting

Hold the button pressed

cycles continuously

Display

Function of the menu item

SET

Menu

Sensitivity

–12 dB

Menu

–12 dB

S e n s i t i v i t y

–  12

 dB

S e n s i t i v i t y

–36

 dB

S e n s i t i v i t y

“Stored”

Call up 
“Sensitivity”

Select the desired 
setting

Store the setting

SET

SET

SET

SET

ew G3 SK 300_529670_0109_SP8_PRT.book  Seite 15  Donnerstag, 5. Februar 2009  10:26 10

Summary of Contents for EM 300 G3

Page 1: ...l or deactivating the RF signal 12 Selecting a standard display 13 Using the operating menu 14 The buttons 14 Overview of the operating menu 14 Working with the operating menu 15 Adjusting settings via the operating menu 17 The main menu Menu 17 The extended menu Advanced Menu 19 Adjustment tips 22 Synchronizing the bodypack transmitter with a receiver 22 Cleaning the bodypack transmitter 22 If a ...

Page 2: ...hock or other hazards Refer all servicing to qualified service personnel Servicing is required if the device has been damaged in any way liquid has been spilled objects have fallen inside the device has been exposed to rain or moisture does not operate properly or has been dropped WARNING To reduce the risk of short circuits do not use the device near water and do not expose it to rain or moisture...

Page 3: ...per frequency range Each frequency range A E G offers 26 frequency banks with up to 24 channels each Each of the channels in the frequency banks 1 to 20 has been factory preset to a fixed transmission frequency frequency preset The factory preset frequencies within one frequency bank are intermodu lation free These frequencies cannot be changed For an overview of the frequency presets please refer...

Page 4: ...rated simultaneously on the preset frequencies without causing intermodulation interference Overview of the microphones and line cables Transmitter Receiver Combinable with SK 300 G3 EM 300 G3 Clip on micro phones ME 2 ME 4 Headmics ME 3 Line cables CI 2 Microphone line cable Type Pick up pattern ME 2 clip on microphone pre polarized condenser microphone omni ME 4 clip on microphone cardioid ME 3 ...

Page 5: ...es The packaging contains the following items 1 SK 300 G3 bodypack transmitter 2 AA size batteries 1 5 V 1 instruction manual 1 frequency information sheet ew G3 SK 300_529670_0109_SP8_PRT book Seite 5 Donnerstag 5 Februar 2009 10 26 10 ...

Page 6: ...indicator red LED lit ON flashing LOW BAT 쐂 Audio overmodulation indicator yellow LED lit AF PEAK 쐆 Charging contacts 쐊 SET button 쐎 왖 왔 rocker button UP DOWN 쐅 Battery compartment 쐈 Battery compartment cover 쐉 Battery compartment catches 씈 Infra red interface 씉 ON OFF button serves as the ESC cancel key in the operating menu 씊 Display panel backlit in orange 쐃 쐏 쐄 쐂 쐊 쐆 씉 쐆 씊 쐅 쐈 쐎 쐉 쐉 쐇 쐋 씈 ew G...

Page 7: ...xcessively high the AF display shows full deflection and in addition the yellow AF PEAK LED 쐂 lights up 햳 Frequency Current transmission frequency 햴 Name Freely selectable name of the bodypack transmitter 햵 Transmission icon RF signal is being transmitted 햶 Lock mode icon Lock mode is activated 햷 P Pilot Pilot tone transmission is activated 햸 MUTE Microphone or line input is muted 햹 Battery status...

Page 8: ...optional accessory Connecting the microphone cable line cable The audio input is designed for the connection of both condenser micro phones and other audio sources DC powering of the condenser micro phones is via the audio input 3 5 mm jack socket MIC LINE 쐃 왘 Use one of the recommended Sennheiser microphones or the optional CL 2 line cable 왘 Connect the 3 5 mm jack plug 씋 from the Sennheiser micr...

Page 9: ... it precisely ME 3 왘 Adjust the ME 3 headmic so that a comfortable and secure fit is ensured The ME 3 headmic has a cardioid pick up pattern 왘 Position the microphone so that its sound inlet is directed towards the sound source e g mouth ME 4 왘 Use the microphone clip 씍 to attach the microphone to clothing e g tie lapel The ME 4 clip on microphone has a cardioid pick up pattern 왘 Position the ME 4...

Page 10: ...antenna pointing downwards To do so withdraw the belt clip 씎 from its fixing points and attach it the other way round The belt clip 씎 is secured so that it cannot slide out of its fixing points accidentally To detach the belt clip 왘 Lift one side of the belt clip as shown 왘 Press down the belt clip at one fixing point and pull it out of the trans mitter housing 왘 Repeat for the other side 씎 ew G3 ...

Page 11: ...red ON LED 쐄 lights up and the transmission icon 햵 is displayed You can switch the bodypack transmitter on and deactivate the RF signal on switch on For more information see below 왘 Press the ON OFF button 씉 until OFF appears on the display panel The red ON LED 쐄 goes off and the display panel turns off When in the operating menu pressing the ON OFF button 씉 will cancel your entry ESC function and...

Page 12: ...he Mute Mode menu item select the desired setting see page 20 왘 Exit the operating menu 왘 Briefly press the ON OFF button RF Mute Off appears on the display panel 왘 Press the SET button The transmission icon 햵 is displayed again 왘 Press the rocker button Unlock appears on the display panel 왘 Press the SET button The lock mode is temporarily deactivated Setting Slide the MUTE 쐇 switch Function AF O...

Page 13: ...햸 is not displayed Receiver s display panel TX Mute is not displayed RF signal is deactivated Transmitter s display panel Transmission icon 햵 is not displayed Receiver s display panel RF Mute is displayed only when activated on the receiver see above RF signal is activated Transmitter s display panel Transmission icon 햵 is displayed Receiver s display panel RF Mute is not displayed You can also de...

Page 14: ...equency bank and the channel see page 17 Name Enters the transmitter name see page 18 Auto Lock Activates deactivates the automatic lock mode see page 18 Advanced Calls up the extended menu Advanced Menu see page 19 Exit Exits the operating menu and returns to the current standard display Extended menu Advanced Menu Tune Sets the transmission frequencies for the frequency banks U1 to U6 see page 1...

Page 15: ...enu see page 12 왘 Press the SET button The current standard display is replaced by the main menu The last selected menu item is displayed 왘 Press the rocker button to change to the Sensitivity menu item The current setting of the selected menu item is displayed 왘 Press the SET button to call up the menu item 왘 Press the rocker button to adjust the input sensitivity 왘 Press the SET button to store ...

Page 16: ...he ON OFF button to cancel the entry The current standard display appears on the display panel 왘 Press the SET button so many times until the last edited menu item appears 왘 Change to the Exit menu item 왘 Confirm your selection You return to the next higher menu level 왘 Press the ON OFF button ON OFF SET Menu Exit SET ON OFF ew G3 SK 300_529670_0109_SP8_PRT book Seite 16 Donnerstag 5 Februar 2009 ...

Page 17: ...menu visit the SK 300 G3 product page at www sennheiser com Input sensitivity adjusted Effect display too high Close talking distances speakers with loud voices or loud music passages cause overmodulation in the transmission link The yellow AF PEAK LED 쐂 lights up The audio level display AF 햲 shows full deflection for the duration of the over modulation correctly The audio level display AF 햲 shows...

Page 18: ...matic lock mode Auto Lock The lock mode prevents that the bodypack transmitter is accidentally switched off or programed during operation The lock mode icon 햶 on the current standard display indicates that the lock mode is activated For information on how to use the lock mode refer to page 12 Frequency bank Channels Type 1 to 20 up to 24 per frequency bank System bank frequencies are factory prese...

Page 19: ...or the current channel 왘 Set the desired frequency Selecting a channel and assigning this channel a frequency 왘 Set the desired frequency bank and the desired channel 왘 Set the desired frequency 왘 Press the rocker button until the Tune menu item appears 왘 Press the SET button The frequency selection appears 왘 Press the SET button Your settings are stored You are back to the operating menu 왘 Press ...

Page 20: ...1 again The RF signal is reactivated Push To Mute RMS 1 external mute switch The audio signal is muted as long as you press the MIC button of the RMS 1 Push To Talk RMS 1 external mute switch The audio signal is activated as long as you press the MIC button of the RMS 1 Disabled MUTE switch or RMS 1 external mute switch optional accessory If you select Push To Talk the bodypack transmitter will be...

Page 21: ...ng the factory preset default settings Reset When resetting the bodypack transmitter only the selected settings for the pilot tone and for the frequency banks U1 to U6 remain unchanged Displaying the software revision Software Revision You can display the current software revision of the bodypack transmitter 왘 For information on software updates visit the SK 300 G3 product page at www sennheiser c...

Page 22: ...odypack transmitter manually 왘 Make sure that you set the bodypack transmitter to the same frequency bank and the same channel as the receiver see page 17 If you still cannot establish a transmission link refer to the chapter If a problem occurs on page 23 Synchronizing bodypack transmitters with receivers multi channel operation Combined with ew 300 G3 receivers ew 300 G3 bodypack transmitters ca...

Page 23: ...r to the same channel as the receiver Synchronize the body pack transmitter with the receiver Bodypack transmitter is out of range Check the squelch threshold setting on the receiver Reduce the distance between bodypack trans mitter and receiving antenna RF signal is deactivated RF Mute Activate the RF signal see page 12 RF signal avail able no audio signal MUTE appears on the display panel Bodypa...

Page 24: ...aracteristics Compander system Sennheiser HDX AF frequency response microphone 80 18 000 Hz line 25 18 000 Hz Signal to noise ratio 1 mV peak deviation t 115 dBA THD d 0 9 Max input voltage 3 Vrms Input impedance 40 k unbalanced 1 M Adjustment range of input sensitivity 60 dB adjustable in 3 dB steps Overall device Temperature range 10 C to 55 C Power supply 2 AA size batteries 1 5 V or BA 2015 ac...

Page 25: ...B SPL 150 dB SPL 120 dB SPL Mic Line Polar diagram ME 3 Polar diagram ME 4 Frequency response curve ME 2 Frequency response curve ME 3 Mic Line 0 5 10 15 20 25 dB 30 30 60 60 90 90 120 150 120 150 0 180 125 Hz 250 Hz 500 Hz 1000 Hz 2000 Hz 4000 Hz 8000 Hz 16000 Hz 0 5 10 15 20 25 dB 30 30 60 60 90 90 120 150 120 150 0 180 125 Hz 250 Hz 500 Hz 1000 Hz 2000 Hz 4000 Hz 8000 Hz 16000 Hz Hz 100 1 000 1...

Page 26: ...ive 2006 66 EU The supplied batteries or rechargeable batteries of the body pack transmitter can be recycled Please dispose of them as special waste or return them to your specialist dealer In order to protect the environment only dispose of exhausted batteries CE Declaration of Conformity R TTE Directive 1999 5 EU EMC Directive 2004 108 EU Low Voltage Directive 2006 95 EU The declarations are ava...

Page 27: ...ons However there is no guarantee that interference will not occur in a partic ular installation If this equipment does cause harmful interference to radio or television reception which can be determined by turning the equipment off and on the user is encouraged to try to correct the inter ference by one or more of the following measures Reorient or relocate the receiving antenna Increase the sepa...

Reviews: