

VIDEo MAnAGEMEnT SoFTwARE InSTALLATIon
wARnInG:
Time between installation screens may take up to five (5) minutes for OS and VMS.
Many VMS’s default to Drive C: during setup as the receptacle for video storage.
It is strongly suggested to use drive letters D: and higher to contain video data.
1. After initial startup and configuration, the system is ready to install the Video Management Software (VMS).
•
Select the VMS Installer Icon on the OS desktop
2. Once the VMS Installer is open install the necessary prerequisites, which are listed on the Seneca VMS Installer window
3. Select the VMS followed by the VMS Server or Client application. (This process will take several minutes to load).
•
If the VMS is unlisted, go to the manufacturer’s website for installation reference
4. Test to verify the VMS application is working
5.
oPTIonAL:
Select the Uninstall Seneca VMS Installer to reclaim the space on the OS drive (NOTE: This will not remove the VMS installed, ONLY the installer).
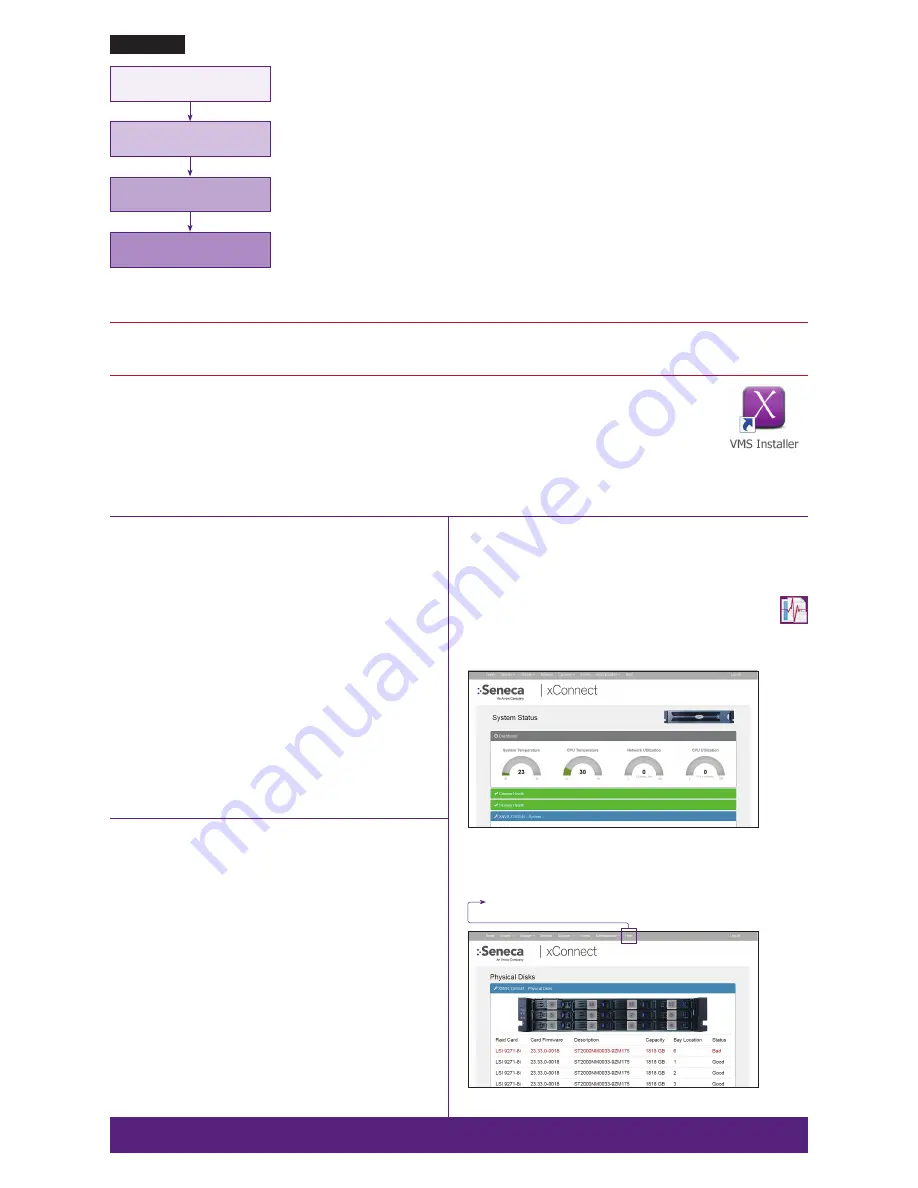
XconnEcT SoFTwARE oVERVIEw
xConnect is a software package that gives health status on the system (including
cameras), pushes out notifications to the xConnect Monitor, and can send email
alerts once properly configured.
1. Click on this icon to access the xConnect Management Software
2.
Default Log In Information
Username: admin@xconnect
Password: P@ssw0rd
The xConnect Monitor is a desktop application that can run anywhere on the local
network. It shows the health status of the four key areas of the xConnect Management
Software. Please go to
support.senecadata.com
to download the software from
the module on the landing page.
Additional Help
A full user guide is available within the xConnect Software under the “Help” tab
SERVER InSTALLATIon
1. Before starting the xVault xNVR400 server the following must be done: Mount and cable hardware. This includes any storage
used external to the xNVR appliance.
2. Review xNVR Guide to understand factory default settings. The user guide is available at:
http://products.senecadata.com/PDF/xNVR-manual-V2.pdf
3. Map and record any changes to be made to factory default settings.
•
(i.e. username, password, IP adress, iSCSI address, etc)
4. Connect a keyboard, mouse, and monitor to the server.
5. Referencing manual or Microsoft documentation, make desired additions and changes.
Inability to access appliance or settings could require complete oS and data installation. ALwAYS document
configuration changes.
Hardware mounting, Ac cabling, signal
cable connection
xManage server configuration
when required
client station and
viewing configuration
Remote management, switch, camera
and viewing LAn configuration
IP cAMERA PRE-InSTALLATIon PREPARATIon
1. Select IP camera address range and camera group settings
2. Have advanced network and switch configuration requirements on hand (i.e.
port segregation supporting IP SAN traffic, multi-switch settings, POE set-
tings, etc.)
3. Be aware of special operating system requirements such as the following:
•
Drive letter designation for camera video stream storage (DO NOT USE
DRIVE C)—we are partial to X.
•
IP address selection for different NIC ports, management port and
connections, RAID
IP cAMERA InSTALLATIon
1. Connect camera switch 1GbE ports to Port 0
2. Connect and document camera to switch and switch port number
3. Using the camera manufacturer’s or VMS software, configure the IP address
for the cameras
XVAULT XnVR SUPPoRT
Seneca customer care group stands ready to assist with any hardware and oper-
ating system assistance.
contact Seneca Digital Security and Surveillance Support:
Normal Business Hours
Outside Business Hours
800.227.3432 option 5
888.227.9994
Available Monday–Friday 8am–6pm EST
Download the complete user manual at
http://products.senecadata.com/PDF/xnVR-manual-V2.pdf
noTE:
All Video Management Software (VMS) and IP Camera support questions
should be directed to the VMS and Camera manufacturers.
First level of data protection and integrity begins
with Ac power protection.
Please consult your Seneca Account Manager for
properly sized, uninterruptable power supply (UPS).
noTE: Please reference manual for more detailed configuration information.
wARnInG:
Power on self test takes several minutes until boots process.
congratulations you have successfully completed your xVault installation. we want to hear from you!
complete a brief three (3) question survey and receive a $5.00 Amazon gift card. Visit http://info.senecadata.com/xvaultinstallation
xConnect


