Sencore OmniHub-PLAY User Manual Download Page 10

– User Manual

Page

10

of

70

3. Ethernet port (ETH0 to ETH5): used for management or data traffic,

depending on the settings
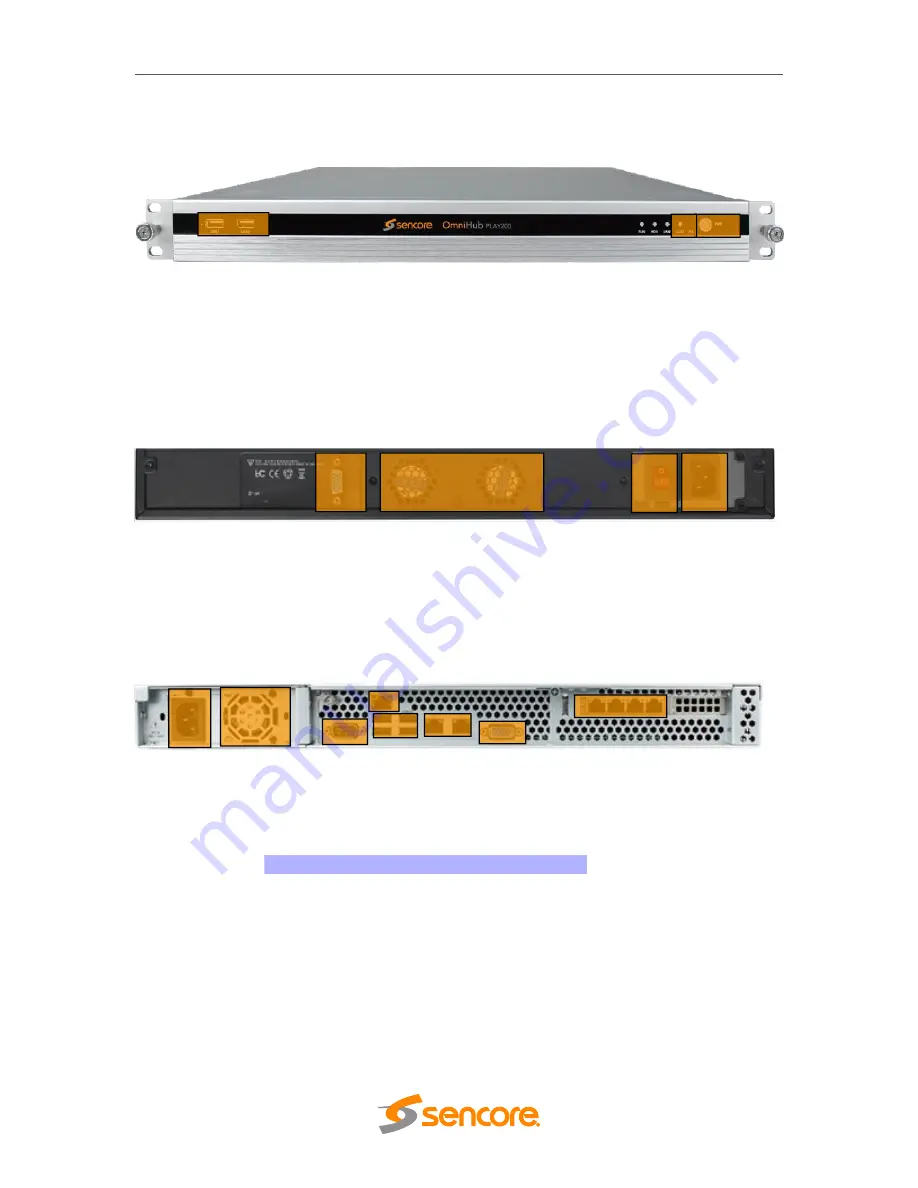
OmniHub-PLAY200

1. USB interface*2

2. Reset to Factory Default button

3. Power switch button

1.3 Rear Panel Overview

OmniHub-PLAY100

1. VGA interface

2. Fan for ventilation

3. Power switch button

4. Power input interface: AC100~240V, 50/60Hz

OmniHub-PLAY200

1. Power input interface: AC100~240V, 50/60Hz

2. Fan for ventilation

3. VGA interface for monitor display

4. PMIT remotely connect to the server BIOS system

5. USB interface

6. VGA interface for monitor display

7. Ethernet port for management and data traffic

1

3

2

1

2

3

4

1

2

3

4

5

6

7

7

Summary of Contents for OmniHub-PLAY

Page 1: ...January 2022 www sencore com 1 605 978 4600 Revision 1 OmniHub PLAY User Manual...

Page 2: ...d be made directly to those companies This document may also have links to third party web pages that are beyond the control of Sencore The presence of such links does not imply that Sencore endorses...

Page 3: ...ay cause damage to Our product NOTE The NOTE symbol calls your attention to important information TIP The TIP symbol calls your attention to additional information that if followed can make procedures...

Page 4: ...ts have fallen into the apparatus the apparatus has been exposed to rain or moisture does not operate normally or has been dropped Do not expose this apparatus to dripping or splashing and ensure that...

Page 5: ...peration email ProCare Sencore com WARNING To reduce the risk of fire or electrical shock never allow your equipment to be exposed to water rain or high moisture environments If it is exposed to a liq...

Page 6: ...ntents The following is a list of the items that are included 1 OmniHub PLAYchassis 2 OmniHub PLAY software 3 AC power cables If any of these items were omitted from the packaging please email ProCare...

Page 7: ...OmniHub PLAY Web Interface 13 3 2 DEVICE STATUS OVERVIEW 14 3 3 QUICK START 16 3 4 CHANNELS 18 3 4 1 Channel List 18 3 4 2 Channel Grouping 21 3 4 3 Local Channels 22 3 4 4 EPG 23 3 5 VOD 26 3 5 1 Loc...

Page 8: ...un Log 59 3 10 SYSTEM SETTING 60 3 10 1 Network 60 3 10 2 System 62 3 10 3 DHCP 62 3 10 4 Time 63 3 10 5 License 63 3 11 TOOLS 64 SECTION 4 APPENDICES 66 APPENDIX A FREQUENTLY ASK QUESTION 66 APPENDIX...

Page 9: ...eas where the streaming of live or VOD content is required via IP Network OmniHub Play have 2 hardware models OmniHub Play100 and OmniHub Play200 The main difference between these 2 models is the plac...

Page 10: ...verview OmniHub PLAY100 1 VGA interface 2 Fan for ventilation 3 Power switch button 4 Power input interface AC100 240V 50 60Hz OmniHub PLAY200 1 Power input interface AC100 240V 50 60Hz 2 Fan for vent...

Page 11: ...r the OmniHub PLAY Make sure that the air intake on the front of the unit and the exhausts on the back of the unit will not be blocked Install the brackets at desired position if there is no supportin...

Page 12: ...or remove the grounding pin This could cause damage to OmniHub PLAY personnel or property Plug the female end of the power cords into the front of the unit Locate a protected outlet to plug into the m...

Page 13: ...owing supported browsers and navigate to the unit s IP address Firefox Google Chrome OmniHub PLAY has six 6 Ethernet ports where you can log in and access the management interface Factory network sett...

Page 14: ...k status Channels status System status will display the real time status of CPU Memory and Hard Disk usage of the device aiming to avoid system crash caused by excessive resource usage Terminal status...

Page 15: ...tput this shows the settings of the Ethernet port being used for input or output Model this shows the settings of the Ethernet port as DHCP or Static Up Bytes this shows the real time traffic of the o...

Page 16: ...us Network Network shows the Status IP Address MAC Address and the setting on each Ethernet port You can change the IP address depending on your Network setup You can also bond input output bond the E...

Page 17: ...70 Time This allows you to manually input the time or sync via NTP Address Channel This menu allows you to input the source IP address and output the service via UDP RTP or HTTP See CHANNELS menu for...

Page 18: ...You can modify the name of the input service on this field Select the ETH port where the source is connected For the Source port there will be a drop down arrow with which you can select the ETH port...

Page 19: ...P address of input and output UDP XXX XXX XXX XXX XXXX RTP XXX XXX XXX XXX XXXX RTSP XXX XXX XXX XXX live 00XX index smil HTTP XXX XXX XXX XXX live 00XX index m3u8 You can also click if you need to ad...

Page 20: ...ed number of terminals with OmniHub PLAY100 and 150 services to unlimited number of terminals with OmniHub PLAY200 To do this you need to check the box Take note that the protocol IP address and IP po...

Page 21: ...ize categories and programs to help viewers to quickly search the programs they want To create a channel group go to Channels and click Channel Grouping Click under Group List to add new a category Yo...

Page 22: ...s of hotels The hotel can prepare a video on hard disk or u disk This video will be included in the Local channel menu on the APP Clicking the will add a new channel To select the local video click an...

Page 23: ...f 70 Select the video from the hard disk or USB then click ok Follow the steps on Channel List submenu on page 18 to output a local channel 3 4 4 EPG OmniHub PLAY also supports EPG and it can be confi...

Page 24: ...h program to associate it click OK Clicking will download a template in xml file from which you can edit and assign to a program by clicking import select the file and click OK You can edit manually t...

Page 25: ...User Manual Page 25 of 70 The EPG that is set on a particular program will appear now on the TV Display You can also add an EPG via FTP by clicking...

Page 26: ...he Server capacity to store VOD are limited To upload a video to the Unit go to VOD Local VOD and click Look for the video you want to upload and enable it so that the terminal can view the service Af...

Page 27: ...The Status will be changed to Online after this You can also click on under Preview to watch the video uploaded for VOD After the video is uploaded you can now polish the video by adding some details...

Page 28: ...with the same information you can select for easier configuration Since the storage of the Server itself is not large you can set the Storage Setting to upload more Local VOD Click on the Storage Set...

Page 29: ...know the newest and trending movie released 3 5 3 VOD Grouping Category is for creating video categories based on their genre Same with the Live Channel Category you can create a category like Action...

Page 30: ...deo to be included in the selected category This can help your guests to easily search for a video they want to watch This also allows you to manage the Services based on their categories 3 5 4 3rd pa...

Page 31: ...will appear Input the parameters and upload the APK file then select a logo for that app then click OK These applications will automatically be added to the STB TV display and will now be accessible t...

Page 32: ...and insert any live channels to ALL or ANY terminal on LIVE interface or ALL interface This is usually used when there is an emergency that the Hotel wants their guests to view the emergency video To...

Page 33: ...s can also be used for events and other stuffs You can disable enable the configuration anytime and avoid configuring the parameters again 3 6 2 Text Overlay Text Overlay is for displaying TEXT messag...

Page 34: ...screen There are no options for the font style and size and displaying speed of the subtitle Make sure the message is short and clear for viewers to read Following the same steps of with Video Inserti...

Page 35: ...f adding pictures to the video are almost same with those of Video and Subtitle Insertion Select the picture you want to display select the Broadcast Type as Immediately or Scheduled and select the as...

Page 36: ...t Theme 3 7 1 APK Layout This page displays the APP interface This shows pages in APP and the posters displaying on them For example for the Welcome Background it will show its two posters in the APP...

Page 37: ...the menu of the APP on this page 3 7 2 APK Background Here you can change or set a picture as the background on a certain page of the IPTV APP You can upload a picture for the following pages Home Bac...

Page 38: ...User Manual Page 38 of 70 3 7 3 APK Management This menu shows APK details as reference for Android STB unit...

Page 39: ...User Manual Page 39 of 70 Here are the details about APK Settings Selects which option do you want to apply regarding on Upgrade Startup Exit Start Interface Live Default and Player Settings...

Page 40: ...ls as reference for TV units requiring WGT file for installation 3 7 5 APK Layout Theme APK Layout Theme provides different user interfaces for the STB Here are three 3 unique UI styles Simply select...

Page 41: ...ures can be seen in the following submenu User Authorization Packages Region Discount Statistics Access Control Advanced Settings 3 8 1 User This is where you can find the list of users or subscribers...

Page 42: ...User Manual Page 42 of 70 By clicking you will be able to view the transactions of a particular user Click the to view the payment history of a user...

Page 43: ...y the details for each user Click to apply a credit amount and a note for a particular user 3 8 2 Authorization This menu shows the current status of each terminal connected to the network The Online...

Page 44: ...als by searching a particular None User name Account or MAC Address Click to add an account A window will pop up upon selecting the field for Authorize User The list of users will appear in the bottom...

Page 45: ...User Manual Page 45 of 70 Once a user is selected click OK...

Page 46: ...e details for each account Click to modify or reset the password for an account 3 8 3 Packages You can make packages of programs in this menu which is composed of the channel groups that is configured...

Page 47: ...of 70 Click to make a new package You can choose between Live and VOD package Select which one you want to make Select the channel group s or VODs that you want to include in the package Click OK whe...

Page 48: ...de to which the user can be assigned to This will be helpful to group and to easily filter out the users The default master region is the headquarters Move the mouse to the region to add or edit a sub...

Page 49: ...User Manual Page 49 of 70 The sub regions that is added will be under the headquarters Repeat the same procedure to the sub region to make smaller regions under it...

Page 50: ...n this submenu Click and fill up the fields for the name discount and description and click OK to add a discount package Click to modify each discount package 3 8 6 Statistics This submenu under the U...

Page 51: ...on 3 8 3 The quantity shows how many terminals are currently subscribed to that particular package The displayed packages can be filtered out by selecting the zone name and or time interval in the se...

Page 52: ...to manage and authorize all the users under that particular region Click to modify each account and the to modify the password of an account An account can be enabled or disabled by clicking A disable...

Page 53: ...gle server To expand it several servers will be needed to be clustered Such servers are Equilibrium Load Balancing BL Server Cache Server the Main Server itself and Backup Servers and Storage when nee...

Page 54: ...ter Status This submenu shows the communication status of each server A green indicator under the status means that the connection is established The CPU RAM and Disk utilization is also displayed tog...

Page 55: ...net number with assigned IP address is shown here as defined in 3 9 1 Node Settings Each server node has designated ethernet port for communication with other nodes Please refer to 3 10 1 Network for...

Page 56: ...User Manual Page 56 of 70 Cache Server Load Balancing BL Server...

Page 57: ...the servers nodes The ethernet number with assigned IP address for the input and output of each server is shown here Please refer to 3 10 1 Network for configuration of ethernet ports Following are th...

Page 58: ...User Manual Page 58 of 70 Cache Server Load Balancing BL Server...

Page 59: ...define the node number and communication port as can be seen in the communication topology in previous section 3 9 1 Cluster Topology 3 9 1 Run Log This submenu shows the logs on the different nodes...

Page 60: ...CP Time License 3 10 1 Network Network tab allows you to check parameters of each Ethernet port This will display the status IP address MAC address input output mode and static DHCP of each port It al...

Page 61: ...User Manual Page 61 of 70 On this page you can also reboot a certain port by clicking on its Restart button You can also bond ports by clicking...

Page 62: ...nfiguration and logs setting the unit to factory default and rebooting the hardware and resetting the cluster node See the picture for reference 3 10 3 DHCP DHCP lets you automatically assigns an IP a...

Page 63: ...n the unit You can change the time manually or by using an NTP Server 3 10 5 License This will display the status of the OmniHub PLAY as ACTIVATED or EXPIRED If the unit is used as a demo and you need...

Page 64: ...g issues Easy Capture is for recording or capturing streams in the system You can select the Ethernet port ETH0 ETH1 ETH2 ETH3 ETH4 ETH5 IP address time for how long the capture will be and protocol A...

Page 65: ...can click on Enable Bridge then select ports you want to Bridge When the ports are in Bridge mode they should not be connected to the same switch Click OK to apply the configuration Remote Desktop is...

Page 66: ...sn t work No power on Ensure the power cord is connected properly and the power switch is turned on Network management interface cannot be accessed IP settings are wrong Ensure the IP address of the P...

Page 67: ...2 Set APP receiving address the same as IP address of the output ETH port Can t get remote account Network connection or setting error Internet accessible unoccupied addresses and DNS must be filled...

Page 68: ...n 1 Returning for Service or Calibration The OmniHub PLAY is a delicate piece of equipment and needs to be serviced and repaired by Sencore Periodically it is necessary to return a product for repair...

Page 69: ...nce an RMA number has been issued the unit needs to be packaged and shipped back to Sencore It s best to use the original box and packaging for the product but if this not available check with the cus...

Page 70: ......

Reviews: