5
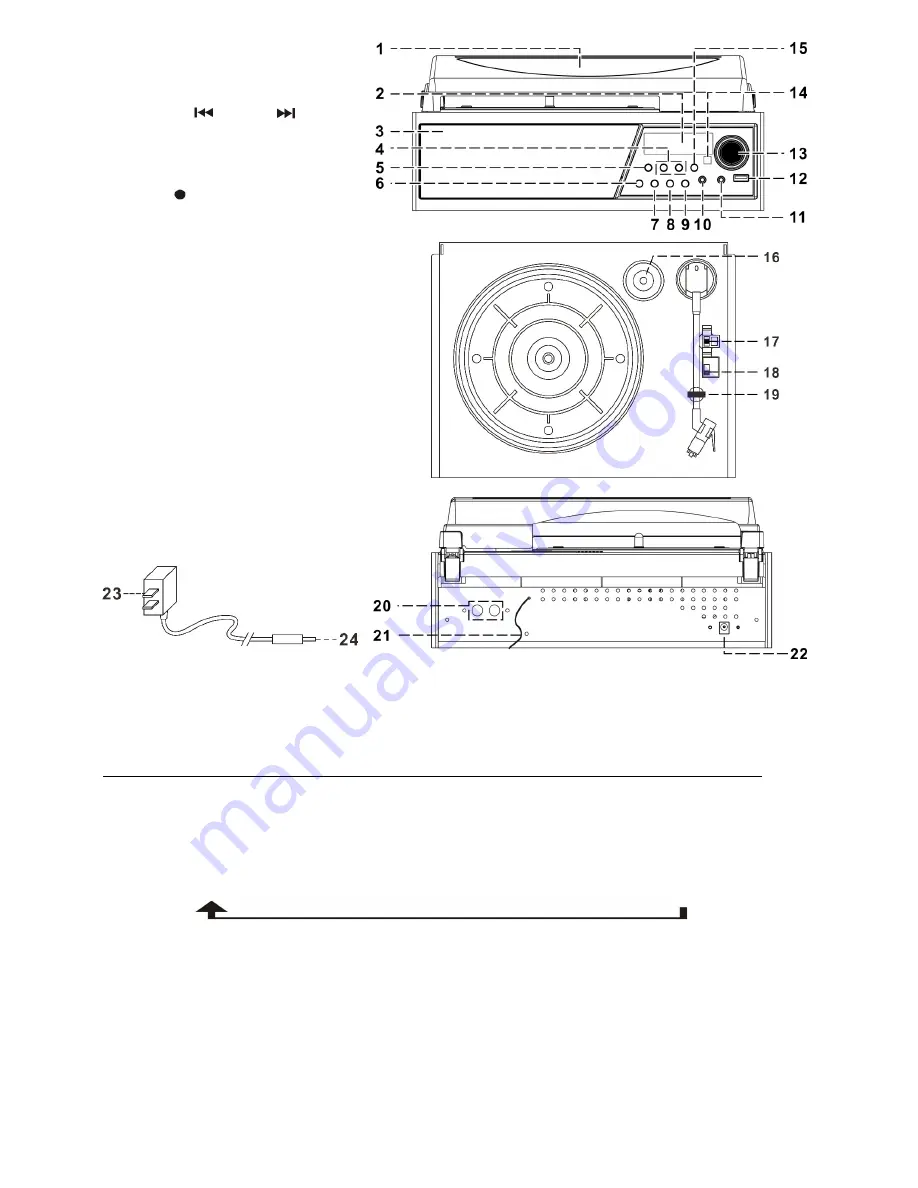
Location of controls
1) Dust
cover
2) LED
display
3) Speakers
4) Skip down
/ Skip up
button
5) Play
mode
6) On-Off / Function button
7) Memory
button
8) TS (Track Separation) button
9) Record button
10) 3.5 mm headphone jack
11) 3.5mm aux-in jack
12) USB socket
13) Volume knob
14) Remote sensor
15) Play/Pause/Stop button
16) Spindle adaptor
17) Turntable speed selector
18) Auto stop switch
19) Tone arm rest
20) Line out socket
21) FM Antenna
22) DC in jack
23) AC adaptor
24) DC plug
Caution:
Usage of controls or adjustments or performance of procedures other than those specified herein may result in
hazardous radiation exposure.
This unit should not be adjusted or repaired by anyone except qualified service personnel.
Connection
1. Connect DC plug (24) of the AC/DC adaptor (23) to the DC in jack (22).
2. Then connect the AC/DC adaptor (23) to the AC outlet.
3. Press the On-Off/Function button (6.), the LED display (2.) will show “ Lod ”, then change to “ bLUE”. It means
the power supply is normal. Now your system is ready to operate.
4. The Function modes are switch from:
bLUE (Bluetooth)
USB (only if the USB drive is being connected)
FM radio
PH (Phono)/Aux
* Before the LED display changes to the name of the mode, it will show “Lod” for a while. So, wait for a while
for the function mode.
* If no USB drive is being connected before switching the function mode, the unit will skip the USB mode and
switch from Bluetooth mode to FM mode directly.
* The Phono mode and the AUX-in mode are sharing the same function mode and once the Aux-in jack (11.)
is plugged in, it will automatically switched to Aux-in mode from Phono mode.
5. To switch off the unit, press and hold the on/off button (6.) for 2-3 second and the LED display will turn off
meaning the unit is switch off.


