background image

3

960-Hour Time Lapse Video Cassette Recorder

6

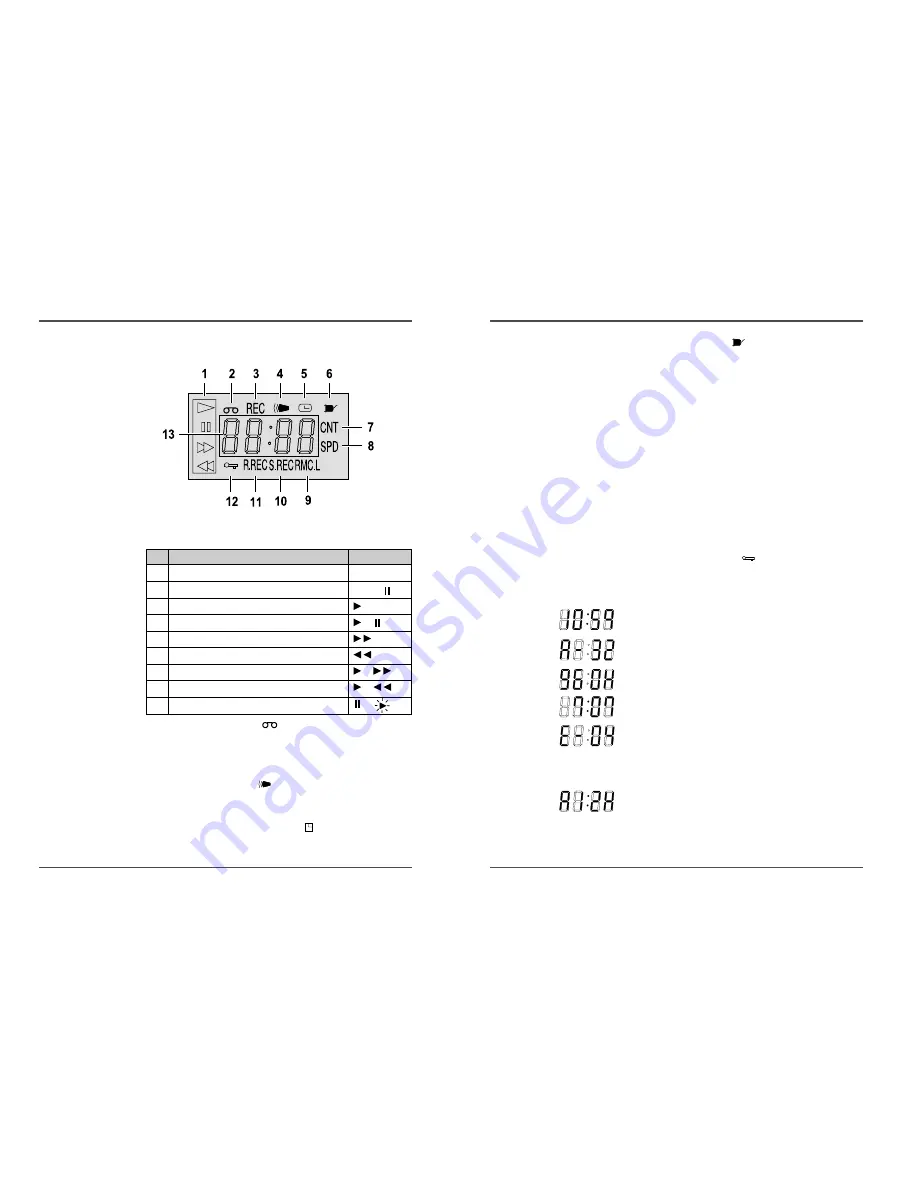
Power Loss indicator : 

Flashes on after power loss.

7

CNT indicator : CNT

Comes on when the tape or alarm counter is on.

8

SPD indicator :  SPD

Comes on when the play or recording speed is on.

9

RMC.L indicator  :  RMC.L

Comes on when the RMC LOCK sw is set to the “ON”
position.

10 S.REC indicator : S.REC

Comes on when “YES” is selected in the menu for the
series recording.

11 R.REC indicator  :  R.REC

Comes on when “YES” is selected in the menu for the
repeat recording.

12 SET LOCK SW indicator : 

Comes on when the SET LOCK sw is set to the “ON”
position.

13 Mode display

• TAPE COUNTER display (ex:10:HOUR,59:MINUTE)

- Maximum Hour : 19  - Maximum Minute : 59 

• ALARM COUNTER display (ex: A:Alarm , 32:Alarm No.)

• PLAY/REC SPEED display (ex: 960H:Play/Recording

Speed)

• TIME display (ex: 7:HOUR , 07:MINUTE)

• ERROR display (ex: E:Error , 04:Error No.)

- E-01 : The cassette cannot be loaded or unloaded.
- E-02 : The tape stops.
- E-03 : The drum can not rotate properly.
- E-04 : The tape is cut/broken.

• AUDIO ON display (ex: A:Audio , 12H:Play Speed)

2

960-Hour Time Lapse Video Cassette Recorder

Digital Display

1

Operation Indicators

They display the actual operation mode.

2

Cassette indicator :

Comes on when a cassette is loaded.

3

Record check indicator :  REC

Flashes on during record check

4

Alarm indicator :  

Flashes on when an alarm is being recorded and stops
flashing after alarm recording.

5

Timer Recording indicator :

Comes on when in timer recording stand-by mode, or
during a timer recording.

Operation Mode

Indicator

1 Record(REC)

REC

2 Record pause (REC PAUSE)

REC + 

3 Playback (PLAY)
4 Still image (STILL)

+

5 Fast forward (FF)
6 Rewind (REW)
7 CUE(CUE)

+

8 Review(REVIEW)

+

9 Slow(Pause Still + FF, Pause Still + REW)

+

Summary of Contents for SL800

Page 1: ...corder User s Guide SL800 Be sure to read carefully and follow all the SAFETY INFORMATION on pages i ii iii Keep the manual in a safe place for future reference 15540 Herriman Blvd Noblesville IN 46060 1 800 774 0284 www spycorder com ...

Page 2: ...onsibility too This sheet lists important information that will help to assure your enjoyment and proper use of the video product and accessory equipment Please read them carefully before operating and using your video product Installation 1 Read and Follow Instructions All the safety and operating instructions should be read before the video product is operated Follow all operating instructions 2...

Page 3: ... video dealer or local power company For video products intended to operate from battery power or other sources refer to the operating instructions 6 Overloading Do not overload wall outlets of extension cords as this can result in a risk of fire or electric shock Overloaded AC outlets extension cords frayed power cords damaged or cracked wire insulation and broken plugs are dangerous They may res...

Page 4: ...ay 2 Back panel 4 Remote control 5 Connections 6 Video Cassettes Tapes 7 Types of on screen displays and Display Sequence 8 Setting the Clock 10 Changing the on screen display 12 Normal Recording 14 Program Timer Recording 15 Alarm Recording 19 Panic Recording 22 Series Recording 22 Autorepeat Recording 24 Normal Playback 25 Normal Playback 25 Tracking Control 25 Audio Playback 25 Special Playback...

Page 5: ...display ex 960H Play Recording Speed TIME display ex 7 HOUR 07 MINUTE ERROR display ex E Error 04 Error No E 01 The cassette cannot be loaded or unloaded E 02 The tape stops E 03 The drum can not rotate properly E 04 The tape is cut broken AUDIO ON display ex A Audio 12H Play Speed 2 960 Hour Time Lapse Video Cassette Recorder Digital Display 1 Operation Indicators They display the actual operatio...

Page 6: ...tton 16 COUNTER button 17 CLEAR button 18 PAUSE STILL button 19 REW button 20 AUDIO ON button 21 REC button 22 REC PLAY SPEED button 23 REC CHECK button 24 MENU button 4 960 Hour Time Lapse Video Cassette Recorder Back Panel 1 AC POWER CORD 2 WARNING OUT terminal 3 SERIES IN terminal 4 COM terminal 5 SERIES OUT terminal 6 SW OUT terminal 7 VIDEO OUT jack 8 VIDEO IN jack 9 AUDIO IN jack 10 TAPE END...

Page 7: ...ad screwdriver to break off the erasure prevention tab on the cassette To record again on a tape without erasure prevention tab cover the hole with adhesive tape Erasure prevention tab To prevent accidental erasure remove the tab after recording To record again cover the hole with vinyl tape Loading Place the cassette label side up in the loading slot Gently push the center of the cassette until i...

Page 8: ...times the setting procedure is now completed and the normal screen is displayed During recording or playback the menus cannot be displayed A Press the MENU button First time Press the SHIFT button to move the arrow mark downward for the desired item Press the SHIFT button to select the desired item then the desired menu is displayed Press the MENU button to return to the normal screen from the ini...

Page 9: ... the week is set automatically 12 Press the MENU button three times the normal screen is displayed The setting procedure is now complete 10 960 Hour Time Lapse Video Cassette Recorder Setting the Clock Example To set the clock to April 12 2001 at 9 30 Clock Setting 1 Turn the power on to all devices used 2 Press the MENU button the initial MENU is displayed The arrow mark is located in VCR Mode Se...

Page 10: ...t the position of 2 items is changed identically L Top C Top R Top Left Top Center Top Right Top L Bottom R Bottom Left Bottom Right Bottom 10 Press the MENU button three times the normal screen is displayed The setting procedure is now complete The items for which YES is set are recorded The items for which NO is set at step 6 above are not recorded 12 960 Hour Time Lapse Video Cassette Recorder ...

Page 11: ...y panel If you don t want to record the recording speed counter title time date etc press the DISPLAY button then start recording 4 Press the REC button The REC indicator is displayed on the display panel and recording starts 5 To stop recording press the STOP button Recording Speed If the Repeat Rec Set is set to NO in the REC MODE SET menu recording will continue to the end of the tape then stop...

Page 12: ...nutes eg 00 then press the SHIFT button 10 Press the SET or button to select the recording speed eg 24 then press the SHIFT button The cursor is moved to the N Y position 11 Press the SET or button to select Y Y recording will take place N recording will not take place Programmed timer recording Example 1 Repeat steps 4 to 13 to program timer recordings for other days of the week To set two or mor...

Page 13: ...ng alarm recording if the power is restored within the recording set duration alarm recording will continue 18 960 Hour Time Lapse Video Cassette Recorder To Cancel a Program Timer Recording 1 Repeat step 1 above 2 Press the SHIFT or button until the cursor is located in the Y corresponding to the timer recording to cancel 3 Press the SET or button to select N 4 Press the MENU button three times u...

Page 14: ...e is alarm trigger input Alarm Recording Counter Display During alarm recording will be flashing on the display panel The maximum display number of alarm triggers is 35 at the next alarm recording the counter will indicate 00 Connecting to a Monitor for Normal Recording Alarm Counter Reset can be performed by pressing the CLEAR key in Alarm Time of Initial Menu screen Connecting to a Monitor for A...

Page 15: ... the series recording function lets you switch recording from one unit to the next only with VCRs of the same model as this one Series Recording Setup 1 Connect 2 VCRs or more as illustrated below 2 Set the following items as indicated Panic Recording This feature is similar to an alarm recording but the recording time is not pre selected When there is a panic input at the PANIC IN Terminal record...

Page 16: ...ed to the left of the playback speed on the display panel Press the AUDIO ON button again to remove A A slow motion effect or accelerated playback effect can be achieved by using a slower or faster playback speed than the speed used for recording Noise will appear in the image when audio playback is used in 12 24 hour mode 24 960 Hour Time Lapse Video Cassette Recorder Autorepeat Recording Autorep...

Page 17: ...With each press of the PAUSE STILL button the still image is advanced one image frame Vertical Lock Control During still image mode 1 Press the TRACKING button to reduce the vertical rolling of the image 2 If it cannot be corrected press the TRACKING button Slow 1 With each press of the FF button during still image mode the slow speed will change as indicated below 1 15times 1 20times 1 30times fo...

Page 18: ...mode each second of the tape counter actually represents approximately 24 2 12 real seconds There may be a slight discrepancy between the position shown on the tape counter and the actual tape position When rewinding the tape past the 0H 00M 00S position 0H 00M on the display panel a minus displayed 28 960 Hour Time Lapse Video Cassette Recorder Alarm Scan 1 Repeat steps 1 to 3 2 Press the SHIFT b...

Page 19: ...ng the Security Lock Set Lock The security lock function is designed to prevent accidental stopping of recording if the STOP button is pressed inadvertently 1 Set the SET LOCK switch to ON position is displayed on the display panel 2 To cancel the security lock set the SET LOCK switch to OFF position will be erased from the display panel Setting the SW Out Terminal Output Synchronization pulses fo...

Page 20: ... Running Time data cannot be reset even though the reset button is pressed If the RESET button is pressed all data can be reset except the running time data Checking the Alarm Recording Times 1 Press the MENU button to display the initial MENU 2 Press the SHIFT button to move the arrow mark to Alarm Time 3 Press the SHIFT button to display the ALARM TIME menu The number of alarm triggers and the 3...

Page 21: ...s terminal is to connect PIR sensors door contacts or any type of motion detector 1 N C Normally CLOSED Switch Circuit If the input becomes DC 5V for 500 msec or more the VCR starts alarm recording 2 N O Normally OPEN Switch Circuit If the input becomes 0V for 500 msec or more the VCR starts alarm recording ALARM OUTPUT Terminal This terminal is to connect to A V external device such as a triggger...

Page 22: ...apse Video Cassette Recorder Connecting to a Multiview System for Alarm Recording If you are also using a Multi View system use the following diagrams as a guide to connecting the VCR for normal or alarm recording Connecting to a Multiview System for Normal Recording ...

Page 23: ...n Press the POWER Timer button Wait for the alarm recording to end Press the STOP button for 3 seconds to stop Wait for the panic recording to end Press the STOP button for 3 seconds to stop Cancel the security lock Load a cassette tape with erasure prevention tab or cover the tab hole with adhesive tape Be sure to select YES for autorepeat recording Set YES again for autorepeat recording Daily In...

Page 24: ...it are subject to change without notice SYMPTOM POSSIBLE CAUSE CORRECTIVE ACTION Timer recording Alarm recording Noise in the playback picture The date and time are not recorded Thecassettetape cannotbeejected The date and time are not correct The unit is not set to timer recording stand by mode N is selected for the TIMER PROGRAM SET NO is selected for alarm recording in the ALARM REC SET menu Th...

Page 25: ...h have been repaired or altered outside of our factory nor to cases where the serial number thereof has been removed defaced or changed This warranty is in lieu of all warranties expressed or implied and no representative or person is authorized to assume for us any other liability in connection with the sale of our electronic products SECURITY LABS INC DOES NOT ASSUME LIABILITY FOR ANY VIOLATION ...

Reviews: