background image

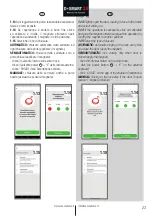
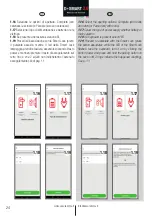
1.13 

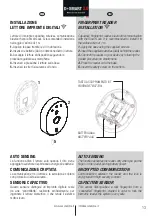
Apri leggermente la porta, lasciandola accostata al 

telaio e premi imposta.

1.14 

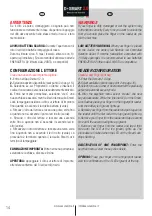
Se l’operazione è andata a buon fine clicca 

su calibrato e incolla il magnete altrimenti ripeti 
l’operazione spostando il magnete in altra posizione.

1.15 

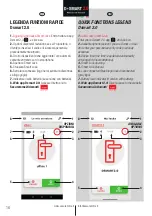
Seleziona il tipo di chiusura:

AUTOMATICO:

 chiusura automatica della serratura ad 

ogni chiusura della porta (applicare il magnete).

SEMIAUTOMATICO:

 chiusura della serratura solo a 

porta chiusa (applicare il magnete):
- clicca il pulsante interno sulla smart lock;
- clicca il pulsante power       + “E” della tastiera esterna;
- clicca “CHIUDI” dallo Smartphone abilitato.

MANUALE:

 chiusura della serratura anche a porta 

aperta (esclusione sensore/magnete).

www.securemme.it

[email protected]

23

2.0

1.14

1.15

1.13

IT

EN

1.13

 Slightly open the door, leaving it close to the frame 

and select setting up.

1.14

 If the operation is successful, click on calibrated 

and glue the magnet; otherwise repeat the operation by 
moving the magnet to another position.

1.15

 Select the type of closure:

AUTOMATIC:

 automatic closing of the lock every time 

you close the door (apply the magnet).

SEMIAUTOMATIC:

 lock closing only when door is 

closed (apply the magnet):
- click the internal button on the smart lock;
- click the power button     + “E” on the external 
keyboard;
- click “CLOSE” on the app of the enabled Smartphone.

MANUAL:

 closing of the lock also if the door is open 

(sensor / magnet excluded).

1.14

1.15

1.13

Summary of Contents for DSMART 2.0

Page 1: ...2 0 DIMENTICA LE CHIAVI APRIRE D SMART 2 0 Patented www securemme it FORGET THE KEYS OPEN WITH D SMART ISTRUZIONI INSTRUCTIONS...

Page 2: ...13 Installazione Smart Bridge Smart Bridge installation 15 Legenda funzioni rapide Dsmart 2 0 Dsmart 2 0 functions legend 16 Opzioni disponibili crea una nuova chiave Available options create a new ke...

Page 3: ...li esaurite gratuitamente presso un centro di smaltimento autorizzato nella propria zona In questo modo si rispettano le disposizioni legali e si contribuisce alla tutela dell ambiente www securemme i...

Page 4: ...o solo nella versione elettrica Smart rel possibilit di gestire un uscita rel Disponibile solo nella versione elettrica 2 2 0 IT EN 2 0 DESCRIPTION Smart Lock Dsmart 2 0 is the innovative Smart Lock t...

Page 5: ...entazione ingresso AC 100 240 VAC uscita 4 2 VDC 1 A 50 60Hz www securemme it info securemme it 3 2 0 PULSANTE APERTURA CHIUSURA OPENING CLOSING BOTTON CARICA BATTERIA BATTERY CHARGING POMOLO PER APER...

Page 6: ...ispositivo Taglia sulla prolunga in plastica la misura X come nel dettaglio A www securemme it info securemme it 4 2 0 3 4 min 52 mm 1 2 A IT EN INSTALLATION 8100 8110 1 Use a cylinder with adjustable...

Page 7: ...teria 8 Applica la cover 9 Effettua una carica completa della batteria prima del suo utilizzo www securemme it info securemme it 5 7 8 6 2 0 5 IT EN 5 Cut the cylinder shank leaving 16 mm from the pan...

Page 8: ...tilizzo Smart Lock 8130 Caratteristiche di alimentazione ingresso AC 100 240 VAC uscita 4 2 VDC 1 A 50 60Hz PULSANTE APERTURA CHIUSURA OPENING CLOSING BOTTON 68 119 41 16 POMOLO PER APERTURA MANUALE K...

Page 9: ...ratura e fissalo 2 0 7 min 52 mm 2 3 31 68 99 48 Lato pannello INTERNO abitazione INTERNAL panel side 1B 46 For 8120 version After you carefully checking the dimension of the battery cut out a 46 mm h...

Page 10: ...indro Fissa sul pannello il supporto plastico e avvitalo con le viti in dotazione 7 Applica sul supporto plastico la placca metallica 8 7 2 0 5 6 4 IT EN 4 Apply the power unit to the cylinder stem up...

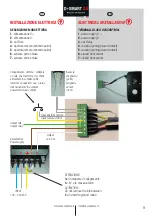
Page 11: ...e V and the ground mass Sensore magnetico porta Magnetic sensor door Collegamento citofono utilizzare un rel che trasforma il contatto alimentato in contatto pulito Intercom connection use a relay tha...

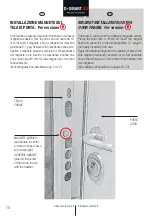
Page 12: ...pag 20 22 www securemme it info securemme it 10 TELAIO FRAME MAGNETE ADESIVO posizionare in centro al telaio in linea d asse con la maniglia ADHESIVE MAGNET place in the center of the frame in axis wi...

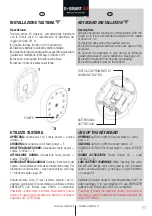
Page 13: ...ra 3 Accoppia la tastiera al dispositivo seguendo la procedura guidata su smartphone Vedi pag 24 punto 1 19 4 Inserisci a pressione la tastiera sulla base 5 Inserisci la vite di sicurezza sul fondo KE...

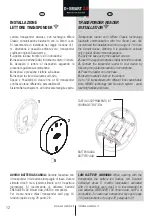
Page 14: ...patibili Per creare nuove chiavi transponder vedi pag 16 funzioni rapide o pag 28 punto 2 8 2 0 12 BATTERIA AAA BATTERY AAA 1 2 5 TASTO ACCOPPIAMENTO BT PAIRING BT BUTTON IT EN TRANSPONDER READER INST...

Page 15: ...a SENSORE CAPACITIVO Questo sensore distingue un impronta digitale reale da una contraffatta realizzata artificialmente per ingannare il lettore biometrico il che rende il sistema molto sicuro IT EN F...

Page 16: ...care elimina APERTURA Appoggiare il dito sul lettore di impronte attendere conferma dei 3 led verdi in alto www securemme it info securemme it 2 0 14 IT EN WARNINGS If your finger is dirty damaged or...

Page 17: ...ntrollare da remoto la Smart Lock tramite smartphone tablet o computer 15 www securemme it info securemme it 2 0 SMART IT EN SMART BRIDGE wireless Connects the Smart Lock to the network to manage and...

Page 18: ...batteria se versione con batteria 8 Web app Dsmart 2 0 Accesso diretto al sito Securemme it dsmart 16 2 0 2 0 IT EN QUICK FUNCTIONS LEGEND Dsmart 2 0 1 Add a new Smart Lock Enter yours Dsmart 2 0 app...

Page 19: ...hone transponder codice numerico impronta digitale e segui la procedura guidata 5 A fine procedure sar attiva la nuova chiave AVAILABLE OPTIONS 1 Create a new key function to enable one opening with s...

Page 20: ...www securemme it info securemme it 2 0 18 IT EN...

Page 21: ...19 www securemme it info securemme it 2 0 IT EN...

Page 22: ...accoppiamento tra Dsmart 2 0 e smartphone 1 4 Clicca su configura www securemme it info securemme it 20 1 1 2 0 1 4 1 3 1 2 2 0 IT EN INSTALLER Smart Lock Configuration 1 1 Activate the Bluetooth of...

Page 23: ...a che non lampeggia rosso 1 7 Premi associa 1 8 Seleziona la mano d apertura destra o sinistra e continua 2 0 1 5 1 6 1 7 1 8 IT EN 1 5 Make sure that the door is open and click on continue 1 6 Press...

Page 24: ...sullo stipite della porta chiudi la porta non la serratura e clicca su imposta Attendi qualche secondo per la calibrazione dello stesso 2 0 1 9 1 10 1 11 1 12 IT EN 1 9 Click on the calibrate button...

Page 25: ...chiusura della serratura anche a porta aperta esclusione sensore magnete www securemme it info securemme it 23 2 0 1 14 1 15 1 13 IT EN 1 13 Slightly open the door leaving it close to the frame and s...

Page 26: ...ino a che 2 squilli non indicheranno l avvenuto accoppiamento Vedi pag 11 www securemme it info securemme it 24 2 0 1 16 1 17 1 18 1 19 IT EN 1 16 Select the opening options Complete with bolts and la...

Page 27: ...e cliccando su CREA CHIAVE Se presente la tastiera crea il PIN numerico Vedi pag 11 www securemme it info securemme it 25 2 0 1 20 1 21 1 24 1 23 IT EN 1 20 If the configuration is done by the install...

Page 28: ...Connetti e attendi circa 60 secondi per il primo abbinamento l accoppiamento tra Dsmart 2 0 e smartphone 2 1 2 3 2 2 2 0 2 0 IT EN OWNER Smart Lock installation 2 1 Activate the Bluetooth of the Smar...

Page 29: ...Serratura seleziona SI e Continua Inserisci il nuovo nome della tua Smart Lock e aggiorna 2 7 2 5 www securemme it info securemme it 27 2 0 2 6 2 4 IT EN 2 4 Click on associate 2 5 Select the owner o...

Page 30: ...va password In caso di smarrimento non sar possibile recuperarla se non richiedendo un intervento tecnico 2 0 2 9 2 10 2 11 2 8 IT EN 2 8 CREATE NEW KEY to enable the opening with smartphone transpond...

Page 31: ...oppiamento tra Dsmart 2 0 e smartphone 3 4 Clicca su associa 3 1 3 3 3 2 www securemme it info securemme it 29 2 0 3 4 2 0 IT EN USER Smart Lock configuration 3 1 Activate the Bluetooth of the Smartph...

Page 32: ...ia di verde premi su associa 3 8 Inserisci credenziali comunicate dal proprietario per aprire con smartphone 30 3 5 3 7 3 8 3 6 2 0 IT EN 3 5 Select User and press continue The owner must authorize th...

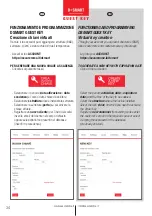
Page 33: ...za numerica digitata in tastiera codice di ingresso Imposta giorni e orari in cui l ospite pu accedere IT EN 2 0 DSMART GUEST KEY Door opening with keyboard Ideal for hotels b b rent rooms holiday hom...

Page 34: ...AUTOMATICAMENTE il codice tastiera Funzione da effettuare fronte porta www securemme it info securemme it 32 IT EN VIRTUAL KEY MANAGEMENT Temporary codes are generated on the Dsmart Guest Key Securemm...

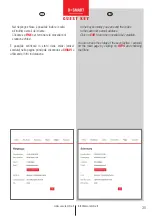
Page 35: ...tivo e inserisci le tue credenziali quelle inserite nel sito Seleziona chiavi temporanee e procedi a configurare Vedi pag 17 18 IT EN ACCOUNT SETTING MANAGEMENT VIA ACCOUNT To create your account regi...

Page 36: ...iente nel campo richiesto oppure selezionarlo tra presenti nel database inseriti in precedenza www securemme it info securemme it 34 IT EN FUNCTIONING AND PROGRAMMING DSMART GUEST KEY Virtual key crea...

Page 37: ...i possibile verificare lo stato delle chiavi attive scadute nella pagina principale cliccando su CHIAVI e utilizzando i filtri in dotazione IT EN In the key summary you can send the codes to the custo...

Page 38: ...di danni alle cose o alle persone contestabili sulla base dell inefficacia del prodotto fornito 36 www securemme it info securemme it 2 0 IT EN WARRANTY CONDITIONS SECUREMMME s r l produces and distr...

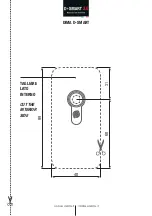
Page 39: ...DIMA D SMART TAGLIARE LATO INTERNO CUT THE INTERIOR SIDE www securemme it info securemme it 68 99 48 31 2 0...

Page 40: ...SECUREMME SRL Via del Lavoro 6 8 23854 Olginate LC Italy Tel 39 0341 605 243 Fax 39 0341 605 486 www securemme it info securemme it SISTEMA GESTIONE QUALIT UNI EN ISO 9001 2015...

Reviews: