background image

ProLogic B22 

Operation Instructions 


17 


8.0 Data Management 
As a security measure, all data that is transmitted between the EntryPad and lock is encrypted, such as 
User codes, etc. 
 
8.1 Encryption Key Set 
The ProLogic B22 sends and receives data to the lock in an encrypted form.  This is a security measure to 
ensure that all data is protected.  The Encryption Key is set during the manufacturing process with a 
default encryption key value.  This value can be changed using the Encryption Key Set menu selection.  


The Encryption Key factory default is 685198 

 
**Note:  If the Encryption Key is changed from the default setting, this value must be maintained, as it is 
a vital element to communicate with the lock inside the safe. 
  

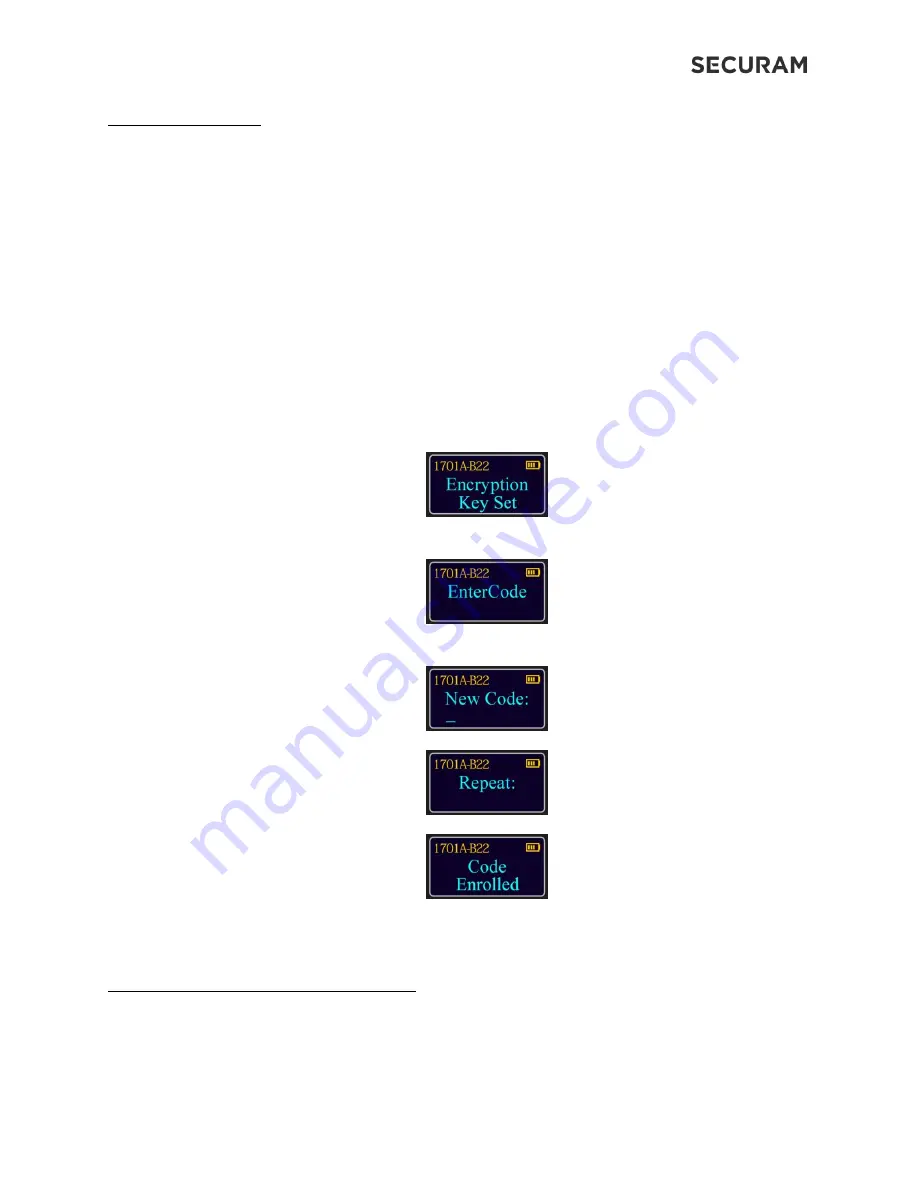
Step1:   Press the Menu/OK button 


Step 2:  Press the "

" button to the menu selection “Encryption Key Set” 


Step 3:  Enter the existing Encryption Key (default: 685198) 


Step 4:  Enter new Encryption Key value. 


Step 5: Repeat new Encryption Key value. 


Note: Once the default value is modified, the modified value must be maintained and kept 
confidential. 

9.0 Recovering the System – Reset to Default 
The ProLogic Series safe lock systems have the ability to be reset to factory default settings using a very 
unique secure method.   Each system has a default recovery code.  The Default code is 999999 - this 
code can be changed as necessary (refer to the Recovery Code Set selection). 
 

Summary of Contents for EC-1701A-B22-II

Page 1: ...4 4 Delete One User 4 5 Delete All Users 4 6 Delete Phone 5 0 Smartphone Management 5 1 Pair Phone 5 2 Delete Phone 6 0 System Identification 6 1 System Info 7 0 Lock Settings 7 1 Factory Reset Firmw...

Page 2: ...is connected to the Entry Pad Step 2 Ensure the lock cable is disconnected from the lock body Step 3 Locate the Reset Hole on the back of the lock under the QC sticker Step 4 Using a paper clip depre...

Page 3: ...itioned so that it lies in the channel on the back of the lock This channel is provided to protect the lock cable from damage or crimping during installation Using the provided lock bolts secure the l...

Page 4: ...Programmed Lock Status After this initial power up it will check to ensure that the system is communicating correctly The display will read Link with Lock OK If the Display reads Fail to Link with Loc...

Page 5: ...end the code to the lock Note the additional 3 masking digits can be added before and or after your code 3 0 Set Date and Time 3 1 Set Clock Time Step1 Press the Menu OK button Step 2 At My Menu press...

Page 6: ...OK button Step 2 At My Menu press the Menu OK button Step 3 The display will prompt you to enter a code enter a valid Super or Manager Code and press Menu OK Step 4 Scroll to the menu selection Chang...

Page 7: ...ill prompt you to enter a code enter a valid Super or Manager Code and press Menu OK Step 4 After logging in the screen will show Users Press Menu OK Step 5 Next the screen will show Enroll Manager2 P...

Page 8: ...r Manager Code and press Menu OK Step 4 After logging in the screen will show Users Press Menu OK Step 5 Next the screen will show Enroll New User Press Menu OK Step 6 Now enter a 6 digit code Step 7...

Page 9: ...t then select the user to be deleted through the or button and finally press the Menu OK button to prompt the screen Step 7 Press Menu OK This User Code is now deleted from the system 4 5 Delete All U...

Page 10: ...l users are deleted 5 0 Smartphone Management The ProLogic B22 uses a smartphone to allow for remote management and control Download the SECURAM app on the App Store for iPhones or on the Google Play...

Page 11: ...Phone This feature is used to remove any mobile device connected to the system Step1 Press the Menu OK button Step 2 At My Menu press the Menu OK button Step 3 The display will prompt you to enter a c...

Page 12: ...Press the Menu OK button Step 2 Press the button to the menu selection System Info Step 3 Press Menu OK and the screen will display information about the system This menu selection can be accessed wi...

Page 13: ...screen will now show Factory Reset press Menu OK Step 6 Press Menu OK to confirm Step 7 The screen will prompt the following and complete the factory reset 7 2 Show Audit Trail Step1 Press the Menu OK...

Page 14: ...ogic B22 has a built in vibration sensor The vibration sensor will send a notification to the app in the event that the safe is being attacked By default the Vibration sensor is enabled Step1 Press th...

Page 15: ...APP 7 4 Set Vibration Sensitivity This menu will appear only if Vibration Alert is enabled Please refer to 7 3 to enable Vibration Sensor There are five levels of vibration sensitivity with Level 1 re...

Page 16: ...he app you may want to either move the Smart Hub closer to the safe lock or set the Battery Efficiency to LOW power consumption will increase but the communication will be more stable To set the Batte...

Page 17: ...hanged from the default setting this value must be maintained as it is a vital element to communicate with the lock inside the safe Step1 Press the Menu OK button Step 2 Press the button to the menu s...

Page 18: ...provement over other commonly used reset functions as it offers a very secure recovery method 9 1 Recovery Code Set The default Recovery Code for the ProLogic Series is 999999 It is not necessary to c...

Page 19: ...onsive to commands and may need to be reset Step1 Press the Menu OK button Step 2 Press the button to the menu selection Recover System and press Menu OK Step 3 To confirm the action press Menu OK The...

Page 20: ...g mode the following Mechanical Reset procedure must be followed Step 1 Ensure that the EntryPad is not connected to the lock and that the battery is connected to the EntryPad Step 2 Find the reset ho...

Page 21: ...er or Manager Code and press Menu OK Step 4 The display will prompt you to enter the new code for the user Step 5 Repeat the user code Code has been successfully enrolled 10 2 Delete User Menu OK 2 St...

Page 22: ...et Recover System Sub Menu Super Manager Codes Users Pair Phone Change My Code My Finger Lock Settings Set Time Set Cancel Time Delay 2nd Level Sub Menu Users Enroll New User Delete One User Delete Al...

Page 23: ...use this product within the temperature range of 0 C 49 C This device is to be used indoors only Child Safety This device and its accessories may contain small parts Keep the device and its accessorie...

Page 24: ...radio communications However there is no guarantee that interference will not occur in a particular installation If this equipment does cause harmful interference to radio or television reception whic...

Page 25: ...e user s body and the handset including the antenna Third party belt clips holsters and similar accessories used by this device should not contain any metallic components Body worn accessories that do...

Page 26: ...their product for this 12 month Consumer Purchase Warranty upon installation or receipt of their safe lock The Consumer Purchase Warranty Registration form is packaged with each product 18 0 Contact...

Reviews: