background image

65

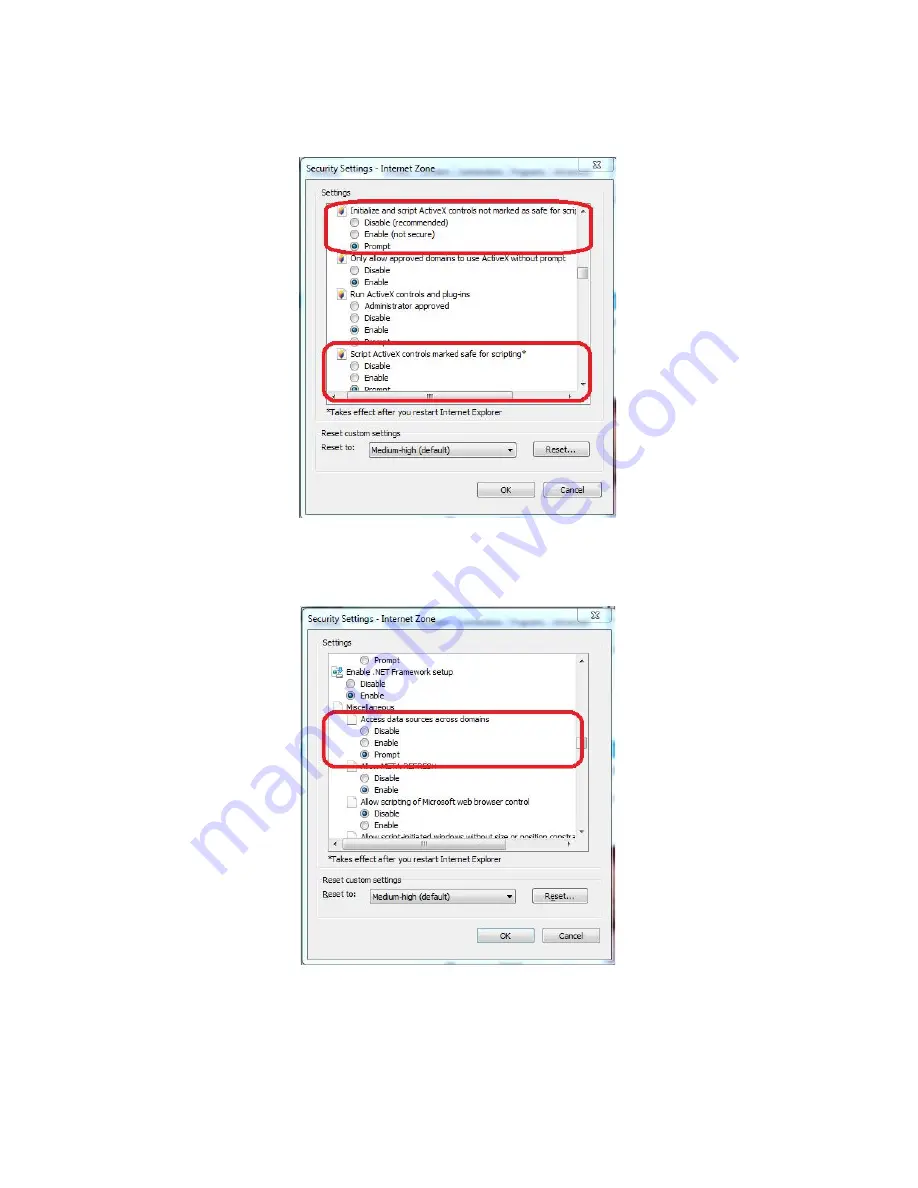
12) Scroll down until you find the setting “Script ActiveX Controls not marked as Safe for

scripting”.

13) Set “Script ActiveX Controls not marked as Safe for scripting” to “Prompt”.

14) Scroll down until you find the “Miscellaneous” section.
15) Set “Access data sources across domains” to “Prompt”.

16) Click the “OK” button.
17) When asked if you want to change settings for this zone, Click “Yes”.
18) Click the “OK” button, then close and re-open Internet Explorer.

Summary of Contents for SX-600

Page 1: ......

Page 2: ...ally shorten the life space of the hard drives Do not disassemble this unit repairs must be performed by qualified technician Do not put liquid on or around this device This product is designed to operate between 32 F and 104 F and 0 to 90 Humidity Do not install this device in conditions outside of its normal operating range as this will void the warranty Statement We do our best to make sure thi...

Page 3: ...up 11 2 8 HDD Setup 12 3 Basic Operations 13 3 1 Live View 13 3 2 The Menu Bar 13 3 3 Logging in to the DVR 14 4 Main Menu 15 4 1 Basic Menu 15 4 1 1 System Menu 15 4 1 2 Date Time 16 4 1 3 Display 17 4 1 4 Record 19 4 1 5 Users 20 4 2 Advanced Menu 21 4 2 1 Alarm 21 4 2 2 Network 24 4 2 3 COMM 26 4 2 4 P T Z 29 4 3 Search Menu 30 4 3 1 Searching for Video 30 4 3 1 Video Playback Screen and Timeli...

Page 4: ...C ViewClient 44 5 3 Remote Viewing via Mac ViewClient 44 5 4 Internet Explorer 51 Appendix A Determining Your MAC Address 60 Appendix B Internet Explorer Security Setup Guide 61 Appendix C Viewing your DVR in Chrome 67 Appendix D Viewing your DVR in Firefox 68 Appendix E Determining Network Information 70 Appendix F Port Forwarding 72 Appendix G Recommended PTZ Camera Setup 77 Appendix H How to Se...

Page 5: ... will guide you through configuring the basic settings for your DVR such as the administrator password time settings record settings hard drive settings etc This wizard can be turned off by checking the box labeled Do not display this wizard on startup It can also be enabled or disabled from the Basic Menu Once completed the wizard will close and your cameras will be displayed on the screen 2 1 Se...

Page 6: ... see section 4 1 5 on how to create additional users Click Next to go on to the next window You may also click Cancel to exit the Setup Wizard or Prev to return to the previous menu Note By default the administrator user name is admin There is no password but for better security we strongly recommend that you setup a password here 2 3 Basic Setup Configuring the Date Time Time Zone DST and Languag...

Page 7: ...digital number pad will appear and allow you to set the time Date Format Here you can set the way the date will be displayed and recorded Time Format Here you can select whether the time will be displayed in 24hr or 12hr format Time Zone Here you can set the correct time zone for your location Auto Update Check this box to allow the DVR to automatically sync its time with the internet time servers...

Page 8: ...VR comes setup for the automated Cloud Setup which allows you to remote view your DVR from anywhere in the world without having to do any additional setup For the default Cloud Setup you must select Obtain IP Address Automatically and Obtain DNS Server Address Automatically See section 4 2 2 for more information on network settings after completing the setup wizard Click Next to continue to the ne...

Page 9: ...9 ...

Page 10: ...tup wizard Click Next to move on to the next screen DDNS Tab DDNS Here you can enable or disable the DDNS function Server Here you can select a DDNS provider from the drop down list Default This will use the selected DDNS providers default server settings Server Address The address of the DDNS provider if you are not using the default value Server Port The port number of the DDNS server if you are...

Page 11: ... can configure the record settings audio settings and record mode from this screen By default the DVR is set to record on motion with a good compromise between video quality and recording time Most users will find the default settings acceptable Click Next to move on to the next screen Basic Tab Enable Here you can enable or disable the recording of specific channels Audio Here you can enable or d...

Page 12: ...e time available 2 8 HDD Setup Here you can view the Hard Drive HDD Information Format the HDD and select the recycling parameters Most users will find the default values acceptable You must format the hard drive before Clicking Next to go on to the next screen Format Check this box and click Format to format the hard drive in the unit Overwrite Here you can select whether the hard drive will fill...

Page 13: ...y to make sure it is recording properly on a camera image means the camera is recording continuously on a camera image means the camera is recording on motion or alarm on a camera image means this channel is currently detecting motion on the screen means audio is enabled on the screen means audio is disabled 3 2 The Menu Bar The Menu Bar is a bar with buttons that will display at the bottom of the...

Page 14: ...olume Adjust the volume output of the DVR 7 PTZ Click this button to display the PTZ Control window 8 Manual Record Click this button to manually override the record mode and record continuously You can click it again to disable the manual override 9 Play Click this button to enter timeline playback 3 3 Logging in to the DVR When you click the Start button on the Menu Bar you may be asked to login...

Page 15: ...1 Basic Menu The Basic Menu is used to configure the basic and most important DVR functions 4 1 1 System Menu From the System tab we can configure the system basics Device Name You can set an easy to remember name for your DVR Device ID You can change the Device ID if you have multiple DVRs that you want to control ...

Page 16: ...he Date Time Parameters Date Time Here you can set the Date and time Click the calendar icon to the right of the date to choose the correct date and then click the time A digital number pad will appear and allow you to set the time Date Format Here you can set the way the date will be displayed and recorded Time Format Here you can select whether the time will be displayed in 24hr or 12hr format T...

Page 17: ...lay such as channel names margins auto sequencing and output display Name Here you can change the name of the camera to easily identify what it s looking at Mask You can click this button to set the privacy mask Click and drag your mouse to create a grey square over the area you do not wish to record To remove the privacy mask double left click on it with the mouse You can have up to 4 separate pr...

Page 18: ...n display Margin Right Here you can adjust the top margin for the main display Layout You can select a layout for auto sequencing 1x1 2x2 3x3 etc You can also select custom layout and then use the and controls below to add or remove different cameras and layouts Main Output Here you can select the default view for the main output You can also set which cameras will be displayed in preferred order ...

Page 19: ...rm recording continuous or manual Resolution Here you can set the resolution the DVR will record in You can choose from CIF 320x240 WCIF 464x240 HD1 704x240 WHD1 928x240 D1 704x480 and WD1 928x480 Frame Rate Here you can select the frame rate each camera will record at You can select between 1 and 30 frames per second FPS Quality Here you can select the quality of the compressed video You can sele...

Page 20: ...py a channel s schedule to another channel or to all channels 4 1 5 Users Here you can add or delete users change user authority and change user passwords User List This will list all the users you have setup for this DVR Delete User after checking the check box next to a user click the delete button to delete a user Add user Click this button to add a new user a new window will appear ...

Page 21: ... of anything other than the specified MAC address For more information see Appendix A MAC Specify the MAC address of the system that the user will login from Authority On the authority tab you can select or deselect different cameras and functions that you want this user to be able to access 4 2 Advanced Menu The Advanced menu is used to configure the more advanced features of the DVR such as netw...

Page 22: ...ed Snapshot Here you can select if a snapshot is taken for email Send E Mail Here you can enable or disable e mail notification Alarm Output Here you can enable the alarm output of the DVR on a motion event Push Here you can enable or disable push notifications for mobile devices Alarm Output Duration Here you can set the length of time the alarm output will be energized Buzzer Here you enable or ...

Page 23: ...on please see Appendix F Name Here you can set an easy to remember name for the sensor input Schedule This will link you to the schedule for this channel Trigger Here you can select which actions will be taken when a motion event is triggered Enabled Here you can enable or disable the video loss alarm Trigger Here you can set which action will be performed when video loss is detected ...

Page 24: ...am settings Obtain an IP Address Automatically Click this option to automatically obtain your IP information from your network You should use this option if you are using the remote view cloud setup Use the Following IP Address Click this option to manual configure your network settings this is normally needed if you are port forwarding Please see Appendix D for more information Obtain DNS Server ...

Page 25: ... the username supplied by your DSL provider here Password Enter the password supplied by your DSL provider here Media Port This is the port the DVR will use to send all video and control data on If you are port forwarding this port must be forwarded This must be a unique value Web Port This is the HTTP port the DVR will use this port is used for remote viewing through Internet Explorer If you are ...

Page 26: ... of the video transmitted on the sub stream 4 2 3 COMM From the COMM tab you can configure DDNS E Mail and UPnP Support DDNS Here you can enable or disable the Dynamic Domain Name Service DDNS This must be enabled for the remote view cloud setup to work Server Here you can select your DDNS provider Select Cloud Setup for the remote view cloud setup Default Check this box to use the default cloud s...

Page 27: ... minute interval it will only send out an email once every 5 minutes even if many email events have been triggered in that period Mail Server SMTP Here you must specify the SMTP server for your email provider Without this information the DVR cannot send emails Connection Security Here you can specify TLS or SSL if your email provider requires it Username Enter the username to login to your service...

Page 28: ... enable or disable the uPnP function uPnP is a protocol that allows the DVR to automatically configure the router for port forwarding Not all routers support this and Linksys routers are known not to work with this function ...

Page 29: ...pported protocols are Pelco P Pelco P PelcoD1 PelcoD2 PelcoD3 PelcoD4 PelcoD_JEC PelcoP WJ ABK2001 ABK2007 ACES HN Dragon EE HT600 HY Samsung Yaan Philips Lilin SAE YLDVR GRX2000 JabscoD Kallaite B01 Panasonic Sony SYYT V1200 Visdom KonyM800 KonyMTR500 Note The protocol baud rate and address for the channel with the PTZ camera connected MUST match the protocol baud rate and address of the PTZ Came...

Page 30: ...ime end time and recording type to search for When you click the search button the DVR will list all recording events that occurred between your start and end times and match the recording type you selected It will display the results of the search in the Event List to the right of the calendar If you have a lot of search results it may stretch across multiple pages with 10 results listed per page...

Page 31: ...o playback an event simply select the event you would like to playback and click the Playback button You can also double click the event or hit the Enter button while the event is highlighted 4 3 1 Video Playback Screen and Timeline Playback 1 Calendar Here you can select the month and year and the calendar will automatically update the display Days marked in red on the calendar indicate that the ...

Page 32: ... zoom and zoom is provided to increase and decrease the hour minute scale for finer timeline selection There is a horizontal scroll bar to navigate the timeline and a vertical scroll bar to scroll through the channels You can simply click on a time period on the time line and the DVR will begin to play video from that point forward The current playback time is indicated on the bottom playback cont...

Page 33: ...33 all the events Now click the backup button to backup ...

Page 34: ...earch in the result list to the left of the search criteria If you have a lot of search results it may stretch across multiple pages with 10 results listed per page You can use the Next and Prev buttons to navigate to the next or previous page or you can use the First and Last buttons to navigate to the first or last page of the search results You can also click the Clear button to clear all the r...

Page 35: ...pacity the HDD will automatically erase the oldest data and write new data to the drive at the same time This ensures you will always have the maximum amount of up to date storage time on your DVR You can also choose By Days as the overwrite mode This allows you to enter a maximum number of days to save Max Saved Days The DVR will store video for up to the specified amount of days If you DVR does ...

Page 36: ...ou specified for your DVR This does not affect the function of the DVR Device ID This is the ID of the device this is used to control multiple DVRs from one remote Serial No This is the software serial number for the DVR this is used for the cloud based remote setup Firmware Version This is the current firmware version of the DVR MAC This is the network MAC address for the DVR QR Code This is the ...

Page 37: ... errors IP address conflict This displays any IP address conflicts the system may have Any IP address conflicts will cause the unit not to function properly or at all IP Address WAN This is the current WAN Address of your DVR If you have setup port forwarding See Appendix D you may use this address for remote access Media Port This is the current media port programmed into the DVR If you are port ...

Page 38: ...38 Username IP address and login time for each user You can choose to disconnect a user by clicking the X in the Disconnect column to the right of the connected user information ...

Page 39: ...ly how much storage space your DVR will use to record one hour of video The size of your hard drive in Megabytes MB divided by the number you calculated by adding up the Data per Hour Column will give you approximately how many hours of video can be recorded with your current configuration 4 7 Maintenance Menu The Maintenance menu provides access to various maintenance functions such as firmware u...

Page 40: ...The DVR will not record in standby mode The DVR can be unplugged when in standby mode Reboot This will reboot the DVR 4 7 2 Settings Functions Export This allows you to export the current DVR configuration to a file on a USB drive Import This allows you to import a DVR configuration file from a USB drive Load Factory Default This allows you to reset all or specific parts of the DVR to the default ...

Page 41: ...th applications you may experience long response times and slow or stuttering video Some businesses and locations may block access to our cloud servers which can prevent cloud viewing from working in these locations Port forwarding is recommended Port forwarding is also recommended if you want the best performance possible To use the cloud you must first sign up for a free account on www 88110 net...

Page 42: ...42 ...

Page 43: ...rial number of your DVR please refer to section 4 6 1 Device User This is the user name you use to login to your DVR Device Password This is the password you use to login to your DVR with the above listed username Once you have entered all the correct information Click Save to save the device information This will bring you back to the device screen where all your device information is displayed s...

Page 44: ...s not do anything you may have to right click on your DVR name and click Browsing by P2P You will have to install the ActiveX control to be able to manage your DVR remotely At the bottom of the page you will be prompted to allow the installation of the ActiveX control After clicking Install you will be prompted to install the ActiveX control Once the ActiveX control has installed you will be prese...

Page 45: ...t the DVR is installed in you must use the local IP address for access The WAN address will only work when you are outside of your location 5 3 1 Installing the Mac ViewClient To install the Mac ViewClient simply download the ZIP file and click on the ViewClient folder in your download files Drag the ViewClient application into your applications folder to install To add a shortcut to your dock nav...

Page 46: ...hannel Display 5 Device List 10 Last Page Next Page 5 3 2 1 DVR Management Options Using the DVR Management options you can view your cameras Live View playback backup a recorded event or configure the DVR Settings 5 3 2 2 Device List The device list shows all the DVRs you have programmed into the ViewClient software By double clicking a device you can open it for live viewing of the DVR video fee...

Page 47: ...t a 4CH 6CH 9CH 16CH or 32CH display mode If you have more channels or cameras than your current display mode the ViewClient will automatically break up the cameras into multiple pages Each page will have a set number of cameras For example if you have an 8 camera NVR DVR and you select the 4CH display mode you will have two pages page 1 cameras 1 4 and page 2 cameras 5 8 5 3 2 5 PTZ Control If yo...

Page 48: ...played in green have normal or continuous recordings After clicking the date on the calendar that you would like to review the event list will be populated with all the events of that day Events are display by time with the channel number to the right of the time to play an event simply double click on the event in the event list and it will begin to play You can navigate the video using the stand...

Page 49: ... information on these settings 5 3 5 Mac ViewClient About Tab The Mac ViewClient application has an additional tab called About Here you can set where your snapshots are saved to as well as PTZ control speed how far the PTZ moved with each click of a button and whether you are using the main stream High quality high bandwidth or the sub stream Low quality low bandwidth ...

Page 50: ...50 ...

Page 51: ...ng your DDNS name or WAN IP Address enter that information into the URL bar on internet explorer It must be formatted in a similar manner as below http IP Address Web Port Ex http 75 99 66 246 8000 http DDNS Name Web Port Ex http activevision dvrdydns com 8000 After you have entered the information correctly you will be presented with a login screen similar to the one shown above Here you would en...

Page 52: ...any of the empty camera boxes and click Open all Windows 5 4 1 IE Remote Interface 1 DVR Management Options 2 H264 Converter 3 Logout 4 Camera Display 5 PTZ Control 6 Image Control 7 Record Stream Control 8 Display Control 5 4 1 1 DVR Management Options Using the DVR Management options you can view your cameras playback backup a 1 2 3 4 5 6 7 8 ...

Page 53: ... images using the right click mouse operation you can open or close individual channels open or close all channels start or stop manual recording and exit full screen mode 5 4 1 5 PTZ Control This section provides the interface to control your PTZ camera if equipped remotely through the IE interface Each button and their function is detailed below 1 Enable Disable PTZ Wiper if equipped 2 Enable Di...

Page 54: ...stream 1 Take a snapshot of the selected camera 2 Start Stop Record of all channels to your computer s hard drive 3 Enable Disable Talkback function if equipped which allows you to talk back to an audio output at the DVR site 4 Open Close Video Stream for live viewing 5 Enable Disable Digital Zoom Draw a box on a camera with your mouse to zoom in 6 Select Master Stream High quality image stream 7 ...

Page 55: ...Page A Page is a full screen of cameras For example if you have an 8CH DVR and are viewing the DVR in a quad display 4 cameras 2x2 you will have two pages in this view 5 4 2 IE Playback Interface To playback data using IE simply click a date on the calendar select the channels you wish to view in playback and then click the search button The timeline bar will be updated and you can scroll through ...

Page 56: ... as your timeline zoom digital zoom audio and display controls for playback 1 This is the status window it will display information about your current play mode as well as any necessary network information ex Buffering 2 This is your standard playback controls You can Play Pause Stop video 3 This allows you to Fast Forward up to 16x speed 4 This allows you to play back in slow motion by hitting th...

Page 57: ...o decrease the resolution of the Timeline Search Bar down to 1 hour per indicator 10 These buttons allow you to control the volume as well as the display parameters Please see the live view for information on these button functions ...

Page 58: ...mply browse the settings and alter them to suit your needs You can even remotely upgrade the DVR or check the system logs All of the information in the remote configuration menu is covered earlier in this manual in Section 4 Please refer to Section 4 for more information on these settings ...

Page 59: ... to Determine the MAC address of a PC Appendix B Internet Explorer Security Setup Guide Appendix C Viewing your DVR in Firefox or Chrome Appendix D Determining Network Information Appendix E Port Forwarding Appendix F Recommended PTZ Camera Setup ...

Page 60: ... bind a client mac address to a user make sure you use the MAC address of the most frequently used connection For example if you normally connect to the internet wirelessly you would want to get the MAC address of your Wireless Network Connection not your Local Area Connection To determine the Mac address of your network devices follow the steps below 1 From the start menu click Run On Windows 8 g...

Page 61: ...eater operating system Internet Explorer 6 0 or later An active internet connection A basic understanding of computers If using Windows Vista or Windows 7 please turn off User Account Control the instructions are listed here http www howtogeek com howto windows vista disable user account control u ac the easy way on windows vista For Windows 7 http www petri co il disable uac in windows 7 htm Proc...

Page 62: ... Security Tab 5 Make sure Internet protected mode is off present in Windows Vista and Windows 6 Click on the picture of the globe marked Internet then click on Custom Level near the bottom of the Internet Options Window ...

Page 63: ... setting Allow Scriptlets 8 Scroll down until you find the setting Download unsigned ActiveX Controls 9 Set Download Unsigned ActiveX Controls to Prompt 10 Scroll down until you find the setting Script ActiveX Controls marked as Safe for ...

Page 64: ...64 scripting 11 Set Script ActiveX Controls marked as Safe for scripting to Enabled ...

Page 65: ...iveX Controls not marked as Safe for scripting to Prompt 14 Scroll down until you find the Miscellaneous section 15 Set Access data sources across domains to Prompt 16 Click the OK button 17 When asked if you want to change settings for this zone Click Yes 18 Click the OK button then close and re open Internet Explorer ...

Page 66: ...66 19 Congratulations You have completed setting up Internet Explorer for remote viewing ...

Page 67: ...re 3 Enter ie tab into the chrome store search bar and hit enter 4 In the search results click the extension labeled IE Tab from ietab net 5 At the top right Click Free and then click Add in the popup message to install IE TAB 6 After it has finished installing close and reopen chrome Navigate to the webpage of your DVR right click on the web page and choose IE TAB Options Open in current tab 7 Yo...

Page 68: ...structions below to enable this function 1 Open Firefox 2 navigate to http www ietab net 3 3 Click Get IE Tab 2 for Firefox 4 Install IE Tabv2 for Firefox After the installation is complete close and restart your browser 5 Navigate to the webpage of your DVR Right click on the page and click View Page in IE Tab ...

Page 69: ...69 6 You can now continue to remote view your DVR ...

Page 70: ...formation about the network to which it is connected 7 From the start menu click Run 8 In the run dialog enter cmd then hit the enter key 9 A black window should appear on your screen with a flashing cursor 10 Type ipconfig then hit enter 11 What you are looking for is an Ethernet Adapter labeled Local Area Connection 12 Write down your IP address which is shown boxed by Green 13 Write down your S...

Page 71: ...71 access Please refer back to your original guide to complete the network setup of your Active Vision DVR System ...

Page 72: ...are common for many router manufactures If you have any problems please contact your routers manufacture or service provider for more detail Logging into your system to perform port forwarding is a chargeable service 1 Gather information about your network according to Appendix C 2 Move your mouse cursor to the lower left hand corner and left click the Start menu 3 Choose All programs and then lef...

Page 73: ...9 a Move your mouse cursor to the arrow button over Setup button at the top of the page and then left click b Left click the drop down arrow next to Internet Connection Type c Select PPPOE from the drop down menu d Move your mouse cursor to the User name field and type in your User name e Move your mouse cursor to the Password field and type in the Password ...

Page 74: ...he Port Range Forwarding tab 10 Copy the following information from the photo below into your Port Range Forwarding tab on your router 11 Left click the Save Settings button 12 Move your mouse cursor to the upper right hand corner and left click the minimize button to minimize the Router Setup Page 13 Repeat Step 1 through Step 3 to open a new Internet Explorer window ...

Page 75: ...a message that says the ports are NOT responding please make sure your router is configured properly by repeating Step 1 through Step 16 20 If you are still receiving a message that states the ports are NOT responding Please call your Internet Service Provider ISP or router manufacture and explain to them you have forwarded the ports through your router but the ports are still showing up closed Pl...

Page 76: ...3 Congratulations You have finished port forwarding NOTE Most Cable and DSL Internet Service providers offer dynamic addressing to customers A dynamic address changes whereas static addresses do not so your IP address may change periodically Check with your local Internet Service Provider for more information You can also setup a DDNS account with a DDNS Service provider Please see Section 5 3 3 f...

Page 77: ...TZ Camera you only need to use the IN port on the camera and do not need to combine any wires If your PTZ Camera does not have an IN and OUT port for PTZ you can simply twist two solid wires and two stripe wires Ex Blue Green White Blue White Green and connect the solid wires to the RS 485 A positive terminal and the striped wires to the RS 485 B negative terminal This will give you an IN Green Gr...

Page 78: ...78 protocol baud rate and address in the DVR for the correct channel that the PTZ Camera video is connected to See Section 4 2 4 for information on how to setup your DVR ...

Page 79: ... circuit is open most of the time The circuit must be closed to trigger the alarm If the alarm type is set for Normally Closed N C this means the circuit is closed most of the time The circuit must be opened to trigger the alarm The device you are integrating with the alarm input must have relay contacts to be able to trigger the alarm You will run the 12V power source to one of the relay contacts...

Reviews: