background image


Working On-Site using the Commander-3 


38 

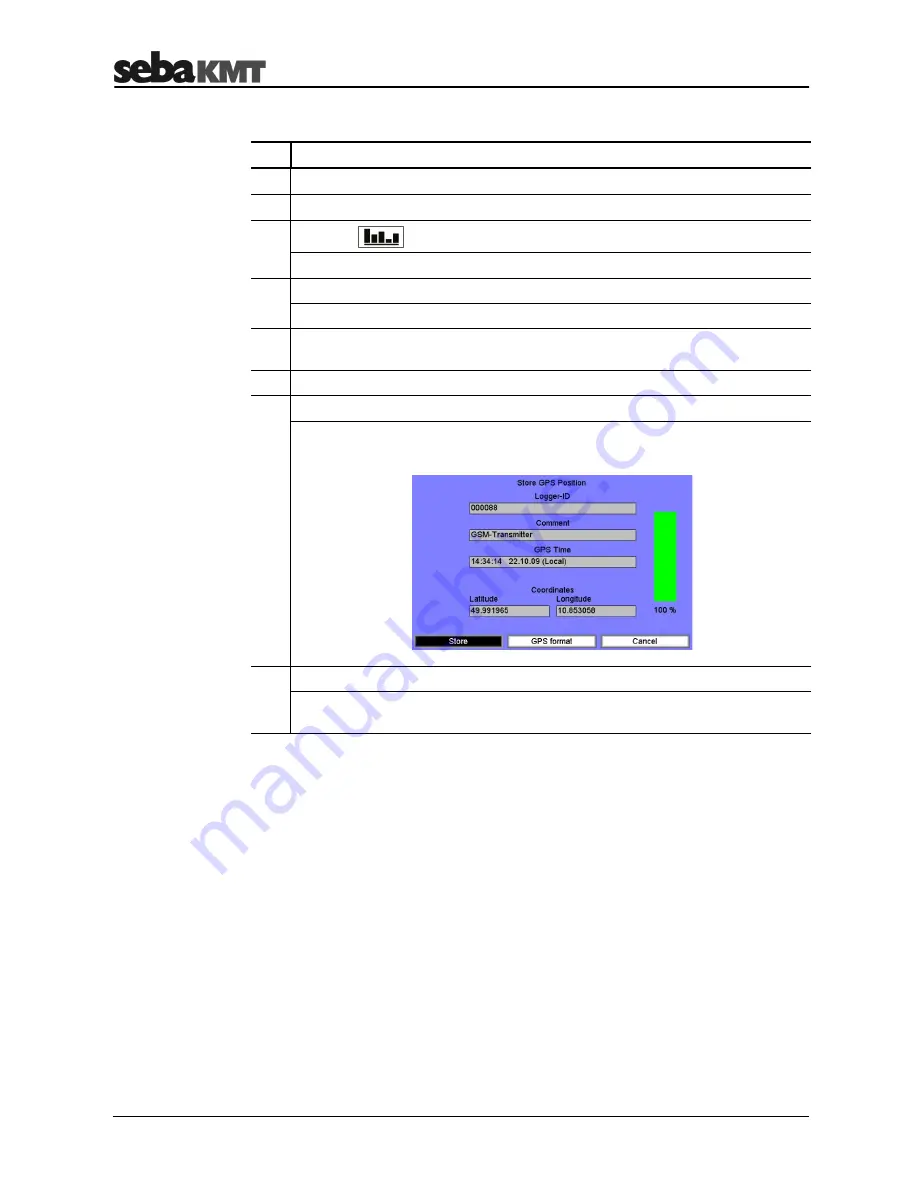
To determine the GPS position using the Commander-3, proceed as follows:  

Step  Description 

Connect the GPS receiver to the Commander-3. 

Move close to the place of installation. 

Open the 

 menu in the main menu bar of the Commander-3. 

Result:

 The menu opens. 

Select the 

Store GPS position

 option. 

Result:

 A new menu level will open. 

Select the required logger group using the drop-down menu at the top of the 

screen.  

Select the required GSM transmitter from the list. 

Select the 

Store GPS pos 

button.  

Result:

 A new view will open. The current GPS position is determined. (The 

Commander-3 should be kept as stationary as possible during this process). 


Wait until the position data is displayed reliably. Then select the 

Store

 button. 

Result: 

This GPS data is now stored in the group data as the position of the 

GSM transmitter. 


Determining GPS data 

Summary of Contents for Sebalog GT-3

Page 1: ...3 Issue 01 01 2015 EN Article number 83923 Mess und Ortungstechnik Measuring and Locating Technologies Elektrizitätsnetze Power Networks Kommunikationsnetze Communication Networks Rohrleitungsnetze Water Networks Abwassernetze Sewer Systems Leitungsortung Line Locating ...

Page 2: ...Consultation with SebaKMT 2 ...

Page 3: ...service station please contact Seba Dynatronic Mess und Ortungstechnik GmbH Hagenuk KMT Kabelmesstechnik GmbH Dr Herbert Iann Str 6 D 96148 Baunach Phone 49 9544 68 0 Fax 49 9544 22 73 Röderaue 41 D 01471 Radeburg Dresden Phone 49 35208 84 0 Fax 49 35208 84 249 E Mail sales sebakmt com http www sebakmt com SebaKMT All rights reserved No part of this handbook may be copied by photographic or other ...

Page 4: ...KMT are hereby limited to a period of 12 months from the date of delivery Each component supplied by SebaKMT within the context of warranty will also be covered by this warranty for the remaining period of time but for 90 days at least Each measure to remedy a claim under warranty shall exclusively be carried out by SebaKMT or an authorized service station This warranty does not apply to any fault...

Page 5: ...r on off 17 4 Preparatory Work in the Office 19 4 1 Mobile communication FTP server email account etc 19 4 2 Inserting the SIM card into the GSM transmitter 19 4 3 Connecting the wireless interface to the PC laptop 20 4 4 Creating a logger group in the SebaDataView 3 software 20 4 5 Creating a GSM transmitter in the SebaDataView 3 software 21 4 6 Programming the GSM transmitter 22 4 6 1 Entering t...

Page 6: ...toring the GPS position 37 6 2 Programming the devices 39 6 3 Installing devices at the place of use 41 6 4 Testing the mobile connection 43 6 5 Linking the devices 44 6 6 Determining the GPS position using a smartphone tablet 45 6 7 Transferring logger groups from Commander 3 to the computer and importing them into the SebaDataView 3 software 46 ...

Page 7: ... label on the product it is used to draw attention to potential hazards which have to be avoided by reading the manual Serves to highlight important information and useful tips on the operation of the device system Failure to observe may lead to unusable measurement results Check the contents of the package for completeness and visible damage right after receipt In the case of visible damage the d...

Page 8: ...hen shipping the device This device is designed for industrial use When used at home it could cause interference to other equipment such as the radio or television The interference level from the line complies with the limit curve B living area the radiation level complies with the limit curve A industrial area according to EN 55011 Given that living areas are sufficiently far away from the planne...

Page 9: ...r taking place Yellow then red when switching off On Off contact field magnetic switch GSM antenna interchangeable Type label with the identification number ID of the device Housing Locking ring unscrewable Magnetic adapter unscrewable 2 2 Function The LOG GT 3 GSM transmitter is a compact waterproof GSM module with its own power supply The GSM transmitter acts as a mobile phone network interface ...

Page 10: ...ort distance wireless transmission Communication between GSM transmitter and a logger Communication between GSM transmitter and a PC laptop a wireless interface must be connected to the computer please see the following sections Mobile wireless communication Transfer of logger measured data from the GSM transmitter to the FTP server Transmission of notifications via email SMS 2 3 1 LOG RI LOG RI w...

Page 11: ...the device is always operated using the latest firmware Information on updating device firmware can be found in the operating instructions for the noise or pressure logger 2 3 2 Reader 3 as a wireless interface for the computer The Reader 3 output device from SebaKMT can be used as a wireless interface Connect the device to the computer via the associated docking station and switch it on The devic...

Page 12: ...r The transmitter must be switched on and within the wireless range of the output device Proceed as follows Step Description Using the Commander 3 Using the computer 1 In Professional mode open the menu In the SDV 3 software select the respective GSM transmitter in the directory tree 2 Select the option Read device configuration Click on Program in the menu bar 4 Select the option Read GSM transmi...

Page 13: ...itive semi conductor components Take care to avoid damaging the components Never use force Proceed as follows Step Description 1 Open the device see page 16 Result You can now access the SIM card slot and the battery compartment 2 Carefully pull the battery tray out of the device until the batteries are freely accessible 3 Replace the batteries Make sure that you fit the new batteries with the cor...

Page 14: ...itter is read out and displayed 5 Enter and confirm the identification number ID of the GSM transmitter in question Click on Status Result A window opens showing information on the current status of the device Result The current configuration of the GSM transmitter is read out and displayed 6 Go to the final configuration data page using the Next button Click on Reset logbook N B If the button is ...

Page 15: ...ion IP68 2 6 Scope of delivery The standard scope of delivery includes the following components Accessory item Description Item no LOG GT 3 GSM transmitter 1003416 Magnetic adapter M8 M6 90008233 90 degree adapter for GSM antenna 90008232 Other accessory items are available in addition to the standard delivery scope Accessory item Description Item no GSM antenna with cable 3 m 2004816 Magnetic ang...

Page 16: ...components Take care to avoid damaging the components Never use force Proceed as follows Step Description 1 The device must be switched off status LED permanently off 2 The magnetic adapter must be screwed onto the device When screwing on tighten carefully Do not over tighten 3 Unscrew the black locking ring from the housing 4 Carefully pull the sealing plug out of the housing Result You can now a...

Page 17: ...the GSM transmitter on off The GSM transmitter has an internal magnetic switch to turn it on and off Move the magnet provided over the on off contact field The status LED first lights up red and then flashes green three times once the magnet has been removed Regular blue flashes then indicate that the device is switched on and ready to receive data To switch off the device hold the magnet against ...

Page 18: ...Setting Up and Starting the Device 18 ...

Page 19: ... an email account that sends alarm messages and measured data overviews You can either use your company s own mail server or you can conclude a usage contract with a commercial provider on the Internet Under certain conditions it is also possible to access SebaKMT s own Demo Account 4 2 Inserting the SIM card into the GSM transmitter A SIM card must be inserted in each GSM transmitter to be used f...

Page 20: ... for this purpose or you can add the loggers in question to an existing group Please note Use of the GSM transmitter is possible in combination with Log P 3 pressure loggers Log N 3 noise loggers in the Lift Shift group mode Use of the GSM transmitter is not possible in combination with Log N 3 loggers in the Patrol group mode Log N 3 loggers in Network group mode To create a new logger group proc...

Page 21: ...ary first open the GSM transmitter tab Result The window for registering new devices appears 3 Register the GSM transmitter 2 Methods Manually Automatically Deactivate the Automatic detection checkbox and enter the identification number ID for the device Activate the Automatic detection checkbox and then switch on the GSM transmitter Result The identification number ID for the device is recognized...

Page 22: ...tree 2 Click on Program in the Communication segment in the menu bar If necessary first open the GSM transmitter tab Result The window for entering the configuration data appears 3 Enter all data necessary for the mobile connection see following section 4 In the Radio Settings segment specify the week days and times that the GSM transmitter should be accessible from outside via short distance wire...

Page 23: ... GSM transmitter Internet Settings Enter the Internet access data for your mobile network operator server address user name password etc By finding and selecting your mobile network operator in the Templates drop down list the necessary data will be entered automatically FTP Settings Enter the access data for the FTP server to which the measured data should be sent server address port user name pa...

Page 24: ...ss data for the account in the software system settings and wish to use this account select the Use own server checkbox The data from the system settings is then applied and appears in the input fields If you would like to use SebaKMT s demo account select the Seba Demo Mode checkbox The access data is then entered automatically Please note that this account may only be used on a short term basis ...

Page 25: ...ite complications an initial GSM test should be carried out in the office on every GSM transmitter to be used for the measurement This test checks whether the device is able to establish a mobile wireless connection without error In order to carry out a GSM test using a computer the following conditions must be met A wireless interface must be connected to the computer e g LOG RI The GSM transmitt...

Page 26: ... are listed in the window on the screen Steps that have been successfully completed are marked as OK Otherwise an error message is shown If the GSM test fails check the following points again Is a SIM card inserted in the GSM transmitter Does the SIM card support data transfer Check the mobile phone contract or contact the mobile network operator Are GSM and data transfer active for the SIM card C...

Page 27: ...roceed as follows Step Description 1 Establish a connection between the computer and the Commander 3 To do so open the menu in the main menu bar of the Commander 3 Select the option Connect to PC Connect the devices using the connection cable VK77 Select Connect in the Commander 3 2 In the SDV 3 software select the respective group in the directory tree 3 Click on Export in the Group segment in th...

Page 28: ...Preparatory Work in the Office 28 ...

Page 29: ...retrieved quickly and securely 2 Methods Determining the GPS data using a laptop Determining the GPS data using a smartphone tablet Prerequisite External GPS receiver connected to the laptop available as an optional accessory Prerequisites GPS and Internet enabled smartphone or tablet On site Internet access Access authorization to SebaKMT Cloud If you would like to determine the GPS coordinates u...

Page 30: ...ceiver move as close as possible to the place of installation 3 In the SDV 3 software select the respective GSM transmitter in the directory tree 4 Click on GPS in the Communication segment in the menu bar If necessary first open the GSM transmitter tab Result A new window will open 5 In the window click on the GPS button Result The current GPS position is determined and displayed The laptop and G...

Page 31: ... screen 3 Select the first logger to be linked to the GSM transmitter using the first of the three drop down menus The list includes all noise and pressure loggers for this group If the required logger is not in the list this indicates that it has not yet been added to this group see page 7 4 Set the measurement parameters for this logger Follow steps 4a 4d 4a Click on the button to the right of t...

Page 32: ...ou want to link the GSM transmitter to the loggers Prerequisite The loggers must be switched on and be in proximity to the GSM transmitter 6 Link devices now Click on Yes in the dialog box Do not link devices now Click on No in the dialog box In this case the devices must be linked see page 35 on another occasion Result The GSM transmitter and the loggers will be linked At the same time the measur...

Page 33: ...u can simply place the GSM transmitter in the shaft or assemble the optional magnetic base or magnetic angled adapter to secure the device in the shaft If the shaft is very narrow you can fit the 90 degree antenna adapter thereby bending the GSM antenna In some cases better GSM reception can be an additional effect of this measure If the shaft is very deep you can replace the standard antenna with...

Page 34: ...ssure logger with GSM transmitter in a German underground hydrant Log N 3 noise logger with GSM transmitter in a German gate shaft Log N 3 noise logger with magnetic angled adapter and GSM transmitter with magnetic angled adapter and 90 degree antenna adapter in a German gate shaft Installation examples ...

Page 35: ...You will then also need to repeat the Programming and linking devices step see page 31 Has the GSM test been successful and is the GSM transmitter already linked to the loggers If so then the devices are now ready for the measurement to be performed 5 5 Linking the devices The GSM transmitter must be linked to the loggers in use As part of this same step the loggers are also programmed automatical...

Page 36: ...e GPS LOG DX GT3 option under GPS assignment Result A new menu level will open 5 Select the checkbox below the GSM transmitter symbol 6 Enter the identification number ID of the GSM transmitter for which you would like to determine the GPS position 7 Select Transmit Result The GPS position of the smartphone tablet is determined and stored in the SebaKMT Cloud as the position of the GSM transmitter...

Page 37: ...yed clearly in a chart and retrieved quickly and securely 2 methods Determining the GPS data using the Commander 3 Determining the GPS data using a smartphone tablet Prerequisite External GPS receiver connected to Commander 3 available as an optional accessory Prerequisites Internet and GPS enabled smartphone or tablet On site Internet access Access authorization to SebaKMT Cloud If you would like...

Page 38: ...lt A new menu level will open 5 Select the required logger group using the drop down menu at the top of the screen 6 Select the required GSM transmitter from the list 7 Select the Store GPS pos button Result A new view will open The current GPS position is determined The Commander 3 should be kept as stationary as possible during this process 8 Wait until the position data is displayed reliably Th...

Page 39: ...uired logger group from the drop down menu at the top of the screen 5 Select the required GSM transmitter from the list 6 Select the Progr Transmitter button Result A new menu level will open 7 Select the first logger to be linked to the GSM transmitter using the first of the three drop down menus 8 Click on the button to the right of the field in order to specify the measurement parameters for th...

Page 40: ...oggers for linking to the GSM transmitter If so use the second and third drop down menus Repeat steps 8 and 9 to specify the measurement parameters for each logger 11 Select the Program button Result The ID and comment for the GSM transmitter are displayed again 12 Select the Program button Result The configuration data for the loggers is now transferred to the GSM transmitter where it is temporar...

Page 41: ...u can simply place the GSM transmitter in the shaft or assemble the optional magnetic base or magnetic angled adapter to secure the device in the shaft If the shaft is very narrow you can fit the 90 degree antenna adapter thereby bending the GSM antenna In some cases better GSM reception can be an additional effect of this measure If the shaft is very deep you can replace the standard antenna with...

Page 42: ...3 pressure logger and GSM transmitter in a German underground hydrant Log N 3 noise logger and GSM transmitter in a German gate shaft Log N 3 noise logger with magnetic angled adapter and GSM transmitter with magnetic angled adapter and 90 degree antenna adapter in a German gate shaft Installation examples ...

Page 43: ...cific GSM transmitter are displayed again 3 Click the Send command button Result The GSM test is launched The GSM transmitter uploads a test file to the FTP server with the name ftp test csv The GSM transmitter also sends a test email or test SMS to all specified addressees This message contains the ID and comment for the GSM transmitter as well as the wording Test email or Test SMS The individual...

Page 44: ...y stored measurement settings are transmitted by the GSM transmitter to the individual loggers Proceed as follows Step Description 1 In the Commander 3 open the menu for programming the GSM transmitter see page 39 steps 2 6 2 Select the Link button Result The ID and comment for the GSM transmitter are displayed again 3 Click on the Send command button Result The GSM transmitter and the loggers wil...

Page 45: ... the GPS LOG DX GT3 option under GPS assignment Result A new menu level will open 5 Activate the checkbox below the GSM transmitter symbol 6 Enter the identification number ID of the GSM transmitter for which you would like to determine the GPS position 7 Select Transmit Result The GPS position of the smartphone tablet is determined and stored in the SebaKMT Cloud as the position of the GSM transm...

Page 46: ...nder 3 To do so open the menu in the main menu bar of the Commander 3 Professional mode Select the option Connect to PC Connect the devices using connection cable VK77 Select the Connect command in the Commander 3 2 Select the required logger group in the directory tree for the SDV 3 software 3 Click on Import in the Group segment in the menu bar If necessary first open the Directory tab 4 In the ...

Reviews: