background image

CorreluxView Software 


27 

6.2 

Basic settings 

You  should  always  check  basic  CorreluxView  software  settings  and  adjust  these  if 

necessary before using the application.  

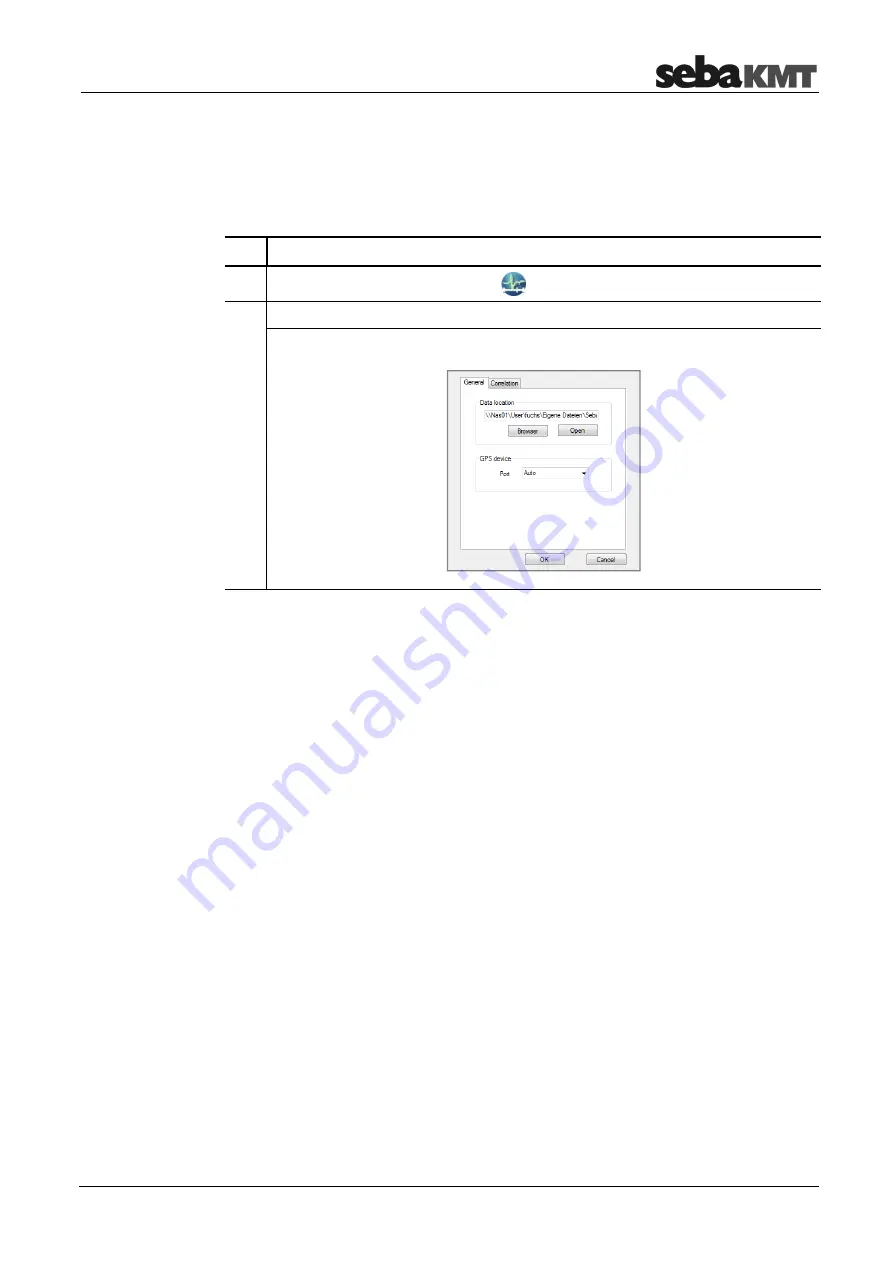
To open the system settings menu, proceed as follows: 

Step  Description 

Click on the CorreluxView symbol 

 at the top left of the menu bar. 

Click on 

Settings

 in the context menu. 

Result:

 The system settings menu opens. 


6.2.1 

Storage location for application database 

In  the 

Data location

  segment  the  storage  location  for  the  CorreluxView  application 

database  is  shown.  This  target  directory  was  created  upon  initial  installation  of  the 

software. All measurement data sets that are imported to the CorreluxView application 

by the Correlator are saved under this location.  

You can use the 

Open

 button to open the directory. 

You can use the 

Browse

 button to specify a new storage location. The application will 

display a window allowing you to navigate to the new target directory for the application 

database. When you are finished, click 

OK

 to confirm your change. 


6.2.2 

GPS receiver port  

The CorreluxView application allows you to connect a GPS receiver to your computer so 

you can use the software to specify GPS coordinates for sensors. 

Use the drop-down menu in the 

GPS device

 segment to select the connection port for 

your GPS receiver.  


6.2.3 

System of units 

You  can  select  whether 

Metric

  or 

Imperial  (Anglo-American)

  units  of  measurement 

are to be used in your CorreluxView application. 

Open the 

Correlation

 tab. Use the drop-down menu in the 

Unit

 segment. 

Summary of Contents for COR C-300-RI

Page 1: ...sue 0 9 03 2017 EN Article number 88888 Mess und Ortungstechnik Measuring and Locating Technologies Elektrizit tsnetze Power Networks Kommunikationsnetze Communication Networks Rohrleitungsnetze Water...

Page 2: ...Consultation with SebaKMT 2...

Page 3: ...ervice station please contact Seba Dynatronic Mess und Ortungstechnik GmbH Hagenuk KMT Kabelmesstechnik GmbH Dr Herbert Iann Str 6 D 96148 Baunach Phone 49 9544 68 0 Fax 49 9544 22 73 R deraue 41 D 01...

Page 4: ...MT are hereby limited to a period of 12 months from the date of delivery Each component supplied by SebaKMT within the context of warranty will also be covered by this warranty for the remaining perio...

Page 5: ...and Design 17 4 2 Identification number ID 19 4 3 Power supply 19 4 4 Commissioning 20 4 5 Installation 20 5 The Multi sensors 21 5 1 Design and function 21 5 2 Identification number ID 21 5 3 Power s...

Page 6: ...lation 31 6 6 1 Perform and display a correlation 31 6 6 2 Display and select audio blocks Offline measurements only 32 6 6 3 Call up the correlation analysis menu 33 6 6 4 Select a correlation method...

Page 7: ...Terms of Warranty 7...

Page 8: ...e to non observance of the instructions and safety advices provided by this manual Locally applying regulations have to be observed The following signal words and symbols are used in this manual and o...

Page 9: ...s designed for industrial use When used at home it could cause interference to other equipment such as the radio or television The interference level from the line complies with the limit curve B livi...

Page 10: ...nline measurement In a so called Online measurement the noise recording and the correlation of the data take place at the same time Step Description 1 Installing the Power transmitters A and B at two...

Page 11: ...e leak noise directly at the water column The Transport case offers space for the C 300 RI 2 Power transmitters and 3 Multi sensors The case is not only for storage and transportation purposes but als...

Page 12: ...by the vehicle s battery even while the vehicle is not in operation This could result in the complete discharge of the vehicle battery When you park the car disconnect the Correlux transport case from...

Page 13: ...sic set Accessory Description Art no COR MS 3 Multi sensor 1004815 CMK 3 8 MS Case for 8 Multi sensors COR MS 3 2005301 LOG TP Trivet adaptor for Sebalog Corr 128309877 LOG MWA Magnetic angled adaptor...

Page 14: ...al description 14 Parameter Value Operating time min 12 h Connections Sensor microphone hydrophone Radio antenna Dimensions without handle 125 x 111 mm Weight without sensor 0 9 kg Degree of protectio...

Page 15: ...ht 0 4 kg Degree of protection IP 68 Parameter Value Sensor Integrated piezo sensor with active amplifier Adapter Magnetic adaptor Indicators Status LED Operation On Off magnetic switch Power supply I...

Page 16: ...ors COR MS 3 and receive the analog signal of the Power Transmitters COR PT 3 The C 300 RI has two external connectors to connect two different antennas one for digital communication and one for long...

Page 17: ...o module and an analogue radio module with antenna inside The sensors have the following external characteristics Element Description Microphone storage place Sensor socket for connecting the micropho...

Page 18: ...the noise level I O LED lit green the transmitter is switched on flashing the device is charging not lit the transmitter is switched off Radio LED lit red the transmitter is in Active mode noise meas...

Page 19: ...one of five LEDs is lit the device should be charged Otherwise it switches itself off automatically Red light represents the recorded noise during the measurement and not the battery status The Power...

Page 20: ...s the microphone is taken from the storage place the Power transmitter switches from Stand by to Active mode The radio module is activated From now on the recorded data are directly sent to the Correl...

Page 21: ...y Device is charging no light Device is turned off ON OFF contact area I O Magnetic foot detachable Type plate Carrying ring detachable 5 2 Identification number ID Each Multi sensor has its own six d...

Page 22: ...rage places in the case they are recharged inductively Charging takes approximately 6 hours The units indicator lights are rapidly flashing during the charging process The indicator lights turn to per...

Page 23: ...the sensor is simply placed on the adapter Then the magnetic adapter can be attached to the pipe or fitting etc NOTE The sensor s type plate and I O area must face away from the angle adapter as can b...

Page 24: ...The Multi sensors 24...

Page 25: ...ately into different segments The CorreluxView symbol at the top left of the menu bar allows you to access system settings for the application The directory structure the so called directory tree of t...

Page 26: ...Button for deleting this sensor from the list Button for listening to the quietest recording made by this sensor Minimum value of this sensor ESA value level in dB frequency in Hz The color of the fi...

Page 27: ...CorreluxView application by the Correlator are saved under this location You can use the Open button to open the directory You can use the Browse button to specify a new storage location The applicat...

Page 28: ...naming and deleting directories To create a new directory in the directory tree proceed as follows Step Description 1 In the directory tree select the directory under which your new directory is to be...

Page 29: ...surement is to be added If necessary first create a new directory 3 Click on Import in the menu bar Result A new window opens 4 Navigate to the Correlator s root directory CORRELUX This directory will...

Page 30: ...nd click on it Result A line will now connect the two sensor icons on the screen A window opens allowing you to enter parameters for the new pipeline 4 You can use the Add and Delete buttons to divide...

Page 31: ...dy be familiar with these correlation diagrams from your work with the Correlator The frequency diagram at the very top of the screen allows you to set a frequency filter and to repeat the correlation...

Page 32: ...ng the 10 checkboxes on the right you have the chance to exclude from the overall correlation those individual audio block correlations which are unusable To do this just deactivate the checkbox next...

Page 33: ...elation The buttons for analyzing correlation curve and coherence will probably also be familiar to you from your work with the Correlator Zoom To magnify a section of the correlation curve Click on t...

Page 34: ...open the printer dialog window Using the radio buttons in the Show segment bottom right you can select whether the two sensors left and right of the correlation curve are described by their Sensor num...

Page 35: ...triche vecchie z me nor da ka iztr d jumu uz kura t atrodas nedr kst izmest kop ar parastiem m jsaimniec bas atkritumiem T k tas ir izstr d jums ko cits citam p rdod un lieto tikai uz mumi tad to nedr...

Reviews: