background image

Latest products and information available at www.sealite.com

10

ATLANTIC-2600  

Ocean Buoy

Mooring Assembly Instructions

Check Components

•  Unpack all Mooring and check all components are complete and correct.

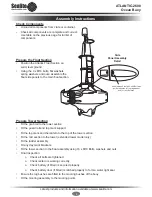
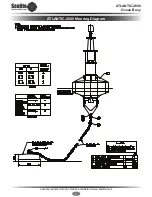
Prepare & Attach Chain

•  Fit and secure 1 x Ø38mm Shackle and 1 x Ø38mm Swivel Eye to the base of the bridle. 


Note:

 All Shackles must be positively locked. For example use 3mm Stainless Steel wire to lock 

the pin eye, or use a shackle pin with nut and split pin.

•  Fit and secure a length of chain to the Swivel Eye using 1 x Ø38mm Shackle.
 

Note:

 Please use the guides below to determine the correct chain size and length.

•  Fit and secure the Bridle to the Buoy using 2 x Ø32mm Shackles. Place Ø36mm washers to either 

side of the bridle plate to pack the Shackle for a neat fit.

Attach Mooring Block

•  Fit and secure the Chain to the Mooring Block.

•  The Buoy is now ready for deployment.

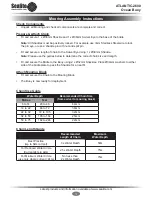
Water Depth

Recommended Chain Size 

(from swivel to mooring block)

Metres

Feet

6 to 14

20 to 46

44mm

14 to 22

46 to 72

38mm

22 to 32

72 to 105

32mm

32 to 50

105 to 164

25mm

50 to 75

164 to 246

22mm

Chain Size Guide

Recommended  

Length of Chain

Maximum  

Water Depth

Best Practice 

(Up to 6kts current)

3 x Water Depth

50m

For Reduced Water Circle 

(Current 2kts to 4kts)

2.5 x Water Depth

75m

For Minimum Water Circle 

(use only where current <2kts)

Not less than 

2 x Water Depth

75m

Chain Length Guide

Summary of Contents for Atlantic-2600

Page 1: ...Version 2 2 ATLANTIC 2600 Ocean Buoy Installation Service Manual ...

Page 2: ......

Page 3: ...ge 7 Assembly Instructions Page 8 Mooring Assembly Instructions Page 10 Mooring Diagram Page 11 Marine Buoy Maintenance Page 12 Sealite Buoy Warranty Page 14 Version No Description Date Author Approved 1 0 Manual Launch April 2011 C Procter 1 1 Max Mooring Load adjustment May 2012 M Walker 1 2 Breather Unit September 2013 P Rainey 1 3 Mooring diagram update September 2015 D Tomaszewicz 2 0 Contact...

Page 4: ...sibility solution to marine navigation The Sealite buoy division provides turn key production of navigation buoys From tooling development raw materials selection and production to final testing and inspection Sealite guarantees superior quality and fast turn around times Sealite s buoy products are available in a wide range of configurations and sizes and can be economically shipped worldwide Why...

Page 5: ...ne Internal tie bars to interconnect lifting mooring points Innovative guidance keel IALA top mark Guard rail 316 grade stainless steel ladder grab rail Optional battery compartment Lifting points Non slip deck Rotationally moulded to 18mm wall thickness Twin mooring points ATLANTIC 2600 ET Model shown includes extended tower to 4 1mtr ATLANTIC 2600 Ocean Buoy The ATLANTIC 2600 is a robust rotatio...

Page 6: ...Latest products and information available at www sealite com 6 ATLANTIC 2600 Ocean Buoy ATLANTIC 2600 Standard Model ATLANTIC 2600 ET Model includes extended tower ...

Page 7: ...Lug Bushes 4 4 10 G316 S S Bolt M10x100mm Long 16 32 11 G316 S S Flat Washer 32 64 12 G316 S S Spring or Locking Washer 16 32 13 G316 S S Plain Nut 16 32 14 G316 S S Bolt M16 x 90mm 8 8 15 G316 S S M16 Flat Washer 16 16 16 G316 S S M16 Spring Washer 8 8 17 G316 S S M16 Plain Nut 8 8 18 Galvanised Grade M Shackle Ø38 with Ø44 pin inside width 70mm x 137mm 2 2 19 Galvanised Grade S Shackle Ø32mm 2 2...

Page 8: ... washers and nuts assemble the float side panels to the main float section Prepare Tower Section Fit the grab rail to the tower section Fit the guard rail and top mark support Fit the top mark and the lantern to the top of the tower section Fit the mid section to the tower extended tower model only Fit the ladder assembly Fit any day mark brackets Fit the tower section to the float assembly using ...

Page 9: ...d spills out through the small hole allowing the water to effectively drain from the buoy and at the same time preventing water from entering into the buoy through the small hole Installation Instructions for Breather Units For Products which Contain Sealite s Power Packs 1 Unscrew the white plug located at the side base of the buoy 2 Apply a small amount of marine grade silicon adhesive to the th...

Page 10: ...e the correct chain size and length Fit and secure the Bridle to the Buoy using 2 x Ø32mm Shackles Place Ø36mm washers to either side of the bridle plate to pack the Shackle for a neat fit Attach Mooring Block Fit and secure the Chain to the Mooring Block The Buoy is now ready for deployment Water Depth Recommended Chain Size from swivel to mooring block Metres Feet 6 to 14 20 to 46 44mm 14 to 22 ...

Page 11: ...Latest products and information available at www sealite com 11 ATLANTIC 2600 Ocean Buoy ATLANTIC 2600 Mooring Diagram ...

Page 12: ...ual Maintenance Check and clear the tail and ride chains from shells and algae Check for wear on any shackle axis and check the tapered pins Any worn shackles must be replaced Check the free movement of each swivel around its head If any swivel head sticks it must be replaced Check every link of the thrash length of the chain Check the diameter of the nips and sides and also inspect the welds on e...

Page 13: ...Latest products and information available at www sealite com 13 ATLANTIC 2600 Ocean Buoy Notes ...

Page 14: ...Latest products and information available at www sealite com 14 ATLANTIC 2600 Ocean Buoy Refer to Sealite website www sealite com Sealite Buoy Warranty ...

Reviews: