background image

User’

s Manual >>

     5

Important Notes on Using Waterproof Housing

Before using the waterproof housing, carefully read and strictly observe the detailed 
instructions described in this manual.  Not following the instructions for usage and 
maintenance may void your warranty.

Notes on Battery Usage

When you use the battery, carefully read and strictly observe the 

Safety Instructions


and the notes described below:


Use only the specified battery included with the camera.


Avoid using the battery in extremely cold environments as low temperatures 
can shorten the battery life and reduce camera performance. 


When you are using the new rechargeable battery or rechargeable battery that 
has not been used for an extended period of time the battery that passed the 
expiry  date  is  an  exception  might  affect  the  number  of  images  that  can  be 
captured. Therefore, to maximize its performance and lifetime, we recommend 
that you fully charge the battery and discharge it for at least one complete cycle 
before use.


The battery may feel warm after long period of continuous use of the camera 
or the flash. This is normal and not a malfunction.


The camera may feel warm after long period of continuous use. This is normal 
and not a malfunction.


If the battery is not to be used for a long period of time, remove it from the 
camera to prevent leakage or corrosion.


If the battery is not to be used for a long period of time, store it after no battery 
power left. If the battery is stored for a long time in a fully charged state, its 
performance may be impaired.


Always keep the battery terminals in a clean state.


Risk of explosion if battery is replaced by an incorrect type.


Dispose of used batteries according to the instructions.


We recommend the battery should be charged 8 hours before the initial use. 

Summary of Contents for ReefMaster DC600

Page 1: ...Go to www sealife cameras com service manuals html for ENGLISH FRANCAIS DEUTSCH ITALIANO and ESPANOL versions SeaLife DC600 Underwater Camera Instruction Manual ...

Page 2: ......

Page 3: ... communications However there is no guarantee that interference will not occur in a particular installation If this equipment does cause harmful interference to radio or television reception which can be determined by turning the equipment off and on the user is encouraged to try to correct the interference by one or more of the following measures Reorient or relocate the receiving antenna Increas...

Page 4: ...demographics and geographical preferences Products very often vary between retailers especially with accessories such as batteries chargers AC adapters memory cards cables carrying cases pouches and language support Occasionally a retailer will specify a unique product color appearance and internal memory capacity Contact your dealer for precise product definition and included accessories 3 The ill...

Page 5: ... repair the camera This might cause fire or electric shock For repair or internal inspection ask the store of purchase Do not use the camera in areas near water unless sealed in its waterproof housing This might cause fire or electric shock Take special care during rain snow on the beach or near the shore Do not place the camera on inclined or unstable surfaces This might cause the camera to fall or...

Page 6: ...ument Do not drop it strike it or use excessive force when handling the camera This might cause damage to the camera Do not use the camera in humid steamy smoky or dusty places unless sealed inside the waterproof housing This might cause fire or electric shock Do not remove the battery immediately after long period of continuous use The battery becomes hot during use Touching a hot battery might ca...

Page 7: ...fect the number of images that can be captured Therefore to maximize its performance and lifetime we recommend that you fully charge the battery and discharge it for at least one complete cycle before use The battery may feel warm after long period of continuous use of the camera or the flash This is normal and not a malfunction The camera may feel warm after long period of continuous use This is n...

Page 8: ...GRAPHY MODE 26 Still Image Mode 27 Recording Voice Memos Using Optical Zoom 28 Using the Digital Zoom 29 Setting the Flash 31 Using the Flash in External Flash Mode 32 Setting the Focus Manual five focus areas 33 Setting the Self timer 34 Exposure Compensation Backlight Correction 35 AE Lock Setting the Scene Mode 37 Setting the Panorama Mode 38 About SPY Mode 39 Using the Photo Frame function 39 V...

Page 9: ... 70 Step 1 Installing the PC camera driver 71 Step 2 Connecting the digital still camera to your computer as a PC camera 72 EDITING SOFTWARE INSTALLATION 72 Installing Photo Explorer 72 Installing Photo Express 73 Installing Cool 360 74 CAMERA SPECIFICATIONS 75 TROUBLESHOOTING 80 UNDERWATER HOUSING INSTRUCTIONS 81 Must Do for Underwater Housing 83 Maintaining a Waterproof Seal 84 Quick Waterproof ...

Page 10: ...king bright colorful pictures with external flash accessory Ext Flash mode or without flash Sea mode Fully expandible system with SeaLife flashes and lenses 6 1 Megapixels A high resolution CCD sensor provides 6 1 megapixels for excellent quality of images 2 5 LTPS color image LCD monitor Optical zoom 3x plus 4x digital zoom 10MB internal built in memory Images can be captured without using a memory ...

Page 11: ...SE DPOF functionality DPOF can be used to print your images on a DPOF compatible printer by simply inserting the memory card PictBridge support You can connect the camera directly to a printer that supports PictBridge and perform image selection and printing using the camera monitor screen and controls Provided editing software Photo Explorer 8 0 Photo Express 5 0 and Cool 360SE You can enhance an...

Page 12: ...tware CD ROM AV Cable AC Power Adapter Battery Charger Camera Strap Camera Pouch 1 Lithium ion Rechargeable Battery International plug adapters Adapter for Flash Link Optical Cable Common Optional Accessories SD Memory Card Spare battery SeaLife Digital Flash SL960D SeaLife Wide Angle Lens SL970 Moisture Muncher anti fog capsules SL911 Deluxe travel case Flash Link Optical Cable Connection SL962 F...

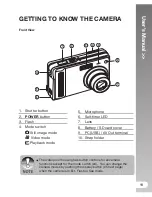
Page 13: ...ode Video mode Playback mode 5 Microphone 6 Self timer LED 7 Lens 8 Battery SD card cover 9 PC USB AV Out terminal 10 Strap holder The waterproof housing has button controls for all camera functions except for the mode switch 4 You can change the camera modes by pushing the display button 5 next page when the camera is in Ext Flash or Sea mode ...

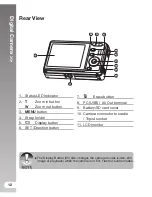
Page 14: ... 4 Strap holder 5 Display button 6 SET Direction button Rear View 7 Erase button 8 PC USB AV Out terminal 9 Battery SD card cover 10 Camera connector to cradle Tripod socket 11 LCD monitor The Display Button 5 also changes the camera modes video still image or playback when the camera is in Ext Flash or scene modes ...

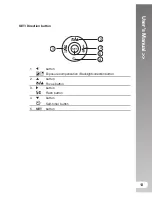
Page 15: ...User s Manual 13 1 button Exposure compensation Backlight correction button 2 button Focus button 3 button Flash button 4 button Self timer button 5 SET button SET Direction button 1 2 3 4 5 ...

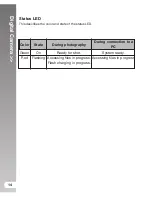
Page 16: ...describes the color and state of the status LED During connection to a PC System ready Accessing files in progress Color Green Red State On Flashing During photography Ready for shot Accessing files in progress Flash charging in progress ...

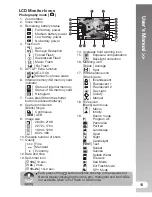
Page 17: ...136 2272 x 1704 1600 x 1200 640 x 480 10 Possible number of shots 11 Quality Fine Standard Economy 12 Date and time 13 Self timer icon 10s 10 sec 2s 2 sec 10 2s 10 2 sec P SD 14 Unsteady hold warning icon 15 Exposure compensation Backlight correction 16 Metering icon Blank Average Spot 17 White balance icon Blank Auto Incandescent 1 Fluorescent 1 2 Fluorescent 2 Day Light Cloudy Manual 18 Focus ic...

Page 18: ...hen the shutter button is pressed halfway 8 Focus icon Playback mode Still image playback 1 Playback mode 2 SD memory card indicator if present 3 File number 4 Folder number 5 Protect icon 6 Voice memo Playback mode Video playback 1 Video status bar 2 Elapsed time 3 SD memory card indicator if present 4 File number 5 Folder number 6 Protect icon 7 Video mode 8 Playback mode 9 Total time SD SD SD ...

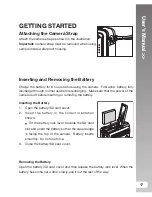
Page 19: ...ure that the power of the camera is off before inserting or removing the battery Inserting the Battery 1 Open the battery SD card cover 2 Insert the battery in the correct orientation shown Tilt the battery lock lever towards the SD card slot and orient the battery so that the square edge is facing the top of the camera Battery inserts smoothly Do not use force 3 Close the battery SD card cover Re...

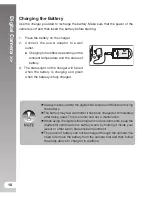
Page 20: ...is charging and green when the bateery is fully charged Always make sure that the digital still camera is off before removing the battery The battery may feel warm after it has been charged or immediately after being used This is normal and not a malfunction When using the digital still camera in cold environments keep the digital still camera and its battery warm by holding it inside your jacket ...

Page 21: ...faces the bottom of the camera Insert the card as far as it can go until it clicks Do not use force3 Close the battery SD card cover Removing the SD card Open the battery SD card cover press lightly on the edge of the SD card and it will eject To prevent valuable data from being accidentally erased from an SD card you can slide the write protected tab on the side of the SD card to LOCK To save edi...

Page 22: ... the digital still camera turns on To turn the power off press the POWER button again The power is turned off automatically when the camera has not been operated for a fixed period time To resume the operation condition turn the power on again Refer to section in this manual titled Auto OFF in the Setup Menu In Photography Mode for further details ...

Page 23: ...etup menu with the button 3 Select Date Time with the buttons and press the SET button The Date Time setting screen will be displayed 4 Select the item s field with the buttons and adjust the value for the date and time with the buttons The date and time is set in the order year month day hour minute The time is displayed in 24 hours format 5 After confirming all settings are correct press the SET b...

Page 24: ...onitor 1 Slide the mode switch to or or 2 Press the MENU button and select Setup menu with the button 3 Select Language with the buttons and press the SET button The Language setting screen will be displayed 4 Select the displayed language with the buttons and press the SET button The setting will be stored Mode Mode ...

Page 25: ...press the SET button To cancel formatting select Cancel and press the SET button To format the internal memory do not insert an SD card into the camera Otherwise you will format the SD card Formatting the SD card also erases the protected images All data other than images are also erased Before formatting the card make sure that all the images are unnecessary Formatting is an irreversible action a...

Page 26: ... space High resolution and quality settings are recommended for printed output and situations requiring the finest detail Lower resolution quality images take up less memory space and may be quite suitable for sharing images via e mail in a report or on a web page To change image resolution or image quality perform these steps below 1 Slide the mode switch to 2 Press the MENU button Capture menu is...

Page 27: ...andard Economy 2848 X 2136 1600 x 1200 640 x 480 10 MB Internal Memory Image size 1GB SD card capacity Quality 17 35 53 27 55 82 53 105 158 316 633 950 2 5 8 4 8 12 8 16 24 49 99 149 32MB 8 17 26 13 27 40 26 51 77 155 310 465 36 72 108 56 112 166 108 213 320 640 1280 1920 72 145 217 113 226 335 217 428 642 1285 2571 3857 146 292 435 227 455 672 435 859 1289 2579 5158 7738 292 584 872 455 911 1347 ...

Page 28: ... adjusts the exposure and pressing the shutter button down fully captures the images The focus area frame turns green and the status LED lights green when the camera is in focus and the exposure is calculated When the focus or exposure is not suitable the frame of the focus area turns red This means there is not enough light or contrast for the camera to focus accurately on the subject In this cas...

Page 29: ...l image mode immediately following a still image captured 1 Slide the mode switch to 2 Press the MENU button and select the Function menu with the button Function menu is displayed 3 Select Voice Memo with the buttons and press the SET button 4 Select On with the buttons and press the SET button 5 Press the MENU button to exit from the menu icon is displayed on the screen 6 Compose the image press...

Page 30: ... d Select On with the buttons again and press the SET button e Press the MENU button to exit from the menu screen f To activate the digital zoom press and hold the T button completely until the image on the LCD monitor expands 3 Press the shutter button to capture a zoomed image The zoom setting is automatically cancelled by either turning the camera off or the activation of the Auto OFF function ...

Page 31: ... Auto l l l l Macro l l l l Landscape infinity l l l l Setting the Flash Set the flash for capturing images The flash firing mode can be set to suit for the photographic conditions 1 Slide the mode switch to 2 Toggle the button to select the desired flash mode A This table is for reference only and varies according to different combination of photography modes l Available X Unavailable When in Ext flash...

Page 32: ...s fires twice and the image is captured at the second firing Forced Flash In this mode the flash always fires Use this mode for photographing under artificial light such as backlighting Suppressed Flash Use this mode when capturing images using indoor lighting for stages and indoor competitions and when the subject is too far away for the flash to be effective Macro Flash Available only when camera is i...

Page 33: ...de In order to achieve proper image exposure it may be necessary to select from one of the following three flash modes Blank This is the default setting ideal for proper exposure from 1 yd 1m to 2 yd 2m Macro Flash This flash setting is ideal for shooting distances inside of 1 yd 1m Far Flash Select this flash mode for best exposure beyond 2 yds 2m shooting distance The above shooting distance may va...

Page 34: ...is 1 ft 35cm to 2 ft 60cm Infinity Select this setting to lock the camera to the infinity focus point 60cm to infinity This setting also results in a very fast shutter response time and is ideal for action shots Manual five focus areas You can choose your desired focus area and make the focus area more clear by this setting 1 Press the POWER button to turn the power on 2 Slide the mode switch to 3 Com...

Page 35: ...eset time has elapsed The countdown is displayed on the LCD monitor To cancel the self timer during operation press the shutter button halfway The table below will help you choose the appropriate self timer mode Self timer mode Description 10s 10 sec The image is captured about 10 seconds after the shutter button is pressed 2s 2 sec The image is captured about 2 seconds after the shutter button is...

Page 36: ...s the button to decrease the value The setting range of the exposure compensation is as follows 2 0 1 7 1 3 1 0 0 7 0 3 0 0 3 0 7 1 0 1 3 1 7 2 0 Press the button to confirm the setting The larger the value the brighter the image The smaller the value the darker the image The set value is displayed on the screen Effective Subjects and Set Values positive compensation Printed matter comprising black...

Page 37: ...rd the exposure value you just got 5 Compose the image press the shutter button down half way to focus the image and press the shutter button the rest of the way down to capture the image It will capture according the recording exposure value Setting the Scene Mode By simply selecting one of the following 15 modes you can capture the image with most appropriate settings 1 Slide the mode switch to ...

Page 38: ...t Select this mode when you want to photograph fast moving subjects Night Select this mode when you want to capture people with an evening or night scene background Candlelight Select this mode when you want to capture photos of candlelit scene without spoiling the atmosphere TEXT Text Select this mode when you want to capture an image that contains black and white subjects like printed documents ...

Page 39: ...tch it together later with a program such as Cool 360 or Photoshop application 1 Slide the mode switch to a Press the MENU button b Select Scene Mode with the buttons and press the SET button c Select Panorama with the buttons and press the SET button 2 Shoot the first image The next image appears beside the previous image 3 Orient the camera so that the second frame overlaps a small portion of the...

Page 40: ...b Select Scene mode with the buttons and press the SET button c Select SPY with the buttons and press the SET button d Select the desired time interval with the buttons and press the SET button e Press the MENU button to exit the menu 2 Aim the camera at the desired subject or scene It is preferred to use a compact tripod so the camera is steady and remains aimed at the subject 3 Push the shutter ...

Page 41: ...clip flash photography is not possible Using the Photo Frame Function You can set your desired photo frame before shooting There are 17 types of frame like borders already stored in the camera 1 Slide the mode switch to and turn your camera on by pressing the POWER button 2 Press the MENU button then select the Function menu with the buttons 3 Select Photo Frame with the buttons then press the SET ...

Page 42: ... information display state in the following order When camera is in Ext Flash or Sea mode the button switches between still image video and playback modes Pressing the buttons during image playback will result in a 90 degree rotated display The button rotates the image clockwise and displays it whereas the button rotates the image counterclockwise and displays it A press of the button opposite to ...

Page 43: ... Press the SET button This pauses video playback To cancel pause press the SET button again To stop video playback press the shutter button This stops playback and returns to the start of the video clip Button Operations During Playback During a Pause During a Stop Shutter button SET button Pause Stop The display returns to the 1st frame playback Cancelling pause Regular forward play Video clips c...

Page 44: ... V cable to the A V OUT terminal of the camera 2 Connect the other end to the A V input socket of the TV set 3 Turn the TV and camera on 4 Change TV channel to Video in refer to your TV instruction manual for information on selecting the correct channel 5 Play back the still images video clips The method of operation is the same as playing back still images and video clips on the camera Refer to t...

Page 45: ...voice memo with the buttons 3 Press the shutter button VOICE RECORDING is displayed on the screen and recording starts 4 To stop recording voice memo during recording press the shutter button again VOICE RECORD END will be displayed and the recording will end A icon is displayed with images that have been recorded with a voice memo Playing back voice memo A press of the SET button displays VOICE P...

Page 46: ...the screen 2 Press the W button The images are displayed in the thumbnail display Images that have been selected with the buttons will be indicated by a green frame When there are ten or more images scroll the screen with the buttons 3 Press the buttons to select the image to be displayed at regular size 4 Press the SET button The selected image is displayed at its regular size A or icon will be d...

Page 47: ...rge from the thumbnail display 3 Adjust the zoom ratio with the T W buttons Pressing the T button enlarges the image To return to normal magnification press the W button The image is displayed enlarged and the magnification factor is displayed on the LCD monitor 4 Press the buttons to select the area to enlarge 5 To return to regular display toggle the W button until the regular display appears on t...

Page 48: ...on The slideshow will start 5 To stop the slide show during playback press the SET button The image is displayed on the screen when you press the SET button The Auto Off function does not operate during slide show All still images in the folder are automatically played back Video clips are displayed the first frame image and they are not played back You can adjust the slide show display interval wi...

Page 49: ...ns 3 Press the MENU button The playback menu is displayed 4 Select Protect with the buttons and press the SET button 5 Select Single or All with the buttons and press the SET button 6 Select Set with the buttons and press the SET button Protect is executed and the camera returns to the playback mode The protect icon is displayed with protected images When All has been selected is displayed with al...

Page 50: ...le images simultaneously 1 Select Protect with the buttons from the playback menu and press the SET button 2 Select Select with the buttons and press the SET button The images are displayed in the thumbnail display 3 Select the image you want to protect with the buttons and press the button The protect icon is displayed with protected images Selecting a protected image and pressing the button agai...

Page 51: ...specified images 1 Slide the mode switch to 2 Select the image that you want to set DPOF with the buttons 3 Press the MENU button The playback menu is displayed 4 Select DPOF with the buttons and press the SET button The DPOF setting screen is displayed 5 Select Single or All with the buttons and press the SET button Single Sets DPOF for each individual image All Sets DPOF for all images at once 6 ...

Page 52: ...tes a file containing the DPOF information and when the operation is finished the screen returns to the playback mode The date that is printed on the photo is the date set on the camera To print the correct date on the photo set the date on the camera before you photograph the image Refer to section in this manual titled Setting the Date and Time for further details Before you perform the DPOF setti...

Page 53: ...a Protected images Video clips Images cannot be resized when the SD card is write protected 1 Select the image that you want to resize 2 Press the MENU button 3 Select Resize with the buttons and press the SET button 4 Select the image size that you want to change with the buttons and press the SET button To quit resizing press the MENU button When resizing ends the screen returns to playback mode...

Page 54: ...mages cannot be resized Economy quality images Images captured with other camera Protected images Images cannot be changed quality when the SD card is write protected 1 Select the image that you want to change its quality 2 Press the MENU button 3 Select Quality Change with the buttons and press the SET button 4 Select the image size that you want to change with the buttons and press the SET butto...

Page 55: ... press the SET button Erasing at Playback Mode Erasing single image Erasing all images 1 Slide the mode switch to The last image will be displayed on the screen 2 Select the image you want to erase with the buttons 3 Press the button The deletion menu will be displayed 4 Select Single or All with the buttons and press the SET button Single Erases the selected image or the last image All Erases all...

Page 56: ...Select Select with the buttons and press the SET button The images are displayed in the thumbnail display 4 Select the image you want to erase with the buttons and press the button The icon will be displayed One more press of the erase button will cancel the operation Repeat this procedure and select all the images that you want to erase 5 Press the SET button To delete the image in internal memor...

Page 57: ...e mode switch to 2 Press the MENU button Capture menu is displayed 3 Select the desired Capture option item with the buttons and press the SET button to enter its respective menu 4 Select the desired setting with the buttons and press the SET button 5 To exit from the menu press the MENU button The unavailable menu options are in gray color ...

Page 58: ...1600 x 1200 640 x 480 Quality This sets the quality compression rate at which the image is captured Fine Standard Economy Sharpness This sets the sharpness of the image that will be photographed Hard Normal Soft Saturation This sets the saturation of the image that will be captured High Normal Low Color This sets the color of the image that will be photographed Standard Vivid Sepia Monochrome ...

Page 59: ...tography will become possible even in dark locations but the more pixilated grainer the image will appear 64 100 200 Auto Metering This sets the metering method for calculating the exposure Blank Average Averages the light metered from the entire frame but gives greater weight to the subject matter at the center Spot A very small portion of the center of the screen is measured and the exposure is ...

Page 60: ...ure an image at a time Continuous Permits continuous photography of 3 images max AEB AEB Permits 3 consecutive images in the order of standard exposure underexposure and overexposure compensation Voice Memo Refer to section in this manual titled Recording Voice Memos for further details On Off When Voice Memo is set to On the preview setting is also fixed at On In Continuous and AEB capture mode th...

Page 61: ...phy On Off Preview This sets whether or not to display the captured image on the screen immediately after the image is captured On Off When Preview is set to Off Voice Memo setting is also fixed at Off Date Print The date of recording can be printed directly on the still images This function must be activated before the image is captured On Off Photo Frame Refer to section in this manual titled Usi...

Page 62: ...enter its respective menu 4 Select the desired setting with the buttons and press the SET button 5 To exit from the menu press the MENU button Color Refer to the section in this manual titled Color in Still Image Menu Capture for further details White Balance Refer to the section in this manual titled White Balance in Still Image Menu Capture for further details Manual WB Refer to the section in t...

Page 63: ...ive menu 4 Select the desired setting with the buttons and press the SET button 5 To exit from the movie menu press the MENU button Audio This sets whether or not to record audio at the time of video recording On Off LCD Bright Refer to section in this manual titled LCD Bright in Still Image Menu Function for further details Digital Zoom On Audio On Digital Zoom Refer to section in this manual tit...

Page 64: ...titled DPOF Settings for further details Protect Refer to section in this manual titled Protecting Images for further details LCD Bright Refer to section in this manual titled LCD Bright in Still Image Menu Function for further details Resize Refer to section in this manual titled Resizing an Image Resize for further details Quality Change Refer to section in this manual titled Compressing an Imag...

Page 65: ...m number 0001 Cancel Execute Auto Off If no operation is performed for a specific period of time the power to the camera is automatically turned off This feature is useful to reduce battery wear 1 Min 2 Min 3 Min Off Date Time Refer to section in this manual titled Setting the Date and Time for further details Sys Reset This returns all basic settings to the camera s default settings The time setti...

Page 66: ...otography Mode for further details Format Refer to section in this manual titled Formatting the SD Card or Internal Memory for further details Fr No Reset Refer to section in this manual titled Fr No Reset in Setup Menu In Photography Mode for further details Card Info This displays the free capacity of the SD card If the SD card is not inserted NO CARD message is displayed on the screen System In...

Page 67: ...a and the USB jack on the printer with the supplied USB cable then turn on your printer Printing images When the camera is properly connected to a PictBridge compliant printer the PictBridge menu is displayed on the monitor 1 Select the item you want to configure with the buttons and press the SET button Images Select whether you want to print specific image or all images You may also select printin...

Page 68: ...ns Select the Print Num up to 99 with the buttons After selecting the desired image and printing number press the SET button to confirm 4 Select Exit with the buttons and press the SET button 5 Select Print with the buttons and press the SET button to start printing 6 The printing starts and the figure shown on the right hand side appears The COMPLETE will be displayed temporarily reminding you that...

Page 69: ...rPC G3 G4 OS 9 0 or later 64MB RAM 128MB hard disk space CD ROM drive Available USB port Step 1 Installing the USB Driver Windows 98 computers The USB driver on the CD ROM is exclusively for Windows 98 computers Installing the USB driver on computers running Windows 2000 ME XP is not necessary 1 Insert the CD ROM that came with the camera into your CD ROM drive The welcome screen appears 2 Click I...

Page 70: ...his Removable disk is actually the memory card in your camera Typically the camera will be assigned drive letter e or higher 5 Double click on the removable disk and locate the DCIM folder 6 Double click on the DCIM folder to open it to find more folders Your recorded images and video clips will be inside these folders Copy Paste or Drag N Drop image and video files to a folder on your computer Mac ...

Page 71: ...ur images are inside these folder s Select the images that you want and then choose Copy from the Edit menu Open the destination location folder and choose Paste from the Edit menu You may also drag and drop image files from the camera to a desired location Macintosh Open the untitled disk icon and the destination location on your hard disk Drag and drop from the camera to the desired destination M...

Page 72: ...phones n Network or Internet connection Video conferencing or video editing software is not included with the digital camera This mode is not supported for Mac Step 1 Install the PC camera driver The PC camera driver included in the CD ROM is exclusively for Windows The PC camera function is not supported for Mac platforms 1 Insert the enclosed CD ROM into your CD ROM drive 2 When the welcome scre...

Page 73: ... Camera with the buttons and press the SET button 6 Connect one end of the USB cable to the conversion adapter terminal of the camera 7 Connect the other end of the USB cable to an available USB port on your computer g The PC Camera is displayed on the screen 8 Position the digital still camera steadily on top of your computer monitor or use a tripod When using this digital still camera as a PC ca...

Page 74: ... efficient way to transfer browse modify and distribute digital media Acquire photos video or sound clips from various digital device types and easily browse or add personal descriptions make timely modifications or distribute the media through the medium of your choice E mail Print Slideshow Presentations It is an indispensable all in one tool for owners of digital cameras WebCams DV camcorders sca...

Page 75: ... installation For more information about the operation of Cool 360 application software refer to its respective help documentation For Windows 2000 XP users please make sure to install and use the Cool 360 in Administrator mode Cool 360 is not supported on the Mac To install Photo Express 1 Insert the CD ROM that came with the camera into your CD ROM drive The welcome screen appears 2 Click INSTAL...

Page 76: ...f Marco Wide 5 cm Infinity Tele 35 cm Infinity LCD monitor 2 5 LTPS color LCD High resolution 230K pixels display Self timer 2 sec delay 10 sec delay 10 2sec delay Exposure compensation 2 0EV 2 0EV in 0 3EV increments White balance Auto Incandescent Fluorescent 1 Fluorescent 2 Day Light Cloudy Manual In Sea mode 25 feet ISO 64 100 200 Auto Scene mode Program AE Panorama Portrait Landscape Sport Nigh...

Page 77: ...ended and unused so the auto power off cuts it off The battery is exhausted Camera malfunction It is being used in extreme low temperature Many shots are being captured in dark places inside requiring flash The battery is not fully charged The battery is not used for an extended period of time after charged Long period of continuous use of the camera or the flash Solution Load the battery correctly ...

Page 78: ... focus range Switch camera to infinity focus All subjects beyond 50cm 25ft will be in focus Symptom Even if I press the shutter button the camera does not shoot Images do not appear on the LCD monitor Although it is set to Auto Focus it does not focus Cause The battery is running low The power is not on The camera is not in shooting mode The shutter button is not pressed all the way The memory card...

Page 79: ... to be solid green Consider setting the flash to ON to force fire the flash in bright light Get closer to your subject and shoot Set the flash to something other than flash off mode Set the exposure compensation to a larger value in ext Flash mode set camera to far Flash to make images brighter Set the exposure compensation to a smaller value In Ext Flash mode set camera to macro flash to make images da...

Page 80: ... protected You played back a memory card that was not formatted by this device The memory card is write protected The memory card is write protected End of memory card life The LCD monitor is too dark Playback Solution Slide the mode switch to playback mode Load a card that was formatted and stored on by this device Cancel protection Load a card that was formatted and stored on by this device Remo...

Page 81: ...ttery once and try again Set the correct date and time Set the date and time again Other Problems About connecting to your computer software Symptom Cannot download images Cause The free space on the hard disk in your computer may be insufficient No power supply The USB driver is not installed for Windows 98 98SE Solution Check whether the hard disk has a space for running Windows and if the drive ...

Page 82: ...nd tested to 200 ft 60m Fully rubbered armored for water and shock protection Soft rubber grips Fully multi coated optical glass lens port for high light transmission Accessory mount for adding one or two external flash es Snap on lens port to quickly attach SeaLife Wide Angle Lens Advanced control buttons to access all camera settings DC600 Front view of underwater housing Backview of underwater h...

Page 83: ... follow O ring removal and installation instructions contained in this manual Replace O ring every year to ensure proper seal Only use approved SeaLife O ring designed for the DC600 Soak and rinse waterproof housing in fresh water after each use Use clean soft cloth to dry housing Store camera and housing only after careful cleaning and when totally dry 4 Carefully close lid to seal housing Make s...

Page 84: ... clean and inspect O ring and O ring contact surfaces before each underwater use in accordance with instructions provided in this manual If O ring needs to be replaced contact your local authorized SeaLife dealer or the SeaLife Service Center at 856 866 9191 or email service sealife cameras com IMPORTANT Do NOT lubricate O ring ...

Page 85: ...ng serviced if the O ring or O ring contact surfaces are damaged Do not use underwater housing if O ring or O ring contact surfaces are damaged Replacement O rings are available at your local authorized SeaLife dealer Inspect and replace O ring if damaged A Cut B Tear C Dent 1 Carefully inspect and clean O ring and O ring contact surfaces for sand hair and other debris before every use Clean o rin...

Page 86: ...rvice 4 Replace O ring every year to ensure proper seal Only use approved SeaLife O ring item SL15017 designed for the DC600 Replacement O rings are available at your local authorized SeaLife dealer 5 After each use underwater a Soak sealed housing in fresh water for about 15 minutes Most dive boats offer special fresh water buckets specifically for underwater photo equipment DO NOT put camera hous...

Page 87: ... before installing O ring Step 2 Push O ring into groove as shown being careful not to twist or roll O ring Step 3 Use two fingers to push last part of O ring into groove Step 4 Carefully close housing to firmly seat O ring and open housing again to inspect that O ring is completely seated into groove Do NOT grease the O ring ...

Page 88: ...Digital Camera 86 To Remove O ring Step 1 Push O ring along groove until it lifts Step 2 Gently lift and remove O ring from its groove ...

Page 89: ...87 HOW TO OPEN AND CLOSE WATERPROOF HOUSING Step 1 Push in locking tab to open latch Step 2 Open latch all the way to lift and release latch from housing Step 3 Open Housing as shown so inner camera does not fall out ...

Page 90: ...Digital Camera 88 Step 4 Close housing and push down on latch as shown to firmly seat latch into housing Step 5 Push down latch until locking tab clicks into place ...

Page 91: ...960D optional accessory It is strongly recommended to purchase the Flash Link optical cable accessory if you are using a SeaLife external Flash to ensure it fires all the time Step 1 Insert end of Flash Link optical cable into one of the adapter holes as shown Push cable in all the way until the end of the cable is directed at the camera s flash Step 2 Use small wrench provided to tighten set screw ...

Page 92: ...o the flash window recess If using two Flash Links attach other cable in second hole and follow above instructions Secure optical cable to Flash arm using velcro ties included with Flash Link cable Refer to Flash link optical cable instruction manual for more details and troubleshooting tips ...

Page 93: ...g lid beyond its stop point or damage may occur to the hinge area 2 Carefully inspect O ring for damage and make sure O ring is firmly seated in its groove If O ring is damaged and requires replacement contact your local authorized SeaLife dealer or SeaLife Service Center 3 Clean the housing glass lens port using clean dry cotton cloth It is recommended to apply anti fog solution to the inside surf...

Page 94: ...0 Avoid exposing housing to direct sunlight for prolonged periods of time This may promote internal fogging Test camera and housing 1 Press the small power button on the top of the housing to turn camera power on 2 Press the large shutter button on the outside of the housing to take a test picture 3 The power or shutter button should have a smooth action and return to its original resting position...

Page 95: ...ens and attract moisture Dry housing with clean soft towel after removing from fresh water tank 3 Do not expose camera and housing to direct sunlight keep in a shaded area or under a dry towel 4 It is not recommended to remove camera from housing while on the dive boat Allowing humid air to enter the housing may cause fogging 5 If you must open the housing while on the dive boat make sure you and ...

Page 96: ...r good underwater pictures Remember the human eye can see more detail than a camera In other words your eyes see the water as being clearer than it actually is Floating particles like algae and silt cause low visibility Avoid stirring up the sandy bottom with your fins These floating particles cause small spots to appear in your picture known as backscatter Always remember to limit your shooting dis...

Page 97: ...Flash to darken picture Select for Far Flash F to brighten picture You can also reduce the flash intensity with the optional SL960D SeaLife Digital accessory to brighten or darken the picture 6 Use Wide Angle Lens for dramatic pictures The SeaLife Wide Angle lens allow you to get close to your subject for images full of colors and razor sharp details With the 24mm wide angle lens you fit a close gro...

Page 98: ...ng the camera set to landscape infinity focus All underwater subjects beyond 11 2 feet 50cm shooting distance will be in focus and the shutter lag time is reduced to a mere 0 37 seconds when the flash is off 0 42 seconds in Ext Flash mode with optional flash accessory 9 Visit the SeaLife website for updated tips an advice Any updates to the manual or additional tips and advice can be found on the Sea...

Page 99: ... leaks water O ring not clean or is damaged Carefully follow O ring care instructions provided in this manual External Flash Accessory not firing at all Camera not set to correct mode Set camera to Ext Flash mode Flash not set up correctly Refer to External Flash Mode accessory manual or visit www sealife cameras com website for detailed troubleshooting information Flash Link optical cable Refer to...

Page 100: ...g lens fog up Humidity or water drops trapped Use fresh Moisture Muncher inside housing may condense on anti fog item SL911 cooler glass lens port Keep inside of housing absolutely dry and load camera in dry climate like an air conditioned room Apply thin film of anti fog solution to inside of lens port Most dive shops offer a variety of effective anti fog solutions Initially charge battery for 8 h...

Page 101: ...eo cable is completely inserted into video jack of camera docking station Also check that connection to TV VCR is correct Memory full message Memory storage is full Delete images or download to PC Insert empty memory card Pictures out of focus Dirty lens Clean lens with clean cotton cloth Fogged housing lens Insert camera in dry air conditioned room Use anti fog desiccant inside housing Do not let...

Page 102: ...indow Tripod Mount Standard 1 4 20 tripod threads to adapt accessories Lanyard Padded lanyard with swiveled attachment clip Hardware 316 Stainless Steel metal hardware Material Rubber overmolded polycarbonate housing Weight 333 grams 11 7 ounces Housing only without inner camera 472 grams 16 6 ounces Housing and inner camera Size 3 5 H x 5 5 W x 3 4 D inches 8 9cm x 14cm x 8 6cm Operating Temp 33 ...

Page 103: ......

Page 104: ...SL16024 November 2006 9M739 4009 01 ...

Reviews: