The SM300 is a two-speed circular saw designed to cut ferrous metal - including structural steel - bars and pipes. It
should not
be used to cut
any other materials. Blade guard, bar stop, integral workpiece vice and coolant system are included.
2. APPLICATION & SPECIFICATION
Blade sizes . . . . . . . . . . . . . . . . . . . . . . . .See Blade Chart
Max.cutting capacity . . . . . . . . . . . . . . . . See Blade Chart
Max. vice opening . . . . . . . . . . . . . . . . . . . . . . . . . 190mm
Motor . . . . . . . . . . . . . . . . . . 1.8/2.2 kW 415Vac 3ph 50Hz
Motor speed . . . . . . . . . . . . . . . . . . . . . . . 1400 - 2800rpm
Blade speed . . . . . . . . . . . . . . . . . . . . . . . . . .52 - 104rpm
Mitre cuts . . . . . . . . . . . . . . . . . . . . . . . . . . . . . 45
O
-0
O
-45
O
Coolant . . . . . . . . . . . .Water + Sealey SCO/5L soluble oil
Coolant capacity . . . . . . . . . . . . . . . . . . . . . . . . . . . .3 litre
Oil (gear box) . . . . . . . . . . .AGIP ACER 320 or equivalent
Oil capacity . . . . . . . . . . . . . . . . . . . . . . . . . . . . . .0.2 litres
Weight . . . . . . . . . . . . . . . . . . . . . . . . . . . . . . . . . . .150kg
Sound pressure level - average . . . . . . . . . . . . 82.6dB(A)
- peak . . . . . . . . . . . . . . .90.6dB(A)
Specification
Blade Chart
Workpiece
SM300
Tube
Blade 300mm dia. x 2.5 x 32mm
Dia. mm
Wall thickness
Tooth pitch mm
No. teeth
10 - 80
<2
4 220
10 - 80
2 - 4
5
190
20 - 80
>40
30 - 40
18 - 30
10 - 18
Dia./depth mm
Solid bar
4 - 10
12
10
6 - 8
5
6 - 8
80
90
160 - 120
180
160 - 120
p
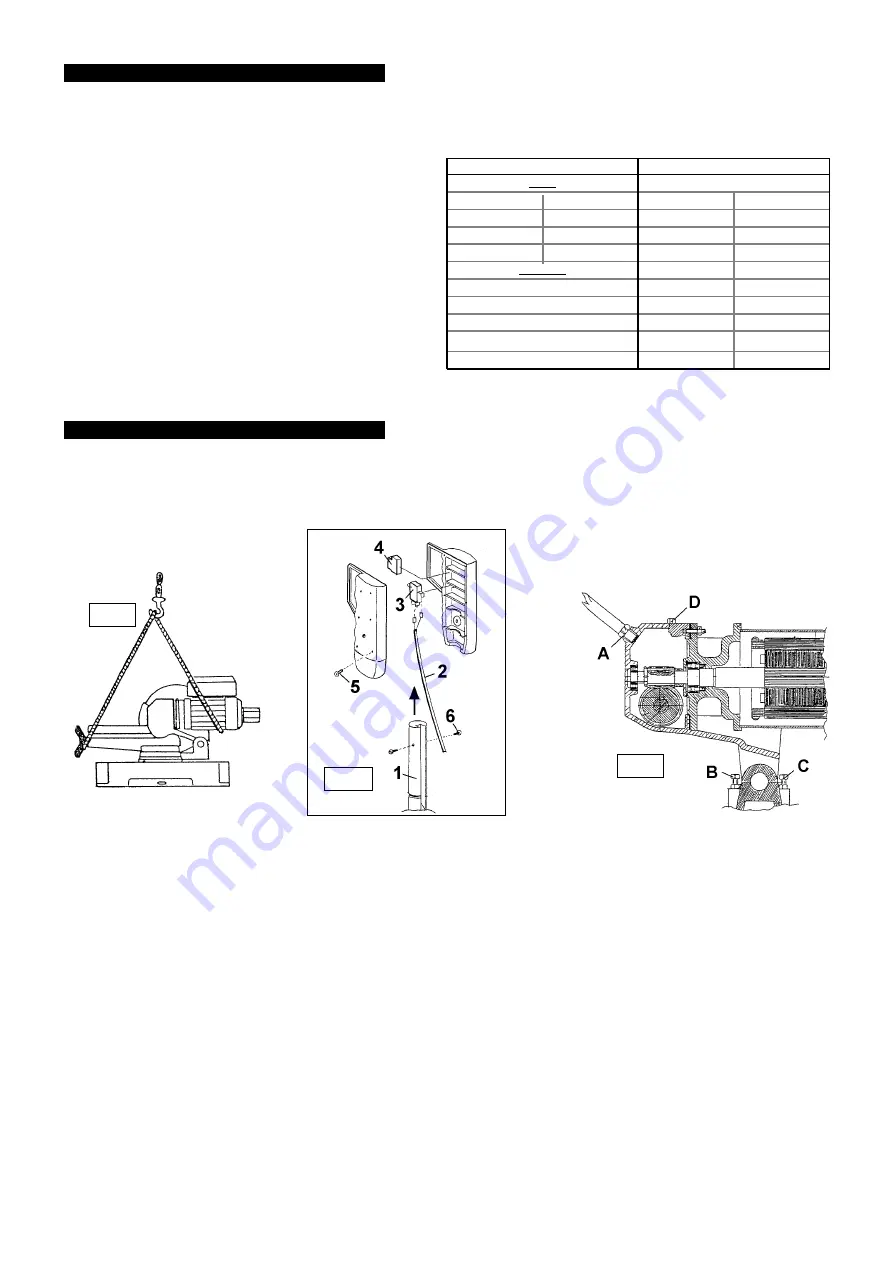
WARNING! For safe handling and movement use a lift truck or crane. Slings should be
located as shown in fig. 1.
3.1.
Unpack the product and check that all components and tools (five Allan keys) are present
and undamaged. If any problem is noted contact your supplier immediately.
Contents:
1. Saw assembly
2. Handle mouldings (2) & screws (3)
3. Micro switch
4. Switch button
5. Control lever
6. End stop
7. Workpiece support arm and roller
8. Allan keys (sizes 3, 4, 5, 6, 14mm)
3. CONTENTS & ASSEMBLY
fig. 1
fig. 3
fig. 2
3.2.
Set the saw on a flat, stable work bench, or surface strong enough to support the saw and any workpiece. Bolt the saw to the work
surface (or pedestal) using the holes provided in the base.
3.3.
Control lever assembly
3.3.1. Check control lever cable slot (fig. 2.1) for burrs or sharp edges - rectify if found - and then screw lever into hole A (fig. 3) in saw head.
Position lever with cable slot to the rear and tighten lock nut.
3.3.2. Connect cable (fig. 2.2) terminals to microswitch (3) and fit microswitch and button (4) into handle moulding as shown.
3.3.3. Fit both handle mouldings around control lever, with button to the rear and cable in cable slot. Insert screw (5) to clamp handle
mouldings together, then attach handle to control lever with 2 screws (6).
3.4.
Blade assembly
3.4.1. Fully raise motor block by pushing control lever rearward.
3.4.2. Remove screw (fig. 4.1) and rotate blade guard towards the rear.
3.4.3. Remove blade retaining screw (fig. 4.2) and blade flange (3).
3.4.4. Locate blade on drive face ensuring that rotation arrow on blade matches that on blade guard. Refit flange and screw.
3.4.5.
Rotate blade guard forward and refit screw (1). Confirm that guard will prevent fingers touching blade.
3.5.
Fill coolant tank - see Section 2 - Specifications. Confirm tap (fig. 7.1) is open.
3.6.
Check sight-glass and confirm that there is oil in the gearbox.
3.7.
Pull control lever forward as far as possible, to lower blade, and confirm that blade is clear of saw base in this position. If blade is
touching base then adjust abutment screw (fig. 3.B) to achieve clearance.
3.8.
Raise blade as far as possible and confirm that rear of motor is clear of base. If motor is touching base then adjust abutment screw
(fig. 3.C) to achieve clearance.
SM300 - (3) - 100203


