4. OPERATING INSTRUCTIONS
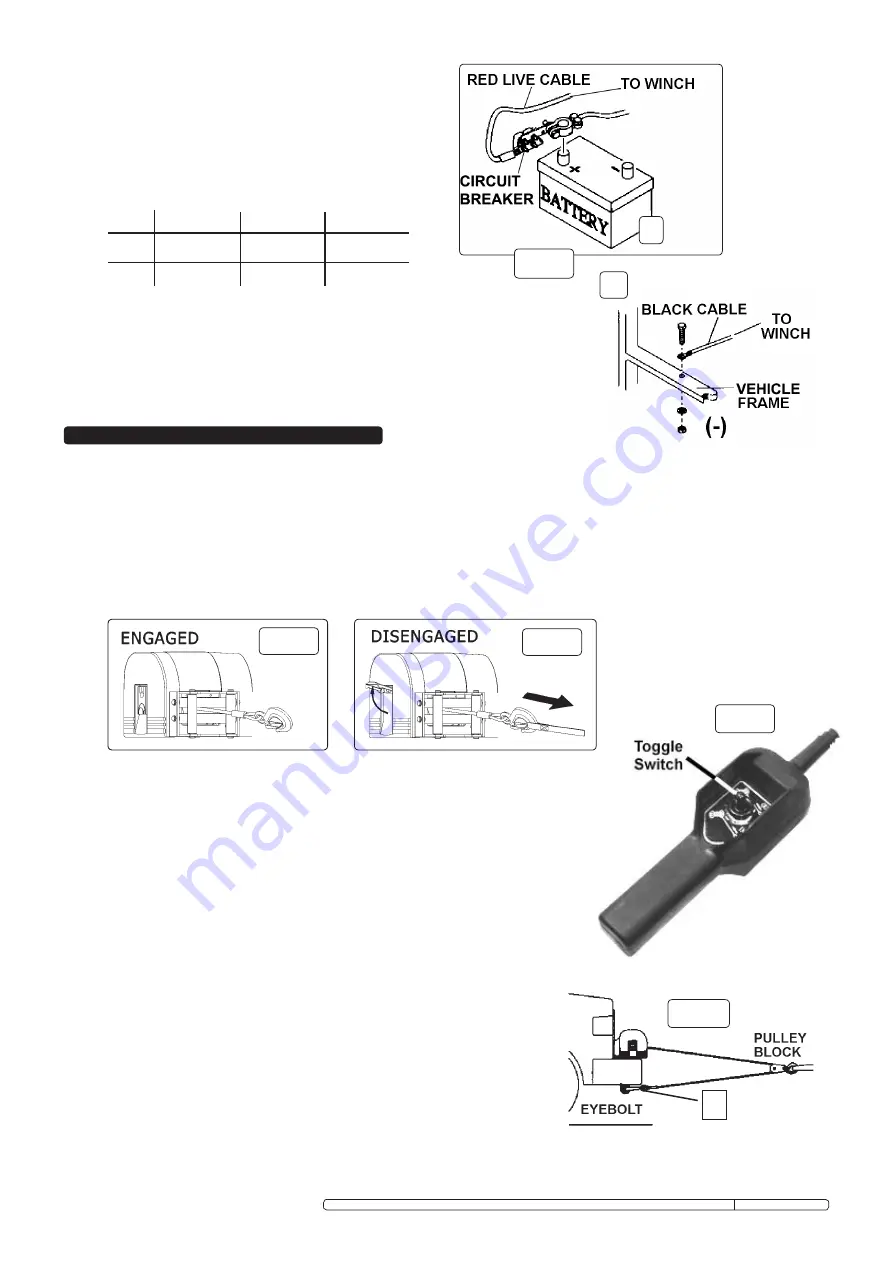
3. connect the free end of the circuit breaker tightly to
the positive (+) terminal of the supply battery (fig 4.A).
4. connect BLAcK cable (negative -) to a suitable
earthing point on the vehicle frame (fig 4.B).
WARNING! Ensure you read and understand the safety instructions before use.
4.1.
FREEWHEEL FUNCTION.
note: the cable may be unwound under power by engaging the clutch and following steps in 4.2. below.
the cable may also be freewheeled and unwound by hand as follows:
the speed of unwinding the winch cable is controlled by a clutch.
for rapid unwinding proceed as follows:
1. Disconnect the winch from the electrical power supply.
2. Disengage the clutch by lifting the clutch lever (fig 5 & 6).
3. to unwind the cable, pull by hand using the hand saver bar and ensure that you wear appropriate safety gloves (fig 6).
note: If the clutch lever will not lock into the ‘Disengage’ position, rotate the drum until it does.
3.2.3. Switch connection.
WARNING! Always connect the remote control before connecting winch to
battery. Disconnect winch from battery before disconnecting remote control.
to fit remote control, lift dust cover on the side of the winch and insert remote plug.
Fig 4
A
B
4.2.
REMOTE SWITCH OPERATION.
WARNING! Always connect the remote control before connecting winch to
battery. Disconnect winch from battery before disconnecting remote control.
to use the electrical remote switch control the clutch must be engaged as follows:
1. connect remote control to winch (para. 3.2.3.)
2. connect the winch to the power supply.
3. Engage the clutch by pushing the lever down (fig 5).
4. to extend the cable, move the toggle switch (fig 7) to the ‘out’ position.
5. to winch the cable, move the toggle switch (fig 7) to the ‘In’ position.
6. stop the winch by releasing the switch. the internal brake will hold the load in place.
7. Before disengaging cable from load, disconnect winch from power supply.
Fig 5
4.3.
USE OF A PULLEY.
Additional pulling power may be obtained by use of a pulley block assembly.
this almost doubles the effective pull and halves the pulling speed.
WARNING!
When using a pulley, ensure the hook anchorage point (fig 8.c) will
be capable of withstanding loads greater than the capacity of the winch.
Note that if winch and hook anchorage are both mounted on the same
vehicle then this vehicle must be capable of withstanding at least
twice the winch capacity.
DO NOT
attach hook back onto winch body as winch mounting may fail.
Always use a separate anchorage point.
C
Model rW2500.V2 rW3500.V2 rW4500.V2
12 Volt 6AWG x 1.5m 6AWG x 1.5m 6AWG x 1.5m
24 Volt 8AWG x 1.5m 8AWG x 1.5m 8AWG x 1.5m
3.2.2. Cable specification.
Fig 7
Fig 8
Fig 6
Original Language Version
rW2500/12.V2, rW3500/12.V2, rW4500/12.V2, rW2500/24.V2, rW3500/24.V2, rW4500/24.V2 Issue: 9 - 22/04/10


