2. INTRODUCTION
High powered unit designed for use with 230V power tools. Certified for M class dust extraction in accordance with EU regulations, which protects
the operator from dust particles hazardous to health. Supplied with Ø36mm flexible hose, Ø45mm flexible hose, crevice nozzle,
multi-diameter tool adaptor, inserts for liquid collection and hard floors, power tool cord clamps, Class-M bag filter, Class-M cartridge filter and foam
filter. Can be set to continuous suction or in conjunction with a power tool via a 2000W rated electronically controlled outlet. Fitted with a self-clean
-
ing filter technology designed to prevent filter blockages whilst in use. Fitted with four castors for manoeuvrability.
3. SPECIFICATION
Model No: . . . . . . . . . . . . . . . . . . . . . . . . . . . . . . . . . . . . . . . . . . . . . . . . . . . . . . . . . . . . . . . . PC35230V
motor Power: . . . . . . . . . . . . . . . . . . . . . . . . . . . . . . . . . . . . . . . . . . . . . . . . . . . . . . . . . . . . . . . . .
1200W
Supply: . . . . . . . . . . . . . . . . . . . . . . . . . . . . . . . . . . . . . . . . . . . . . . . . . . . . . . . . . . . . . . . . . . . . . . . . 230V
maximum Vacuum Pressure: . . . . . . . . . . . . . . . . . . . . . . . . . . . . . . . . . . . . . . . . . . . . . . . . . . . . 240mbar
Air Flow: . . . . . . . . . . . . . . . . . . . . . . . . . . . . . . . . . . . . . . . . . . . . . . . . . . . . . . . . . . . . . . . . . . . . 216m³/hr
drum Size: . . . . . . . . . . . . . . . . . . . . . . . . . . . . . . . . . . . . . . . . . . . . . . . . . . . . . . . . . . . . . . . . . . . . . . 35L
Weight:
. . . . . . . . . . . . . . . . . . . . . . . . . . . . . . . . . . . . . . . . . . . . . . . . . . . . . . . . . . . . . . . . . . . . . . .10.5kg
Vac Accessories: . . . . . . . . . . . . . . . . . . . . . . . . . . . . . . . . . . . . . . . . . . . . . . . . . . . . . . . . . . . . . . .Ø36mm
Power tool Capacity: . . . . . . . . . . . . . . . . . . . . . . . . . . . . . . . . . . . . . . . . . . . . . . . . . . . . . . . . . . .
2000W
4. CONTENTS
c
4.1.
Carton content
4.1.1.
unpack the carton carefully.
4.1.2.
Locate the two side clasps which hold the motor housing in place.
4.1.3.
undo the clasps, remove the motor housing and take out the loose items from the drum.
4.1.4.
Check and identify each component as listed below. If anything is missing or damaged please contact your Sealey dealer immediately.
4.2.
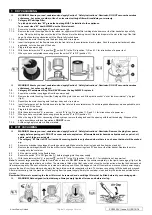
Drum Contents: (fig.1)
Item: Description.
1: motor Housing.
2: drum.
3:
Ø36mm x 3m Hose.
4:
Crevice nozzle.
5:
Cartridge Filter.
6:
Foam Filter.
7:
Category M Vacuum Bag.
8:
Pick-up tube (x2).
9:
Swivel nozzle.
10:
Insert (hard floor).
11:
Insert (wet floor).
12:
Adaptor.
5. ASSEMbLY
5.1.
ensure the electrical supply is disconnected.
5.2.
undo the clasps.
5.3.
Lift off the motor housing assembly (fig.1).
5.4.
For dry vacuum cleaning use the locking cartridge filter supplied.
5.5.
For dry vacuum cleaning and containment use the vacuum bag supplied.
5.6.
For wet vacuum cleaning fit the supplied foam filter.
NOTE: DO NOT
operate the cleaner without a filter fitted as this will damage the vacuum cleaner and invalidate your warranty.
5.6. replace the motor housing onto the container.
5.7.
Align the motor housing with the clasps and snap closed by hooking the top of the clasp into the location in the motor housing and
pressing the handles down over centre.
6. CONTROLS
6.1.
Function symbols
6.1.1.
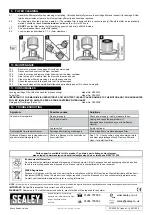
With a power tool connected, switch “B” in position “I” and selector switch “A” is in position , the self cleaning function is
initiated. When the power tool is switched off the vacuum cleaner will continue to run for 8/10 seconds, stop, then the self cleaning filter
function will run for 8/10 seconds and stop.
6.1.2.
When the selector switch “A” is set to the self cleaning filter function is not active, that is: vacuum and power tool only.
6.1.3.
When the warning light “C” illuminates, start the self cleaning filter manually by pressing the orange switch “D”.
NOTE: Continuous operation of the self cleaning system for more than 60 seconds may cause the thermal protection to trip,
resetting after 20 minutes.
(For fuller filter cleaning see section 9.)
6.1.4.
If the exhaust air speed drops below 20m/sec warning light “C” illuminates in accordance with IEC/EN60335-2-69.
6.1.5.
fig.2
PC35230V | Issue 3 (I) 05/10/16
Original Language Version
© Jack Sealey Limited
fig.1


