


Aqua Whisper DX Modular 450-1800
Page 5-2
Installa
tion
Inline Vacuum/Pressure Gauge is not required as
the Multi Media Filter includes inlet and outlet
pressure gauges.
9.
The optional Plankton Filter, either the single
or double housing version, is mounted to a flat
vertical surface using the supplied screws.
Allow minimum 4 in. (10 cm) below the bowl,
and allow accessibility to the Plankton Filter for
mesh screen removal and maintenance. Mount
the Plankton Filter in close proximity to the outlet
of the Booster Pump
or (either install the Plankton Filter or the Multi
Media Filter. Installing both is redundant and will
lead to line pressure loss).
The optional Multi Media Filter is mounted to a
flat horizontal surface using the supplied screws.
Maintain an orientation and accessibility that
allows the operator to view the pressure gauges,
and adjust the valves mounted to the Multi
Media Filter. Mount the Multi Media Filter in close
proximity to the outlet of the Booster Pump.
10. The optional Multi Media Filter is mounted to a
flat horizontal surface using the supplied screws.
Maintain an orientation and accessibility that
allows the operator to view the pressure gauges,
and adjust the valves mounted to the Multi
Media Filter. Mount the Multi Media Filter in close
proximity to the outlet of the Booster Pump.
Connect the inlet to the Booster Pump or Fresh
Water Flush outlet. Connect the oulet to the
Prefilter inlet. Connect the Multi Media Filter’s
waste discharge fitting to the overboard dump
waste fitting. Connect the waste outlet to the Multi
Media Filter’s over board dump waste fitting.
Before use, you must place the supplied media,
small gravel and fine sand, into the Multi Media
Filter. Unscrew the Multi Media fill plug, located
on top of the Multi Media Filter lid. Using a funnel,
pour in approximately 15 lbs. (7 kg) of small gravel
(1/8”x1/4”), then pour in approximately 26 lbs. (12
kg) of #20 silica sand. The silica sand must always
go on top of the gravel. Clean the fill plug female
threads of all debris and replace lid with a wrench,
lightly tightened.
NOTE
: The Multi Media Filter must be
back washed prior to use to avoid prefilter
and RO Membrane Element fouling.
(Refer to Commisioning, Section 6)
11. Allow sufficient space after the Plankton Filter
Outlet for the Inline Vacuum/Pressure Gauge, if
used. If the Multi Media Filter is installed this Inline
Vacuum/Pressure Gauge is not required.
12. Prefilter. The 10 in. (25.4 cm) Dual Prefilters
and the Commercial Prefilter serve the same
function. Use either the 10 in. (25.4 cm) Dual
Prefilters or the Commercial Prefilter. Do not use
both. Using both is redundant and will lead to
line pressure loss.
The Dual Prefilters are mounted to a flat vertical
surface. Allow minimum 4 in. (10 cm) below the
bowl, and allow accessibility to the Filters for
element removal and maintenance.
or (either install the Dual Prefilters or
Commercial Prefilter. Installing both will
lead to line pressure loss).
The optional Commercial Prefilter replaces the
10 in. (25.4 cm) Dual Prefilters. The Commercial
Prefilter is mounted to a flat horizontal surface
using the supplied screws. Maintain an orientation
and accessibility that allows the operator access
to remove the filter element for maintenance.
Allow minimum 12 in. (30.5 cm) above the top of
the housing for filter element removal. Mount the
Commercial Prefilter in close proximity to the outlet
of the Booster Pump and the System frame. The
commercial prefilter is plumbed as per the raised
arrow and Inlet and Outlet letters molded into the
filter housing. The correct water flow enters the
outer surface of the filter element and migrates to
the center core.
Refer to PAGE 5-3, fig. 5b
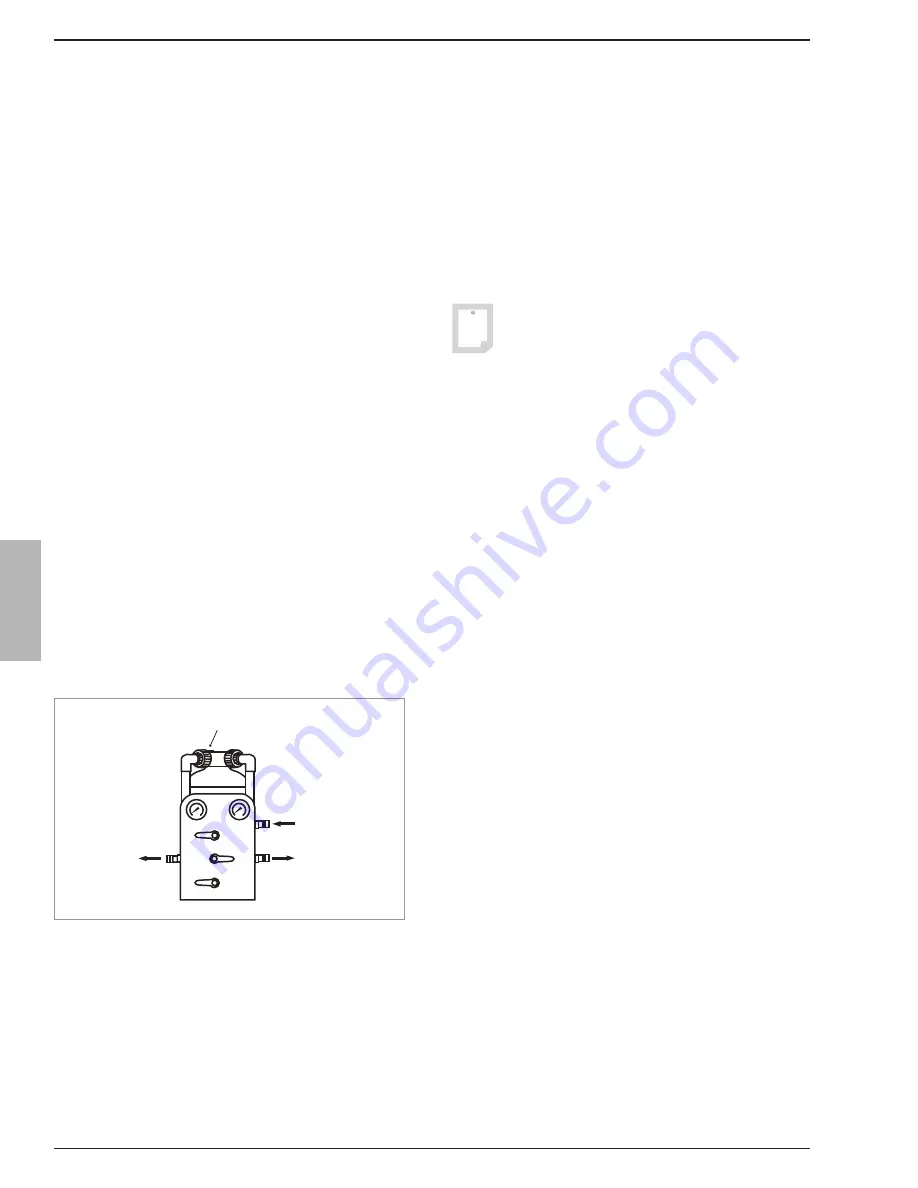
Filling plug
Inlet of Multi Media Filter
from Booster Pump outlet
-or-
Fresh Water Flush outlet
Outlet of Multi Media Filter
to Prefilter Inlet
Waste discharge of
Multi Media Filter to
Multi Media Filter
waste overboard
dump fitting
Figure 5a: Multi Media Filter
Summary of Contents for Aqua Whisper DX 1400-2
Page 2: ......
Page 3: ...Aqua Whisper DX Modular 450 1800 Owner s Manual...
Page 4: ......
Page 11: ...Introduction Aqua Whisper DX Modular 450 1800 Section 1 INTRODUCTION...
Page 12: ...Introduction...
Page 15: ...Description Aqua Whisper DX Modular 450 1800 Section 2 SYSTEM DESCRIPTION...
Page 16: ...Description...
Page 21: ...Aqua Whisper DX Modular 450 1800 Page 2 5 Description COMPLIANCE CERTIFICATES...
Page 23: ...Aqua Whisper DX Modular 450 1800 Page 2 7 Description...
Page 25: ...Aqua Whisper DX Modular 450 1800 Page 2 9 Description...
Page 30: ...Aqua Whisper DX Modular 450 1800 Page 2 14 Description OPTIONAL ACCESSORIES...
Page 38: ...Aqua Whisper DX Modular 450 1800 Page 2 22 Description This page is intentionally left blank...
Page 39: ...Aqua Whisper DX Compact 450 1800 Section 3 PRE INSTALLATION NOTES Pre installation...
Page 40: ...Pre installation...
Page 56: ...Aqua Whisper DX Modular 450 1800 Page 3 16 Pre installation...
Page 57: ...Aqua Whisper DX Modular 450 1800 Page 3 17 Pre installation...
Page 65: ...Aqua Matic Compact 450 1800 Section 4 ELECTRICAL INFORMATION Electrical...
Page 66: ...Electrical...
Page 75: ...Aqua Whisper DX Modular 450 1800 Page 4 9 Electrical Electrical Motor Wiring Three Phase...
Page 80: ...Electrical...
Page 81: ...Installation Aqua Whisper DX Modular 450 1800 Section 5 INSTALLATION REQUIREMENTS...
Page 82: ...Installation...
Page 94: ...Aqua Whisper DX Modular 450 1800 Page 5 12 Installation...
Page 95: ...Commissioning Aqua Whisper DX Modular 450 1800 Section 6 COMMISSIONING...
Page 96: ...Commissioning...
Page 106: ...Aqua Whisper DX Modular 450 1800 Page 6 10 Commissioning...
Page 107: ...Operation Aqua Whisper DX Modular 450 1800 Section 7 OPERATION...
Page 108: ...Operation...
Page 120: ...Aqua Whisper DX Modular 450 1800 Page 7 12 Operation...
Page 122: ...Aqua Whisper DX Modular 450 1800 Page 7 14 Operation...
Page 123: ...Aqua Whisper DX Compact 450 1800 Section 8 MAINTENANCE AND REPAIR Maintenance...
Page 124: ...Maintenance...
Page 145: ...Troubelshooting Troubelshooting Aqua Whisper DX Modular 450 1800 Section 9 TROUBLESHOOTING...
Page 146: ...Troubelshooting...
Page 167: ...Parts View Aqua Whisper DX Modular 450 1800 Section 10 EXPLODED PARTS VIEW...
Page 168: ...Parts View...
Page 183: ...Aqua Whisper DX Modular 450 1800 Page 10 15 Parts View...
Page 191: ...Aqua Whisper DX Modular 450 1800 Page 10 23 Parts View...
Page 217: ...Sheet 11 3 Aqua Whisper DX Electrical Wiring Diagram 110 120 VAC 50 60 HZ Single Phase...
Page 219: ...Sheet 11 5 Aqua Whisper DX Electrical Wiring Diagram 208 240 VAC 50 60 HZ Single Phase...
Page 221: ...Sheet 11 7 Aqua Whisper DX Electrical Wiring Diagram 200 240 VAC 50 60 HZ Three Phase...
Page 223: ...Sheet 11 9 Aqua Whisper DX Electrical Wiring Diagram 380 460 VAC 50 60 HZ Three Phase...
Page 225: ......


