background image

MULTIFUNCTION GAUGE

9) Multifunction Display

The multifunction display is used to:

– Display the WELCOME message

on power up.

– Display the KEY recognition mes-

sage.

– Provide various indications as se-

lected by the operator.

– Activating and setting various func-

tions and modes of operation.

– Display scrolling messages of func-

tion activation or system faults.

– Display fault codes.

NOTE:

The default indication in the

multifunction display is the compass
direction.

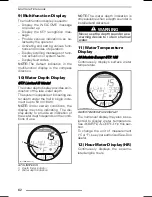
10) Water Depth Display

GTX Limited iS Model

The water depth display provides an in-
dication of the lake water depth.

The system is capable of indicating wa-
ter depth under the hull in single incre-
ments up to 50 m (164 ft).

NOTE:

Under certain conditions, the

display may stop indicating. The dis-
play ability to provide an indication of
the water depth depends on the condi-
tions of use.

1

2

smo2009-002-114_r

GTX LIMITED iS

1. Depth finder indicator
2. Water depth indication

NOTE:

The water depth indication is

only available when a depth sounder is
installed and detected.

WARNING

Never use the depth sounder as a
warning device to ride in shallow
water.

11) Water Temperature
Display

All Models Except GTX 155

Continuously displays surface water
temperature.

smo2009-002-114_t

WATER TEMPERATURE DISPLAY

The numerical display may also be se-
lected to display water temperature.
See

NUMERICAL DISPLAY

in this sec-

tion.

To change the unit of measurement
(°C or °F), see your authorized Sea-Doo
dealer.

12) Hour Meter Display (HR)

Continuously displays the accumu-
lated engine hours.

62

______________

Summary of Contents for 2012 GTX 155

Page 1: ......

Page 2: ... reproductive harm In Canada products are distributed by Bombardier Recreational Products Inc BRP In USA products are distributed by BRP US Inc Knight s Spray Nine is a trademark of Korkay System Ltd GTX is a trademark of Castrol Ltd Used under license This is a non exhaustive list of trademarks that are the property of Bombardier Recreational Products Inc or its affiliates 4 TECTM O T A S TM VTST...

Page 3: ... Safety Messages This Operator s Guide utilizes the fol lowing symbols and words to empha size particular information WARNING Indicates a potential hazard which if not avoided could result in seri ous injury or death CAUTION Indicates a poten tially hazardous situation which if not avoided could result in minor or moderate injury NOTICE Indicates an instruction which if not followed could se verel...

Page 4: ...hange specifications designs fea tures models or equipment without incurring any obligation upon itself This Operator s Guide and the SAFETY DVD should remain with the watercraft when it s sold 2 _______________ ...

Page 5: ...OL 18 Introduction 18 iTC intelligent Throttle Control 18 iBR intelligent Brake and Reverse System 19 iS intelligent Suspension 20 SAFETY EQUIPMENT 21 Required Safety Equipment 21 Additional Recommended Equipment 23 PRACTICE EXERCISES 24 Where to Practice Exercises 24 Practice Exercises 24 Important Factors Not to Neglect 24 NAVIGATION RULES 26 Operating Rules 26 FUELING 28 Fueling Procedure 28 Re...

Page 6: ...6 VTS Position 59 7 iS Position 60 8 Numerical Display 60 9 Multifunction Display 62 10 Water Depth Display 62 11 Water Temperature Display 62 12 Hour Meter Display HR 62 13 iBR Position 63 14 Compass 63 15 Touring Mode Indicator 63 16 Sport Mode Indicator 64 Navigating the Multifunction Display 64 Changing Numerical Display Indication 67 Resetting Numerical Display Indication 68 Multifunction Gau...

Page 7: ...How to Engage Forward 95 How to Engage and Use Reverse 95 How to Engage and Use Braking 96 How to Use the Variable Trim System VTS 97 General Operating Recommendations 101 OPERATING MODES 104 Touring Mode 104 Sport Mode 104 ECO Mode Fuel Economy Mode 108 Cruise Mode 109 Slow Speed Mode 111 Ski Mode 113 Learning Key and Rental Key Modes 116 SPECIAL PROCEDURES 118 Jet Pump Water Intake and Impeller ...

Page 8: ...ber 146 ENGINE EMISSIONS INFORMATION 147 Manufacturer s Responsibility 147 Dealer s Responsibility 147 Owner Responsibility 147 EPA Emission Regulations 147 SPECIFICATIONS 148 TROUBLESHOOTING TROUBLESHOOTING GUIDELINES 156 MONITORING SYSTEM 160 Fault Codes 160 Indicator Lights and Message Display Information 161 Beeper Code Information 163 WARRANTY BRP LIMITED WARRANTY USA AND CANADA 2012 SEA DOO ...

Page 9: ...NTS BRP LIMITED WARRANTY FOR THE EUROPEAN AND THE RUSSIAN ECONOMIC AREAS AND TURKEY 2012 SEA DOO PERSONAL WATERCRAFT 178 CUSTOMER INFORMATION PRIVACY INFORMATION 184 CHANGE OF ADDRESS OWNERSHIP 185 _______________ 7 ...

Page 10: ...TABLE OF CONTENTS 8 _______________ ...

Page 11: ...SAFETY INFORMATION ________ SAFETY INFORMATION ________ 9 ...

Page 12: ...de can result in CO poisoning serious health prob lems and death Avoid Gasoline Fires and Other Hazards Gasoline is extremely flammable and highly explosive Fuel vapors can spread and be ignited by a spark or flame many feet away from the en gine To reduce the risk of fire or explo sion follow these instructions Use only an approved red gasoline container to store fuel Strictly adhere to the instr...

Page 13: ...ance When braking riders must brace them selves against the deceleration force to prevent from moving forward on the watercraft and losing balance When operating an iBR equipped wa tercraft be aware that other boats fol lowing or operating in close proximity may not be able to stop as quickly When at speed and the brake is first applied a plume of water will shoot up in the air behind the watercra...

Page 14: ...and the WARRANTY section contained in this Operator s Guide Engine exhaust contains carbon monoxide CO which can cause seri ous health problems or death if inhaled in sufficient quantities Do not operate the PWC in a confined area or allow CO to accumulate around the PWC or in enclosed or sheltered areas such as when docked or when rafting Be aware of the risk of CO emanations from exhaust of othe...

Page 15: ...re Be alert to changing conditions Keep accurate and up to date charts of the boating area on board Before get ting underway check water conditions in the planned boating area Ensure there is enough fuel on board for the planned trip Always verify fuel level before use and during the ride Apply the principle of 1 3 of the fuel to reach your destination 1 3 to re turn and keep 1 3 in reserve Allow ...

Page 16: ...throttle command by the user When releasing the iBR lever while the throt tle lever is still depressed the throt tle command will regain control and generate an acceleration after a short delay Release throttle lever if acceler ation is not needed Severe internal injuries can occur if water is forced into body cavities as a result of falling into water or being near a jet thrust nozzle Consequentl...

Page 17: ...on skis wakeboard or other water products Always carry an observer when pulling a tube skier or wakeboarder to observe the person being towed and inform the operator about the participants hand signals The op erator must focus his attention on operating the watercraft and the waters ahead Proceed with only as much speed as required and follow the observers instructions When pulling a tube skier or...

Page 18: ... sunset and sunrise It is illegal in most ar eas Do not drive the watercraft directly behind a water skier tuber or wake boarder At 40 km h 25 MPH per hour the watercraft will overtake a person who falls in the water 60 m 197 ft in front of your watercraft in about 5 seconds Shut off the engine and remove the tether cord from the engine cut off switch when anyone is in the water nearby Stay at lea...

Page 19: ...ater are not recom mended Keep your head out of the water This will greatly lessen heat loss and increase your survival time Maintain a positive attitude about your survival and rescue This will improve your chances of extending your survival time until you can be rescued Your will to live does make a difference If there is more than one person in the water huddling together is recommended This ac...

Page 20: ...a miliar with this watercraft its systems controls capabilities and limitations iTC intelligent Throttle Control The system uses an electronic throttle control ETC that provides command signals to the ECM Engine Control Module With this system there is no need for a traditional throttle cable The iTC allows the following operating modes Touring mode Sport mode ECO mode Cruise mode Slow speed mode ...

Page 21: ...eases the throttle at the same time Refer to HOW TO STEER THE WA TERCRAFT in OPERATING INSTRUC TIONS section for details Learning Key and Rental Key The Sea Doo LKTM learning key can be programmed to limit the speed of the watercraft therefore enabling first time users and less experienced op erators to learn how to operate the watercraft while gaining the necessary confidence and control Limitati...

Page 22: ...pants sit on what is known as the moving deck When the suspension system is active the moving deck is usually in an up position This means the moving deck is raised above the fixed deck suf ficiently for the suspension system to absorb the up and down movement of the watercraft as it travels through the water The iS system incorporates a func tion known as DOCK MODE When activated manually or auto...

Page 23: ...ht or approved flares Signaling device Sound producing devices air horn or whistle Recommended Protection Gears The operator and passenger s of PWCs must wear protective gear in cluding A wet suit bottom or thick tightly woven and snug fitting clothing that provides equivalent protection As an example thin bike shorts would not be appropriate Severe inter nal injuries can occur if water is forced ...

Page 24: ...pe I is most effective for all waters especially off shore when rescue may be delayed It is also the most effective in rough wa ters F00A2CY TYPE I WEARABLE PFD Type II Wearable turns its wearer in the same way as Type I but not as effectively The Type Il does not turn as many persons under the same conditions as a Type I You may prefer to use this PFD where there is a prob ability of quick rescue...

Page 25: ...ld contribute to in crease the risk of a collision Weighing the Risks vs Benefits In order to decide whether or not you should wear a helmet it is best to con sider the particular environment you will be riding in as well as other fac tors such as personal experience Will there be a lot of traffic on the water What is your riding style The Bottom Line Since each option minimizes some risks but inc...

Page 26: ...uts NOTE Always perform this exercise at slow speeds Avoiding an Obstacle Practice to avoid an obstacle choose a virtual point on the water by steering watercraft and maintaining throttle Repeat exercise but this time release throttle while turning NOTE With this exercise you will learn that you need throttle to steer the watercraft in a different direction Docking Practice docking using the throt...

Page 27: ...PRACTICE EXERCISES For delicate maneuvers the best ad vice is always to try to reduce your speed to a minimum ________ SAFETY INFORMATION ________ 25 ...

Page 28: ...ard side right side by a GREEN light F00A13Y Starboard Port Stern Bow 2 1 TYPICAL DIRECTIONAL REFERENCE POINTS 1 RED light 2 GREEN light yield zone Crossing Give the right of way to a watercraft ahead and to your right Never cross in front of a boat you should see his RED light he should see your GREEN light he has the right of way Personal watercrafts PWC do not have these colored lights but the ...

Page 29: ...eople and objects Do not wake or wave jump ride the surf line or attempt to spray or splash others with your watercraft You may misjudge the ability of the watercraft or your own riding skills and strike a boat or person This watercraft has the capability of turning more sharply than other boats however unless in an emergency do not negotiate sharp high speed turns Such maneuvers make it hard for ...

Page 30: ...ape from the fuel tank Stop filling immediately after the re lease of the gas pump nozzle handle and wait a moment before removing the spout Do not retract the gas pump nozzle to put more fuel in fuel tank WARNING Do not overfill or top off the fuel tank and leave the watercraft in the sun As temperature increases fuel expands and may overflow Close the fuel tank cap and ensure it is properly latc...

Page 31: ...ated X 215 and 260 engines Supercharged Intercooled X 1 X 1 For optimum engine performance Outside North America MINIMUM OCTANE RATING 92 RON 95 RON ENGINES 95 92 155 engine Naturally Aspirated X 215 and 260 engines Supercharged Intercooled X 1 X 1 For optimum engine performance ________ SAFETY INFORMATION ________ 29 ...

Page 32: ...rmly secured on the trailer Use ad ditional tie downs if necessary Ensure fuel tank cap front stor age compartment cover glove box cover boarding platform and seat are properly latched Observe trailering safety precau tions NOTICE Do not route ropes or tie downs over the seat or grab handle as they could be perma nently damaged Wrap ropes or tie downs with rags or similar pro tectors where they ca...

Page 33: ...NG Bungee cords are under tension and could spring back and whip someone when released Use cau tion NOTE When trailering 2 watercrafts it may be necessary to remove the in ner wakeboard rack ________ SAFETY INFORMATION ________ 31 ...

Page 34: ... watercraft NOTE The first illustration of the watercraft indicates the approximate locations of the various labels A dotted line indicates that the label is not on the outer sur face and that the seat or a cover of some type must be opened to see the label 1 16 17 3 4 5 7 9 19 6 8 20 10 11 12 13 2 18 21 smo2009 002 100_d TYPICAL RXT iS GTX iS AND GTX LIMITED iS 1 16 17 3 4 5 7 9 19 6 8 20 10 11 1...

Page 35: ... 5 7 9 19 6 8 20 10 11 12 13 21 18 15 smo2011 002 001_a WAKE PRO 1 16 17 3 4 5 7 9 19 6 8 20 10 11 12 13 21 18 smo2011 002 008_a RXT 260 1 16 17 3 4 5 7 9 19 6 20 10 11 12 13 21 18 smo2010 002 003_b RXT X ________ SAFETY INFORMATION ________ 33 ...

Page 36: ...surer qu il n y a pas d émanation d essence dans le compartiment moteur Les vapeurs d essence peuvent provoquer un incendie ou une explosion Éviter de trop remplir le réservoire d essence Garder la motomarine à l écart des flammes et des étincelles Ne pas démarrer la motomarine en présence d essence liquide ou d émanation d essence Toujours remettre la boîte de ventillation si applicable en place ...

Page 37: ...05_aen LABEL 4 TYPICAL F18L0NY LABEL 5 TYPICAL smo2009 002 106_aen LABEL 6 TYPICAL 219903177 LABEL 7 TYPICAL smo2009 002 107_aen LABEL 8 TYPICAL F00A2TY LABEL 9 TYPICAL 219903301 LABEL 10 TYPICAL smo2009 002 109_a LABEL 11 TYPICAL ________ SAFETY INFORMATION ________ 35 ...

Page 38: ...BELS smo2009 002 110_aen LABEL 12 TYPICAL smo2009 002 111_a LABEL 13 TYPICAL 219903137 LABEL 14 TYPICAL 219903228 LABEL 15 TYPICAL 219903197 LABEL 16 GTX iS GTX LTD iS AND RXT iS MODELS 36 _______ SAFETY INFORMATION ________ ...

Page 39: ...y from people objects and other watercraft Do not follow directly behind PWCs or other boats Do not go near others to spray or splash them with water Avoid sharp turns or other maneuvers that make it hard for others to avoid you or understand where you are going Avoid areas with submerged objects or shallow water TAKE EARLY ACTION to avoid collisions Remember generally PWCs and other boats do not ...

Page 40: ... sharp turns or other maneuvers that make it hard for others to avoid you or understand where you are going Avoid areas with submerged objects or shallow water TAKE EARLY ACTI ON to avoid collisions Remember generally PWCs and other boats do not have brakes DO NOT RELEASE THROTTLE WHEN TRYING TO STEER away from objects you need throttle to steer Always check throttle and steering controls for prop...

Page 41: ...P recommends a minimum operator age of 16 years old Know the operator age and training requirements for your province state A boating safety course is recommended and may be required in your province state ATTACH ENGINE SHUT OFF CORD LANYARD to PFD and keep it free from handlebars so that engine stops if operator falls off After riding remove cord from PWC to avoid unauthorized use by children or ...

Page 42: ...t cover removing the front storage bin and looking aft smo2009 002 152_a 1 Compliance label 2 Ventilation box 3 Riser GTX155 RXT X and WAKE Pro On these models the EPA compliance label is located on the RH side of a deck riser just below the glove box To view the label open the seat and look to the right of the seat hinge near the top of the riser smo2010 002 004_a GTX155 RXT X AND WAKE PRO MODELS...

Page 43: ...S Watercraft Inside North America 219903554 LABEL 21 CANADIAN COMPLIANCE NOTICE CAN MODELS ONLY Watercraft Outside North America smo2009 002 112_a LABEL 21 WATERCRAFT OUTSIDE NORTH AMERICA ________ SAFETY INFORMATION ________ 41 ...

Page 44: ...and operate prop erly Check the items listed in the following table before launching the watercraft ITEM OPERATION Hull Inspect Jet pump water intake Inspect clean Drain plugs Tighten Fuel tank Refill Engine compartment Check for any fluid leaks and gasoline vapor odor Engine oil level Check refill Engine coolant level Check refill Steering system Check operation Throttle lever Check operation iBR...

Page 45: ...L INSPECT THESE AREAS 1 Water intake 2 Ride plate Drain Plugs Secure bilge drain plugs smo2009 002 135_a TYPICAL BILGE DRAIN PLUG LOCATIONS 1 Bilge drain plugs 2 Tighten 3 Untighten WARNING Ensure bilge drain plugs are prop erly secured prior to launching the watercraft in water Fuel Tank Fill the fuel tank WARNING Strictly adhere to instructions de tailed in FUELING PROCEDURE Engine Compartment I...

Page 46: ...peration for free movement When the handlebar is horizontal the jet pump nozzle should be in the straight ahead position Ensure the jet pump nozzle pivots easily and in the same direction as the handlebar e g when handlebar is turned to the left the nozzle opening must point towards the LH side of watercraft WARNING Check handlebar and correspond ing steering nozzle operation be fore starting Neve...

Page 47: ...of all obstructions to permit free move ment of the deck and any water which may accumulate in the foot well areas Use only provide stor age compartments Wakeboard Rack WAKE Pro Model WARNING Ensure wakeboard rack is properly secured to watercraft body and that the wakeboard is properly po sitioned and secured to the rack prior to using watercraft Ensure wakeboard retaining straps are in good cond...

Page 48: ...er Gauge 1 Press START STOP button and install tether cord on the engine cut off switch 2 As the information center cycles through its self test function en sure all indications come on WARNING Always attach the tether cord clip to your PFD iBR System NOTICE Ensure there is sufficient space ahead and behind watercraft to safely carry out the iBR system test to avoid a collision Watercraft will mov...

Page 49: ...WATERCRAFT INFORMATION _______________ 47 ...

Page 50: ...CONTROLS 3 6 7 8 2 1 5 10 9 4 smo2009 002 200_d ALL MODELS EXCEPT GTX 155 5 4 10 1 2 9 8 3 smo2011 002 004_a GTX 155 48 ______________ ...

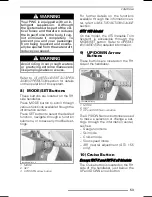
Page 51: ...ever with your finger To decrease watercraft speed release the throttle lever smo2009 002 201_a 1 Throttle lever 2 To accelerate 3 To decelerate The throttle lever is spring loaded and should return to rest position idle when not pressed 3 iBR Lever intelligent Brake and Reverse The iBR lever on the LH handlebar can electronically command Brake Reverse Neutral NOTE A minimum of 25 of iBR lever str...

Page 52: ...rting or to avoid unau thorized use by others children and to prevent theft Digitally Encoded Security System D E S S The tether cord cap contains an elec tronic circuit D E S S TM key that is programmed to give it a unique elec tronic serial number This is the equiv alent of a conventional key The D E S S system reads the key in stalled on the engine cut off switch and only allows engine starting...

Page 53: ...torque there fore enabling first time users and less experienced operators to learn how to operate the watercraft while gaining the necessary confidence and control The learning and rental modes offer also the possibility of setting the maxi mum speed of the watercraft For more information on learning and rental keys refer to OPERATING MODES section 5 Engine START STOP Button The engine START STOP...

Page 54: ...g the vertical position of the jet nozzle The VTS can be electrically trimmed to desired attitude or to one of two pre set trim positions Press VTS control button up or down arrow to adjust riding attitude of the watercraft sdd2009 001 019_c TYPICAL VTS CONTROL BUTTON 1 Bow up 2 Bow down Refer to OPERATING INSTRUCTIONS section for details 7 iS Button intelligent Suspension RXT iS GTX iS and GTX Li...

Page 55: ...the desired function navigate through a function submenu or to save any modified set tings sdd2009 001 024_b 1 MODE 2 SET 3 UP DOWN arrow button For further details on the functions available through the information cen ter refer to MULTIFUNCTION GAUGE section GTX 155 Model On this model the VTS Variable Trim System is accessible through the MODE SET button Refer to OPERAT ING MODES for detailed i...

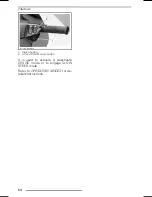
Page 56: ... smo2011 002 009_a 1 Cruise button 2 UP and DOWN arrow button It is used to activate or deactivate CRUISE mode or to engage SLOW SPEED mode Refer to OPERATING MODES for de tailed instructions 54 ______________ ...

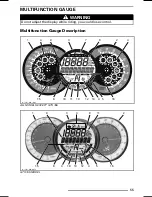
Page 57: ...le riding you could lose control Multifunction Gauge Description in AM RPMgal h lap 13 11 10 6 15 12 14 5 16 7 3 9 1 8 4 4 2 4 smo2011 002 100_a ALL MODELS EXCEPT GTX 155 15 6 16 2 8 1 9 3 5 12 13 4 11 10 4 4 smo2011 002 005_a GTX 155 MODEL _______________ 55 ...

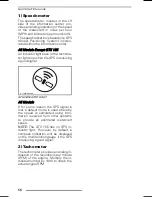
Page 58: ...eceiving a good signal smo2009 002 900 GPS INDICATOR LIGHT All Models If for some reason the GPS signal is lost a default mode is used whereby the speed is calculated using infor mation received from other systems to provide an estimated watercraft speed NOTE The GTX 155 has no GPS in dicator light However by default a compass indication will be displayed on the multifunction gauge if the GPS is r...

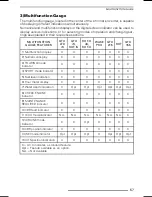
Page 59: ...display X X X X X X X 2 Numerical display X X X X X X X 3 TOURING mode indicator X X X X X X X 4 SPORT mode indicator X X X X X X X 5 Fuel level indication X X X X X X X 6 Hour meter display X X X X X X X 7 Water depth indication X Opt Opt Opt Opt Opt Opt 8 CHECK ENGINE indicator X X X X X X X 9 MAINTENANCE REQUIRED indicator X X X X X X X 10 iBR fault indicator X X X X X X X 11 ECO mode indicator...

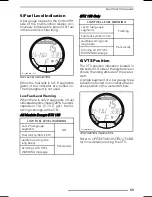
Page 60: ...PTION MAINTENANCE REMINDER Maintenance required Bring your watercraft to your Sea Doo dealer to have it serviced and to have the maintenance required indicator reset LOW FUEL Low fuel level approx 25 tank capacity 14 L 3 7 U S gal or fuel level sensor disconnected Scrolling SLOW SPEED MODE message CRUISE mode or SLOW SPEED MODE engaged Refer to OPERATING MODES subsection _ Good GPS uplink Scrollin...

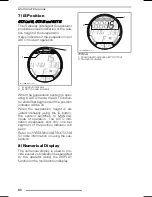
Page 61: ...TX 155 LOW FUEL LEVEL WARNING Last 2 fuel gauge segments Fuel tank symbol LED ON Audible warning one long beep Scrolling LOW FUEL WARNING message Periodically GTX 155 Only LOW FUEL LEVEL WARNING Last 2 fuel gauge segments Fuel tank symbol LCD Flashing Audible warning one long beep Scrolling LOW FUEL WARNING message Periodically 6 VTS Position The VTS position indication located in the bottom LH si...

Page 62: ...s of the position indicator will be on When the suspension height is ad justed manually using the iS button the system switches to MANUAL mode of operation The AUTO indi cation disappears and only one bar segment of the position indicator will be on Refer to OPERATING INSTRUCTIONS for more information on using the sus pension 8 Numerical Display The numerical display is used to pro vide a variety ...

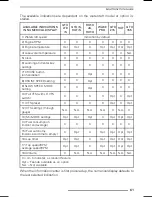
Page 63: ...X Opt X X X X 9 SLOW SPEED MODE setting X X Opt X X X X 10 Full VTS with LH VTS switch X X X X Opt X Opt 11 VTS preset X X X X Opt X Opt 12 VTS settings through gauge N A N A N A N A X N A X 13 SKI MODE settings Opt Opt Opt X Opt Opt Opt 14 Fuel consumption instant and average X X X X X X X 15 Fuel autonomy distance and time to empty X Opt X Opt Opt Opt Opt 16 Lap timer Opt Opt X Opt Opt Opt Opt 1...

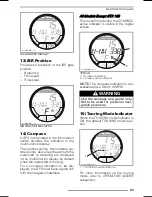
Page 64: ...m 164 ft NOTE Under certain conditions the display may stop indicating The dis play ability to provide an indication of the water depth depends on the condi tions of use 1 2 smo2009 002 114_r GTX LIMITED iS 1 Depth finder indicator 2 Water depth indication NOTE The water depth indication is only available when a depth sounder is installed and detected WARNING Never use the depth sounder as a warni...

Page 65: ...or a compass indication to be dis played the GPS must have a good link with the navigation satellites All Models Except GTX 155 This is confirmed when the COMPASS active indicator is visible in the digital screen 2 1 smo2009 002 114_v TYPICAL 1 Compass indication 2 Compass active indicator NOTE The compass indication is only available above 5 km h 3 MPH WARNING Use the compass as a guide only Not ...

Page 66: ...en the func tion is active The multifunction display is also used to display a menu for the selection of various functions which permit chang ing the numerical display indication system modes of operation settings active system fault codes and a lap timer WARNING Selecting various numerical dis plays system modes of opera tion or changing settings should only be carried out with the water craft st...

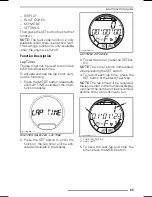
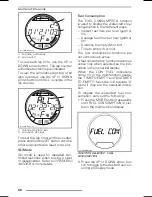
Page 67: ...ti function display smo2010 002 111 FUNCTION SELECTED LAP TIME 2 Press the SET button to enter the function the lap timer will be acti vated and visible in the display lap smo2010 002 112 LAP TIMER ACTIVATED 3 To start the timer press the SET but ton NOTE The timer starts immediately when pressing the SET button 4 To record each lap time press the SET button at the start of each lap NOTE The lap t...

Page 68: ... function is used to display the watercrafts fuel consumption in four different ways Instant fuel flow per hour gal h or l h Average fuel flow per hour gal h or l h Distance to empty Mi or Km Time to empty h or min The fuel consumption functions are not continuously active A fuel consumption function becomes active only when selected as the indi cation in the numerical display When the LOW FUEL in...

Page 69: ...L DISPLAY INDICATION Fault Codes The FAULT CODES function is used to display active fault codes Refer to MONITORING SYSTEM subsection Key Mode The KEY MODE function is used for changing LEARNING or RENTAL key settings Refer to OPERATING MODES subsection for details Settings The SETTINGS function is used for Clock setting Refer to MULTI FUNCTION GAUGE SETUP Dock mode setting Refer to iS IN TELLIGEN...

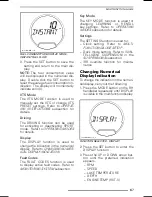
Page 70: ...Indication The following numerical display indica tions can be reset Average fuel consumption Top speed Average speed Top RPM Average RPM To reset indications double click the SET button The numerical display will momentarily indicate zero 0 NOTE Each of these functions be come active ONLY when selected as the numerical display indication Multifunction Gauge Setup Changing Clock Setting 1 Press th...

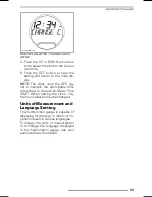
Page 71: ...he GPS sig nal to maintain the appropriate time referenced to Greenwich Mean Time GMT When setting the clock only the hour indication may be changed Units of Measurement and Language Setting The multifunction gauge is capable of displaying information in metric or im perial units and in various languages To change the units of measurement or to change the language displayed in the multifunction ga...

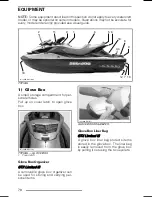
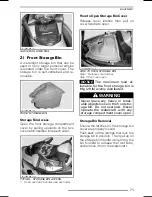
Page 72: ...small storage compartment for per sonal articles Pull up on cover latch to open glove box smo2009 002 120_a TYPICAL GLOVE BOX 1 Cover latch Glove Box Organizer GTX Limited iS A removable glove box organizer can be used for storing and carrying per sonal items sdd2009 001 051 GLOVE BOX ORGANIZER Glove Box Liner Bag GTX Limited iS A glove box liner bag protects items stored in the glove box The line...

Page 73: ...ease cover latches then pull on cover handle to open smo2009 002 123_a HOW TO OPEN STORAGE BIN Step 1 Release cover latches Step 2 Pull cover open NOTICE The maximum load al lowable for the front storage bin is 9 kg 20 lb evenly distributed WARNING Never leave any heavy or break able objects loose in the front stor age bin Do not overload Never operate the watercraft with any storage compartment c...

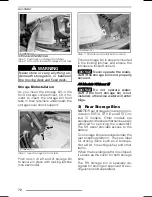
Page 74: ...rted in the locking latches and ensure the latches are locked forward NOTICE Never operate the water craft if the storage bin is not properly secured All Models Without iS NOTICE Do not operate water craft if the front storage bin is not installed otherwise water will enter bilge 3 Rear Storage Bins NOTE Rear storage bins are only pro vided on RXT iS GTX iS and GTX Lim ited iS models Other models ...

Page 75: ...s or electrical problems 4 Fire Extinguisher Holder RXT iS GTX iS and GTX Limited iS Use the support inside the RH storage bin under the rear boarding platform and secure the extinguisher using the rubber tie down Refer to REAR STORAGE BINS for il lustration NOTE Fire extinguisher is sold sepa rately Other Models The fire extinguisher support is located in the front storage bin 5 Seat Opening the ...

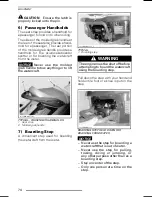
Page 76: ...130_a TYPICAL PASSENGER HANDHOLDS 1 Seat strap 2 Molded grab handle 7 Boarding Step A convenient step used for boarding the watercraft from the water smo2009 002 132_a TYPICAL 1 Boarding step WARNING The engine must be shut off before attempting to board the watercraft using the boarding step Pull down the step with your hand and hold until a foot or a knee is put on the step smo2009 002 133 BOARD...

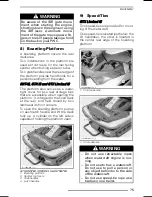
Page 77: ...the fixed deck at the rear and held closed by two latches at its front corners To open the boarding platform pull up on each latch handle and lift the deck fully up A cylinder on the left side is capable of holding the platform open smo2009 002 131_c GTX LIMITED iS MODEL ILLUSTRATED 1 Boarding platform 2 Spotter foot rests 3 Grab handles 4 Latch handles 9 Speed Ties GTX Limited iS Two speed ties a...

Page 78: ...ng cleat sdd2009 001 050_a TYPICAL FRONT SPEED TIE 1 Speed tie mooring line 2 Mooring line stopper 3 Speed tie locking lever 3 Push down on the speed tie locking lever to lock the mooring line NOTICE Always ensure the speed tie rope is properly locked Make sure mooring rope is not in contact with any components that could lead to watercraft damaged or premature rope wear 4 When speed tie rope is s...

Page 79: ...rope is retracted snap the mooring rope stopper into its receptacle 2 Step onto the watercraft Be sure to position your weight over the center of the watercraft as much as possi ble to maintain watercraft stability 3 Carefully move to the operators po sition 4 Release the front mooring rope from the dock cleat retract it and lock the stopper as with the rear speed tie 5 Push or drift the watercraf...

Page 80: ... will allow water accumulated in the bilge to be evacuated and helps to reduce con densation smo2009 002 135_a TYPICAL 1 Drain plugs 2 Tighten 3 Loosen NOTICE Ensure drain plugs are properly secured prior to launching the watercraft in water 13 Ski Wakeboard Post WAKE Pro Model Pull up on the knob to extend the post Ensure both sections of post are fully extended and properly locked before attachi...

Page 81: ...r or wake boarder with a maximum gross weight of 114 kg 250 lb Always have one person other than the operator as an observer NOTE The handles on the ski wake board post are provided as a handhold for the observer NOTICE Never use the ski wakeboard post to tow other water crafts Respect the maximum load limit rating of the ski wakeboard post Overloading can affect ma neuverability stability and per...

Page 82: ...ard to ensure it is tightly secured to rack WARNING If the wakeboard is not properly se cured on the rack it could become loose and detach unexpectedly creating a risk of injury to people nearby To avoid Inspect bungee cords condition and replace if damaged Secure wakeboard properly on rack Periodically ensure the board is properly attached NOTE When the wakeboard is re moved from its rack secure ...

Page 83: ... tilts up or down as a unit To perform this adjustment pull on the release handle at the base of the steer ing column just ahead of the glove box and tilt the handlebars to the desired position sdd2009 001 088_a TYPICAL 1 Release handle 2 Available tilt adjustment 3 Multifunction gauge When the handlebars are at the de sired position release the latch handle and ensure the latch pawl properly en g...

Page 84: ...Model The handlebar width and angular posi tion of the controls may be adjusted to driver preference by extending and ro tating the handlebar extension tubes NOTE To carry out the ergonomic ad justments see an authorized Sea Doo dealer smo2010 002 006_c ERGONOMIC ADJUSTMENTS 1 Handlebar width adjustment 2 Angular position adjustment of controls 82 ______________ ...

Page 85: ...atically move up to a factory preset height This height is ideal for most riding con ditions at cruising speeds The iS system constantly monitors the stroke of the suspension and automat ically compensates for changing water conditions and passenger load When the moving deck is raised above the hull it proportionally elevates the center of gravity of the watercraft higher above the water If the wa...

Page 86: ...TO MATIC SUSPENSION mode by dou ble clicking the iS button UP or DOWN arrow Refer to the CONTROLS sub section for more details Manually Adjusting Ride Height Press the iS UP or Down arrow button once to move the suspension to the next height increment or press and hold the button until the desired ride height is obtained sdd2009 001 019_d TYPICAL 1 iS UP arrow button 2 iS Down arrow button The fol...

Page 87: ...icked the suspension will lower itself to DOCK mode height even if the sus pension is set to DOCK MODE OFF If the suspension is in the down posi tion dock mode height with the water craft powered up and the iS UP button is double clicked the suspension will move up to the factory preset height WARNING When performing certain maneu vers at low speed or when dock ing the watercraft s propensity to o...

Page 88: ...ion RXT X aS The adjustable Suspension aS al lows the moving deck to move inde pendently of the fixed deck isolating rider and passenger from the impact of rough water With the aS feature the moving deck may be adjusted mechanically to ab sorb dampen water shocks according to the driver riding style and water con ditions Spring Preload Adjustment The spring preload can be easily ad justed using a ...

Page 89: ...06_a 1 Blue knob 2 Nitrogen gas damper TYPICAL CONDITIONS NBR OF CLICKS ON DAMPER ADJUSTER CLOCKWISE 0 Calm water 5 10 Rough water 15 Offshore 20 0 is set at fully unscrewed position counterclockwise NOTE These adjustments are pro vided as guidelines to ensure optimum suspension performance Personal preference may dictate different set tings than those recommended _______________ 87 ...

Page 90: ...ximum throttle should not exceed 1 2 to 3 4 opening However brief full acceleration and speed variations contribute to a good break in NOTICE Continued wide open throttle accelerations prolonged cruising speeds and engine over heating are detrimental during the break in period NOTE 215 and 260 engines Dur ing the first 5 hours of operation the engine management limits the engine maximum speed for ...

Page 91: ...tercraft Then bring the other foot over the seat and place it on the other footboard Push the watercraft away from the dock F18A01Y Boarding from Shallow Water In shallow water board the watercraft from either the side or the rear WARNING Keep limbs away from jet or in take grate Never use propulsion system as a supporting point to board the watercraft Ensure there is at least 90 cm 3 ft of water ...

Page 92: ... iBR system Be aware of the iBR gate move ment when starting the engine shutting down the engine or us ing the iBR lever Automatic movement of the gate may squeeze fingers or toes of peo ple taking a hold on the back or your PWC Never use propulsion system or iBR gate as a supporting point to board the watercraft Operator Alone Swim to the rear of the watercraft Using one hand lower the boarding s...

Page 93: ... on the watercraft in the same way as explained previ ously In choppy water while in the water the passenger may hold the water craft steady to help the operator climb aboard smo2009 002 146 NOTICE Stay on center of the step Only one person at a time on the step The passenger then climbs onto the watercraft while the operator main tains balance by sitting as close as pos sible to the console smo20...

Page 94: ...n starting or operating the watercraft 5 Depress the START STOP button to start the engine NOTE The START STOP button must be activated within 5 seconds after the tether cord cap is installed on the engine cut off switch to allow engine starting NOTICE In the event the engine does not start right away do not hold START STOP button more than 10 seconds to avoid starter over heating A rest period sh...

Page 95: ...pplied to turn the water craft WARNING Throttle should be applied and handlebar turned to change the di rection of the watercraft Steering efficiency will differ depending on the number of passengers load water conditions and environmen tal factors such as the wind Unlike a car a watercraft needs some throttle to turn Practice in a safe area applying the throttle and turning away from an imaginary...

Page 96: ...tercraft is first started the iBR system automatically sets the iBR gate to the neutral position by de fault If the gate is in forward thrust position tap the iBR lever The gate will move to neutral If braking or reverse is used the iBR gate will move to the neutral position when the iBR lever is released if throt tle is not applied NOTE The throttle lever must be fully released for the iBR gate t...

Page 97: ...h the iBR and throt tle levers simultaneously reverse thrust can be more precisely con trolled Too much RPM will create water turbulence and reduce reverse efficiency NOTE Engine power will be reduced to idle whenever the iBR lever position is changed Release the iBR lever to end reverse operation To stop rearward velocity after iBR lever release apply enough throttle to stop rearward movement WAR...

Page 98: ... thus be modulated by using only the iBR lever Watercraft deceleration is proportional to the braking force The more the iBR lever is pulled in the greater the brak ing force applied NOTE Be careful to gradually actuate the iBR lever to adjust intensity of the braking force and simultaneously re lease the throttle lever CAUTION When braking rid ers must brace themselves against the deceleration fo...

Page 99: ...rim System VTS The variable trim system VTS changes the vertical position of the jet pump nozzle to provide the operator with a fast effective system to com pensate for load thrust riding position and water conditions Correctly ad justed it can improve handling reduce porpoising and position the watercraft at its best riding attitude to attain maxi mum performance When first using the watercraft t...

Page 100: ...ions and recording or changing preset trim positions on certain models VTS Trimming Methods AVAILABLE VTS TRIMMING METHODS GTX iS GTX LIMITED iS RXT RXT X RXT X aS WAKE PRO GTX VTS trim button X X X Opt VTS double click trimming X X X Opt VTS presets X X X Opt VTS trimming through multifunction gauge N A N A N A X X Indicates a standard feature Opt Feature available as an option N A Not Available ...

Page 101: ...s released at the desired trim attitude or the maximum trim position up or down is reached Using Preset Trim Positions Two preset trim positions can be se lected To select the highest trim position recorded double click on the VTS UP arrow button bow up To select the lowest trim position recorded double click on the VTS DOWN arrow button bow down NOTE If only one preset trim position is recorded d...

Page 102: ... position indicator at setting 1 bow down 6 Press the SET button to save PRE SET 1 and display PRESET 2 7 Press the VTS UP or DOWN button to change the PRESET 2 VTS posi tion Gauge will display setting 1 through 9 in the digital screen above PRESET 2 2 1 3 smo2009 002 114_f FUNCTION SELECTED PRESET 2 1 Preset 2 function 2 VTS setting selected to 9 3 VTS position indicator at setting 9 bow up 8 Pre...

Page 103: ...e conditions If you must do so proceed with caution using minimum speed Crossing Waves Reduce speed Always be prepared to steer and main tain your balance as necessary When crossing wakes always keep a safe distance from watercraft ahead WARNING When crossing wakes slow down Operator and passenger s should brace themselves and adopt a semi standing position to help absorb the bumps Do not jump wav...

Page 104: ...llow in a convoy formation of the braking and maneuvering capabil ity of your PWC what the plume of water indicates and that a greater distance should be maintained be tween both of you The operator should also practice dock ing with an imaginary dock using the various controls available iBR lever and throttle lever Release the throttle at a sufficient dis tance before the expected landing area Re...

Page 105: ...e watercraft in shallow water may result in damage to the impeller iBR components or other jet pump components Al ways shut off the engine before wa ter is less than 90 cm 3 ft deep and never use reverse or braking F18A03Y ______________ 103 ...

Page 106: ...mode of operation when started A TOURING mode indicator is ON in the multifunction gauge to confirm the active mode of operation 1 smo2010 002 100_a 1 Touring mode indicator Sport Mode When selected SPORT MODE pro vides for instant throttle response and more rapid accelerations than TOUR ING MODE NOTE If using a LEARNING or RENTAL key sport mode of operation is not available A SPORT mode indicator...

Page 107: ...t mode provides for in creased accelerations and that they are to hold on tightly 2 Press the SET button again to acti vate sport mode A scrolling SPORT MODE ACTIVATED message will momentarily confirm that sport mode has been activated smo2010 002 103 MESSAGE SPORT MODE ACTIVATED NOTE After a few seconds the gauge will revert to its normal display 3 Ensure the SPORT mode indicator is turned on 1 s...

Page 108: ...w ing WARNING Activating sport mode through the information center should only be carried out with the watercraft stopped and the engine running at idle The operator must ensure to maintain situational awareness of other watercrafts obstacles or persons in the water 1 With the engine running at idle press the MODE button repeatedly until DRIVING MODE scrolls across the multifunction display smo201...

Page 109: ...Ensure the SPORT mode indicator is turned on 1 smo2010 002 201_a 1 SPORT mode indicator NOTE The SPORT mode indicator will come on and stay on as long as sport mode is active If the engine is not at idle and sport mode cannot be activated the following message will appear SPORT MODE RETURN TO IDLE TO ACTIVATE Deactivating Sport Mode Through Information Center To deactivate sport mode carry out the...

Page 110: ...dica tor is on 1 smo2010 002 100_a 1 Touring mode indicator ECO Mode Fuel Economy Mode GTX 155 Only How to Activate Fuel Economy Mode 1 Press the MODE button repeatedly until the following message appears in the multifunction display MULTIFUNCTION DISPLAY MESSAGE FUEL ECONOMY MODE 2 Press SET button to enter the func tion the following message will ap pear MULTIFUNCTION DISPLAY MESSAGE FUEL ECONOM...

Page 111: ...ruise speed is set the operator can vary the water craft speed from idle speed up to the set cruise speed using the throttle lever The set cruise speed will not be exceeded even if the throttle lever is fully depressed As you proceed under a constant cruis ing speed setting keep your attention level up to maintain good situational awareness Slowing down is a matter of releasing the throttle lever ...

Page 112: ...ay MULTIFUNCTION DISPLAY MESSAGE CRUISE MODE _ SELECT SPEED _ PRESS SET TO ACCEPT OR MODE TO EXIT 2 Press the UP arrow button until the desired cruise speed is indicated in the numerical display The following message will scroll in the multifunc tion display MULTIFUNCTION DISPLAY MESSAGE CRUISE MODE _ SPEED ADJUSTING 3 Press the SET button to save the cruise speed selected and engage cruise speed ...

Page 113: ...M when the throttle is released Should a situation arise where the op erator must stop or accelerate quickly away from a hazardous situation pulling in the iBR lever or pulling in on the throttle lever will deactivate slow speed mode and normal control of the watercraft will be returned to the oper ator Activating Slow Speed Mode To activate slow speed mode of opera tion 1 Release the throttle lev...

Page 114: ...l screen will come back on to indicate the slow speed setting change 2 1 smo2009 002 114_zz CONTINUOUS MESSAGE SLOW SPEED MODE 1 Scrolling SLOW SPEED MODE message 2 Numerical display reverts to previous indication The displays will revert back to their previous indication a few seconds after the last activation of the UP or DOWN arrow button NOTE There are 5 slow speed set tings available 1 throug...

Page 115: ...dual acceleration RAMP 1 also provides for the slowest TARGET SPEED range RAMP 5 provides for the quickest launch and most rapid acceleration RAMP 5 also provides the highest TAR GET SPEED range The RAMP setting that is selected by default when entering ski mode may be changed to a different setting TARGET SPEED Function The TARGET SPEED function limits the maximum towing speed Once the RAMP has b...

Page 116: ...ifunction display will change to the TARGET SPEED set ting function 1 smo2010 002 118 SECOND SETTING AVAILABLE TARGET SPEED 1 TARGET SPEED setting 5 Press the UP or DOWN arrow but ton to increase or decrease the tar get speed 6 Press SET to lock in the target speed the display will switch to the following scrolling message SKI MODE PRESS_SET_TO START OR MODE TO EXIT smo2010 002 119 SCROLLING MESSA...

Page 117: ... lever in 2 Press UP arrow button to increase speed 3 Press DOWN arrow button to increase speed MULTIFUNCTION DISPLAY MESSAGE SKI MODE SPEED ADJUSTING NOTE If the throttle is partly released during a ski run the SKI MODE indica tor light will start to blink and the speed adjust function using the UP or DOWN arrow button will be deactivated 10 To end a ski run or to pick up a fallen skier or wakebo...

Page 118: ...Wait for the information center to complete its self test and display the key recognition message 3 Press the MODE button repeatedly until KEY MODE is visible in the digi tal screen of the information center sdd2009 001 024_b TYPICAL GAUGE CONTROL BUTTONS 1 MODE button 2 SET button 3 UPDOWN arrow button smo2009 002 114_b FUNCTION SELECTED KEY MODE 4 Press the SET button once to enable learning key...

Page 119: ...ing will automatically be saved NOTE The key speed setting is appli cable to any key of the same type used on a specific watercraft The same key type used on a different watercraft may therefore have a different key speed setting D E S S KEY TYPE KEY SPEED SETTING APPROX MAX SPEED 5 58 km h 36 MPH 4 55 km h 34 MPH 3 50 km h 31 MPH 2 47 km h 29 MPH LEARNING KEY 1 42 km h 26 MPH 5 74 km h 46 MPH 4 6...

Page 120: ...n Water Cleaning Rock the watercraft several times while repeatedly pressing engine START STOP button for short period without starting engine Most of the time this will remove the blockage Start engine and make sure watercraft operates properly If the aforementioned method does not work the following can be per formed With engine running and before ap plying throttle pull the iBR lever in to sele...

Page 121: ...R gate travel be fore moving it WARNING If it is necessary to reach in to re move any foreign object caught in the propulsion system strictly observe the following before pro ceeding Remove tether cord from the engine cut off switch Wait at least 5 minutes Do not press on START STOP button Should the START STOP button is pressed wait another 5 minutes Activating iBR Override Function To activate t...

Page 122: ...R to the desired position once the iBR override function has been activated as described in the pre vious steps All Models 10 Remove the tether cord from the engine cut off switch WARNING If it is necessary to reach in to re move any foreign object caught in the propulsion system strictly observe the following before pro ceeding Remove tether cord from the engine cut off switch Wait at least 5 min...

Page 123: ...tips over the engine is automatically stopped When the watercraft is returned to its normal operating position the engine can be started normally NOTICE If the watercraft has been capsized for more than 5 minutes do not attempt to crank the engine to avoid water ingestion that would damage the engine See an autho rized Sea Doo dealer as soon as pos sible NOTICE If the engine does not crank do not ...

Page 124: ...ed may cause severe engine damage Towing the Watercraft in Water Special precautions should be taken when towing a Sea Doo watercraft in water The maximum recommended towing speed is 24 km h 15 MPH This will prevent the exhaust system from filling with water which may lead to water being injected into and filling the engine Without the engine run ning there isn t any exhaust pressure to push the w...

Page 125: ...MAINTENANCE ______________ 123 ...

Page 126: ...o Watercrafts dealer The initial maintenance is very important and must not be neglected NOTE The break in inspection is at the expense of the PWC owner We recommend that this inspection be signed by an authorized Sea Doo Water crafts dealer Date of break in inspection Authorized dealer signature Dealer name 124 ______________ ...

Page 127: ...e and fasteners X Coolant X FUEL SYSTEM Fuel cap filler neck fuel tank fuel tank straps fuel lines and connections X Fuel system leak test X Throttle body X AIR INTAKE SYSTEM Air intake silencer X ELECTRONIC MANAGEMENT SYSTEM EMS sensors X Fault codes ECM iBR iS Cluster X ELECTRICAL SYSTEM Spark plugs X Electrical connections and fastening ignition system starting system fuel injectors fuse boxes ...

Page 128: ...ller wear ring clearance X Pump mounts X iBR SYSTEM intelligent Brake and Reverse iBR gate backlash X iBR support plates X iBR friction sleeves X iBR connecting arms sleeves and bushings X iBR U lever VTS trim ring iBR gate and bushings X iBR locking sleeve X iBR protective guard X iS SYSTEM intelligent Suspension iS oil X iS position sensor X aS SYSTEM adjustable Suspension Nitrogen remote reserv...

Page 129: ... maintenance schedule may not be applicable to every watercraft model 25 HOURS OR 3 MONTHS 50 HOURS OR 6 MONTHS 100 HOURS OR 1 YEAR 200 HOURS OR 2 YEAR A ADJUST C CLEAN I INSPECT L LUBRICATE R REPLACE O OPERATOR D DEALER TO BE PERFORMED BY PART TASK NOTE ENGINE Engine oil and filter R D Rubber mounts I D Corrosion protection L O Supercharger clutch R 1 D 1 See NOTE 1 after maintenance chart EXHAUS...

Page 130: ...jectors fuse boxes etc I D Engine cut off switch I D Monitoring beeper I D Battery and fasteners I 5 D 5 Inspect once a month Add electrolyte as required STEERING SYSTEM Steering cable and connections I D Steering nozzle bushings I D O T A S 6 I D 6 Inspect operation PROPULSION SYSTEM Carbon ring and rubber boot drive shaft I D Impeller boot I D Impeller shaft seal sleeve and O ring I 4 D Drive sh...

Page 131: ...water intake grate I O NOTE 1 The supercharger clutch requires replacement when the MAINTENANCE SUPERCHARGER message is displayed in the information center at every 100 hours of operation or earlier depending on the riding style speed engine RPM water conditions This is determined by the engine management system The supercharger clutch will need to be replaced within 5 hours of the message display...

Page 132: ...one of the above standards Models with 215 and 255 Engines Use XPS 4 STROKE SYNTH BLEND OIL SUMMER P N 293 600 121 NOTICE These engines have been developed and validated using the BRP XPS Synthetic blend oil BRP strongly recommends the use of its XPS Synthetic blend oil at all times Damages caused by oil which is not suitable for the engine will not be covered by the BRP limited war ranty If the r...

Page 133: ...ec tion and follow the procedure NOTICE Never run engine without supply ing water to the exhaust system Failure to cool exhaust system may severely damage it Never run engine longer than 2 minutes Drive line seal has no cooling when watercraft is out of water 5 With the engine already at normal operating condition let engine idle for 30 seconds then stop engine 6 Wait at least 30 seconds for the o...

Page 134: ... ternal combustion aluminum engines NOTE Using a blend of 40 an tifreeze with 60 demineralized wa ter will improve the cooling efficiency when watercraft is used in particularly hot weather and or hot water condi tion Engine Coolant Level WARNING Check coolant level with engine cold Never add coolant in cooling system when engine is hot CAUTION Certain compo nents in the engine compartment may be ...

Page 135: ...zed Sea Doo dealer Ignition Coils Ignition Coil Access RXT iS GTX iS GTX Limited iS Open seat Remove rear air ventilation box Models other than iS Open seat Remove engine cover Ignition Coil Removal Disconnect ignition coil connector smr2009 032 004_b 1 Ignition coil 2 Ignition coil connector NOTICE Do not remove the igni tion coil before disconnecting the input connector or the wires may be damag...

Page 136: ...onnect the garden hose NOTE It is recommended to fog the engine valves with XPS Lube Contact your authorized Sea Doo dealer Spark Plugs Spark Plug Removal 1 Open seat 2 Remove rear ventilation box as ap plicable 3 Disconnect the ignition coil input connector 4 Remove ignition coil Refer to IGNI TION COIL REMOVAL WARNING Never remove an ignition coil from a spark plug without disconnect ing it from...

Page 137: ...ssential to neutralize corroding effects of salt or other chem ical products present in water It will help to remove sand salt shells or other particles in water jackets and or hoses Flushing should be performed when the watercraft is not expected to be used further the same day or when the watercraft is stored for any extended time WARNING Perform this operation in a well ventilated area Proceed ...

Page 138: ... 5000 RPM NOTICE Never run engine without supplying water to the exhaust sys tem when watercraft is out of water Ensure water flows out of jet pump while flushing Otherwise refer to an authorized Sea Doo dealer for servic ing NOTICE Never run engine longer than 2 minutes Drive line seal has no cooling when watercraft is out of water Close the water tap then stop the en gine NOTICE Always close the...

Page 139: ...excess grease and reinstall post Extend and retract several times to dis tribute the lubricant Fuses Fuse Removal and Installation Use the fuse remover installer in cluded in the fuse box to ease fuse removal Fuse Inspection If an electrical problem occurs check the fuses If a fuse is burnt replace by one of the same rating A15E0KZ 1 2 3 TYPICAL 1 Fuse 2 Check if melted 3 Ampere rating WARNING Do ...

Page 140: ... a fuse box cover squeeze locking tabs together hold and pull fuse box cover to open NOTE Fuse ratings and positions are illustrated on the fuse box cover Fuse Description FUSE RATING DESCRIPTION 1 5A iS Control intelligent Suspension 2 15 A Diagnostic connector 3 3 A START STOP button 4 3 A GPS 5 30 A iBR 6 30 A Charge 7 30 A iS 8 30 A Battery 9 Not used 10 Not used 11 3 A Depth sounder if so equ...

Page 141: ...nts Never leave the watercraft stored in direct sunlight Watercraft Cleaning Body and Hull Occasionally wash the hull and various body components with water and soap use only mild detergent Remove any marine organisms from engine and or hull Apply non abrasive wax such as silicone wax NOTICE Never clean fiberglass and plastic parts with strong deter gent degreasing agent paint thin ner acetone or ...

Page 142: ... Protection P N 413 408 600 or equivalent should be added in the fuel tank to pre vent fuel deterioration and fuel system gumming Follow stabilizer manufac turers instructions for proper use NOTICE It is highly recommended to add fuel stabilizer at storage in or der to maintain fuel system in good condition Fuel stabilizer should be added prior to engine lubrica tion and fuel tank top up to ensure...

Page 143: ...ect it from any expelled water from the intercooler smo2009 002 151_a TYPICAL RXT iS MODEL ILLUSTRATED 1 Hose alignment lines 2 Hose clamp 3 Intercooler outlet hose 4 iS module 6 Start and rev the engine up to 4000 RPM several times NOTE Ensure air intake system does not aspirate foreign objects which may cause severe engine or damage 7 Stop engine 8 Reinstall the intercooler air outlet hose ensur...

Page 144: ...very 200 hours or every 2 years to prevent antifreeze deterioration NOTICE Improper antifreeze den sity may result in freezing of the liq uid in the cooling system if the wa tercraft is stored in an area where the freezing point is attained This would seriously damage the engine Electrical System Battery Removal and Charging Contact your authorized Sea Doo dealer WARNING Never charge or boost the ...

Page 145: ...aintenance preparation must be per formed in conjunction with PERIODIC MAINTENANCE CHART Ensure to perform all tasks included in the 100 HOURS OR 1 YEAR column Since technical skills and special tools are required some operations should be performed by an authorized Sea Doo dealer NOTE It is highly recommended that an authorized Sea Doo dealer perform factory campaigns in addition to the preseason...

Page 146: ...STORAGE AND PRESEASON PREPARATION This page is intentionally blank 144 ______________ ...

Page 147: ...TECHNICAL INFORMATION ______________ 145 ...

Page 148: ...Hull Identification Number H I N is located on footboard at the rear of watercraft smo2009 002 131_b TYPICAL 1 Hull Identification Number H I N It is composed of 12 digits YDV 12345 L 8 09 Model year Year of production Month of production Serial number a letter may also be used as a digit Manufacturer Engine Identification Number The Engine Identification Number E I N is located on the front end o...

Page 149: ...ptions include manufacturer s prescribed changes such as altitude adjustments for example Owner Responsibility The owner operator is required to have engine maintenance performed to maintain emission levels within pre scribed certification standards The owner operator is not to and should not allow anyone to modify the engine in any manner that would alter the horsepower or allow emissions levels ...

Page 150: ...tle body 60 mm 2 4 in Bore 100 mm 3 9 in Stroke 63 4 mm 2 5 in Compression ratio 8 4 1 10 6 1 Cooling Closed loop system ELECTRICAL SYSTEM Ignition IDI inductive discharge ignition Starter Electric Battery 12 V 30 A h Electrolyte type Make and type NGK DCPR8E Spark plug Gap 0 75 mm 03 in PROPULSION Propulsion system Sea Doo direct drive Type Axial flow single stage Large hub with 10 vane stator Je...

Page 151: ...d Inside North America 87 RON MON 2 Minimum octane Outside North America 92 RON Inside North America 91 RON MON 2 Inside North America 87 RON MON 2 Recommended octane rating for optimum performance Outside North America 95 RON Outside North America 92 RON Fuel Tank capacity 70 L 18 5 U S gal 60 L 15 9 U S gal Type XPS synthetic blend oil summer grade Refer to MAINTENANCE section for more informati...

Page 152: ...60 mm 2 4 in Bore 100 mm 3 9 in Stroke 63 4 mm 2 5 in Compression ratio 8 4 1 Cooling Closed loop system ELECTRICAL SYSTEM Ignition IDI inductive discharge ignition Starter Electric Battery 12 V 30 A h Electrolyte type Make and type NGK DCPR8E Spark plug Gap 0 75 mm 03 in PROPULSION Propulsion system Sea Doo direct drive Type Axial flow single stage Large hub with 10 vane stator Jet pump Material ...

Page 153: ... 600 lb FLUIDS Type Unleaded Inside North America 87 RON MON 2 Minimum octane Outside North America 92 RON Inside North America 91 RON MON 2 Fuel Recommended octane rating for optimum performance Outside North America 95 RON RXT iS 260 RXT X aS 260 70 L 18 5 U S gal Fuel tank capacity RXT X 260 RXT 260 60 L 15 9 U S gal Type XPS synthetic blend oil summer grade Refer to MAINTENANCE section for mor...

Page 154: ...re 100 mm 3 9 in Stroke 63 4 mm 2 5 in Compression ratio 8 4 1 Cooling Closed loop system ELECTRICAL SYSTEM Ignition IDI inductive discharge ignition Starter Electric Battery 12 V 30 A h Electrolyte type Make and type NGK DCPR8E Spark plug Gap 0 75 mm 03 in PROPULSION Propulsion system Sea Doo direct drive Type Axial flow single stage Large hub with 10 vane stator Jet pump Material Aluminum Impell...

Page 155: ...North America 91 RON MON 2 Recommended octane rating for optimum performance Outside North America 95 RON Fuel Tank capacity 60 L 15 9 U S gal Type XPS synthetic blend oil summer grade Refer to MAINTENANCE section for more information Engine oil Capacity 3 L 3 2 qt U S liq Oil change w filter Coolant type See ENGINE COOLANT in the MAINTENANCE PROCEDURES section of this guide Cooling system Capacit...

Page 156: ...SPECIFICATIONS This page is intentionally blank 154 ______________ ...

Page 157: ...TROUBLESHOOTING ______________ 155 ...

Page 158: ...te is poisonous and dangerous Avoid contact with eyes skin and clothing 5 Battery connections corroded or loose Bad ground Refer to an authorized Sea Doo dealer 6 Water flooded engine Refer to WATER FLOODED ENGINE in SPECIAL PROCEDURES 7 Faulty sensor or ECM Refer to an authorized Sea Doo dealer 8 Seized jet pump Try to clean Otherwise refer to an authorized Sea Doo dealer ENGINE TURNS SLOWLY 1 Lo...

Page 159: ...r to an authorized Sea Doo dealer 4 Clogged injectors Refer to an authorized Sea Doo dealer 5 Engine management system fault detected check engine pilot lamp is ON Refer to MONITORING SYSTEM ENGINE SMOKE 1 Oil level too high Refer to an authorized Sea Doo dealer 2 Water ingestion coolant leak or damaged cylinder head gasket Refer to an authorized Sea Doo dealer 3 Internal engine damage Refer to an...

Page 160: ... fuel Siphon and replace 9 Engine damaged by water ingestion Refer to an authorized Sea Doo dealer WATERCRAFT CAN NOT REACH TOP SPEED 1 Jet pump water intake clogged Clean Refer to JET PUMP WATER INTAKE AND IMPELLER CLEANING in SPECIAL PROCEDURES section 2 Damaged impeller or worn out wear ring Replace Refer to an authorized Sea Doo dealer 3 Engine management system fault detected check engine pil...

Page 161: ...iBR gate returns to neutral 2 Throttle lever does not fully return to null when released Refer to an authorized Sea Doo dealer ABNORMAL NOISE FROM PROPULSION SYSTEM 1 Weeds or debris jammed around impeller Clean Refer to JET PUMP WATER INTAKE AND IMPELLER CLEANING in SPECIAL PROCEDURES section Ceck for damage 2 Damaged impeller shaft or drive shaft Refer to an authorized Sea Doo dealer 3 Water int...

Page 162: ... watercraft systems when comparing them to a fault list Fault codes can be viewed in the in formation center multifunction display however this function is only available if a fault is still active If there is an active fault code it may be viewed by the operator on the mul tifunction display The operator may then choose to call his authorized Sea Doo dealer to pass on the fault code The dealer wi...

Page 163: ...on or if an anomaly occurs For information on usual indicator lights refer to INFORMATION CENTER GAUGE PILOT LAMPS ON MESSAGE DISPLAY DESCRIPTION LOW or HIGH BATTERY VOLTAGE Low high battery voltage HIGH TEMPERATURE Engine or exhaust system overheating CHECK ENGINE or LIMP HOME MODE Check engine minor fault req maint or LIMP HOME MODE major eng fault LOW OIL PRESSURE Low oil pressure _ iBR system ...

Page 164: ...e system malfunction or maintenance required HIGH BATTERY VOLTAGE High battery voltage detected LOW BATTERY VOLTAGE Low battery voltage detected LIMP HOME MODE Major fault detected engine power limited FUEL SENSOR DEFECTIVE Fuel level sensor fault WATER TEMP SENSOR DEFECTIVE Problem in iBR not sending water temperature info CALIBRATION CHECKSUM ERROR Cluster programming corrupted NOTICE Running en...

Page 165: ...fer to an authorized Sea Doo dealer Watercraft is upside down Turn watercraft upright Refer to SPECIAL PROCEDURES A 2 seconds beep every 15 minutes interval Engine management system fault Refer to an authorized Sea Doo dealer Low fuel level Refill fuel tank If problem persists refer to an authorized Sea Doo dealer A 2 seconds beep every 5 minutes interval Fuel tank level sensor or circuit malfunct...

Page 166: ...MONITORING SYSTEM This page is intentionally blank 164 ______________ ...

Page 167: ...WARRANTY ______________ 165 ...

Page 168: ...THIS WARRANTY IS EXPRESSLY GIVEN AND ACCEPTED IN LIEU OF ANY AND ALL OTHER WARRANTIES EXPRESSED OR IMPLIED INCLUDING WITHOUT LIMITATION ANY WARRANTY OF MERCHANTABILITY OR FIT NESS FOR A PARTICULAR PURPOSE TO THE EXTENT THAT THEY CANNOT BE DISCLAIMED THE IMPLIED WARRANTIES ARE LIMITED IN DURATION TO THE LIFE OF THE EXPRESS WARRANTY INCIDENTAL AND CONSE QUENTIAL DAMAGES ARE EXCLUDED FROM COVERAGE UN...

Page 169: ... private use owners 2 FOUR 4 CONSECUTIVE MONTHS for commercial use owners A personal watercraft is used commercially when it is used in connection with generating income or any work or employment during any part of the warranty period A personal watercraft is also used commercially when at any point during the warranty period it has commercial tags or is licensed for commercial use 3 Emission rela...

Page 170: ...omer must notify an authorized servicing BRP dealer within two 2 days of the appearance of a defect and provide it with reasonable access to the product and reasonable opportunity to repair it The customer must also present to the authorized BRP dealer proof of purchase of the product and must sign the repair work order prior to the start of the repair in order to validate the warranty repair All ...

Page 171: ...oversy or a dispute in connection with this BRP limited warranty BRP suggests that you try to resolve the issue at the dealership level We recommend discussing the issue with the authorized BRP dealer s service manager or owner If the issue has not yet been resolved please submit your complaint in writing or call the appropriate number below In CANADA In USA Bombardier Recreational Products Inc Cu...

Page 172: ...g money and resources Longer Emission Warranty Protects consumer for worry free operation One Star Low Emission The one star label identifies personal watercraft outboard stern drive and inboard engines that meet the Air Resources Board s Personal Watercraft and Out board marine engine 2001 exhaust emission standards Engines meeting these standards have 75 lower emissions than conventional carbure...

Page 173: ...ime listed below provided there has been no abuse neglect or improper maintenance of your personal watercraft engine Your emission control system may include parts such as the fuel injection system the ignition system and catalytic converter Also included may be hoses belts connectors and other emission related assemblies Where a warrantable condition exists BRP will repair your personal watercraf...

Page 174: ...ance and use of your personal water craft All emission warranty parts are warranted by BRP for the entire warranty period of the personal watercraft unless the part is scheduled for replacement as required maintenance in the Operator s Guide Emission warranty parts that are scheduled for replacement as required mainte nance are warranted by BRP for the period of time before the first scheduled re ...

Page 175: ...deny you warranty coverage if your engine s or a part has failed due to abuse neglect improper maintenance or unapproved modifications You are responsible for presenting your engine to an authorized BRP Dealer as soon as a problem exists The warranty repairs will be completed in a reasonable amount of time not to exceed 30 days If you have any questions regarding your warranty rights and responsib...

Page 176: ...of the personal watercraft 2 LIMITATIONS OF LIABILITY THIS WARRANTY IS EXPRESSLY GIVEN AND ACCEPTED IN LIEU OF ANY AND ALL OTHER WARRANTIES EXPRESSED OR IMPLIED INCLUDING WITHOUT LIMITATION ANY WARRANTY OF MERCHANTABILITY OR FITNESS FOR A PARTICULAR PURPOSE TO THE EXTENT THAT THEY CANNOT BE DISCLAIMED THE IMPLIED WARRANTIES ARE LIMITED IN DURATION TO THE LIFE OF THE EXPRESS WARRANTY INCIDENTAL AND...

Page 177: ...l taxi inconvenience insurance coverage loan payments loss of time loss of income 4 WARRANTY COVERAGE DURATION This warranty will be in effect from the date of delivery to the first retail consumer or the date the product is first put into use whichever occurs first and for a period of 1 TWELVE 12 CONSECUTIVE MONTHS for private recreational use 2 FOUR 4 CONSECUTIVE MONTHS for commercial use owners...

Page 178: ...er must notify a servicing BRP distributor dealer within two 2 days of the appearance of a defect and provide it with reasonable access to the product and reasonable opportunity to repair it The customer must also present to the BRP distributor dealer proof of purchase of the product and must sign the repair work order prior to the start of the repair in order to validate the warranty repair All p...

Page 179: ...istance is required the distributor s service department should be contacted in order to resolve the matter You will find your distributor s coordi nates on www brp com 3 If the matter still remains unresolved then contact BRP by writing to us at the ad dress listed below For countries within Europe Middle East Africa please contact our European office BRP EUROPE N V Consumer Assistance Center Ska...

Page 180: ...warranty as that of the personal watercraft 2 LIMITATIONS OF LIABILITY THIS WARRANTY IS EXPRESSLY GIVEN AND ACCEPTED IN LIEU OF ANY AND ALL OTHER WARRANTIES EXPRESSED OR IMPLIED INCLUDING WITHOUT LIMITATION ANY WARRANTY OF MERCHANTABILITY OR FITNESS FOR A PARTICULAR PURPOSE TO THE EXTENT THAT THEY CANNOT BE DISCLAIMED THE IMPLIED WARRANTIES ARE LIMITED IN DURATION TO THE LIFE OF THE EXPRESS WARRAN...

Page 181: ...an payments loss of time loss of income 4 WARRANTY COVERAGE PERIOD This warranty will be in effect from the date of delivery to the first retail consumer or the date the product is first put into use whichever occurs first and for a period of 1 Twenty four 24 CONSECUTIVE MONTHS for private recreational use 2 FOUR 4 CONSECUTIVE MONTHS for commercial use owners A personal watercraft is used commerci...

Page 182: ...subject to the applicable national or local legisla tion in your country 7 WHAT BRP WILL DO BRP s obligations under this warranty are limited to at its sole discretion repairing parts found defective under normal use maintenance and service or replacing such parts with new genuine Sea Doo parts without charge for parts and labor at any authorized BRP Distributor Dealer during the warranty coverage...

Page 183: ...ss listed be low For countries within Europe to the exception of the Scandinavian countries Turkey and Russia CIS please contact our European office BRP EUROPE N V Consumer Assistance Center Skaldenstraat 125 9042 Gent Belgium Tel 32 9 218 26 00 For Scandinavian countries please contact our Finland office BRP FINLAND OY Service Department Isoaavantie 7 Fin 96320 Rovaniemi Finland Tel 358 16 3208 1...

Page 184: ...182 ______________ ...

Page 185: ...CUSTOMER INFORMATION ______________ 183 ...

Page 186: ...stomer list to distribute marketing and promotional information about BRP and related products To exercise your right to consult or correct your data or to be removed from the addressee list for direct marketing please contact BRP By E mail privacyofficer brp com By mail BRP Senior Legal Counsel Privacy Officer 726 St Joseph Valcourt QC Canada J0E 2L0 184 ______________ ...

Page 187: ... owner if necessary like when safety recalls are initiated It is the owner s responsibility to notify BRP STOLEN UNITS In the event that your boat is stolen you should notify your area s distributor warranty department of such We will ask you to provide your name ad dress phone number Hull Identification Number and date it was stolen NORTH AMERICA Bombardier Recreational Products Inc Warranty Depa...

Page 188: ...CHANGE OF ADDRESS OWNERSHIP This page is intentionally blank 186 ______________ ...

Page 189: ...CHANGE OF ADDRESS OWNERSHIP ______________ 187 ...

Page 190: ...CHANGE OF ADDRESS OWNERSHIP 188 ______________ ...

Page 191: ......

Page 192: ......

Reviews: