background image

· The system will disarm.  If the code is entered incorrectly, turn off the ignition and begin again.

To set the Emergency Override Code:

1. Turn on ignition.
2. Within 5 seconds, press the valet switch 5 times.

· The siren will provide one long chirp, indicating that you have entered Programming.

3. Press the valet switch 3 times.

· The siren will chirp each time the valet switch is pressed.

4. Within 5 seconds, press Button 3 on the transmitter.

· The siren will chirp 3 times.

5. Press the valet switch the number of time equal to the desired code (from 1-15).
6. Turn off the ignition then arm the system.
7. Disarm the system using the new Override Code to permanently store the new code.

Note: If the code set procedure is not properly performed, turn off the ignition and begin again.  The override code will not

be permanently stored until the code is used to disarm the system.

Valet Mode

The Valet Mode temporarily disables the security system so the vehicle may be operated by a mechanic or

parking attendant.
To activate or deactivate the Valet Mode:

1.  Turn on the ignition.
2.  Press and hold the override switch for 5 seconds.

· The siren will chirp once to confirm the Valet Mode is on.
· The siren will chirp twice to confirm the Valet Mode is off.

3.  Turn off the ignition.

While in Valet Mode the remote transmitters will continue to lock and unlock the doors, and operate the

optional auxiliary functions. 

Battery Replacement

Your Remote Transmitter uses a 2 of 3 volt  battery (type CR2016 ), which will require

replacement in time.  Depending on the amount of use, the battery may last up to six months

or more before it needs replacement.
When the battery needs replacing, the system’s operating range will decrease or the transmitter

LED may not be as bright.
In order to change the battery, separate the top and bottom halves of the case.  
While replacing the battery make sure that the positive and negative terminals are positioned

correctly, then carefully reassemble the transmitter case.

Page 6 -  A10-4B

Summary of Contents for P10 Series

Page 1: ...P10 SERIES VEHICLE SECURITY SYSTEM PRODUCT MANUAL...

Page 2: ...ill be a maximum service charge of 25 00 per calendar year if required for repair and or replacement of any defective parts A copy of the original purchase receipt must accompany any products returned...

Page 3: ...ition Controlled Door Locks Page 7 Dome Light Activation Page 7 Auxiliary Function Outputs Page 7 Remote Sensor Disable Page 7 Anti Carjacking Protection Page 7 5 System Installation Page 8 Mounting t...

Page 4: ......

Page 5: ...d or labor see store for details A10 4B Page 1 Remote Door Locking Two Stage Door Unlocking Starter Defeat Horn Honk Illuminated Entry Remote Car Start Extended Range Antenna Power Trunk Hatch Release...

Page 6: ...ng Transmitters To replace lost or stolen transmitters or to add additional transmitters into the system have all desired transmitters ready and follow the steps below Note Up to 4 transmitters can be...

Page 7: ...A10 4B Page 3...

Page 8: ...ystem is triggered by the doors or hood trunk the system will alarm for 45 seconds If triggered by the shock sensor input the system will alarm for 30 seconds In the event the alarm is triggered and r...

Page 9: ...the ignition is on when the Panic feature is activated the doors will lock for personal safety Emergency Override If the transmitter is lost or inoperable the system can still be disarmed using the fo...

Page 10: ...orarily disables the security system so the vehicle may be operated by a mechanic or parking attendant To activate or deactivate the Valet Mode 1 Turn on the ignition 2 Press and hold the override swi...

Page 11: ...arms To disable the sensor inputs 1 Arm the system normally 2 Within 5 seconds of Arming the system press the Arm button again The siren will chirp 5 times and the parking lights will flash 5 times to...

Page 12: ...ll vehicle systems before and after the installation 6 Always use a Volt Ohm meter for testing vehicle circuits Never use a test light 7 Always look before drilling any holes or mounting self tapping...

Page 13: ...n Choose a siren mounting location that is away from heat sources such as exhaust manifolds and where it cannot be easily accessed from underneath the vehicle Be sure to face the siren downward to pre...

Page 14: ...Pin Main Harness Pin 1 WHITE WIRE Parking Light Output 10A The WHITE wire must connect to the circuit that shows 12V when only the parking lights are on For parking light circuits exceeding 7 amps a...

Page 15: ...utton 3 The siren will chirp 6 times indicating that the reset signal was received All System Programming parameters are now set to factory default settings The Valet Mode is off 3 Turn off ignition P...

Page 16: ...or Unlock Pulse Selects between one pulse or two pulse operation for the door unlock output Vehicles that require two pulses on the proper wire to unlock the doors can be interfaced directly without t...

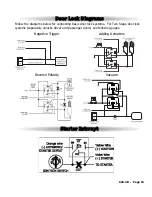
Page 17: ...ng Actuators Reverse Polarity Vacuum Follow the diagrams below for connecting basic door lock systems For Two Stage door lock systems separately unlocks driver and passenger doors see following pages...

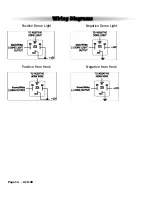
Page 18: ...Page 14 A10 4B Wiring Diagrams Positive Dome Light Negative Dome Light Positive Horn Honk Negative Horn Honk...

Page 19: ...A10 4B Page 15...
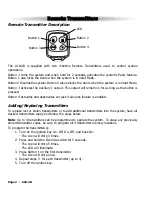
Page 20: ...including interference that may cause undesired operation Technical Information Impact Sensor Green Lock Out Blue Unlock Out Valet Switch LED Orange Starter Interrupt Output Blue Trigger Black White...

Reviews: