3
2.1
INSTALLATION OF HDD AND CD-RW (DVD-RW)
2.1.1 IDE
ports
y
This DVR provides 2 x IDE ports that are to be divided into Primary and Secondary respectively.
y
Every IDE port will be connected with 2 IDE devices (HDD, CD-RW, DVD-RW) in a row, but each of the storage devices should be set as
Master or Slave in accordance with following port setting plan
y
Correct set of CD-RW (or DVD-RW) is
Slave in the Secondary port
.
y
Please refer to following Port Setting Plan for the installation of HDD and CD-RW (DVD-RW).
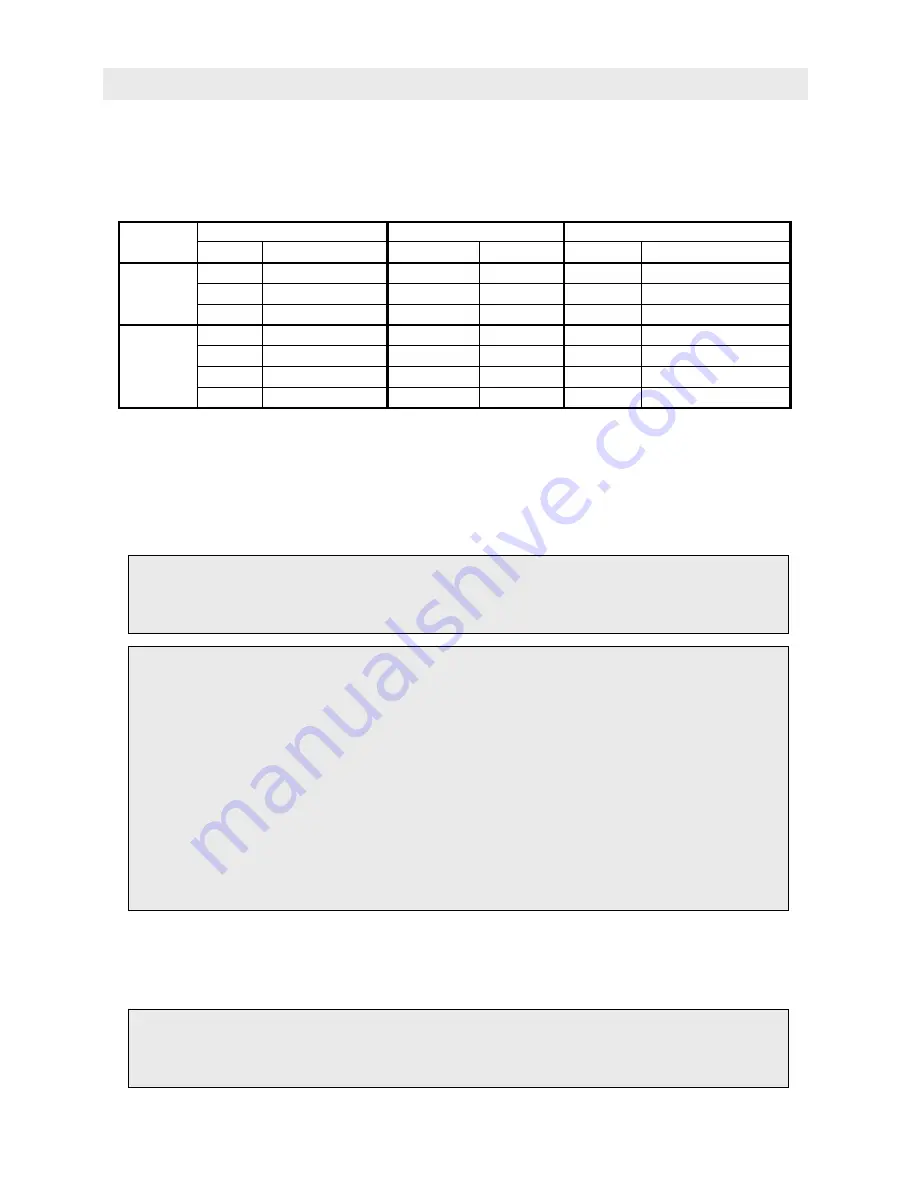
Storage
Primary IDE Port Secondary
IDE
Port
HDD CD-RW
(DVD-RW) Master
Slave
Master
Slave
1 1pc
HDD ---- ----
CD-RW
(DVD-RW)
2 1pc
HDD HDD ---- CD-RW
(DVD-RW)
4 / 8ch DVR
3 ----
HDD HDD
HDD
----
1 1pc
HDD ---- ----
CD-RW
(DVD-RW)
2 1pc
HDD HDD ---- CD-RW
(DVD-RW)
3 1pc
HDD HDD
HDD
CD-RW
(DVD-RW)
16ch DVR
4 ----
HDD HDD
HDD
HDD
2.1.2
How to set Master / Slave
y
You are required to use Jumper pins for setting Master or Slave in the HDD or CD-RW (or DVD-RW). Because every brand has its own
specific ways of set, how to set will be described on the surface of each device. The setting pin for selecting Master / Slave locates at
between IDE connector (40-pin) and Power connector (4-pin).
2.1.3
How to install HDD
y
You are required to use the brackets and screws provided in the package for installing HDD.
y
You are firmly requested to use only the cable kits provided (Data cable and Power cable). Otherwise HDD can be damaged.
2.1.4
How to install CD-RW (or DVD-RW)
y
You are required to use the brackets and screws provided in the package for installing CD-RW (or DVD-RW).
y
You are firmly requested to use only the cable kits provided (Data cable and Power cable). Otherwise CD-RW (or DVD-RW) can be
damaged.
y
You are allowed to use only 1 x CD-RW (or DVD-RW). CD-RW (or DVD-RW) should always be set as
Slave in the Secondary ports.
(ATTENTION)
y
You are firmly requested to turn the power of DVR off prior to the installation/Add/Change/Move/Removal of HDD and CD-
RW (DVD-RW). Otherwise it can cause fatal damages to those storage devices. For turning the power of DVR off, go to
SETUP>SYSTEM>Shutdown to shutdown the system and then DVR will be automatically rebooted. If DVR doesn’t process
automatic reboot, unplug power cord for power off by force.
y
For Installing/Add-up/Change:
‘HDD Format and Default’ should be processed once you install/add/change Hard disk
drive, regardless any cases of installing brand new one or second handed one, re-installing existing one, installing
additional ones as a Primary Slave or Secondary Master, changing the location of pre-installed HDDs and so on. Otherwise
DVR doesn’t properly detect the HDD and it can cause abnormal system operation. ‘HDD Format and Default’ will be
processed as below;
①
(Date/Time Setting) This is to set present Date and Time(SETUP>SYSTEM>Admin>Date/Time).
②
(Default Setting) This is to set all of setting values as same as to those of the factory defaulted.
(SETUP>SYSTEM>Information>Status>Setup>Default).
③
(HDD Format) Go to SETUP>SYSTEM>Admin>Storage>Format to format HDD. If you are using 2 x HDD or more, it’s
required for you to format every HDD of them respectively. DVR will be automatically rebooted after format is completed.
y
For Removal:
You are firmly requested to process Remove as soon as you remove the HDD. Go to
SETUP>SYSTEM>Admin>Storage>Format. To complete removal process, click (
) Removed mark displayed next to
Format column of the HDD that is to be removed. DVR will be automatically rebooted after removal is completed.
(ATTENTION)
y
You are firmly requested to turn the power of DVR off first prior to installing HDD. Otherwise it can cause fatal damages to
HDD. For turning the power of DVR off, go to SETUP>SYSTEM>Shutdown to shutdown the system and then DVR will be
automatically rebooted. If DVR doesn’t process automatic reboot, unplug power cord for power-off by force. You are
suggested to turn the power on again after 5 seconds.
(ATTENTION)
You are firmly requested to turn the power of DVR off prior to installing HDD, CD-RW or DVD-RW. Otherwise it can cause fatal
damages to those storage devices. For turning the power of DVR off, go to SETUP>SYSTEM>Shutdown to shutdown the system
and then DVR will be automatically rebooted. If DVR doesn’t process automatic reboot, unplug power cord for power off by force.
You are suggested to turn the power on again after 5 seconds.
2. INSTALLATION