macchie mantenendone la traspirabilità. Si raccoman-
da di seguire le istruzioni seguenti di manutenzione
per rendere ottimale la durata del tessuto:
– Togliere periodicamente depositi di polvere, macchie
e altro tipo di sporco per evitare che anche dopo la
pulizia rimangano tracce visibili.
– È importantissimo assicurarsi che la copertura sia
perfettamente asciutta prima di chiudere l’ombrello-
ne. Durante i mesi di non utilizzo l’ombrellone deve
essere riposto in un ambiente asciutto.
COMPONENTI
• Le parti in acciaio, la viteria e gli accessori sono zincati
antiruggine. Per garantire e assicurare una maggiore
durata del prodotto è consigliabile comunque porre
l’ombrellone e la base al riparo durante i mesi invernali
o durante i periodi di non utilizzo.
• Durante ogni stagione verificare periodicamente lo stato
e la funzionalità dei componenti soprattutto dopo un
periodo lungo dove l’ombrellone non sia stato utilizzato.
MECCANISMO MANOVELLA
• Periodicamente e comunque almeno una volta all’an-
no, è opportuno applicare olio lubrificante negli ingra-
naggi del meccanismo manovella. Tale operazione è
particolarmente consigliata dopo un periodo lungo
di non utilizzo o comunque all’inizio di ogni stagione
dopo il ricovero invernale.
Per ogni eventualità ribadiamo che la ditta Scolaro è a
vostra disposizione per ogni supporto tecnico.
ASSI GARANZIA
• Durante il periodo di garanzia, in caso di danno de-
rivante da difetto di fabbricazione, la ditta Scolaro
fornisce assistenza, fornitura pezzi di ricambio gra-
tuitamente oppure, dove necessario, la sostituzione
dell’ombrellone completo.
• Trascorso il periodo di garanzia, la ditta Scolaro può
fornire un servizio di assistenza attraverso i nostri
rivenditori di zona o direttamente per molti anni suc-
cessivamente alla vendita, quale fornitura prezzi di
ricambio e possibilità di eseguire riparazioni.
• Per maggiori informazioni su garanzia o ma-
teriali vi preghiamo di vistare il nostro sito web
(www.scolaro-parasol.it) oppure consultare il catalogo.
ASSEMBLING INSTRUCTION
1
uk
A Open all carton boxes, position the base (1) on the
floor and fix the tube (2) with its screws (3). Put into
the spaces (3) the cement plates (1).
B Put the parasol (4) into the metallic tube (2).
C Screw and fasten strongly the black screws (12).
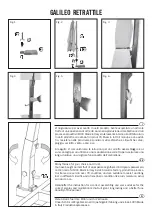
(Fig. 1 - 2)
DIRECTIONS FOR USE
1 Take the parasol string away, move the ribs to make
easier the opening.
(Fig. 3)
2 Put the crank (13) into the proper loophole of the
mechanism and turn slowly to open paying attention
that there are no obstacles for the closing.
3 When the parasol will be completely opened hold
the carriage handle and change the inclination of
the parasol by going up and down.
(Fig. 4)
4 When you have found the inclination you prefer keep
the button pressed and let the carriage run until the
locking springs up.
(Fig. 5)
5 If you want to change the inclination release the han-
dle pressing the side button. Let the carriage slide
and find the new position.
(Fig. 6)
6 For the closing release the handle and let it free.
Now begin to turn the crank paying attention that
there aren’t obstacles.
Attention!!! The crank has
to be turned slowly, as the iron wire has always to
be strained.
This step has to be done with the ut-
most attention in order to avoid to break the winding
mechanism.
7 For this parasol a ballast of
200 kg
is required. The
cement plates or pots can be found easily or are
available in our range of optional items. See Art
BC5050
BC5151 – BC5151G
BV5050G – BV5050B.
In case of particular environments or special atmos-
pheric condition it could be necessary to increase
the ballast. ADDITIONAL INFORMATION IN THE DEDI-
CATED BROCHURE SECTION. The company Scolaro,
its staff and all retailers are at your disposal for any
further information and technical assistance.
8 The parasols you have bought is revolving 360°
whether closed or opened. Revolving is possible by
unscrewing the black screws (12) at the end of the
side post and by turning it.
ATTENTION
• Before use, directions and assembling instructions,
which are inside the package, have to be kept and
read carefully.
• The base has to be ballasted. An insufficient weight will
seriously compromise the stability of the parasol.
• Always remove crank when not in use and keep out
of reach of children.
• To avoid damage or personal injury, parasol must be
closed and removed from the support when unat-
tended and/or in windy conditions. Remember always
that the parasol is not a fixed construction.
The company Scolaro cannot be held responsible for
damage to goods supplied, persons or property result-
ing from misuse and failure to follow instructions and
guidelines on indications.
MAINTENANCE
FABRIC
• The fabric is waterproof and anti mould treated to
reject water, spots and grant transpiration. Please
follow our maintenance instruction to grant the long
lasting of the fabric:
– Remove often dust deposits, spots and any type of
dirt in order to avoid trails after cleaning.
– It’s very important to close the parasol only when it is
perfectly dry. During the winter and when the parasol is
not employed, it has to be stored in dry environment.
COMPONENTS
• The steel components, screws and accessories are
anti rust treated. Anyway for a long lasting of the para-
sol, during the winter and when the it is not employed,
the parasol has to be stored in dry environment.
• During every season it is necessary to check the
functionality of all components, especially after a
long period of non-employ.
WINDING MECHANISMUS
• Periodically and at least once a year, you should apply
lubricating oil in the crank gear mechanism. This is es-


