


68
1.
2.
3.
4.
5.
6.
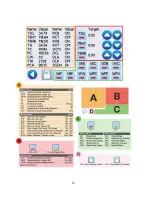
STAGE 3. Adjusting the atmospheric pressure
12.
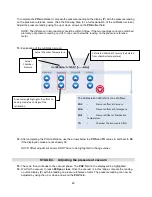
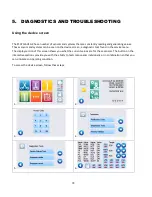
When you press the Calibration button to start the calibration cycle, the following screen will appear.
IMPORTANT! When this screen appears, the
POA
field will be highlighted and you will have 30 seconds
to complete the
POA
calibration before the cycle continues to the vacuum phase.
Enter
7919
and
press EN
icon
Press
Calibration
once to lock
the door.
Press
Calibration
again to
START.
Summary of Contents for STATCLAVE G4
Page 5: ...5 Diagram of key systems and components...
Page 6: ...6...
Page 17: ...17 Checking package contents...
Page 18: ...18 Positioning a unit Unit dimensions and operating environment...
Page 20: ...20 Direct to drain connection recommended...
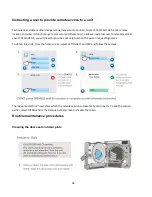
Page 21: ...21 Connecting to a waste bottle...
Page 22: ...22 Connecting to the Internet Connecting to a wired network Connecting to a wireless network...
Page 23: ...23...
Page 25: ...25 Connecting an auxiliary pump...
Page 28: ...28...
Page 30: ...30 Starting and stopping a cycle...
Page 50: ...50 Registering for online access...
Page 51: ...51 First start up...
Page 52: ...52...
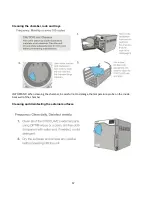
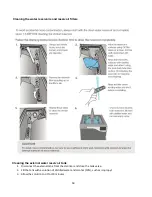
Page 58: ...58 Draining the unit for cleaning and shipping...
Page 61: ...61 Replacing the bacteriological filter Replacing the door seal...
Page 75: ...75...
Page 107: ...107 APPENDIX A STATCLAVE G4 plumbing diagram...
Page 108: ...108 APPENDIX B STATCLAVE G4 electrical schematic...