background image

42


02.00 | KSH3 IM | Assembly and Operating Manual | en | 1477686


Sealing kits, accessory packs and parts lists


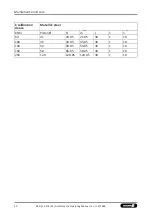
Item


Designation


Quantity


a


b


c


d


e


y


z


14


Cover


1


21


Cupped-type lubrication nipples


4


21


Conical lubrication nipple


4


22


Sound absorber


1


23


Locking screw


2


34


Cylindrical pin


2


35


Angular plug


2


36


Proximity switch


2


37


Supply cable


2


40


Turcon Glyd Ring


1


41


Turcon Glyd Ring


1


45


O-ring DIN ISO 3601


1


47


Sealing ring


1


48


Flat seal


10


60


Set-screw


2


4


62


Set-screw


6


4


64


Countersunk screw ISO 14581


2


65


Countersunk screw


9


Cylindrical screw


15


13


66


Cylindrical screw


2


69


Screw


1


70


Sealing plug


3


4


71


Cylindrical screw


1


72


Washer


2


81


Plug


4


82


Fitting screw


2


83


O-ring DIN ISO 3601


4


84


Screw


4


85


Clamping sleeve


2


86


Screw


8


87


O-ring DIN ISO 3601


10


89


Set-screw


2


93


Set-screw


2


Summary of Contents for TANDEM KSH3 IM 100

Page 1: ...Translation of Original Operating Manual TANDEM Clamping Force Block KSH3 IM Assembly and Operating Manual ...

Page 2: ...0 04 01 2022 en Dear Customer thank you for trusting our products and our family owned company the leading technology supplier of robots and production machines Our team is always available to answer any questions on this product and other solutions Ask us questions and challenge us We will find a solution Best regards Your SCHUNK team Customer Management Tel 49 7572 7614 1300 Fax 49 7572 7614 103...

Page 3: ...y 11 2 13 2 Protection during commissioning and operation 11 2 13 3 Protection against dangerous movements 11 2 13 4 Notes on particular risks 12 3 Technical data 14 4 Tightening torques for screws 17 5 Assembly and connection 18 5 1 Assembly of the Clamping Block on themachine table 18 5 2 Connecting the clamping block 20 5 2 1 Supply lines 21 5 2 2 Hydraulic circuit diagram 22 5 3 Monitoring of ...

Page 4: ...eaning 35 7 4 3 Testing the leakage and tightness of thehydraulic system 38 7 4 4 Assembly devices piston seals 38 8 Sealing kits accessory packs and parts lists 41 8 1 Sealing kit lists 41 8 2 Accessory packs 41 8 3 Parts lists 41 8 4 Proximity switches and supply cables for single orreplacement orders 43 9 Assembly drawing 44 10 Translation of the original declaration of incorporation 45 11 Appe...

Page 5: ... may differ from the actual product design Inadditiontotheseinstructions thedocumentslisted under 1 1 2 5 are applicable 1 1 1 Presentation of Warning Labels To make risks clear the following signal words and symbols are used for safety notes DANGER Danger for persons Non observance will inevitably cause irreversible injury or death WARNING Dangers for persons Non observance can lead to irreversib...

Page 6: ...itions 2 6 8 Observance of the specified care and maintenance instructions 7 33 Parts touching the workpiece and wear parts are not included in the warranty A cycle consists of a complete clamping process Open and Close 1 3 Scope of delivery Power clamping block KSH3 IM KSH3 LH IM including inductive proximity switch without top jaws ACCESSORY KIT for contents see sealing kit list and parts list 8...

Page 7: ... are notpermissible Workpieces are not properly clamped Safety regulations are disregarded and persons are working at this product for example to machine clamped workpieces without additional protective equipment The technical data specified by the manufacturer are exceeded during usage It is used with machines systems or workpieces that are not designed to be used with it 2 3 Constructional chang...

Page 8: ...ed application parameters 3 14 Make sure that the product is a sufficient size for the application Ensure that maintenance and lubrication intervals are observed 7 33 Ensure that the environment is free from ferromagnetic particles or chips 2 7 Personnel qualification Inadequate qualifications of the personnel If the personnel working with the product is not sufficiently qualified the result may b...

Page 9: ...r the required personal protective equipment Observe the valid safety and accident preventionregulations Wear protective gloves to guard against sharp edges and corners or rough surfaces Wear heat resistant protective gloves when handling hot surfaces Wear protective gloves and safety goggles when handling hazardous substances Wear close fitting protective clothing and also wear long hair in a hai...

Page 10: ...ended loads 2 11 Malfunctions Behavior in case of malfunctions Immediately remove the product from operation and report the malfunction to the responsible departments persons Order appropriately trained personnel to rectify the malfunction Do not recommission the product until the malfunction has been rectified Test the product after a malfunction to establish whether it still functions properly a...

Page 11: ...suspended loads and do not step intotheir swiveling range Never move loads withoutsupervision Do not leave suspended loadsunattended 2 13 2 Protection during commissioning and operation Falling or violently ejected components Falling and violently ejected components can cause serious injuries and even death Take appropriate protective measures to secure the danger zone Never step into the danger z...

Page 12: ...jury in the event of workpiece loss due to failure or pressure reduction of the oil pressure Provide system pressure monitoring in the hydraulic system Ensure stable hydraulic pressure WARNING Risk of injury in the event of workpiece loss due to component failure on the product as a result of exceeding the technical data The product is only allowed to be used within the scope of its technical data...

Page 13: ...oduct using manual force Use load handling equipment for lifting and transporting CAUTION Allergic reactions or irritation due to skin or eye contact with lubricants on the product Wear protective equipment protective gloves protective goggles in case of foreseeable contact with lubricants on the product e g when lubricating or cleaning CAUTION Risk of injury due to damaged connection cable on liv...

Page 14: ... pressure bar 60 60 60 Repeat accuracy mm 0 01 0 01 0 01 Max jaw stroke mm 60 60 60 Weight kg 5 9 5 14 Designation KSH3 LH IM 100 140 160 250 Stroke per jaw mm 6 7 8 15 Clamping force at max pressure kN 16 30 40 50 Max pressure bar 120 120 120 120 Repeat accuracy mm 0 01 0 01 0 01 0 02 Max jaw stroke mm 60 60 60 150 Weight kg 5 9 5 14 36 5 Clamping force isthearithmeticsumoftheindividualforces occ...

Page 15: ...55 74 82 140 I 64 91 104 170 J 74 2 77 7 87 2 103 2 K 41 43 47 57 L 15 13 5 15 20 M 57 88 100 45 off center N M8 M8 M10 M12 O 15 15 5 18 20 P 4 3 5 4 5 Ø Q 10f7 10f7 12f7 14f7 Ø R 11 11 13 16 S 4 5 5 5 6 6 T 54 74 82 140 U 18 7 26 29 54 V 40 58 5 67 104 W 65 8 81 8 81 8 134 8 X 82 1 93 99 5 124 5 Y 68 5 70 78 92 2 Z 14 20 18 5 26 5 18 5 26 5 27 5 42 5 ...

Page 16: ...H3 IM Assembly and Operating Manual en 1477686 Technical data 1 Optional Z variant 0 01 mm to clamping center 2 Clamping sleeve 0 04 mm to clamping center 3 Clamping sleeve fitting screw 0 02 mm to clamping center ...

Page 17: ...ble torque MA Nm 4 2 7 5 13 28 50 88 120 160 200 290 400 500 Tightening torques for mounting top jaws on the TANDEM clamping force block screw quality 12 9 Screw size M4 M5 M6 M8 M10 M12 M14 M16 M20 M24 Tightening torques MA Nm 5 9 15 32 62 108 170 262 510 880 Tightening torques for mounting the chuck piston onto the cylinder piston screw quality 12 9 Designation Screw size M5 M8 M10 M12 KSH3 Tigh...

Page 18: ...machine table during assembly Do not reach between the product and machine table during assembly CAUTION Danger of abrasions due to rough components of the product and its accessories which may slip out of your hands during assembly Wear protective equipment protective gloves when working on the product and when handling itsaccessories 5 1 Assembly of the Clamping Block on the machine table 34 Cyl...

Page 19: ...ere are two fittings in the housing item 1 that along with fitting screws item 82 are used to center the clamping force block on the machine table with repeat accuracy Do not realign the clamping force block after removing it from the machine table e g after replacing the seals When using fitting screws item 82 these are used instead of the clamping sleeves item 85 and two of the four screws item ...

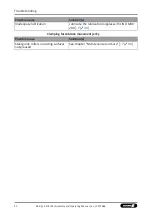
Page 20: ... bottom IV CLOSED bottom V Coolant drainage connection for air purge front 1 No use 2 No use 3 No use 4 No use 5 Bottom connection for coolant drain or use for air purge 6 Bottom connection for lubrication one sided supply left 7 Bottom connection for lubrication one sided supply right 8 No use Hose free direct connection Clamping system Adapter O ring ...

Page 21: ...he housing item 1 are G for all clamping forceblocks Connection III and IV in the base for hose free direct connection in the machine table The threads for hose free direct connection are not designed for pneumatic fittings NOTE On delivery of the clamping force block all four hydraulic connections are sealed On the base side with set screws item 60 and on the front with locking screws item 23 Whe...

Page 22: ...hrough recesses in the base jaws of the clamping force block The signals can be directly processed by the machine control system The monitoring result is The clamping force block is open or closed for I D or O D clamping depending on the application Information on handling sensors is available at schunk com or from SCHUNK contact persons Technical data for the sensors can be found in the data shee...

Page 23: ... proximity switch from coming into contact with hard objects or with chemicals in particular nitric chromic or sulfuric acid Proximity switches are electronic components which can react sensitively to high frequency interference or electromagnetic fields Check that the cable is correctly connected and installed There must be sufficient distance between the switches and sources of interference and ...

Page 24: ...urrent on contact 200 mA short circuit proof Switching hysteresis 15 of the nominal switching distance Temperature range 25 C to 70 C Switching frequency approx 1000 Hz Voltage drop max load 2 5 V Thread on connecting plug for feed cable Protection class in accordance with DIN EN 60529 M8 x 1 IP 67 for the pin terminal only when screwed on 5 3 3 Dimensions and switching function of the IN S M8 2 D...

Page 25: ... when the stroke end position is open or closed Proximity switch S2 is used for monitoring the clamping position between the two jaw end positions Adjust the switching point so that a switching signal is present in the area of the clamping position Exceeded workpiece tolerances can be monitored via the signal output of switch S2 The function and circuit diagram for adjusting the proximity switches...

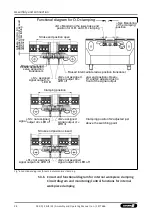
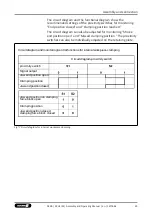
Page 26: ...r any circumstances during operation Both proximity switches must be installed in the operating condition to prevent chips from entering the clamping system through the open clamp 5 3 5 Circuit and functional diagram for external workpiececlamping Circuit diagram and monitoring control functions for external workpiece clamping The circuit diagram and the functional diagram show the recommended set...

Page 27: ...closed Clampingposition clamping force block open Jaw end positionon closed Jaw endposition Clampingposition open Jaw endposition Circuit diagram and monitoring control functions for external workpiece clamping Circuit diagram proximity switch proximity switch Signal output Fig 5 Circuit diagram for external workpiece clamping ...

Page 28: ...LED lit S2 not assigned signal output 0 LED off Jaw end position Open S1 and S2 adjusted just in front of the signal output Clamping position signal S1 not assigned f S2 assigned Clamping position S2 adjusted just output 0 LED of signal output 1 LED lit above the switching point Stroke end position closed signal S1 not assigned f S2 not assigned D off Fig 6 Functional diagram for external workpiec...

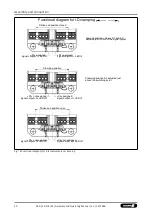
Page 29: ...troke end position open and Missed clamping position The proximity switches can also be individually adjusted on the retaining plate Fig 7 Circuit diagram for internal workpiece clamping clamping force block closed Jaw end position closed Clampingposition force blockopen Jaw end position on clamping proximity switch Signal output Jaw end position open Clamping position Jaw end positionclosed Circu...

Page 30: ...1 not assigned Stroke end position open signal output 1 LED lit S2 assigned output 0 LED off signal S1 not assigned above the switching point Clamping position S2 adjusted just Clamping position signal output 1 S1 assigned LED lit utput 1 LED lit signal o S1 assigned adjusted just in front of the signal output Jaw end position Open S1 and S2 Functional diagram for I D clamping Stroke end position ...

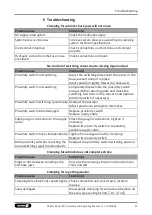
Page 31: ... the sensor head replace proximity switch if necessary Proximity switch switching sporadically Readjust the position Adjust position to workpiece tolerances Proximity switch cable damaged Replace proximity switch Replace supply cable Cable plug in connection to the supply cable Check the plug in connections tighten if necessary Replace IN proximity switch or separately available supply cable Proxi...

Page 32: ...shooting Possible cause Solution s Inadequate lubrication Lubricate the lubrication nipples with LINO MAX 200 7 33 Clamping force block movement jerky Possible cause Solution s Steel guide rollers on sliding surfaces not greased See chapter Maintenance and Care 7 33 ...

Page 33: ...rval cycles months Lubrication 10000 1 Basic cleaning 6 Leak test 5000 1 Regularly check inductive proximity switches for proper functioning Check for damage to connection cables connection plugs and the sensor head 7 3 Greasing areas lubricants Greasing areas Lubricant Sliding surfaces body base jaw LINOMAX 200 Sliding surfaces base jaws chuck piston LINOMAX 200 Lubrication nipples LINOMAX 200 Ce...

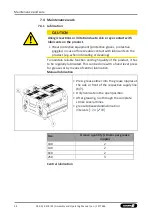
Page 34: ...ricating or cleaning To maintain reliable function and high quality of the product it has to be regularly lubricated This can be done with a hand lever press for greases or by means of central lubrication Manual lubrication Press grease either into the grease nipples at the side or front of the respective supply line 6 7 Only lubricate in the open position After greasing run through the complete s...

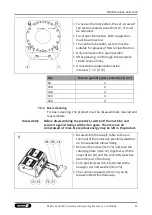
Page 35: ...0 4 140 4 160 4 250 4 7 4 2 Basic cleaning For basic cleaning the product must be disassembled cleaned and reassembled Disassembly Before disassembling the product switch off the machine and secure it against being switched on again Then remove all compressed air lines No residual energy may be left in theproduct Disassemble the supply cable to the pin terminal of the inductive proximityswitches o...

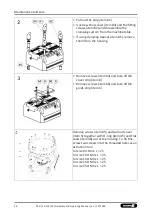
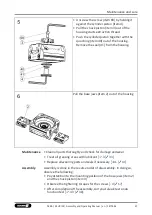
Page 36: ... 85 remove them from the housing Remove screws item 64 and take offthe cover strip item 8 Remove screws item 66 and take offthe guide strip item 6 Remove screws item 65 and pull out cover item 5 together with O ring item 45 and Flat seals item 48 out of the housing To do this screw two screws into the threaded holes as an extraction tool for size 64 M3 x L 25 for size 100 M3 x L 25 for size 140 M4...

Page 37: ...ousing Pull the base jaws item 2 out of the housing Maintenance Clean all parts thoroughly and check for damage andwear Treat all greasing areas with lubricant 7 3 33 Replace all wearing parts and seals if necessary 8 1 41 Assembly Assembly is done in the reverse order of disassembly In doing so observe the following Pay attention to the mounting position of the base jaws item 2 and the chuck pist...

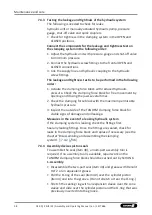
Page 38: ...ing the jaws several times 2 Check the clamping force block with the maximum permissible hydraulic pressure 3 Inspect the outside of the TANDEM clamping force block for visible signs of damage and oil leakage Measures in the event of a leaking hydraulic system If the clamping system is leaking check the fittings first Seal any leaking fittings Once the fittings are sealed check for leaks in the cl...

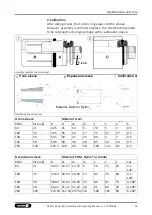
Page 39: ... 15 d1 d2 d3 L I1 0 3 t1 t2 64 21 22 5 21 13 5 70 5 2 0 5 100 35 36 5 35 22 17 75 5 7 2 7 0 5 140 50 51 5 50 37 25 80 5 2 0 5 160 58 59 5 58 40 28 85 5 4 2 4 0 5 250 120 121 5 120 60 58 100 11 5 8 5 0 5 B expansion sleeve Material POM Nylon or similar KSH3 Piston Ø D d1 d2 d3 L I1 I2 xyz 64 21 20 37 16 37 12 37 5 76 71 63 3 x 120 100 35 34 64 30 64 26 64 17 81 76 68 3 x 120 140 50 48 94 44 94 40 9...

Page 40: ...anual en 1477686 Maintenance and care C calibration sleeve Material steel KSH3 Piston Ø D 0 1 d1 L I1 1 l2 64 21 29 05 21 05 30 1 10 100 35 43 05 35 05 30 1 10 140 50 58 05 50 05 30 1 10 160 58 66 05 58 05 30 1 10 250 120 128 05 120 05 30 1 10 ...

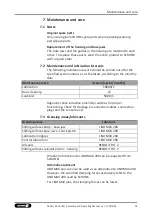
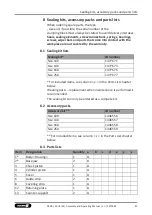
Page 41: ...t lists Sealing kit ID number Size 100 1477671 Size 140 1477673 Size 160 1477675 Size 250 1477677 For included items see column y in the Parts List chapter below Wearing parts replacement when maintenance is performed is recommended The sealing kit can only be ordered as a compete kit 8 2 Accessory packs Accessory kit ID number Size 100 1446556 Size 140 1446557 Size 160 1446558 Size 250 1446559 Fo...

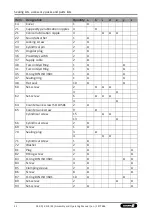
Page 42: ...2 36 Proximity switch 2 37 Supply cable 2 40 Turcon Glyd Ring 1 41 Turcon Glyd Ring 1 45 O ring DIN ISO 3601 1 47 Sealing ring 1 48 Flat seal 10 60 Set screw 2 4 62 Set screw 6 4 64 Countersunk screw ISO 14581 2 65 Countersunk screw 9 Cylindrical screw 15 13 66 Cylindrical screw 2 69 Screw 1 70 Sealing plug 3 4 71 Cylindrical screw 1 72 Washer 2 81 Plug 4 82 Fitting screw 2 83 O ring DIN ISO 3601 ...

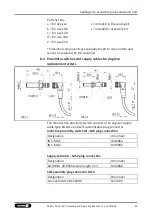
Page 43: ...nnot be replaced by the customer 8 4 Proximity switches and supply cables for single or replacement orders The IN inductive proximity switch consists of an angular supply cable type KA M12 and self customizable plug connector Inductive proximity switch IN M8 plug connection Designation ID number IN S M8 1 1349984 IN S M8 2 1349990 Supply cable KA M12 plug connection Designation ID number KA BW8 L ...

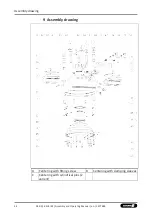
Page 44: ...44 02 00 KSH3 IM Assembly and Operating Manual en 1477686 Assembly drawing 9 Assembly drawing A Centering with fitting screw B Centering with clamping sleeves C Centering with cylindrical pins Z variant ...

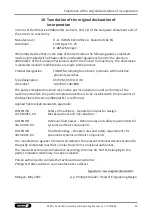
Page 45: ...ly completed machine may not be put into operation until conformity of the machine into which the partly completed machine is to be installed with the provisions of the Machinery Directive 2006 42 EC is confirmed Applied harmonized standards especially DIN EN ISO 12100 2011 03 DIN EN ISO 4413 2011 04 DIN EN ISO 4414 2011 04 Safety of machinery General principles for design Risk assessment and risk...

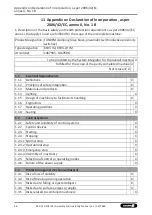
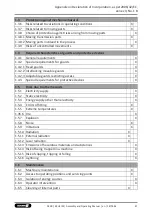
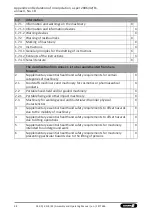
Page 46: ...achine Not relevant 1 1 Essential Requirements 1 1 1 Definitions X 1 1 2 Principles of safety integration X 1 1 3 Materials and products X 1 1 4 Lighting X 1 1 5 Design of machinery to facilitate its handling X 1 1 6 Ergonomics X 1 1 7 Operating positions X 1 1 8 Seating X 1 2 Control Systems 1 2 1 Safety and reliability of control systems X 1 2 2 Control devices X 1 2 3 Starting X 1 2 4 Stopping ...

Page 47: ... 2 Interlocking movable guards X 1 4 2 3 Adjustable guards restricting access X 1 4 3 Special requirements for protective devices X 1 5 Risks due to other hazards 1 5 1 Electricity supply X 1 5 2 Static electricity X 1 5 3 Energy supply other than electricity X 1 5 4 Errors of fitting X 1 5 5 Extreme temperatures X 1 45 6 Fire X 1 5 7 Explosion X 1 5 8 Noise X 1 5 9 Vibrations X 1 5 10 Radiation X...

Page 48: ...health and safety requirements for certain categories of machinery X 2 1 Foodstuffs machinery and machinery for cosmetics or pharmaceutical products X 2 2 Portable hand held and or guided machinery X 2 2 1 Portable fixing and other impact machinery X 2 3 Machinery for working wood and material with similar physical characteristics X 3 Supplementary essential health and safety requirements to offse...

Page 49: ...SCHUNK ...

Page 50: ...SCHUNK ...

Page 51: ...SCHUNK ...

Page 52: ...SCHUNK GmbH Co Spanntechnik KG Lothringer Str 23 D 88512 Mengen Tel 49 7572 7614 0 Fax 49 7572 7614 1099 info de schunk com schunk com Folgen Sie uns I Follow us 01 2022 2022 SCHUNK GmbH Co KG 02 00 KSH3 IM Assembly and Operating Manual en 1477686 ...

Reviews: