background image

 6 

Attach the Foot:

9.2 

 Remove the charger from the packing materials 

and place upside down on a flat surface. Attach the foot and secure it with 

the four ¼-20 thread cutting screws provided.

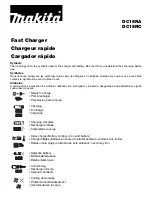
Assemble the Wheels and Axle:

9.3 

 Hold the axle 

upright on the floor or work surface. Then, using a 

hammer, tap one of the axle caps onto the top end 

of the axle. Be sure to tap the axle cap on straight. 

Slide both wheels onto the axle with the recessed 

hubs facing out as shown. Install the second axle cap.

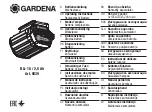
Mount the Axle to the Charger:

9.4 

 Place 

one end of each bracket into the slot on the 

bottom of the charger. Place the axle assembly 

under each bracket. Attach the brackets using 

the two, 10-32 thread cutting screws provided.

NOTE: 

Be careful not to drop the brackets inside 

of the charger case.

Attach the Handle:

9.5 

 Turn the charger right side up onto its foot 

and wheels. Remove the two top screws from each side of the 

charger. Align the handle so the screw holes are aligned with 

the screw holes on each side of the charger. Attach the handle 

using the same screws you previously removed.

CONTROL PANEL

10. 

Ammeter


The Ammeter indicates the amount of current, measured in amps, that is being drawn 

by the battery. As a battery takes on a charge, it draws less current from the charger. 

Correspondingly, the meter will show less current being drawn by the battery. When the 

current stops decreasing, the battery is charged. The start area of the meter indicates a 

high rate of current being drawn from the charger. When cranking an engine, the meter 

needle will be at the extreme right side of the start area. The 2 amp charge rate may 

indicate some activity on the meter, although the meter does not have the resolution to 

display this low rate. 

Charge Rate Selector Switch


Use the Charge Rate selector switch to select the charge rate or engine starting setting 

you require.

Switch #1 – 

• 

Use this switch to select the 55 Amp Charge Rate ↔ 150 Amp Engine 

Start and the 20 Amp Charge Rate. Switch #2 must be in the down position (Select 

Position) when using Switch #1.

Switch #2

• 


 Use this switch to select the 2 amp Charge Rate and the OFF position. 

Also, use to select use of Switch #1. Note that Switch #1 is only effective when 

Switch #2 is set to “Select Position.”

2A Slow Charge Rate

• 


 Intended for charging small batteries such as those 

commonly used in garden tractors, snowmobiles and motorcycles. 

Summary of Contents for DY-1420

Page 1: ... DO SO COULD RESULT IN SERIOUS INJURY OR DEATH LEA EL MANUAL COMPLETO ANTES DE UTILIZAR ESTE PRODUCTO CUALQUIER FALLA PODRÍA RESULTAR EN SERIAS LESIONES O PODRÍA SER MORTAL OWNER S MANUAL Manual del usuario DO NOT RETURN THIS PRODUCT TO THE STORE Call Customer Service for assistance 800 621 5485 NO LO DEVUELVA este producto A LA TIENDA Llame a Servicios al Cliente para asistencia 800 621 5485 ...

Page 2: ...er to rain or snow 1 2 Use only recommended attachments Use of an 1 3 attachment not recommended or sold by Schumacher Electric Corporation may result in a risk of fire electric shock or injury to persons or damage to property To reduce the risk of damage to the electric plug or cord pull by the plug rather than the 1 4 cord when disconnecting the charger An extension cord should not be used unles...

Page 3: ...y of fresh water and soap nearby in case battery acid contacts your skin 2 8 clothing or eyes Wear complete eye and body protection including safety goggles and protective 2 9 clothing Avoid touching your eyes while working near the battery If battery acid contacts your skin or clothing immediately wash the area with soap and 2 10 water If acid enters your eye immediately flood the eye with cold r...

Page 4: ... If it is necessary to close the hood during the charging process ensure that the hood does not touch the metal part of the battery clips or cut the insulation of the cables Stay clear of fan blades belts pulleys and other parts that can cause injury 6 2 Check the polarity of the battery posts The POSITIVE POS P battery post usually 6 3 has a larger diameter than the NEGATIVE NEG N post Determine ...

Page 5: ...e on a 8 1 nominal 120 volt circuit and has a grounded plug that looks like the plug illustrated The charger must be grounded to reduce the risk of electric shock The plug must be plugged into an outlet that is properly installed and grounded in accordance with all local codes and ordinances The plug pins must fit the receptacle outlet Do not use with an ungrounded system 8 2 Never alter the AC co...

Page 6: ...CONTROL PANEL 10 Ammeter The Ammeter indicates the amount of current measured in amps that is being drawn by the battery As a battery takes on a charge it draws less current from the charger Correspondingly the meter will show less current being drawn by the battery When the current stops decreasing the battery is charged The start area of the meter indicates a high rate of current being drawn fro...

Page 7: ... Follow all safety instructions and precautions for charging your battery Wear complete eye protection and clothing protection Charge your battery in a well ventilated area Using the ENGINE START feature WITHOUT a battery installed in the vehicle could cause damage to the vehicle s electrical system NOTE If you have charged the battery and it still will not start your car do not use the engine sta...

Page 8: ...battery 13 1 charger see sections 6 7 and 8 Use a dry cloth to wipe all battery corrosion and other dirt or oil from the battery clips 13 2 cords and the charger case Ensure that all of the charger components are in place and in good working condition 13 3 for example the plastic boots on the battery clips Servicing does not require opening the unit as there are no user serviceable parts inside 13...

Page 9: ...ger into an AC outlet Check for open fuse or circuit breaker supplying AC outlet Check for poor connection to battery and frame Make sure connection points are clean Rock clips back and forth for a better connection Unplug the charger and reverse the clips Have battery checked Ammeter may show no activity at the 2A charge rate Ammeter reading stays high Battery is severely discharged Wrong battery...

Page 10: ...sembly or Output Rectifier Assembly hum No problem this is a normal condition Have charger checked by a qualified technician Short or no start cycle when cranking engine Drawing more than the Engine Start rate Failure to wait 6 minutes 360 seconds between cranks Clips are not making a good connection AC cord and or extension cord is loose No power at receptacle The charger may be overheated Batter...

Page 11: ...ship Manufacturer s obligation under this warranty is solely to repair or replace your product with a new or reconditioned unit at the option of the Manufacturer It is the obligation of the purchaser to forward the unit along with proof of purchase and mailing charges prepaid to the Manufacturer or its authorized representatives in order for repair or replacement to occur Manufacturer does not pro...

Page 12: ...rporation Customer Service 1 800 621 5485 Monday Friday 7 00 a m to 5 00 p m CST Schumacher and the Schumacher Logo are registered trademarks of Schumacher Electric Corporation To activate the warranty please fill in the warranty registration card on page 13 and mail it in OR go to www batterychargers com to register your product online DO NOT RETURN THIS PRODUCT TO THE STORE Call Customer Service...

Page 13: ...____________________ Serial Number________________________ SEE PRODUCT PROGRAMA DE REGISTRO DE 1 AÑO DE GARANTÍA LIMITADA MODELO ___________________ DESCRIPCIÓN ___________________________ Esta es la única garantía limitada expresa y el productor no autoriza ni otorga a alguien a realizar alguna otra obligación No existe ninguna otra garantía más que la descrita en el manual del dueño La tarjeta d...

Page 14: ... 14 ...

Page 15: ... o suministrado por Schumacher Electric Corporation puede provocar riesgo de incendio descarga eléctrica o lesiones a personas o daño a la propiedad Para reducir el riesgo de daños al enchufe o cable eléctrico jale del enchufe en lugar de 1 4 jalar del cable al desconectar el cargador No se debe utilizar un alargador a menos que resulte absolutamente necesario El uso 1 5 de un alargador inadecuado...

Page 16: ...tar y provocar lesiones a personas o daño a la propiedad NUNCA cargue una batería congelada 2 5 NUNCA sobrecargue una batería 2 6 Considere la idea de que alguna persona se encuentre cerca suyo para poder ayudarlo 2 7 cuando trabaje en forma cercana a una batería de plomo ácido Cuente con una gran cantidad de agua potable y jabón a mano en caso de que el ácido 2 8 de la batería tenga contacto con ...

Page 17: ...ería No utilice el cargador en un área cerrada o restrinja la ventilación en cualquier forma 4 5 PRECAUCIONES DE CONEXIÓN EN CC 5 Conecte y desconecte los ganchos de salida C C sólo después de haber establecido 5 1 todos los interruptores del cargador a la posición de apagado si es aplicable y de haber desconectado el enchufe de C A del tomacorriente eléctrico Nunca permita que los ganchos tengan ...

Page 18: ...bíquese junto con el extremo libre del cable que previamente sujetó al borne 7 4 NEGATIVO NEG N de la batería a la mayor distancia posible de la batería Luego conecte el gancho NEGATIVO NEGRO del cargador al extremo libre del cable No se ubique en posición frontal a la batería al realizar la conexión final 7 5 Conecte el condón de alimentación del cargador de CA al tomacorriente 7 6 Al desconectar...

Page 19: ...s cuatro tornillos de rosca cortante de 20 que se suministran Ensamble las ruedas y el eje 9 3 Mantenga el eje en posición vertical sobre el piso o sobre la superficie de trabajo Luego con un martillo inserte una de las tapas de eje en el extremo superior del eje Asegúrese de insertar la tapa de eje en forma recta Deslice ambas ruedas por el eje con los cubos empotrados hacia afuera como se muestr...

Page 20: ... Índice de carga lenta 2A Destinado a la carga de baterías pequeñas tales como aquellas habitualmente utilizadas en tractores para jardín motos de nieves y motocicletas Índice de carga rápido 20A y proporción 55A Utilice para la carga de baterías de automóviles marinas y de ciclo profundo No utilizar en aplicaciones industriales Arranque de motor 150A Proporciona 150 amperes para el arranque de un...

Page 21: ...l cargador y la batería que se enfríen NOTA Bajo clima frío extremo o si la batería es inferior a 2 volts cargue la batería por 5 minutos antes de poner en marcha el motor Si el motor no arranca cargue la batería por 5 minutos más antes de darle arranque 6 nuevamente Después de que el motor se puso en marcha cambie el selectore 2 a la posición 7 OFF apagado y desenchufe el cable de alimentación de...

Page 22: ... en un lugar fresco y seco 14 2 No guarde los ganchos en asas enganchados entre sí en o cerca de metales o 14 3 enganchados en cables Si el cargador se mueve alrededor del taller o se transporta a otra localidad 14 4 trate de evitar prevenir daño a los cables pinzas y al cargador El ignorar estas recomendaciones podría llegar a causarle daños personales o de inmueble LOCALIZACIÓN Y SOLUCIÓN DE PRO...

Page 23: ...ierta los ganchos Haga revisar la batería El amperímetro podría dejar de mostrar actividad en el índice de carga de mantenimiento La lectura en el amperímetro permanece elevada La batería se encuentra extremadamente descargada Tensión de batería errónea Continúe con la carga de la batería por dos horas más Si persiste algún problema haga revisar la batería Verifique que esté utilizando una batería...

Page 24: ...tados y reemplace los mismos de ser necesario La batería tal vez no decida aceptar una carga debido a un estado de agotamiento Permita que la carga continúe hasta que la batería tenga la oportunidad de recuperarse lo suficientemente como para aceptar una carga Si este período se extiende a más de 20 minutos detenga la carga y haga revisar la batería Apague el cargador y corrija las conexiones prin...

Page 25: ...l tiempo de arranque podría ser menor a 3 segundos Aguarde 6 minutos en tiempo de descanso antes del próximo arranque Verifique la posible presencia de una conexión defectuosa en la batería y en el bastidor Verifique la posible pérdida del enchufe perteneciente a los cables de alimentación o al alargador Verifique la posible presencia de fusibles abiertos o disyuntores que suministren energía al t...

Page 26: ... 60056 2179 REALIZA LA PRESENTE GARANTÍA LIMITADA AL COMPRADOR MINORISTA ORIGINAL DE ESTE PRODUCTO LA PRESENTE GARANTÍA LIMITADA NO PUEDE TRANSFERIRSE NI CEDERSE Schumacher Electric Corporation el Fabricante otorga garantía por este cargador de batería por un plazo de un año contados a partir de la fecha de compra por menor por la existencia de cualquier material o de mano de obra defectuosos que ...

Page 27: ...garantía implícita por lo que las limitaciones o exclusiones mencionadas anteriormente podrían no corresponder con su caso La presente garantía le otorga derechos legales específicos y es probable que usted cuente con otros derechos que podrían diferir de los incluidos en la presente garantía LA PRESENTE GARANTÍA LIMITADA ES LA ÚNICA GARANTÍA LIMITADA EXPRESA Y EL FABRICANTE NO ASUME NI AUTORIZA A...

Reviews: