11
3. Settings.
3.2 Battery pack box
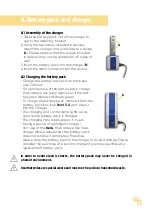
The battery pack box contains the micro-
processor required for the drive and the con-
trol as well as the battery pack. To use the
battery pack, please press the red button /
emergency stop button (
A
) on the battery
pack box and lift the cover. Now you can in-
sert the battery pack. Close the cover until it
engages audibly. To remove the battery pack,
press again the red button / emergency off
button (
A
) and pull out the battery pack (
B
).
Press the red button / emergency off button (
A
)
even when the
tram.
is not in use to avoid
unintentional switching on.
For optimum use of the battery pack, we recommend that you charge it every
night - even if the battery pack still shows a green light.
3.3 Battery pack display
The LED display on the battery pack box dis-
plays the charging status of the battery pack.
• green = charging status sufficient
• yellow = charge battery pack soon
• red = low charging status
An acoustic signal sounds when the battery pack is completely empty.
Up to 70 lifting procedures can be carried out with a fully-charged battery
pack. In order to avoid damage to the battery pack, charge this as soon
as the yellow lamp lights up. The control lamp goes out after approx. 10
minutes after the last activation of the operating switch on the push hand-
le. It switches on again as soon as the operating switch is pressed or the
battery pack is inserted into the battery pack box.
When the battery pack reaches a critical level, the microprocessor will de-
activate the operating switch. However, the button for emergency lowering
will continue to function.
Charge or change the battery pack immediately when the battery pack display
lights up red. Do not try any further lifting attempts or transfers.
Prior to use, press the operating switch in order to activate the battery pack dis-
play and ensure that the battery pack lights up green. If this is not the case, char-
ge or change the battery pack.
A
B


