48 | EN
www.schmalz.com
30.30.01.01648/06
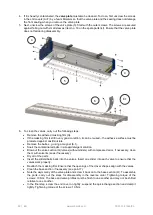
4. If it is heavily contaminated, the
valve plate
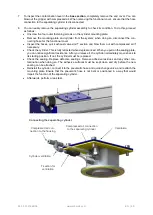
must also be cleaned. To do so, first unscrew the screws
in the end covers (A+F) by a few millimeters so that the valve plate and the sealing does not damage
the front sealing when you remove the valve plate.
5. Next, unscrew the screws of the valve plate (5). Start with the outer screws. The screws are secured
against falling out with small sleeves (item no. 16 on the spare parts list). Ensure that the valve plate
does not fall during disassembly.
6. To clean the valves, carry out the following steps:
Remove the adhered masking film (H).
If the masking film is still in very good condition, it can be reused
– the adhesive surface must be
protected against dust/moisture.
Remove the balls, e.g. using a magnet (6.1).
Soak the contaminated balls in a soap/detergent solution.
Blow out the valve section (G)/valves (without sliders) with compressed air or, if necessary, clean
them with solvents (soak if necessary).
Dry all of the parts.
Insert the sliders/balls back into the valves. Insert one slider into each valve to ensure that the
valves work properly.
Reattach the masking film. Ensure that the openings of the clover shapes align with the valves.
Clean the base section if necessary (see point 7).
Note the asymmetry of the valve plate and screw it back on to the base section (D). To assemble
the parts, carry out the steps for disassembly in the reverse order. Tightening torque of the
screws: 10 Nm. The base and valve profiles must be flush to one another and may not be shifted
relative to one another.
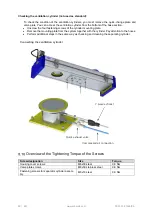
In the final step, screw the end cover on tightly, suspend the quick-change section and clamp it
tightly. Tightening torque of the screws: 10 Nm.
4
5
6
4
6.1
A
F

