background image

6.4.1  パッドの定義

下部: Modules -> CollisionCheck -> Gripper -> + Add new Gripper -> Vaccum-Gripper

4

パッドの名前を割り当て、適切なコンポーネントを選択して保存します。

ロブセットには以下が含まれます:

真空発生器: ECBPi

拡張: VEE-FE_181

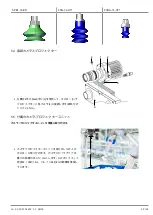
そして、それぞれの場合に使用される吸引機(5.3も参照)。

1つまたは複数のコンポーネントが別のものに置き換えられている場合は、「ユーザー定義」フィールドから入力するこ

とができます。

4

下部: Modules-> CollisonCheck -> CollisonCheck 設定は、安全距離を設定します。

6.4.2  グリップ点の定義

下部: Modules -> ItemPick or BoxPick

1. 下部: ItemPick / BoxPick -> Settings、必要なグリップ ポイントの数、および負荷量検出の許容値 (負荷量検出のパ

ラメーター) とグリップ面検出 (クラスター パラメーター) を設定します。

2. 対象の領域を埋めないでください。

3. Load Carriers -> + Add a new Load Carrier から、受け入れ範囲 (例: ボックス) が定義されます。受入範囲をできる

だけ正確に測定することをお勧めします(+/- 3mm)。曲線壁などの偏差は、負荷量検出 のパラメータから考慮でき

ます。

下部: Try Out -> Detect Grasp Points

1. 吸引パッドのサイズ、および検出される物体の寸法を調整します。

ヒント: 小型、または重く構造化された物体の場合は、吸引パッドのサイズを実際に使用する吸引パッドのサイズ

よりも小さく設定することをお勧めします。

2. 基準サイズ(荷重キャリアまたはパッド)を選択します。

3. グリップ 点 検出機能で、設定がグリップ点につながるかどうかも判断できます。結果がない場合は、パラメータ

のチェックと調整をお勧めします。

6.5  UR キャップの設定

ü

Polyscopeは、以下のソフトウェアバージョンである必要があります:3.12からのCBシリーズ、5.6からの電子シ

リーズ。

ロボット ソフトウェアをアップデートする: https://www.universal-robots.com/download/ .

1. ロボットのコントロールパネルのロブセットに含まれるUSBメモリを差し込んで、URCapを取り付けます。キ

ャップの読み込み: 

Settings -> UR Caps -> + -> Select the Cap -> Reboot Robot

2. カメラとロボットコントローラをイーサネットケーブルで接続します(! (ロボットカメラと同じネットワーク上に

設定してください)。

Menu -> Settings -> System -> Network下のURコントロールメニューでカメラまたはロボットのIPアドレスを変更

します。

ð

接続が成功すると、ライブイメージが下に表示されます: 

Installation -> Schmalz 3D-R -> rc_visard

34 / 36

JA · 30.30.01.02422 · 00 · 06/20

Summary of Contents for 3D-R

Page 1: ...ndling Sets 3D R Quick Start Guide WWW SCHMALZ COM DE 30 30 01 02422 00 06 20 DE Quick Start Guide Vision Handling Sets 3D R 2 EN Quick Start Guide Vision Handling Sets 3D R 13 JA Vision Handling Sets...

Page 2: ...st ndigkeit pr fen Die bermittlung des Lizenzkey f r die Software erfolgt per Mail sollte dieser nicht vorliegen wenden Sie sich an ihren Schmalz Kontakt 2 M gliche Sch den durch mangelhafte Verpackun...

Page 3: ...quelle vom Projektor Augenirritationen oder Augensch den durch helles Licht 4 Nicht direkt in das Objektiv des Projektors blicken 4 Sehen Sie sofort weg wenn der Strahl direkt in Ihre Augen scheint VO...

Page 4: ...e Installation oder Wartung Personensch den oder Sachsch den 4 Bei Installation und Wartung sind alle Komponenten des Systems spannungs und druckfrei zu schalten und gegen unbefugtes Wiedereinschalte...

Page 5: ...erl ngerung Verbindung zwischen Sauger ECBPi an ECBPi montieren 6 Sauggreifer gem Auswahlhilfe Kap 5 3 aus w hlen und montieren 1 2 3 4 7 Flanschadapter und Kamerahalter lagerichtig PokaYoke Zylinders...

Page 6: ...0 01 06 00932 Zum Greifen von Kartonagen und flachen rauen Oberfl chen Zum Greifen von runden und schr g liegenden Teilen Das Material ist abdruckarm und f r sensitive Oberfl chen geeignet F r kleiner...

Page 7: ...zwei Schrauben der Gr e M4x14 am Kamerasystem Halter befestigen 5 6 Die Kamera und ECBPi anschlie en Die rc_visard bietet eine Gigabit Ethernet Schnittstelle zum Anschluss des Ger ts an ein Computern...

Page 8: ...168 0 20 und SubNet Mask z B 255 255 255 0 Best tigen mit OK In rcdiscover gui auf Set temporary IP address klicken ndern der IP adress und Subnet mask entspre chend der IP Vorgaben hier dann aber z B...

Page 9: ...ick oder ItemPick zu aktivieren siehe Kap Die Lizenz aktivieren 6 3 1 Die Kamera auf die Szene einstellen 4 Im Web GUI das Kamerabild unter Kamera pr fen In der Regel liefert der Automatikmodus optima...

Page 10: ...Anordnung der Teile 6 4 1 Greifer definieren Unter Module Collision Check Greifer neuen Greifer hinzuf gen Vakuumgreifer 4 Einen Namen f r den Greifer vergeben und die entsprechenden Komponenten ausw...

Page 11: ...rt werden Die Umgebungsbeleuchtung beeinflusst das Ergebnis der Kalibrierung ma geblich Optimieren Sie bei Bedarf das Umgebungslicht F r die Kalibrierung der Kamera muss der Bereich optimal belichtet...

Page 12: ...lt bei vollst ndigen gr nen Markierungen 3 Speichern des Ergebnisses durch save calibration 6 7 Greifer einstellen Die Einstellung des Greifers wird im UR Cap unter Installation Schmalz Gripper in den...

Page 13: ...notes to make sure nothing is missing The license key for the software is provided via e mail If you have not received it please inform your Schmalz contact 2 Damage caused by defective packaging or o...

Page 14: ...work gloves CAUTION Looking into the bright light source of the projector Eye irritation or damage due to bright light 4 Do not look directly into the lens of the projector 4 Look away immediately if...

Page 15: ...ons CAUTION Improper installation or maintenance Personal injury or damage to property 4 During installation and maintenance all components of the system must be de energized and depressurized and sec...

Page 16: ...nnection between suc tion cup ECBPi to the ECBPi 6 Select the suction cup using the selection aid chapter 5 3 and attach it 1 2 3 4 7 Using four M6x30 screws attach the flange adapter and camera holde...

Page 17: ...10 01 06 01241 10 01 06 00932 For gripping cardboard boxes and flat rough surfaces For gripping round and inclined parts The material leaves few marks and is suitable for sensitive surfaces For small...

Page 18: ...rojector unit to the camera system holder using two M4x14 screws 5 6 Connecting the Camera and ECBPi The rc_visard features a Gigabit Ethernet interface for connecting the device to a computer network...

Page 19: ...192 168 0 20 and SubNet mask e g 255 255 255 0 Confirm with OK In rcdiscover gui click Set temporary IP address Change the IP address and Subnet mask according to the IP specifications in this case u...

Page 20: ...xPick or ItemPick Instructions are pro vided under Activating the License 6 3 1 Adapting the Camera to the Scene 4 Check the camera image under Camera in the Web GUI The auto mode generally produces o...

Page 21: ...Pick For detecting different shapes and or unsorted parts 6 4 1 Defining a Gripper Select Modules CollisionCheck Gripper Add New Gripper Vacuum Gripper 4 Enter a name for the gripper before selecting...

Page 22: ...must be calibrated The ambient lighting has a significant impact on the results of the calibration Optimize the ambient lighting if necessary Optimum illumination of the area is re quired to ensure su...

Page 23: ...when all markings are green 3 Save the result with save calibration 6 7 Setting the Gripper The process for setting the gripper is described in the URCap under Schmalz Gripper Installation in the info...

Page 24: ...om QR 2 1 Schmalz 2 J Schmalz GmbH 2 1 10 9 7 3 5 6 11 12 13 14 4 8 1 rc_visard 65 160 2 4 3 4 SPB1 30 ED 5 FSGA 14 HT1 6 USB UR Cap Rcdiscover gui exe 7 FSG 32 HT1 8 6x40 9 10 11 12 24 36 JA 30 30 01...

Page 25: ...13 14 Y CE 3 ECPBi 4 4 4 4 4 4 60 C JA 30 30 01 02422 00 06 20 25 36...

Page 26: ...automation vakuum komponenten vakuum erzeuger elektrische vakuum erzeuger vakuum erzeuger ecbpi RandomDot https tutorials roboception de IOControl https doc rc visard com latest de revisions html http...

Page 27: ...5 2 1 2 3 M12 4 ECBPi 5 ECBPi ECBPi JA 30 30 01 02422 00 06 20 27 36...

Page 28: ...5 3 1 2 3 4 7 PokaYoke 6 40 M6 30 4 8 PokaYoke ECBPi M5x16 ECBPi 0 6 Nm 1 3x M5x16 2 5 3 SPB1 30 ED FSG 32 HT1 FSGA 14 HT1 10 01 06 04530 10 01 06 01241 10 01 06 00932 28 36 JA 30 30 01 02422 00 06 2...

Page 29: ...SPB1 30 ED FSG 32 HT1 FSGA 14 HT1 5 4 4 2 M4x8 2 3 1 4 2 4 Nm 3 2 2 1 4 5 5 4 X 0 5 3m KLT 1 4m 2m x JA 30 30 01 02422 00 06 20 29 36...

Page 30: ...UR 4 M4x14 5 6 ECBPi rc_visard 1 2 PC 1 2 2 Y 1 3 3 3 4 LED LED LED LED 5 30 36 JA 30 30 01 02422 00 06 20...

Page 31: ...LAN 4 IP 192 168 0 20 255 255 255 0 OK rcdiscover gui IP IP IP 192 168 0 21 255 255 255 0 MAC IP IP IP a IP rcdiscovery web Web IP WebGui System Network IP UniversalRobot IP WebGui 6 2 1 Mac https rob...

Page 32: ...6 3 rc_visard Web GUI Web Web GUI Rob Rob BoxPick ItemPick 6 3 1 4 Web GUI 32 36 JA 30 30 01 02422 00 06 20...

Page 33: ...les IOControl Out 1 High for Always on or ExposureAlternateActive for flashing Light 2 3 Depth Image Single Out1 4 Modules IOControl Out 1 Low RandomDot https tutorials roboception de 6 4 JA 30 30 01...

Page 34: ...k or BoxPick 1 ItemPick BoxPick Settings 2 3 Load Carriers Add a new Load Carrier 3mm Try Out Detect Grasp Points 1 2 3 6 5 UR Polyscope 3 12 CB 5 6 https www universal robots com download 1 USB URCap...

Page 35: ...6 6 CAP 1 2 3 UR rc 4 4 5 27 JA 30 30 01 02422 00 06 20 35 36...

Page 36: ...1 2 UR rc 4 3 6 7 UR Schmalz SP2 7 USB 1 2 36 36 JA 30 30 01 02422 00 06 20...

Reviews: