background image

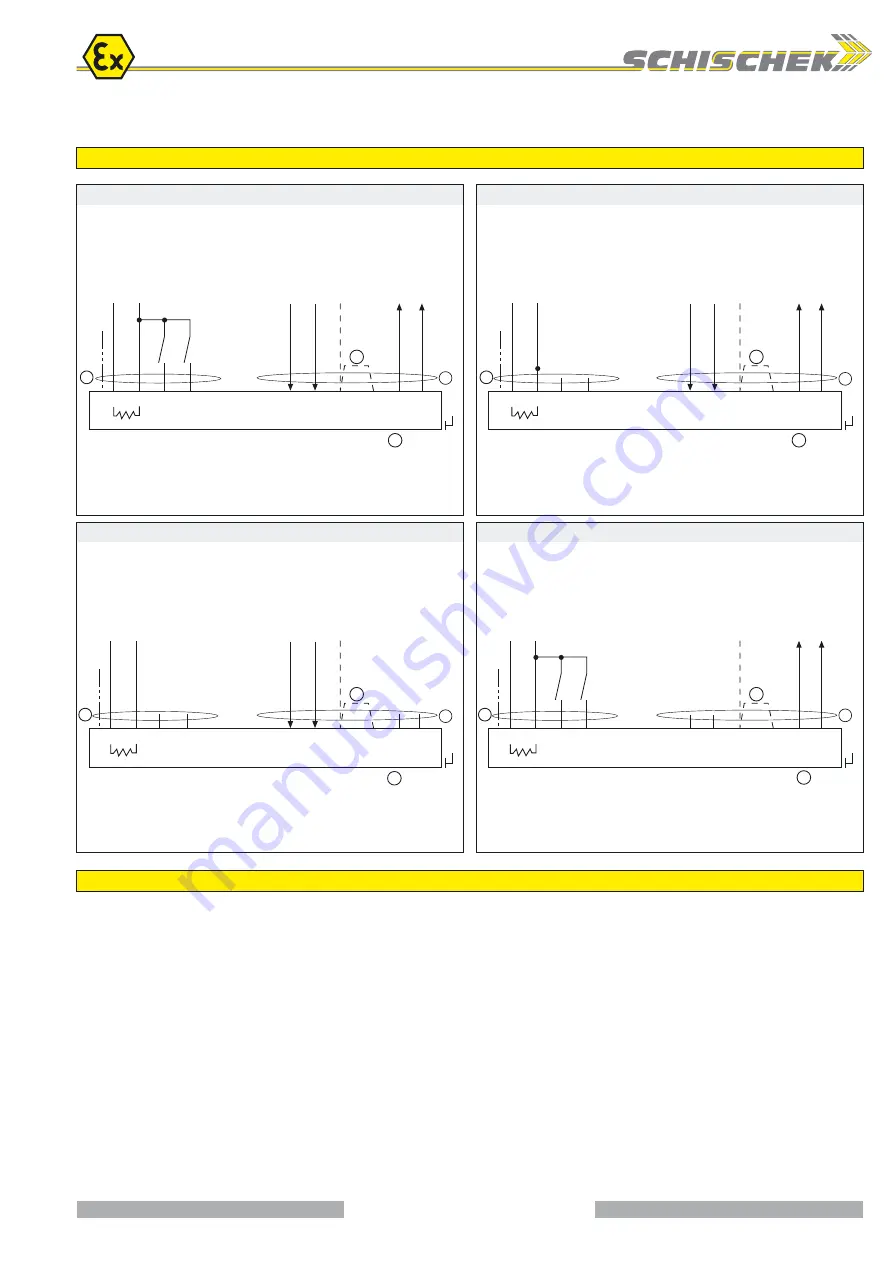
ExMax-...-Y.., RedMax-...-Y..

PA

PA

PA

PA

Over temperature, 3-pos-operation, heating by low ambient temperatures

Wiring alternatives for modulating actuators with or without spring return

Modulating or 3-pos with/without spring return

1

Y

mA

2

T

3

U

mA

4

5

Y

VDC

U

VDC

6

I

VDC/mA

1

2

3

4

~

-

~

+

PE

heater

a

b

24...240 VAC/DC

Modulating with/without spring return

1

Y

mA

2

T

3

U

mA

4

5

Y

VDC

U

VDC

6

I

VDC/mA

1

2

3

4

~

-

~

+

PE

heater

24...240 VAC/DC

3-pos with/without spring return, plus feedback

1

2

T

3

U

mA

4

5

U

VDC

6

I

VDC/mA

1

2

3

4

~

-

~

+

PE

heater

a

b

24...240 VAC/DC

Modulating with/without spring return, no feedback

1

Y

mA

2

T

3

4

5

Y

VDC

6

I

VDC/mA

1

2

3

4

~

-

~

+

PE

heater

24...240 VAC/DC

I

Reverse function:

bridge 3 up 4 reverse input and output

signals.

I

I

I

Reverse function:

bridge 3 up 4 reverse input and output

signals.

Reverse function:

bridge 3 up 4 reverse input and output

signals.

Reverse function:

bridge 3 up 4 reverse input and output

signals.

B

A

B

A

B

A

B

A

SB 4.0

SB 4.1

SB 4.3

SB 4.2

I. Temperature rise

While operating the ExMax actuator following parameters have to be aligned:

At overload resp. temperature rise the actuator will remain functionless until cooling.

During cooing the LED is red.

II. 3-pos operation

ExMax (RedMax) actuators are in the best way suitable for the 3-pos operation.To  protect

such elements as gears and mounting elements against harmful influences like minimum

pulse time, ExMax (RedMax) actuators are protectet via internal electronics.

The internal electronic permits impulses > 0,1 sec., the puls length must be 0,5 sec.

By shift in direction the interval is 1 sec.

III. Use at low ambient temparature below -20°C

All ExMax (RedMax) actuators are equipped with a regulated integrated heating device
designed for employments down to -40°C ambient temperature.

The heater will be supplied automatically by connecting the constant voltage supply on

the clamps 1 and 2.

Following parameters are to be considered by ambient temperaure < 10°C:

1. After mounting the actuator must bei immediately electrically connected.

2. The actuator will only be activated after the operating temperature has reached at least -20°C

3. The adjustment options are only ensured after this heating up period.

IV. Mechanical protection

1. The actuator must be operated with an outside load of at least 10 Nm.

2. After installing the actuator to the damper/armature an automatic alignment has to be

accomplished, in order to obtain a „gentle blockade/stop“. This function protects the 

damper/armature by reducing the end positions/blockade speed in order to avoid 

mechanical overload. The actuator alignes specifically once with 90 sec/90° onto each

position, recognizes the blockade position in order to reduce the motor performance 

during operation briefly before reaching the end/blockade position.

ExMax-.. and RedMax-.. extra information EL – size M

Self adjustment:

To adjust the signal input/output to the Angle

of rotation of the damper/valve the button T

must be pushed for minimum 3 sec.

Function of switch a and b:

a

 closed,  On (Off) - in acc. to left/right mounting ot the actuator

b

 closed,  Off (On) - in acc. to left/right mounting ot the actuator

Self adjustment:

To adjust the signal input/output to the Angle

of rotation of the damper/valve the button T

must be pushed for minimum 3 sec.

Self adjustment:

To adjust the signal input/output to the Angle

of rotation of the damper/valve the button T

must be pushed for minimum 3 sec.

Self adjustment:

To adjust the signal input/output to the Angle

of rotation of the damper/valve the button T

must be pushed for minimum 3 sec.

Function of switch a and b:

a

 closed,  On (Off) - in acc. to left/right mounting ot the actuator

b

 closed,  Off (On) - in acc. to left/right mounting ot the actuator

Schischek GmbH 

Germany, Mühlsteig 45, Gewerbegebiet Süd 5, 90579 Langenzenn, Tel. +49 (0)9101 9081-0, Fax +49 (0)9101 9081-77, E-Mail [email protected]

www.schischek.com

E X P L O S I O N P R O O F

Summary of Contents for ExMax CTM Series

Page 1: ... 90 120 150 sec at 90 without On off 3 pos SB 1 0 ExMax 100 100 Nm 24 240 VAC DC 40 60 90 120 150 sec at 90 without On off 3 pos SB 1 0 ExMax 150 150 Nm 24 240 VAC DC 40 60 90 120 150 sec at 90 without On off 3 pos SB 1 0 ExMax 30 F 30 Nm 24 240 VAC DC 40 60 90 120 150 sec at 90 20 sec at 90 On off 3 pos SB 1 1 ExMax 50 F 50 Nm 24 240 VAC DC 40 60 90 120 120 sec at 90 20 sec at 90 On off 3 pos SB ...

Page 2: ...et wrench slow motion enough torque force is required Attention with manual operation of actuators with spring return danger of injury exists with release let go the socket wrench Integral heater integral heater controlled for ambient temperature down to 40 C Housing material Aluminium die cast housing painted optional in amercoat painted CTM Dimensions L W H 286 150 116 mm for diagramm see extra ...

Page 3: ...en push button T for minimum 3 seconds The actuator will drive into both end positions to be adjusted LED indicates green Adjusmtent time needs approx 180 sec 90 sec On 90 sec Off After that switch S into position 00 09 in acc with your required torque and running time B Selection of running time and torque Put switch S into the correct selected position in acc to above table The selected paramete...

Page 4: ...ature below 20 C See extra information EL M F Excess temperature In acc to the ATEX rules and regulations Ex actuators must be protected against excess temperature An internal thermostat guarantees the temperature class in the event of failure If this thermostat is working the actuator must be sent to the factory ExMax actuators are equipped with an additional temperature sensor to stop the actuat...

Page 5: ...of needed cable cross section A at a cable length of L A 0 0714 l L Uv 18V The EL data sheet contains additional information for ExMax and RedMax actuators of the size M for the optimization and simplification in regard to planning installation and initial startup It provides influences of external factors in reference to the safe initiation of the actuators as well as technical references and pro...

Page 6: ...ors without external torque force min 10 Nm Attention If you use this type of wiring the heater does not work in case of open contact Attention If you use this type of wiring the heater does not work in case of open contact Attention If you use this type of wiring the heater does not work in case of open contact Integrated aux switches max 24 V 3 A 240 V 0 5 A switching at 5 and 85 Supply at aux s...

Page 7: ...y on the clamps 1 and 2 Following parameters are to be considered by ambient temperaure 10 C 1 After mounting the actuator must bei immediately electrically connected 2 The actuator will only be activated after the operating temperature has reached at least 20 C 3 The adjustment options are only ensured after this heating up period IV Mechanical protection 1 The actuator must be operated with an o...

Page 8: ...re remounting on the damper shaft Consider additional information ME M of the assembly instructions A modulating actuator Y works with reduced angle of rotation and already reaches its end positions before 0 V 4 mA respectively before 10V 20mA l At start up no self adjustment of angle of rotation was accomplished l Accomplish self adjustment of angle of rotation in accordance with assembly instruc...

Page 9: ...unting For outdoor installation it has to be certain that the actuator is protected against direct sun exposure warmth and UV rain and snow by employing an enclosure roof Supply voltage is to be applied immediately after mounting in order to assure integrated heating at start Since explosion proof actuators must have internal safety temperature limiters these may not be exposed neither at storage ...

Page 10: ... In case of spring return function the safety postion must be selected by turning the actuator 180 Mounting 1 Affix tap hole M8 in accordance with drill template on the damper or to a mounting bracket 2 Adjust drive shaft of the actuator with the socket wrench that the drive stands perpendicular to the damper before pluging actuator on to the damper shaft 3 Plug actuator onto damper shaft and fix ...

Page 11: ...ten the remaining screws 6 Mount temperatur limiter type ExPro TT InPro TT 7 Mount terminal box 8 Connect sensor on actuator Note the drive shaft is selflockingly produced and may only be mechanically adjusted either with the provided socket wrench or the optional accessory HV M manual override External applied force to the shaft can lead to mechanical damage of the actuator Mounting instructions ...

Page 12: ... Switch 1 Screw mounting bracket MKK M to the actuator A then screw terminal box to the mounting bracket B Mounting bracket MKK M can be mounted every 90 Terminal box mounted above the actuator Terminal box mounted beside the actuator 2 2 B A 4 Mounting of ExSwitch RedSwitch InSwitch accessory to the actuator Mounting of terminal boxes type ExBox RedBox InBox via mounting bracket type MKK M to the...

Reviews: