Schick G2 Concept Operating Instructions Manual Download Page 3

Wir freuen uns, daß Sie sich für ein
technisch hochwertiges Gerät aus
dem Hause SCHICK entschieden haben
und wünschen Ihnen mit Ihrer neuen
Modellsäge G2 Concept viel Erfolg
und Freude beim Arbeiten.

Wir haben diese Gebrauchsanweisung
zusammengestellt, um Sie mit Ihrem
neuen Gerät vertraut zu machen und
Ihnen die notwendigen Hinweise für
Bedienung und Wartung zu geben.

We are pleased that you decided to
buy a highly developed piece of
equipment from SCHICK and would
like to wish you every success when
working with your new G2 Concept
all purpose  model saw.

We wrote these operating instructions
to enable you to get accustomed to
your new piece of equipment and to
provide you with the correct operating
and maintenance instructions.

Nous nous réjouissons de votre décision
d'utiliser un appareil de haute technicité
de la maison SCHICK et nous vous
souhaitons, avec votre nouvelle scie à
modèles G2 Concept, beaucoup de
satisfications dans votre travail.

Nous avons rédigé ce mode d'emploi
pour vous familiariser avec votre nouvel
appareil et pour vous fournir les inform-
ations nécessaires pour l'utilisation et
l'entretien de celui-ci.

Inhalt
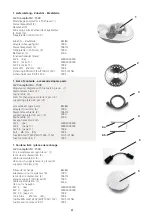
1. Lieferumfang - Zubehör - Ersatzteile
2. Einsatz und Gebrauch
3. Allgemeine Hinweise

Achtung !

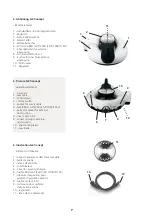
4. Abbildung G2 Concept -

Bedienelemente

5. Aufstellen
6. Bedienung
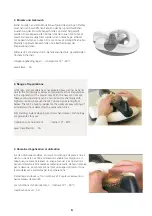
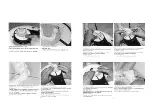
7. Wechsel Sägeblatt
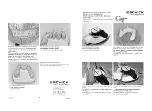
8. Laser Kalibrierung
9. Pflege und Wartung
10. Störungen
11. Technische Daten
12. Konformitätserklärung

Index
1. List of contents - accessories
2. Range of applications
3. General information

Caution !

4. Picture G2 Concept -

operating elements

5. Setting up
6. Operating the unit
7. Exchanging the saw blade
8. Calibrating laser beam
9. Maintenance and care
10. Possible faults
11. Technical data
12. Declaration of conformity

Contenu:
1. Contenu livré
2. Domaine d'application et utilisation
3. Indications générales

Attention !

4. Illustration G2 Concept -

élements d’utilisation

5. Mise en service
6. Maniement
7. Changement de lame de scie
8. Réglage du laser sur
9. Entretien
10. Interruptions
11. Données techniques
12. Déclaration de conformité

3

Seite:
4
5
6

7

8
9
10
11
12
12
13
14

Page:
4
5
6

7

8
9
10
11
12
12
13
14

Page:
4
5
6

7

8
9
10
11
12
12
13
14

Summary of Contents for G2 Concept

Page 1: ...Instructions Model saw G2 Concept Mode d emploi Scie à modèles G2 Concept Original Georg Schick Dental GmbH Lehenkreuzweg 12 D 88433 Schemmerhofen Telefon 49 7356 9500 0 Telefax 49 7356 9500 95 E Mail info schick dental de Internet www schick dental de ...

Page 2: ...2 ...

Page 3: ...digé ce mode d emploi pour vous familiariser avec votre nouvel appareil et pour vous fournir les inform ations nécessaires pour l utilisation et l entretien de celui ci Inhalt 1 Lieferumfang Zubehör Ersatzteile 2 Einsatz und Gebrauch 3 Allgemeine Hinweise Achtung 4 Abbildung G2 Concept Bedienelemente 5 Aufstellen 6 Bedienung 7 Wechsel Sägeblatt 8 Laser Kalibrierung 9 Pflege und Wartung 10 Störunge...

Page 4: ...saw blade 2 pcs 4 supporting plates 30 pcs 5 accessories spare parts Adapter for suction 6 Diamond saw blade 2 supporting plates 30 pcs 5 Mains cable 3 hexagon socket wrench SW 4 4a SW 3 page 11 SW 2 5 page 11 bolt Ø4 mm 4b fuse 800 mA T 220V 2A T100V 115V fuse for motor 8 A T Art Nr 1580 1967 2 1550 2160 W602000400 W602000300 1588 1934 3105 3106 1932 1 Contenu livré pièces de rechange G2 ConceptA...

Page 5: ...er dies With the new G2 Concept these sawing operations can be carried out mechanically with highest precision because the G2 Concept is operating from below The G2 Concept provides for the optimum saw cutting of all models without damaging the preparation lines Soft starting instant stopping and two hand sensor technology are guarantee for your Conditions of environment interior 10 40 C Laser cla...

Page 6: ...1 Ascertain that your mains supply coincides with the data in the rating plate 3 2 The model saw G2 Concept is not suitable for the following applications in areas where there is a risk of explosion on patients for working on moist materials 3 3 Insure that all regulatory requirements are observed during use always wear protective glasses take care for good illumination use dust suction WEEE Reg N...

Page 7: ...ble 3 control lamp 4 mains switch 5 socket for mains cable 6 fuse 800 mA T 7 extractor socket for external dust suction 8 fuse motor 8 A T 9 socket to plug in external dust suction 10 line marking laser 11 saw blade 230V 2A T 100V 115V 4 Illustration G2 Conept éléments d utilisation 1 Repos manuel avec 2 table de sciage 3 lampe de controle 4 commutateur 5 prise de courant générale 6 fusible 800 mA...

Page 8: ...rmation on the identification plate 12 corresponds Mains cable 13 in the mains socket 5 and afterwards power plug 14 in mains socket or in the external suction socket Plug in the tube of the external suction 7 In use of an external suction without controller plug mains cable of the external suction with an adapter in the G2 Concept socket 9 5 Mise en service Retirez la protection de transport pour...

Page 9: ...rom below by the supporting plate and into the plaster arch and produces a clean saw cut in parallel to the pins If the optimal cut depth is reached drive back the saw table slowly again in the starting position Then the saw switches off itself again automatically To work nearly dust free the external suction will run a few time longer and stop then automatically 2 Security advice Operate saw neve...

Page 10: ...thighs Unscrew inside hexagonal screw A and remove fixation ring use counter pressure with the provided tool in the intended whole B on the shaft Exchange saw blade Use only original SCHICK diamond discs Insert fixation disc again and scew in the inside hexagonal screw under counterholds with the intended tool 7 Echange de la lame de scie Tirez la prise de réseau Enlèvez le tuyau flexible d aspira...

Page 11: ...olt pic 1 by using allen key 3mm ATTENTION 8 Réglage du laser sur la scie Concept G2 à partir de la série n 150 416 1 éteindre l appareil ne jamais regarder le rayon laser en face 2 utiliser la clé 6 pans 3mm photo 1 l enfoncer à l horizontal et déverrouiller l ecrou 3 utiliser la clé 2 5mm utiliser la clé 2 5mm et l installer de manière oblique photo 2 4 un vissage dans le sens de aiguille d une ...

Page 12: ...10 Possible faults Net switch lighting and net LED are not working net fuse 800 mA T No 3105 230V 2A T No 3106 100V 115V check and exchange when required Engine does not start See by net fuse If in order then check fuse for engine 8 A T No In 1932 and exchange when required By all other faults send the device directly to SCHICK Dental or an authorized dealer 9 Entretien Nettoyez l appareil avec le...

Page 13: ...ety and suppression These operating instructions should be readily accessible and are best kept close to the unit itself We would like to take this opportunity to advise you that a proper repair service and suitable qualified personnel are required for such highly developed technical equipment SCHICK guarantees to carry out perfect repairs using original spare parts and we are extending another 6 ...

Page 14: ...g 12 88433 Schemmerhofen Declaration of Conformity We GEORG SCHICK DENTAL GmbH Lehenkreuzweg 12 88433 Schemmerhofen declare herewith that the product is in conformity with the following provisions of Directive 2001 95 EG 2006 42 EG 2006 95 EG 2004 108 EG EMV directive Name and adress of person in charge Schemmerhofen April 2010 M G2 Concept general product safety machinery directive low voltage di...

Page 15: ......

Page 16: ......

Page 17: ......

Page 18: ......

Reviews: