1
Fixation de la marquise / Befestigung Markise /
Fissaggio della tenda / Attaching the awning
2
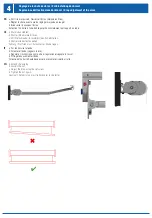
Ajustement de la marquise / Markise justieren /
Regolazione della tenda / Align the awning
FR
a. Rentrer et sortir la marquise de manière contrôlée puis effectuer les ajustements
suivants:
b.
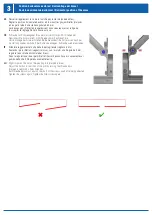
Parallélisme des bras
rentrer la marquise jusqu’à 50 – 100 mm.
Desserrer légèrement la vis Allen M10 (marquée en bleu) sur la fixation du bras au
niveau de la barre à toile puis régler les bras pour qu’ils soient parallèles.
Les bras articulés doivent reposer sur le profil de la barre à toile dans cette
position. Serrer à nouveau la vis Allen.
DE
a. Markise kontrolliert aus- und einfahren und folgende Justierungen vornehmen:
b.
Parallelität der Arme
Markise bis auf 50 – 100 mm einfahren. Inbusschraube M10 (blau markiert) zur Arm-
befestigung am Stoffstab leicht lösen und Arme parallel stellen. Knickarme sollen in
dieser Position am Stoffstabprofil anliegen. Inbusschraube wieder fest anziehen.
IT
a. Far uscire e rientrare la tenda in modo controllato ed eseguire le seguenti regolazioni:
b.
Parallelismo dei bracci
Far rientrare la tenda fino a 50 – 100 mm.
Allentare leggermente la vite a brugola M10 (segnata in blu) per il fissaggio dei
bracci sulla barra finale e posizionare i bracci in parallelo.
In questa posizione i bracci ripieghevoli devono trovarsi sul profilo della barra finale.
Stringere nuovamente la vite a brugola.
EN
a. Extend and retract the awning in a controlled manner and make the following
adjustments:
b.
Parallelism of the arms
Retract the awning up to 50 – 100 mm.
Slightly loosen the Allen screw 10 (marked in blue) for attaching the arm on the
fabric rod and adjust the arms so they are parallel.
Hinged arms in this position should abut onto the fabric rod profile.
Tighten the Allen screw again.
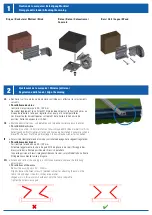
Béton / Beton / Calcestruzzo /
Concrete
Bois / Holz / Legno / Wood
Brique / Backstein / Mattoni / Brick
✖
✔

