background image


ScanSnap fi-5110EOX2 Getting Started | 9  

3

How to Use ScanSnap


This chapter describes basic operation of ScanSnap. 


3.1. Scanning Documents 

With “ScanSnap” you can turn paper office documents on 
your desk into digital files and save them just by pressing a 
single button. The scanned image can be viewed on the 
screen using the supplied applications (Adobe Acrobat, 
CardMinder). 
Two typical usages are: 

c


Create digital backups of general office documents in PDF 

format. 
You can edit them later using Adobe Acrobat. Adobe 
Acrobat allows you to make full use of the scanned 
information by using the OCR (Recognize Text Using OCR) 
function to recognize the image of the text portion, the 
security function to set passwords, etc. 
(Note: For information on using Adobe Acrobat, please refer 
to [Adobe Acrobat Help].) 

d


Scan and manage business cards. With “

CardMinder

”, scan, 

recognize and edit business cards, and export the data to a 
popular personal information manager application such as 
Outlook. 

3.2. About the Scan Settings


You can change ScanSnap settings by using “

ScanSnap 

Manager

”.


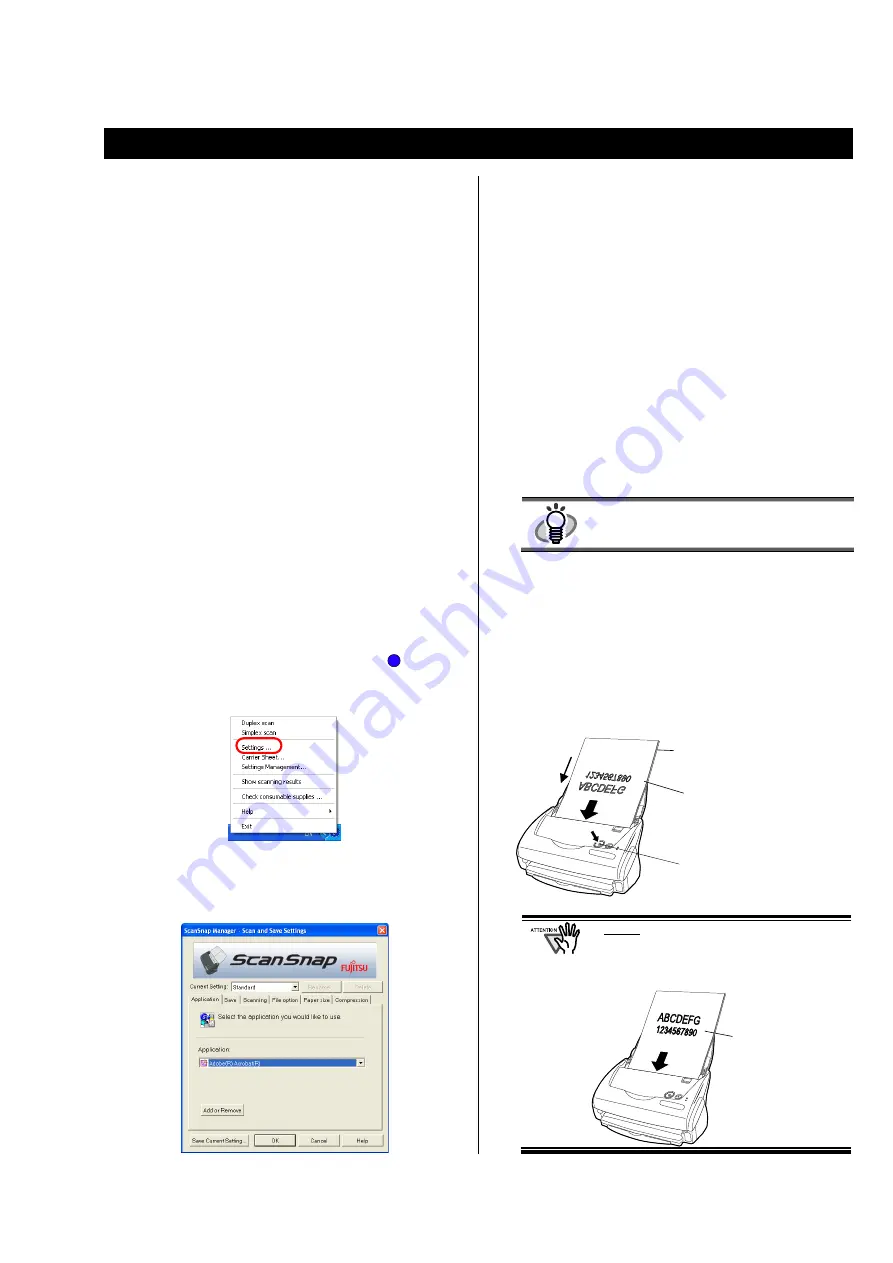
1.


Right-click the “ScanSnap Manager icon” 

  on the 

task tray and select [Setting ...] from the following 
menu.


Ö


The 

Scan and Save Settings” window opens.


2.


Change the scan settings on the “Scan and Save 

Settings” window.


There are six tabs used to configure the scan options: 

[Application] 

Select the application for viewing/editing the scanned 
images. 

[Save] 

Specify the folder and file name to save the scanned 
images. 

[Scanning] 

Specify the quality of the scanned image. 

[File option] 

Select the file format (PDF, JPEG) for saving the scanned 
images. 

[Paper size] 

Select the size of the document to be scanned. 

[Compression]


Select the compression rate of a file.


HINT

Refer to 

the 

ScanSnap Operator’s Guide

” in 

the “

ScanSnap Setup CD-ROM

” to learn more 

about these settings.


3.


  Click the [OK] button to finish the configuration.


Ö

 The new settings are enabled. 

3.3. Scanning Office Documents


1.


Select “

Adobe Acrobat

” at “Application:” under the 

[Application] tab of “Scan and Save Settings”.


2.


Load the documents onto the scanner. 


In step 3 of “2.1.2 Installing ScanSnap 
Manager, ScanSnap Organizer, CardMinder 
and PDF Thumbnail View”, if you select 

“Allow 

documents to be scanned face up through 
the ADF”

, set the document as follows. 

S

Set the paper 

face-up  

[SCAN] button 

Set the paper face-down 
on the Paper chute cover.

Set the back side of the 

paper to the front. 

Scanning 
direction 

Summary of Contents for fi-5110eox2

Page 1: ...Color Image Scanner fi 5110EOX2 G Ge et tt ti in ng g S St ta ar rt te ed d P3PC 1142 03EN Please read this guide before connecting the scanner to your PC TM...

Page 2: ...6 4 Purchasing the Carrier Sheet 22 All Rights Reserved Copyright PFU LIMITED 2005 2009 The contents of this manual are subject to change without notice This manual may not be reproduced adapted or tr...

Page 3: ...i shi Kanagawa 212 8563 Japan Phone 81 44 540 4538 Trademarks Microsoft and Windows are registered trademarks of Microsoft Corporation in the United States and or other countries Adobe the Adobe logo...

Page 4: ...the party responsible for compliance could void the user s authority to operate the equipment The use of a USB interface cable and AC cable supplied with this product is required to comply with the Cl...

Page 5: ...t in severe injury or death CAUTION This indication alerts operators to an operation that if not strictly observed may result in safety hazards to personnel or damage to equipment Symbols Used In This...

Page 6: ...part or modify the scanner The inside of the scanner contains high voltage components Touching these components might cause fire or electric shock CAUTION The following describes important cautions In...

Page 7: ...automatically when you open close the Paper chute cover To turn off the scanner when the cover is opened press the POWER button ADF cover ADF Automatic Document Feeder Paper chute cover Open this cove...

Page 8: ...e CPU Intel Pentium III 600MHz or higher recommended Intel Pentium 4 1 8GHz or higher Memory 128MB or more recommended 256MB or more If the CPU and the memory do not meet the recommended requirements...

Page 9: ...talled including its manual Custom You can select the software and the manuals to install When reinstalling the programs the following 2 windows will not appear Set the document face down and scan Rec...

Page 10: ...K button For Windows Me The new hardware is detected and the installation will be completed automatically For Windows 2000 When Digital Signature not Found appears click the Yes button For Windows XP...

Page 11: ...r icon on the task tray and select Setting from the following menu The Scan and Save Settings window opens 2 Change the scan settings on the Scan and Save Settings window There are six tabs used to co...

Page 12: ...olded document inside Align the top of the document to the top of the Carrier Sheet and the folded portion to the top right corner closely 3 Set the Carrier Sheet onto the scanner Place the top of the...

Page 13: ...l 2 Select Enable and click the OK button on the PDF Thumbnail View Function Settings window You can see the thumbnail images of PDF files with the Windows Explorer just like bitmap or JPEG images HIN...

Page 14: ...nnected Correctly connect the USB cable When a hub is used check the hub s power supply Does the LED light blink repeatedly Disconnect the AC adaptor cable and reconnect them again Note Please wait at...

Page 15: ...zes If your PC has an USB 2 0 port connect the scanner to this port If using a USB hub it must also support USB 2 0 interfaces 3 Multi feeds 4 occur frequently Is the Pad ASSY dirty Clean the Pad ASSY...

Page 16: ...es not improve even after you have tried this method clear the check box for Allow automatic image deskew on Option of the Scanning tab of Scan and Save Settings Depending on the contents of document...

Page 17: ...fter removing the above given folders files restart your computer with ScanSnap disconnected Reinstall ScanSnap Manager and restart 3 To confirm whether the scanner is connected with USB1 1 or USB2 0...

Page 18: ...f scanning documents the accumulated paper powder and dust inside the scanner causes a scanning error As a guideline clean the ADF every 1 000 scans Note that this guideline varies according to the ty...

Page 19: ...ng them Feed rollers x2 Clean the rollers lightly taking care not to roughen the surface of the rollers Take particular care when cleaning the feed rollers as black debris on the rollers adversely aff...

Page 20: ...mild detergent to lightly clean off the dirt and dust from the surface and the interior of the Carrier Sheet Never use paint thinner or other organic solvents Do not rub too hard Otherwise the Carrie...

Page 21: ...o be replaced and to get an overlook of the already scanned pages please refer to the following 1 Right click the ScanSnap Manager icon on the task tray 2 Click Check consumable supplies at the menu T...

Page 22: ...ver 2 Open the ADF cover while pulling the Cover open lever 3 Remove the Sheet guide Pinch the handle on the Sheet guide to remove it 4 Rotate the Pick roller bushing Left in the direction of the arro...

Page 23: ...slot while lowering it 9 Fix the Pick roller bushing left by rotating it in the direction of the arrow Make sure that the Pick roller is completely attached and correctly installed Otherwise document...

Page 24: ...product cannot be used for scanning due to damage or wear and tear you can purchase just the Carrier Sheet separately As a guideline it is recommended to replace the Carrier Sheet every 500 scans How...

Reviews: