Quick Guide
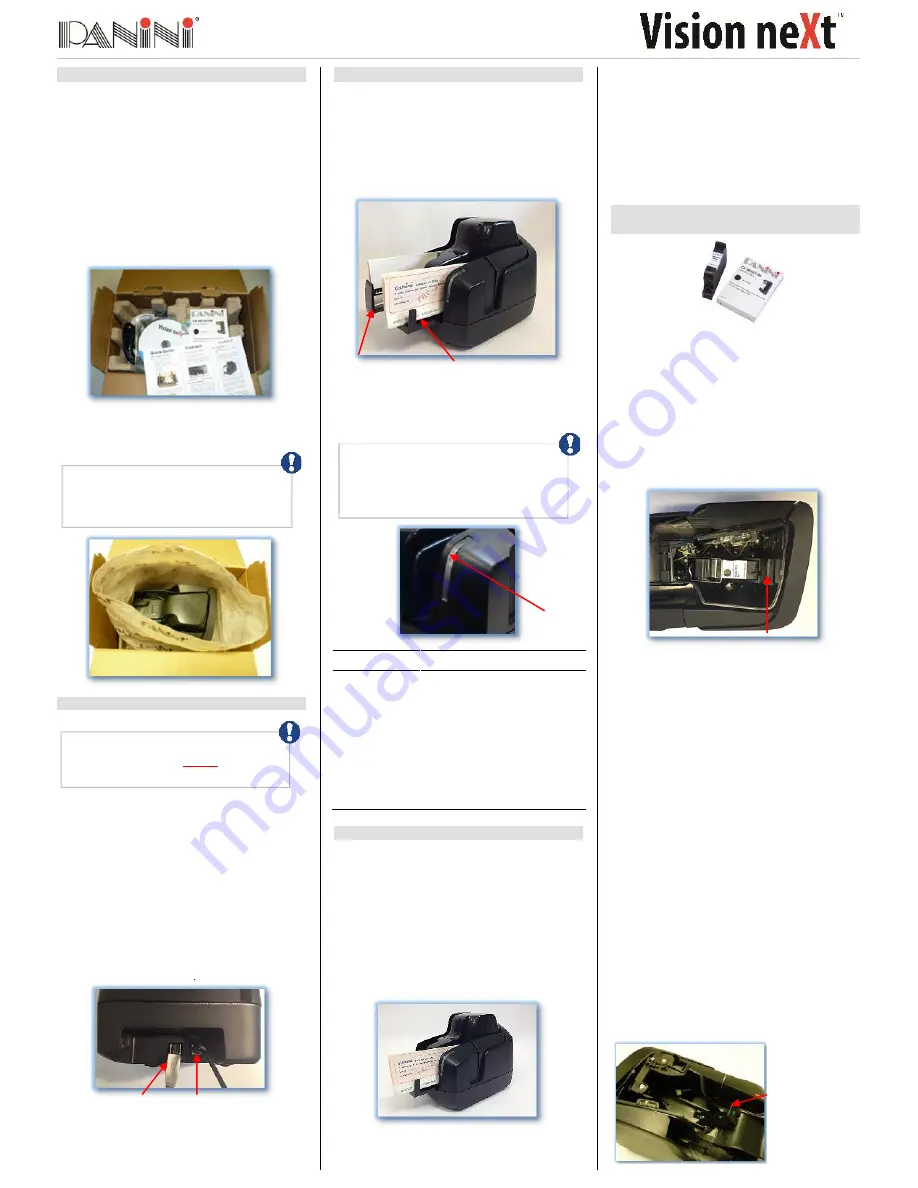
Step 1: Unpack the Scanner
Make sure that all parts are included:
Panini Vision NeXt Scanner;
Operator Manual (CD-ROM);
Quick Guide;
USB 2 Cable;
Power Cable;
Power Supply;
AGP or single line Cartridge (no cartridge if
the unit is ordered without endorsement).
Before unpacking the box, examine it for
damage received during shipping.
Remove box contents and the upper cardboard
shell, as the pictures below. Next, remove the
scanner and place it on a flat surface near the
PC.
Step 2: Connect the Scanner
Connect Panini Vision NeXt to your PC following
the steps below:
Place the device on a level surface near the
host computer. Leave enough space to
open the pocket flaps, top cover and to
insert documents.
Plug the power supply cable in the Vision
NeXt™ power connector.
Connect the Vision NeXt™ to a dedicated
electrical power outlet.
Connect the USB cable to the USB port
located on the rear side of the scanner, and
then connect the other end of the cable to
an available USB 2.0 port on the PC.
Step 3: Getting Started
Assuming that the application program is
already installed on the user workstation,
the device will be recognized. On the first
connection, the new hardware wizard will
associate the correct preinstalled driver to
the device.
Open the Feeder Extension and the Pocket
Extension to collect all the documents.
Once you launch your application, the LED
will light-up indicating the status of the
machine (see Operator Manual for details).
Status LED
Description
OFF
The Vision neXt is offline
Blue Solid
The Vision neXt is online
Blue Blinking
Documents in the Feeder area
Green Solid
The Vision neXt is ready to
process and the feeder is empty
Green Blinking
The Vision neXt is processing
documents
Red Blinking
Jam or other problem
Step 4: Device Start-Up
Straighten document and remove any
staples and paper clips before feeding
document into the unit.
You may feed documents one at a time or
in batches by inserting documents into the
feeder area from above
Insert documents right side up with the
MICR line aligned with the right side of the
scanner and visible to you. To ensure
proper feeding, do not overfill the feeder.
The inserted document will be detected and
feeding will begin automatically.
The document will be properly aligned and
scanned according to the Document Feeder
Option configured.
Processed documents will then either be
returned out the Exit Pocket or Exception
Pocket. For best results,
remove the
documents when the application notifies the
Exit pocket is full, or when you notice the
Exit pocket is nearly full. Jams may occur
when the Exit pocket is too full.
Step 4: Installing AGP Cartridge
(Panini P/N: CA-00165)
4-lines AGP version:
Instruction to insert AGP Cartridge:
Open the Upper Cover.
Place lever system to the back position,
insert cartridge, grab the metal latch and
pull it up pushing down gently the cartridge.
The two piece lever system should lay flat
to the back of the cartridge.
Close the AGP cover.
Instructions to remove AGP cartridge:
Open the AGP cover.
Push the lever handle down, remove the
cartridge from the nest and place the lever to
the front position.
Close the AGP cover.
Remove the AGP cartridge when transporting
the unit or when the unit will not be used for long
periods. In case the scanner is not used
regularly, periodically cleaning the ink-jet nozzles
with a lint-free cloth is recommended.
14-lines AGP version:
The cartridge is inserted into a nest that is
mounted on an elevator mechanism.
Change the cartridge with the machine in
online state
. When the top cover is opened
the nest moves up to a load/unload position
and latched so it will not move to the bottom
of its travel.
Swing the cartridge plastic latch open and
away from the nest.
Slide the cartridge into the nest so that it sits
flat in the bed of the nest.
Snap the plastic latch onto the cartridge.
Close the top cover, the nest will be released
and the motor will take it to its home position.
If the device, or any component, appears
damaged do not use it. File a claim with
the shipping company and contact your
reseller
Ensure that the device drivers have been
installed on the PC
before
connecting
the USB cable to the device.
USB Interface
Power Connection
Pocket Extension
Feeder Extension
Status
LED
An application must be started before you
begin to process documents. When the
application starts, the Vision Next turns on
which is indicated by the blue led in the
outer cover.
AGP Cartridge Holder
AGP nest in load
position and
plastic latch
opened