


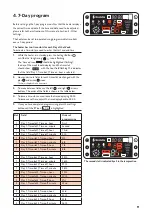


5. OTHER SETTINGS
SET TEM
SET TEM
P
P
R T °C
R T °C
TIME ON
TIME ON
TIME OFF
TIME OFF
HEAT
HEAT
TIME
TIME
R
R
FIRE
FIRE
LONG
LONG
TIMING
TIMING
SHOR
SHOR
T
T
TIMING
TIMING
WORKIN
WORKIN
G
G
MOD
MOD
E
E
DEVICE
DEVICE
SETTING
SETTING
12
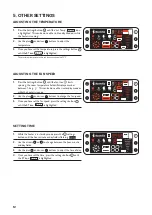
ADJUSTING THE TEMPERATURE
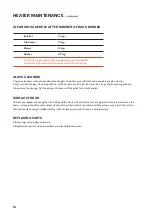
ADJUSTING THE FAN SPEED
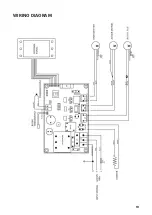
SETTING TIME
SET TEMP
R T °C
TIME ON
TIME OFF
HEAT
TIMER
FIRE
LONG
TIMING
SHORT
TIMING
WORKING
MODE
DEVICE
SETTING
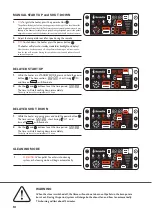
1.
Press the Settings Button
SHORT
TIMING
TIME ON
TIME OFF
LONG
TIMING
R T °C
SET TEMP
WORKING
MODE
DEVICE
SETTING
until the ‘Set Temp’
SHORT
TIMING
TIME ON
TIME OFF
LONG
TIMING
R T °C
SET TEMP
WORKING
MODE
DEVICE
SETTING
icon
is highlighted. This can be done either in Standby Mode or while
the heater is running.
2.
Use the plus
SHORT
TIMING
TIME ON
TIME OFF
LONG
TIMING
R T °C
SET TEMP
WORKING
MODE
DEVICE
SETTING
and minus
SHORT
TIMING
TIME ON
TIME OFF
LONG
TIMING
R T °C
SET TEMP
WORKING
MODE
DEVICE
SETTING
buttons to adjust the
temperature.
3.
Once you have set the temperature, press the settings button
SHORT
TIMING
TIME ON
TIME OFF
LONG
TIMING
R T °C
SET TEMP
WORKING
MODE
DEVICE
SETTING
until the RT icon
SHORT
TIMING
TIME ON
TIME OFF
LONG
TIMING
R T °C
SET TEMP
WORKING
MODE
DEVICE
SETTING
is highlighted.
The maximum temperature that can be set on the unit is 35
º
C
1.
Press the Settings Button
SHORT
TIMING
TIME ON
TIME OFF
LONG
TIMING
R T °C
SET TEMP
WORKING
MODE
DEVICE
SETTING
until the fan icon
SHORT
TIMING
TIME ON
TIME OFF
LONG
TIMING
R T °C
SET TEMP
WORKING
MODE
DEVICE
SETTING
starts
spinning, the room temperature field will display a number
between 1-4 e.g.
SHORT
TIMING
TIME ON
TIME OFF
LONG
TIMING
R T °C
SET TEMP
WORKING
MODE
DEVICE
SETTING
. This can be done either in standby mode or
while the heater is running.
2.
Use the plus
SHORT
TIMING
TIME ON
TIME OFF
LONG
TIMING
R T °C
SET TEMP
WORKING
MODE
DEVICE
SETTING
and minus
SHORT
TIMING
TIME ON
TIME OFF
LONG
TIMING
R T °C
SET TEMP
WORKING
MODE
DEVICE
SETTING
buttons to change the fan speed.
3.
Once you have set the fan speed, press the settings button
SHORT
TIMING
TIME ON
TIME OFF
LONG
TIMING
R T °C
SET TEMP
WORKING
MODE
DEVICE
SETTING
until the RT icon
SHORT
TIMING
TIME ON
TIME OFF
LONG
TIMING
R T °C
SET TEMP
WORKING
MODE
DEVICE
SETTING
is highlighted.
1.
While the heater is in standby mode, press the
SHORT
TIMING
TIME ON
TIME OFF
LONG
TIMING
R T °C
SET TEMP
WORKING
MODE
DEVICE
SETTING
settings
button until the hour, minute or day field is flashing
SHORT
TIMING
TIME ON
TIME OFF
LONG
TIMING
R T °C
SET TEMP
WORKING
MODE
DEVICE
SETTING
.
2.
Use the arrows
SHORT
TIMING
TIME ON
TIME OFF
LONG
TIMING
R T °C
SET TEMP
WORKING
MODE
DEVICE
SETTING
or
SHORT
TIMING
TIME ON
TIME OFF
LONG
TIMING
R T °C
SET TEMP
WORKING
MODE
DEVICE
SETTING
to change between the hour, minute
and day fields.
3.
Use the plus
SHORT
TIMING
TIME ON
TIME OFF
LONG
TIMING
R T °C
SET TEMP
WORKING
MODE
DEVICE
SETTING
and minus
SHORT
TIMING
TIME ON
TIME OFF
LONG
TIMING
R T °C
SET TEMP
WORKING
MODE
DEVICE
SETTING
buttons to adjust the time of day.
4.
Once you have set the time, press the settings button
SHORT
TIMING
TIME ON
TIME OFF
LONG
TIMING
R T °C
SET TEMP
WORKING
MODE
DEVICE
SETTING
until
the RT icon
SHORT
TIMING
TIME ON
TIME OFF
LONG
TIMING
R T °C
SET TEMP
WORKING
MODE
DEVICE
SETTING
is highlighted.
Summary of Contents for Verdant LE
Page 2: ......
Page 21: ...19 WIRING DIAGRAM...
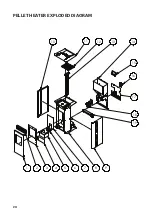
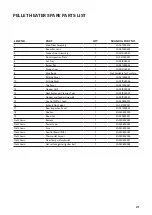
Page 22: ...20 PELLET HEATER EXPLODED DIAGRAM 1 2 3 4 5 6 7 8 9 18 17 15 13 11 14 10 19 12 16...
Page 26: ...24...
Page 27: ...25...