


4. 7
-
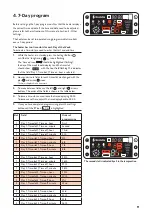
Day program
SET TEMP
R T °C
TIME ON
TIME OFF
HEAT
TIMER
FIRE
LONG
TIMING
SHORT
TIMING
WORKING
MODE
DEVICE
SETTING
TIME ON
SET TEMP
R T °C
TIME ON
TIME OFF
HEAT
TIMER
FIRE
LONG
TIMING
SHORT
TIMING
WORKING
MODE
DEVICE
SETTING
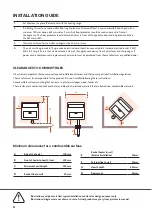
The second slot is indicated by a 2 in the temp section
11
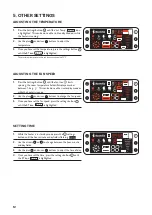
Before setting up the 7-day program, confirm that the heater displays
the correct time and date. If the time and date need to be adjusted,
please refer to the instructions of this manual in Section 5 - Other
Settings
.
The heater can be set to operate during programmable time-slots
over a 7-day period.
The heater has two time-slots for each Day of the Week.
To activate a time-slot, we need to enter the start and end time.
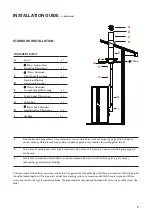
1.
While the heater is in standby, press the Settings Button
SHORT
TIMING
TIME ON
TIME OFF
LONG
TIMING
R T °C
SET TEMP
WORKING
MODE
DEVICE
SETTING
until the the ‘long timing’
SHORT
TIMING
TIME ON
TIME OFF
LONG
TIMING
R T °C
SET TEMP
WORKING
MODE
DEVICE
SETTING
icon is flashing.
The ‘time on’ icon
SHORT
TIMING
TIME ON
TIME OFF
LONG
TIMING
R T °C
SET TEMP
WORKING
MODE
DEVICE
SETTING
should be highlighted (flashing);
the day of the week should display 1 and the time slot
should show
SHORT
TIMING
TIME ON
TIME OFF
LONG
TIMING
R T °C
SET TEMP
WORKING
MODE
DEVICE
SETTING
with the hour field flashing.This indicates
that the field ‘Day 1, Time-slot 1, Time on, hour is selected.
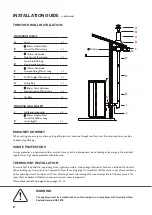
2.
Hour and minute fields for each time-slot are changed with the
plus
SHORT
TIMING
TIME ON
TIME OFF
LONG
TIMING
R T °C
SET TEMP
WORKING
MODE
DEVICE
SETTING
.and minus
SHORT
TIMING
TIME ON
TIME OFF
LONG
TIMING
R T °C
SET TEMP
WORKING
MODE
DEVICE
SETTING
.icons.
The time is displayed in 24 hour time.
3.
To move between fields, use the left
SHORT
TIMING
TIME ON
TIME OFF
LONG
TIMING
R T °C
SET TEMP
WORKING
MODE
DEVICE
SETTING
. and right
SHORT
TIMING
TIME ON
TIME OFF
LONG
TIMING
R T °C
SET TEMP
WORKING
MODE
DEVICE
SETTING
arrows
buttons. The order of the fields is shown in the table below.
4.
To leave a time-slot unused, leave the time displaying 00:00.
To remove a set time, adjust the time display back to 00:00.
5.
Once you have completed programmimg, press the settings
button until the RT icon
SHORT
TIMING
TIME ON
TIME OFF
LONG
TIMING
R T °C
SET TEMP
WORKING
MODE
DEVICE
SETTING
is highlighted.
Slot
Field
Order of
programming
1
Day 1, Time-slot 1, Time on, hour
First
1
Day 1, Time-slot 1, Time on, minute
Second
1
Day 1, Time-slot 1, Time off, hour
Third
1
Day 1, Time-slot 1, Time off, minute
4th
1
Day 2, Time-slot 1, Time on, hour
5th
1
Day 2, Time-slot 1, Time on, minute
6th
1
Day 2, Time-slot 1, Time off, hour
7th
1
Day 2, Time-slot 1, Time off, minute
8th
…
1
Day 7, Time-slot 1, Time on, hour
25th
1
Day 7, Time-slot 1, Time on, minute
26th
1
Day 7, Time-slot 1, Time off, hour
27th
1
Day 7, Time-slot 1, Time off, minute
28th
2
Day 1, Time-slot 2, Time on, hour
29th
2
Day 1, Time-slot 2, Time on, minute
30th
2
Day 1, Time-slot 2, Time off, hour
31st
2
Day 1, Time-slot 2, Time off, minute
32nd
…
2
Day 7, Time-slot 2, Time on, hour
53rd
2
Day 7, Time-slot 2, Time on, minute
54th
2
Day 7, Time-slot 2, Time off, hour
55th
2
Day 7, Time-slot 2, Time off, minute
56th
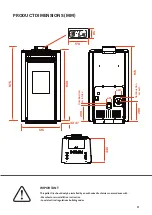
Summary of Contents for Verdant LE
Page 2: ......
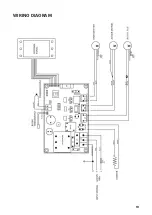
Page 21: ...19 WIRING DIAGRAM...
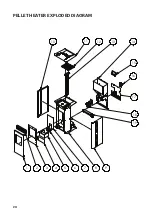
Page 22: ...20 PELLET HEATER EXPLODED DIAGRAM 1 2 3 4 5 6 7 8 9 18 17 15 13 11 14 10 19 12 16...
Page 26: ...24...
Page 27: ...25...