SBS Compact Action Camera with CMOS Sensor User Manual Download Page 5

NOTE: The Action Cam will turn off automatically if it is 

inactive for 5 minutes.
Start to Use
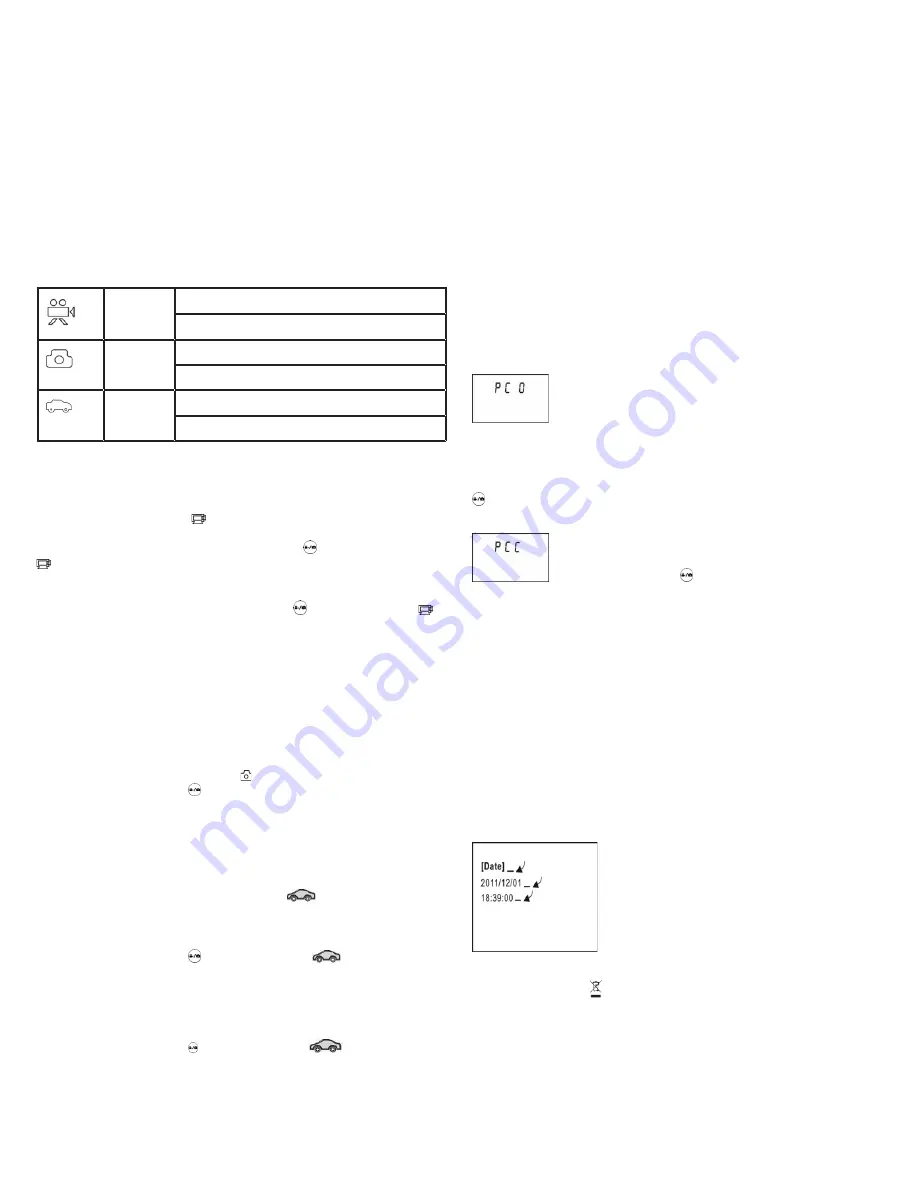
The Action Cam provides different shooting modes. 

Conversion is available via the mode switch after startup:

video 

recording 

mode  

HI stands for 720P (1280x720,30 fps) video

Lo stands for 640P (640x480,60 fps) video

picture 

taking 

mode

HI stands for 5M (2592 x 1944) resolution

Lo stands for 1M (1280x 960) resolution

vehicle-

mounted 

mode

HI stands for 720P (1280x720,30 fps) video

Lo stands for 640P (640x480,60 fps) video

1. Video Recording 
To record a video, please check whether the Cam is under 

Video mode. The icon    is played on the screen.
Start recording: press and release the   button, the icon 

 and [:] displayed in LCD will flash. At the same time the 

blue indicator will flash too, meaning that the recording is in 

progress.

Stop recording: press and release the   button, the icon   

and [:] displayed in LCD will stop flashing. At the same time 

the blue indicator will stop flashing either, meaning that the 

recording is stopped. 

When the SD card is full, or the battery runs out, the 

recording will stop automatically, and the recorded video will 

be saved before Action Cam turns off.
2. Photo
To take a photo, please check whether the Action Cam is 

under Camera mode: the icon   is displayed on the screen.

Press and release the   button: the blue indicator will flash, 

meaning that a photo is taken (If you take more than 9999 

photos, the LCD display will stop at  9999)
3. Vehicle-mounted  recording 
To record a video, please check whether the Cam is turned 

on Vehicle-mounted  mode. The icon 

 is displayed on 

the screen.
Start recording

Press and release the   button, the icon 

 and [:] 

displayed on LCD will flash. At the same time the blue 

indicator will flash too, meaning that the recording is in 

process.
Stop recording

Press and release the   button, the icon 

 and [:] 

displayed in LCD will stop flashing. At the same time the blue 

indicator will stop flashing either, meaning that the recording 

is stopped. 

Press the shutter button once in the preview mode to begin 

recording, save a segment for recording every 3 minutes, 

then start to record the following segment of video. When the 

SD card is full, the earliest segment of video will be deleted 

to release the corresponding space for continuous recording.
4 . PC connection
4.1
 Turn on the Action Cam and connect it to the USB port of 

the PC using  the equipped USB cable. Cam will enter U-disk 

mode and the LCD will display as in  below draw:

Now you can view the photos or videos taken by the Cam on 

your PC.
4.2 In U-disk mode (PCO mode), press the Shutter button 

 to switch to web cam mode (PCC mode):  the LCD will 

display as in below draw:
     

    Now you can start the web cam through 

application. To return to U-disk mode (PCO 

mode), press the   button again.

NOTE: Driver is not required using web cam mode (PCC 

mode) with Windows XP(SP3) or upper version.
5. Set system  and date time
You can set  time and date system as per  following 

instruction:

  1  Connect the Camera to computer

  2   In the root directory of SD create a new file TIMESYNC.

TXT

  3   Edit TIME.TXT is: 

[date]+senter 

2014/06/01+space bar+enter  

15:45:00+senter 

  4  Save and exit the editing

  5  Reboot the device: clock will be set

DIRECTIVE 2002/96/EC OF THE EUROPEAN PARLIAMENT AND OF THE COUNCIL of 27 January 2003 on waste electrical and 

electronic equipment (WEEE)

Information for users

(a) the device requirement not to dispose of WEEE as unsorted municipal
waste and to collect such WEEE separately;
(b) the device must return and collection systems available to them;
(c) the device will be collected by the vendor in case of a new one is buyed
(d) the device not correctly disposed has potential effects on the environment and human health
as a result of the presence of hazardous substances in electrical and electronic equipment;
(e) The symbol indicating separate collection for electrical and electronic equipment consists of the crossed-out wheeled bin, 
as shown below. The symbol must be printed visibly, legibly and indelibly.

Summary of Contents for Compact Action Camera with CMOS Sensor

Page 1: ...Compact Action Camera with CMOS Sensor HD Resolution Universal TTACTIONCAMDG User Manual...

Page 2: ...censione della fotocamera possibile utilizzare il tasto accensione funzione per commutare in sequenza le seguenti modalit Nella registrazione di video e la modalit montati su un veicolo premere il pul...

Page 3: ...stesso tempo anche il led blu smetter di lampeggiare il che indica la fine della registrazione Premere il pulsante dell otturatore una volta in modalit anteprima per avviare la registrazione salvare...

Page 4: ...the status of the Action Cam WORKING MODE FLOW CHART After turn on the Camera you can change the Power button Mode switch to switch the following modes in turn In video recording and vehicle mounted m...

Page 5: ...ue indicator will stop flashing either meaning that the recording is stopped Press the shutter button once in the preview mode to begin recording save a segment for recording every 3 minutes then star...

Page 6: ...Taste Funktion die nacheinander in der folgenden Weise zu wechseln In der Video Aufnahmemodus und auf einem Fahrzeug montiert ist dr cken Sie den Ausl ser um die Aufnahme die Flash Anzeige Arbeitslich...

Page 7: ...as Ende der Aufnahme Dr cken Sie den Ausl ser einmal im Vorschau Modus um die Aufnahme zu starten speichern Sie ein Segment f r die Aufnahme alle 3 Minuten dann starten Sie die Aufzeichnung der n chst...

Page 8: ...ISER Apr s avoir allum l appareil photo vous pouvez utiliser le bouton d alimentation fonction pour basculer dans l ordre par les moyens suivants En mode d enregistrement vid o et mont sur un v hicule...

Page 9: ...e et s affiche sur l cran LCD s arr te de clignoter Dans le m me temps le voyant bleu arr te de clignoter indiquant la fin de l enregistrement Appuyez sur le d clencheur une fois en mode de pr visuali...

Page 10: ...ZAR Despu s de encender la c mara se puede utilizar el bot n de encendido funci n En el modo de grabaci n de v deo y montado en un veh culo presione el bot n disparador para iniciar la grabaci n el in...

Page 11: ...dor una vez en el modo de vista previa para iniciar la grabaci n ahorrar un segmento para el registro de cada 3 minutos y luego empezar a grabar el pr ximo segmento del video Cuando la tarjeta SD est...

Page 12: ...c o FORMA DE USO Depois de ligar a c mera voc pode usar o bot o de alimenta o fun o para mudar em seq ncia das seguintes formas No modo de grava o de v deo e montado sobre um ve culo pressione o bot o...

Page 13: ...o emissor de luz azul p ra de piscar o que indica o fim da grava o Pressione o bot o do obturador uma vez no modo de visualiza o para iniciar a grava o salvar um segmento para gravar a cada 3 minutos...

Page 14: ...de camera kunt u de knop functie overschakelen achtereenvolgens de volgende manieren In de video opname modus en gemonteerd op een voertuig druk de ontspanknop om de opname de flitser indicator Werke...

Page 15: ...te starten bespaart een segment voor het opnemen van elke 3 minuten dan beginnen met het opnemen van het volgende segment van de video Wanneer de SD kaart vol is zal het eerste segment van de video wo...

Page 16: ...1 2 3 4 5 6 7 Led 8 9 USB 10 Micro SD 11 Cam 1 2 3 4 SD 5 5 2592x1944 720p 1280x720 LO 1 1280x960 640p 640x480 6 7 9999 8 Cam 1 SD Micro SDHC 4 SD 8 1 2 16GB 32GB 3 4 64Gb Cam 2 Cam USB 2 ON 3 OFF Ca...

Page 17: ...480 60 HI 5 2592 1944 Lo 1 1280x 960 HI 720P 1280x720 30 Lo 640p 640x480 60 1 SD Cam 2 9999 9999 3 3 SD 4 4 1 Cam USB USB Cam U Cam 4 2 U PCO PCC U Windows XP SP3 5 Cam 1 2 I SD TIMESYNC TXT 3 Enter 0...

Page 18: ...V HUR MAN ANV NDER Efter att ha slagit p kameran kan du anv nda str mbrytaren funktion att v xla i f ljd p f ljande s tt I videoinspelningsl ge och monteras p ett fordon tryck p avtryckaren f r att st...

Page 19: ...nspelningen Tryck p avtryckaren en g ng i f rhandsgranskningsl ge f r att starta inspelningen spara ett segment f r inspelning var 3 minuter sedan b rja spela in n sta segment av videon N r SD kortet...

Page 20: ...tusu dzia ania kamery DRZEWO JAK KORZYSTA Po w czeniu aparatu mo na korzysta z funkcji przycisku zasilania aby prze czy si kolejno w nast puj cy spos b W trybie nagrywania film w i zamontowane na poje...

Page 21: ...iu przycisku migawki gdy w trybie podgl du aby rozpocz nagrywanie zapisz segment do nagrywania co 3 minuty a nast pnie rozpocz nagrywanie kolejnego segmentu wideo Gdy karta SD jest pe na pierwszy segm...

Page 22: ...ro USB 10 Micro SD 11 LCD Cam LCD 1 2 3 4 SD 5 Icon 5 Megapixel 2592x1944 720p 1280x720 LO 1 megapixel 1280x960 640P 640x480 6 7 9999 8 Timer Cam Action Cam 1 micro SD micro SDHC 4 SD 8GB 1 2 16GB 32G...

Page 23: ...HI 720P 1280x720 30fps Lo 640P 640x480 60 fps 1 LED LCD SD 2 Camera 9999 LCD 9999 3 mounted LED LCD LED 3 SD 4 PC 4 1 USB USB U LCD 4 2 U PCO web cam U PCO web cam PCC Windows XP SP3 5 Cam 1 2 SD TIM...

Page 24: ...ir NASIL KULLANILACA INI ANAHAT Kamera a t ktan sonra g d mesi i levini kullanabilirsiniz a a daki yollarla s rayla ge i Video kay t modunda ve bir ara zerine monte edilmi kay t fla g stergesi al ma I...

Page 25: ...mesine her 3 dakikada bir kay t i in bir segment kaydetmek daha sonra video bir sonraki b l m n kaydetmeye ba layabilirsiniz SD kart doldu unda videonun ilk b l m devam kayda kar l k alan n bo altmak...

Page 26: ...nuo veiksm kamera status PARODYTI KAIP NAUDOTI jungus fotoaparat galite naudoti maitinimo mygtukas funkcija pereiti i eil s iais b dais vaizdo ra ymo re imu ir pritvirtinus prie transporto priemon s p...

Page 27: ...ustos mirks ti nurodant ra o pabaig Paspauskite u rakto mygtuk vien kart per i ros re imu Nor dami prad ti ra ym i saugoti registravimo kas 3 minutes segment tada prad kite ra ym kit segment video Kai...

Page 28: ...varieeruda staatuse kohta Action Cam KIRJELDADA KUIDAS KASUTADA P rast kaamera sissel litamist saate kasutada l lituda j rjestusega j rgmistest viisides In video salvestamise re iim ja s idukile paiga...

Page 29: ...ise Samal ajal sinine LED vilkumise n idates l puks salvestamist Vajutage p stikunupp kord eelvaate re iimis et alustada salvestamist v lja arvatud segment registreerimise iga 3 minuti tagant siis sal...

Page 30: ...at irties atkar b no t ar r c bas Cam IZKL ST T K IZMANTOT P c pagrieziena uz kameru j s varat izmantot baro anas poga funkcija p riet sec gi dos veidos Ar video ierakst anas re mu un uzst d ts uz tr...

Page 31: ...spiediet sl d a pogu vienreiz priek skat juma re m lai s ktu ierakst anu saglab jiet segmentu re istr anas ik p c 3 min t m p c tam s k ierakst t n kamo segmentu video Kad SD karte ir pilna pirmais se...

Page 32: ...11 Reset LCD DISPLAY Action Cam The LCD 1 Camera mode 2 3 4 SD 5 HI 5 2592x1944 720p 1280x720 LO 1280x960 640P 640x480 6 7 Counter 9999 8 Action Cam Light Action Cam 1 SD SDHC 4 SD 8GB 1 2 16 Gb 32 GB...

Page 33: ...80x720 30fps Lo 640P 640x480 60 1 SD Action Cam 2 Action Cam Camera 9999 9999 3 Recording Vehicle 3 SD 4 4 1 Action Cam USB USB Cam U LCD 4 2 U PCO PCC The LCD U PCC Windows XP SP3 5 Setting Cam 1 2 S...

Page 34: ...ARA POWER BUTTON MODE SWITCH POWER BUTTON MODE SWITCH MODE SWITCH POWER BUTTON...

Page 35: ...v v v...

Page 36: ...TTACTIONCAMDG...

Reviews: