


64 SawStop
®
10” Industrial Cabinet Saw
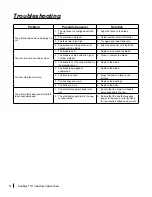
Making Adjustments to Your Saw
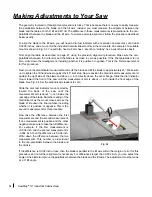
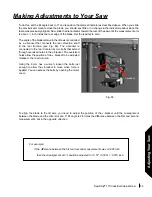
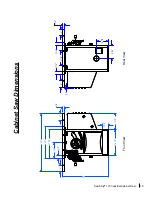
Next, remove the spreader and install the riving knife. Loosen the vertical positioning bolts using the included
5 mm hex L-wrench. Loosen the bolts just enough to allow the clamp to slide up and down on the clamp
mounting bracket. Reinstall the blade.
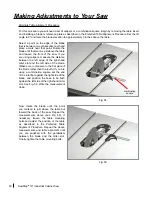
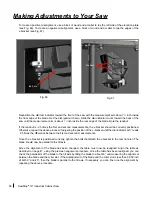
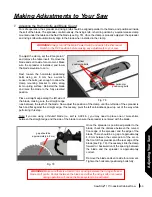
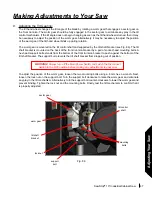
The top of the riving knife should be between
1-5 mm below the top of the blade (see Fig. 80).
This allows the riving knife to be used on rabbet cuts
and other non-through cuts. In addition, the arc on
the front of the riving knife should be approximately
concentric with the blade.
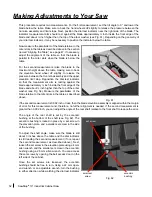
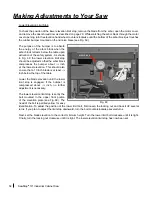
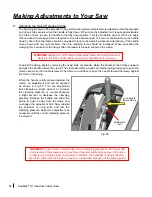
To check the height of the riving knife relative to the
blade, lower the blade elevation until the lower limit
stop is engaged. Place a ruler or another straight
edge on the table so that it lies across the width of
the table insert and directly above the tip of the riving
knife. Raise the blade elevation until the tip of the
riving knife just comes in contact with the straight edge or ruler (see Fig. 81). Now measure the distance from
the top of the table to the top of the blade. If the height of the riving knife is set correctly, the saw blade should
be between 1-5 mm above the table. If the distance is between 1-5 mm, no further adjustments are necessary.
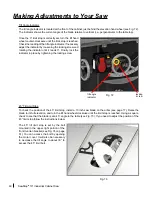
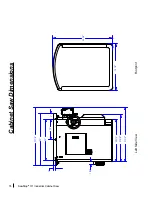
Adjusting the Height of the Riving Knife
If the height of the riving knife is not correct,
use the elevation handwheel to set the top of
the blade to be between 1-5 mm above the top
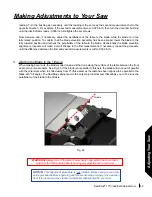
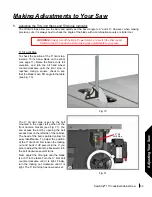
of the table. Next, remove the table insert and
loosen the two vertical positioning bolts shown
in Fig. 78 using the included 5 mm hex key.
Loosen the bolts just enough so that you can
move the clamp up and down on the clamp
mounting bracket.
Next, adjust the position of the clamp up or
down to set the height of the riving knife. You
can also rotate the clamp forward or backward
so that the arc on the front edge of the riving
knife is concentric with the blade. When the
riving knife is correctly positioned, tighten the two vertical positioning bolts just enough to hold the clamp
in position and reinstall the table insert. Check to make sure the tip of the riving knife is level with the table.
Repeat the adjustment if necessary. Once the vertical alignment of the riving knife is correct, fully tighten the
two vertical positioning bolts on the clamp.
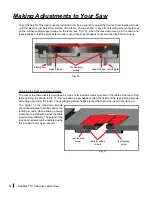
In some cases, adjusting the vertical alignment may cause the spacing between the front edge of the riving
knife and the teeth of the blade to be incorrect. If this happens, repeat the steps explained above to adjust the
gap between the front edge of the spreader and the teeth of the blade so that it is 4-8 mm.
Once the clamp has been properly positioned, further adjustment should not be necessary. Both the spreader
and riving knife will now automatically align when installed in the clamp.
Fig. 80
between
1-5 mm
Fig. 81
tip of riving knife
saw blade tooth


