background image

Key Operator Settings

50

6

Using Key Operator Settings

This chapter explains about functions
the key operator handles.

Memory Lock

This is a security function to prevent
unauthorized individuals from read-
ing  printed  fax  messages.  When
Memory Lock is switched on, all re-
ceived messages are stored in memo-
ry and are not automatically printed.
To print the messages, you have to
enter the Memory Lock ID.

Note

Before  you  can  use  this  function,
you  must  register  the  Memory
Lock ID. See p.66 “ID Code” 

Limitation

Memory  Lock  cannot  be  selected
until  you  have  registered  the
Memory Lock ID. 

To  use  this  function  you  must
switch Memory Lock on after you
register the Memory Lock ID.

You can select to lock only messag-
es from Specified Users, or you can
select to lock messages from send-
ers other than from Specified Us-
ers. See p.58 “User Parameters”
(switch 09, bits 1 and 0). 

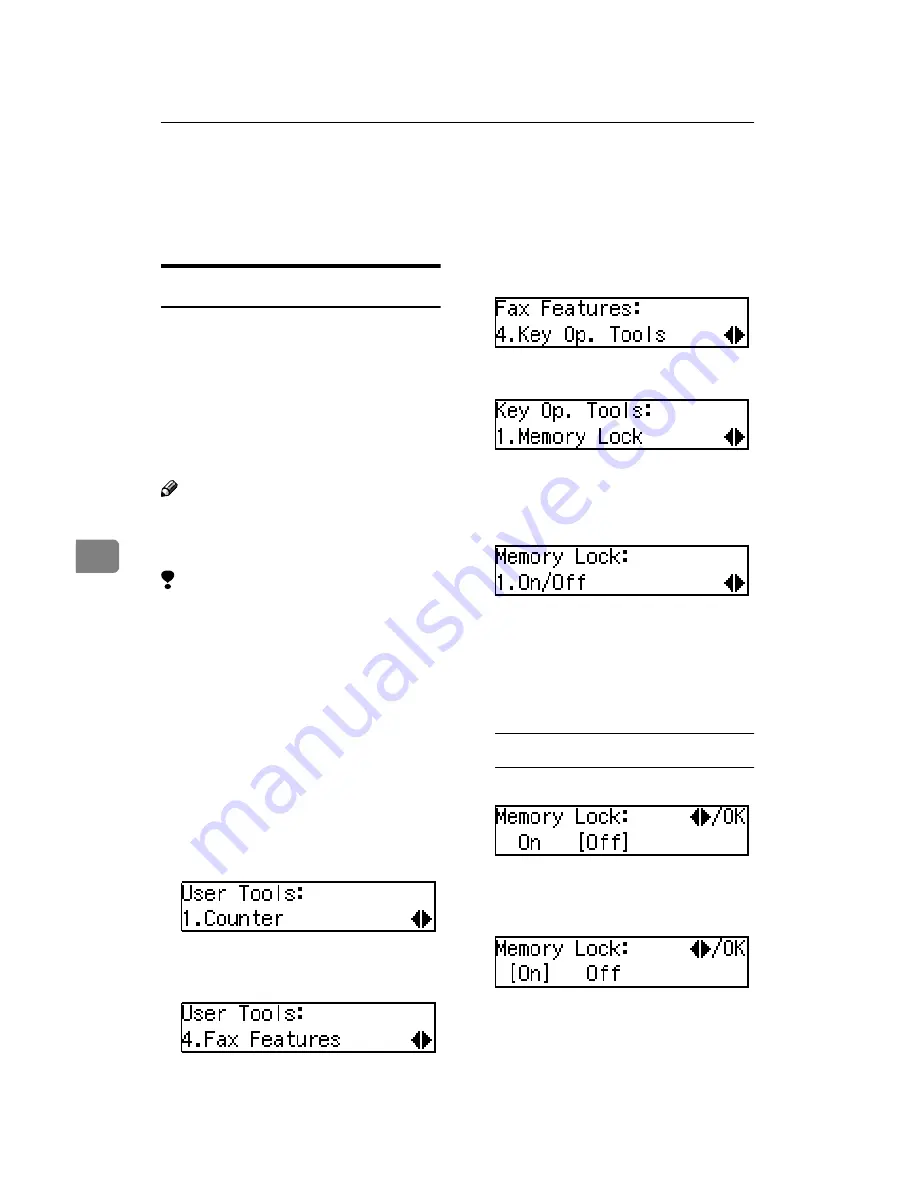
AAAA

Press the 

{{{{

User Tools

}}}}

 key.

BBBB

Press 

0

0

0

0

  or 

1

1

1

1

  until  "  4.  Fax  Fea-

tures " is displayed.

CCCC

Press the 

{{{{

OK

}}}}

 key.

DDDD

Press 

0

0

0

0

  or 

1

1

1

1

  until  "  4.  Key  Op.

Tools " is displayed. 

EEEE

Press the 

{{{{

OK

}}}}

 key. 

Confirm that " 1. Memory Lock " is
displayed. 

FFFF

Press the 

{{{{

OK

}}}}

 key. 

GGGG

Follow  the  procedures  below  to
switch Memory Lock On/Off, reg-
ister a Specified Sender, delete a
Specified Sender, or print a list of
Specified Senders.

Switching Memory Lock On/Off 

A

A

A

A

Press the 

{{{{

OK

}}}}

 key. 

B

B

B

B

Press 

0

0

0

0

 or 

1

1

1

1

 to "On" to switch

this function on, or select "Off"
to switch this function off. 

C

C

C

C

Press the 

{{{{

OK

}}}}

 key. 

Summary of Contents for G1619

Page 1: ...s Facsimile Reference Basic Features Read this manual carefully before you use this product and keep it handy for future reference For safety please follow the instructions in this manual Advancedd Fe...

Page 2: ...tes Some illustrations might be slightly different from your machine Certain options might not be available in some countries For details please contact your local dealer Two kinds of size notation ar...

Page 3: ...munications However there is no guarantee that interference will not occur in a particular installation If this equipment does cause harmful interference to radio or television reception which can be...

Page 4: ...nsmission the date and time it is sent and an identification of the business other entity or other individual sending the message and the telephone number of the sending machine or such business other...

Page 5: ...disposal instructions Save these instructions Certalnes mesures de s curit doivent tre prises pendant l utilisation de mat ri al t l phonique afin de r duire les risques d incendle de choc lectrique...

Page 6: ...ine without following the instructions under this symbol Be sure to read the instructions all of which are described in the Safety Information section in the Copy Reference manual The statements above...

Page 7: ...s about erasing a fax message stored in memory and checking the con tents of any files in memory Chapter 3 Other Transmission Features Explains about useful features for transmission You can find out...

Page 8: ...13 Placing a Single Original on the Exposure Glass 14 Loading Originals in the Document Feeder 14 Original Sizes Difficult to Detect 15 Memory Transmission 16 Canceling a Memory Transmission 19 Before...

Page 9: ...y Label Dial label 42 Speed Dial 44 Registering 44 Editing 46 Deleting 47 Groups 49 Registering 49 Editing 52 Deleting 55 Entering Characters 59 Available Characters 59 Keys 59 How to Enter Characters...

Page 10: ...viii...

Page 11: ...pe1 Type1 Type2 Copy Speed 12 copies minute A4 81 2 11 13 copies minute A4 81 2 11 13 copies minute A4 81 2 11 Paper Capacity for Bypass Tray 1 sheet 100 sheets 100 sheets Paper Tray Unit Not availabl...

Page 12: ...ver when you set a document on the expo sure glass 4 Handset Option This permits voice communication 5 main power switch If the machine does not operate after turning on the operation switch check if...

Page 13: ...off press this switch again the On indicator goes off See p 6 Turning On the Power 7 Paper Tray Set paper here 8 Paper Tray Unit Option for Mod el B Only You can set more paper here Side View 1 Bypas...

Page 14: ...Cancel key Press to cancel an operation or return to the previous display 9 LCD display This guides you through tasks and in forms you of the machine status A mes sage appears here 10 0 0 0 0 1 1 1 1...

Page 15: ...dialing or storing a fax number A pause cannot be inserted as the first digit Redial Press to redial one of the last ten num bers 22 On Hook Dial key Use to dial a number from the numeric keypad with...

Page 16: ...e operation switch check if the main power switch is turned on If it is off turn it on Important Fax files stored in memory can be kept for 12 hours after the main power is switched off if the ma chin...

Page 17: ...may be canceled and incoming fax documents cannot be received Nor mally only the service representative operates this switch When you have to turn off this switch for some rea son follow the procedur...

Page 18: ...set this machine to display facsimile mode immediately after the oper ation switch is turned on See Chapter 2 Settings You Can Change with the User Tools in the System Settings manual Limitation You...

Page 19: ...n select the period in Fax Reset Timer See Chapter 5 Setting the Fax Reset Timer in the Advanced Features manual Reading the Display and Using Keys A Display for the machine status or currently select...

Page 20: ...y If you are in User Tools mode press the User Tools key or the Cancel key Communication Display While the machine is communicating the status is displayed Display during Memory Transmission or Recept...

Page 21: ...scan ning It is convenient when you would like to send a document immedi ately and would like to check whether you have successfully connected with the other party s fax machine A fax document is not...

Page 22: ...ory Trans key is lit Memory Transmission is selected Note You can set whether the machine is in Memory Transmission mode or Immediate Transmission mode right after the power is turned on with the User...

Page 23: ...t at the other end depends on the size and direction of paper used in the receiver s terminal If the receiver does not use paper of the same size and direction as that of the original the fax image si...

Page 24: ...ment Feeder Use the Document Feeder to scan in a stack of originals in one operation The Document Feeder can handle sin gle sided originals Limitation The maximum document length is 1260mm 49 6 with m...

Page 25: ...ginals with any kind of coating such as thermosensitive paper art paper aluminum foil carbon pa per or conductive paper Originals with index tabs tags or other projecting parts Sticky originals such a...

Page 26: ...deleted files If you turn just the operation switch off files are not deleted Limitation If memory is full 0 appears on the display Memory Transmis sion is disabled Use Immediate Transmission instead...

Page 27: ...Reference p 13 Setting Originals C C C C Select any scan settings you re quire See p 24 Scan Settings D D D D Dial If you wish to send the same message to more than one desti nation press the OK key...

Page 28: ...re glass face down B B B B Dial C C C C Press the Start key The machine starts scanning the original D D D D Place the next original on the exposure glass within 60 sec onds after the machine has fin...

Page 29: ...on Use this procedure to cancel a trans mission after the original has been scanned Limitation If transmission finishes while you are carrying out this procedure it will not be canceled Note If you ca...

Page 30: ...be canceled even if you cancel the transmis sion The transmission may be sent before you can cancel it even if you start canceling the transmis sion before it is fully sent A A A A Press the Job Info...

Page 31: ...right after the power is turned on with the User Parameters The machine does not redial with immediate transmission A A A A Check that the Memory Trans mission indicator is not lit If it is lit press...

Page 32: ...ss A A A A Place the first page face down on the exposure glass B B B B Dial C C C C Press the Start key The machine starts scanning the original D D D D Place the next original on the exposure glass...

Page 33: ...des key Note When you have already set the original you can also cancel an Immediate Transmission by re moving the original from the machine After the Start key is Pressed A A A A Press the Clear Stop...

Page 34: ...mm 200 100dpi Select for originals containing nor mal sized characters Detail 8 7 7lines mm 200 200dpi Select for originals containing small characters or when you re quire greater clarity This resol...

Page 35: ...en Text is selected If you send a fax message with Photo and the background of the received image is dirty reduce the density setting and re send the fax When the machine is turned on or modes are cle...

Page 36: ...ax number with the number keys The digits appear on the display as you enter them Note If you make a mistake press the Clear Stop key and enter again If you wish to send this message to more than one...

Page 37: ...You can insert a pause in numbers stored in Quick Dials and Speed Dials Tone This function allows a machine con nected to a pulse dialing line to send tone signals for example if you want to use a spe...

Page 38: ...ode 00 to 49 You must store the destination s fax number in a Speed Dial beforehand Additionally you can store a name for the destination in Speed Dials Note To register edit or delete Speed Dial entr...

Page 39: ...Group name in Groups The method for specifying Groups differs according to the way they were programmed When programmed in a Quick Di al Press the Quick Dial key When not programmed in a Quick Dial Fi...

Page 40: ...D D D Press the Start key When Specifying a Group with the Group key Make sure that the Memory Trans mission indicator is lit if not press the Memory Trans key to light it Note You must program the Gr...

Page 41: ...ng Auto Select In this mode the machine rings a number of times You can answer the call while the machine is ring ing If you do not answer the call the machine automatically chang es to receive fax me...

Page 42: ...c tive Ring Each number will have a different ringing pattern This is use ful for distinguishing a fax from a telephone call Please contact your telephone compa ny for details After making a contract...

Page 43: ...Your fax header can be up to 32 characters long and is printed on the header of ev ery page you send Own Fax Number Required by inter national law This is your fax machine s phone number which must i...

Page 44: ...ed E E E E Press the OK key F F F F Press 0 0 0 0 or 1 1 1 1 until 6 Fax Infor mation is displayed G G G G Press the OK key Confirm that 1 Own Name is displayed H H H H Press the OK key I I I I Enter...

Page 45: ...nterna tional Dial Prefix Your Country Code Your Area Code do not insert a pause after your Area Code followed by your tele phone number Check the Inter national Dialing Prefix and the Country Code wi...

Page 46: ...it I I I I Press the OK key J J J J Press the Clear Stop key and then reenter the Number or Name K K K K Press the OK key L L L L Press the User Tools key to re turn to standby display Deleting The fo...

Page 47: ...6 Fax Infor mation is displayed G G G G Press the OK key H H H H Press 0 0 0 0 or 1 1 1 1 to select the item that you want to delete I I I I Press the OK key J J J J Press the Clear Stop key K K K K P...

Page 48: ...We recommend that you print the Quick Dial list and keep it when you program or change fax num bers See Chapter 5 Printing Re ports Lists in the Advanced Features manual Limitation When a registered...

Page 49: ...x number and then press the User Function key that contains the Dial Option You can specify SUB or SEP SID and PWD See Chapter 3 SEP Code or SUB Code in the Advanced Features manual H H H H Press the...

Page 50: ...number of the Quick Dial key you want to edit Press a Quick Dial key or search using 0 or 1 G G G G Press the OK key H H H H Press the Clear Stop key and then reenter the fax number with the number ke...

Page 51: ...Quick Dial or Speed Dial to be printed on the fax when it is received at the other end See Chapter 1 Label Insertion in the Advanced Fea tures manual M M M M Press the OK key If you want to store ano...

Page 52: ...ber and name is deleted If you want to delete another Quick Dial key go to step F I I I I Press the User Tools key to re turn to standby display Quick Dial Key Label Dial label You can print a templat...

Page 53: ...Quick Dial 43 3 Label paper 1 Quick Dial key number 2 Destination name...

Page 54: ...e recommend that you print the Speed Dial list and keep it when you register or change a destination Limitation When a registered Speed Dial is be ing used for a standby Memory Transmission the messag...

Page 55: ...want to specify and then press the OK key I I I I Press the OK key The fax number is programmed J J J J Enter the Destination name Note If a destination name is already registered in the Speed Dial t...

Page 56: ...ed Dial you want to edit 00 to 49 Enter the Speed Dial number with the number keys or search using 0 or 1 H H H H Press the OK key I I I I Press the Clear Stop key and then reenter a fax number with t...

Page 57: ...mber go to step F O O O O Press the User Tools key to re turn to standby display Deleting The following procedure describes how to delete fax numbers in Speed Dials Limitation If a registered Speed Di...

Page 58: ...ou want to delete 00 to 49 Enter the Speed Dial number with the number keys or search using 0 or 1 The Speed Dial number and the fax number or name are displayed H H H H Press the OK key The programme...

Page 59: ...le Groups a maximum of five can be stored in a Group key thus leaving the Quick Dial keys to be used more effectively Registering You can register the following items in a Group Destination fax number...

Page 60: ...1 1 1 until 5 Prog Group Dial is displayed F F F F Press the OK key G G G G Display the number of the Group you want to register 1 to 5 Enter the group number with the number keys or search using 0 o...

Page 61: ...to K K K K for all the des tinations you want to register in the Group M M M M Enter the Group name Note If the Group name is already registered it is shown on the display If you wish to change the G...

Page 62: ...1 until 4 Fax Fea tures is displayed C C C C Press the OK key Confirm that 1 Program Delete is displayed D D D D Press the OK key E E E E Press 0 0 0 0 or 1 1 1 1 until 5 Prog Group Dial is displayed...

Page 63: ...Quick Dial key and then the OK key O O O O Press the OK key If you want to program another group name go to step F P P P P Press the User Tools key to re turn to standby mode Adding a Fax Number to a...

Page 64: ...cify the destination using one of the following three methods Enter the fax number with the number keys Press a Quick Dial key Press the Speed Dial key and en ter a Speed Dial number Note If you speci...

Page 65: ...estina tion to the group go to step F V V V V Press the User Tools key to re turn to standby mode Deleting The following procedure describes how to delete a destination from a group When you delete a...

Page 66: ...te L L L L Press the OK key M M M M Press 0 0 0 0 or 1 1 1 1 to display the desti nation you want to delete N N N N Press the OK key To delete another destination re peat steps L to N O O O O If you a...

Page 67: ...or 1 1 1 1 until 4 Fax Fea tures is displayed C C C C Press the OK key Confirm that 1 Program Delete is displayed D D D D Press the OK key E E E E Press 0 0 0 0 or 1 1 1 1 until 6 Del Group Dial is di...

Page 68: ...0 or 1 to display 5 Prog Group Dial E Press the OK key F Enter the group number 1 to 5 G Press the OK key H Press 0 or 1 to select No and then press the OK key I Press the OK key J If you want to cha...

Page 69: ...displayed For ex ample when you press Quick Dial 01 let ters in display are changed A B C A as you press the key Press 1 to move cursor and enter next one 2 Shift key Quick Dial 14 Use to switch betwe...

Page 70: ...cter is shown left of the cursor position B B B B Press the OK key Wild Cards When you register other party s Own Name or Own Fax Numbers for mul tiple destinations you can register a sequence of char...

Page 71: ...o the destination Key Tone Sounds when keys on the Control panel are pressed Alarm The sound to signal something go ing amiss A A A A Press the User Tools key B B B B Press 0 0 0 0 or 1 1 1 1 until 4...

Page 72: ...H H H H Press 0 0 0 0 or 1 1 1 1 to adjust the vol ume I I I I Press the OK key The volume is adjusted If you want to adjust another item repeat steps G to I J J J J Press the User Tools key to re tur...

Page 73: ...sion Press the OK key and then resend the original Note There may be a problem with the machine or the telephone line for example noise or cross talk If the error re occurs frequently contact your ser...

Page 74: ...Facsimile key and read the message If h is lit refer to the table below and take the appropriate action Problem Solution Paper has run out Add paper See Chapter 3 Loading Paper in the Copy Reference A...

Page 75: ...on Status Solution Paper has run out h is lit red Add paper See Chapter 3 Loading Paper in the Copy Reference Toner is empty h is lit red Replace the toner cartridge See Chapter 3 Changing the Toner C...

Page 76: ...ppears on the display toner is beginning to run out Replace the toner cartridge soon Reference See Chapter 3 Changing the Toner Cartridge in the Copy Reference Message appears blank at the other end T...

Page 77: ...Directly 26 Using Groups 29 Using Quick Dials 27 Using Speed Dials 28 Dial label 42 Display 9 Document Feeder ADF 2 14 E Editing Fax Header 35 Groups 52 Own Fax Number 35 Own Name 35 Quick Dial 40 Spe...

Page 78: ...Dialing 27 Dial label 42 Editing 40 Registering 38 Quick Dial keys 4 R Receive File Indicator 4 65 Reception Mode Selecting 31 Reception Modes Auto Receive 31 Auto Select 31 Manual Receive 31 Register...

Page 79: ...69 V Volume 61 W Wild Cards 60...

Page 80: ...70 MEMO...

Page 81: ...71 MEMO...

Page 82: ...72 UE USA B465 MEMO...

Page 83: ...ne without following the instructions under this symbol Be sure to read the instructions all of which are described in the Safety Information section in the Copy Reference manual The statements above...

Page 84: ...the parts of the control panel and machine Chapter 2 Faxing Explains basic transmission You can also learn about other types of transmis sions Chapter 3 Registering Explains how to make initial setti...

Page 85: ...11 Printing a Memory locked Message 12 Printing the Journal 13 Report Formats 14 3 Other Transmission Features Handy Dialing Functions 15 Chain Dial 15 Telephone Directory 16 Redial 16 On Hook Dial 1...

Page 86: ...ages in Telephone Mode 29 Auto Fax Reception Power up 29 Printing Options 30 Center Mark 30 Checkered Mark 30 TSI Print 30 Reception Time 31 Page Separation and Length Reduction 31 When There is No Pa...

Page 87: ...S Remote Diagnostic System 70 7 Troubleshooting Reading Reports 71 Error Report 71 Power Failure Report 71 8 Appendix Connecting to a Telephone Line and a Telephone 73 Connecting the Optional Handset...

Page 88: ...vi...

Page 89: ...ings you require C C C C Press the Transmission Option key D D D D Confirm that 1 Send Later is displayed E E E E Press the OK key F F F F Press 0 0 0 0 or 1 1 1 1 to select On G G G G Press the OK ke...

Page 90: ...ed time is set L L L L Specify the destination If you want to specify another des tination press the OK key and repeat step L M M M M Press the Start key Note You can cancel a message trans mission se...

Page 91: ...the Fax Header Register the fax number and switch on Fax Header Print with the User Parameters See p 58 User Parameters Switch06 Bit0 A A A A Make sure that the machine is in Facsimile mode and the s...

Page 92: ...ur personal code will also appear on the page From is automatically inserted before your personal code This function is available when per sonal code is registered and the Re stricted Access is turned...

Page 93: ...ng in the transmit ting machine with matching ID s If no ID s match any messages that does not require an ID are received Free Polling Limitation Polling Reception requires that the other machine can...

Page 94: ...s Note You can enter A to F by the Quick Dial keys You can enter 0 to 9 by the number keys 0000 and FFFF can not be en tered If you make a mistake press the Clear Stop key and try again H H H H Press...

Page 95: ...nction on or off with the User Parameters See p 58 User Parameters Switch03 Bit3 Communication Result Report Polling RX This report is printed after a Polling Reception has been completed and shows th...

Page 96: ...Transmission Options 8 1...

Page 97: ...n firm the transmission files stored in memory Reference For details about Memory Trans mission and Polling Reception see Chapter 2 Memory Transmis sion in the Basic Features manual and p 5 Calling to...

Page 98: ...Note The contents of an original stored in memory can also be printed See p 11 Printing a Stored Message Print TX File A A A A Make sure that the machine is in Facsimile mode and the standby display...

Page 99: ...Press the Job Information key The Information menu is shown C C C C Press 0 0 0 0 or 1 1 1 1 until 3 Print TX File is displayed and then press the OK key D D D D Display the file you want to print Th...

Page 100: ...are automatically printed even if this function is switched on If the main power switch is turned off for more than 12 hours all mes sages protected by Memory Lock are deleted If this happens use the...

Page 101: ...he Journal is useful when you need to register a Specified Sender If you do not want the Journal to be printed automatically you can turn au tomatic printing off See p 58 User Parameters switch 03 bit...

Page 102: ...he type of communication These codes are explained on the bottom of the report 2 The Result Column OK Successful communication E An error occurred D Power Failure 3 The Footnote on the Journal Transmi...

Page 103: ...Speed Dial 0 1 5551234 Limitation Maximum length of telephone or fax number 254 digits Note For Memory Transmission and Im mediate Transmission insert a pause between numbers For On Hook Dial and Man...

Page 104: ...s played and then press the OK key Note If you make a mistake press the Cancel key and try again If you wish to dial another des tination press the OK key and dial another fax number E E E E Press the...

Page 105: ...ely dials the destination If you make a mistake press the On Hook Dial key and re turn to step B Note You can change the volume of sound with 0 or 1 D D D D When the line is connected and you hear a h...

Page 106: ...e lect any scan settings you require B B B B Pick up the external telephone You will hear a tone C C C C Dial If you make a mistake replace the external telephone and try again from step B D D D D Whe...

Page 107: ...s Messages you receive using this function are marked SEP on all reports When you send a fax message with SEP Code to other makers ma chines sometimes a password PWD is necessary Use PWD when it is ne...

Page 108: ...function to a User Function key be forehand See p 35 User Function Keys Note The ID can be up to 20 digits long and consist of numbers spaces q q q q and p p p p Make sure the ID matches the specifica...

Page 109: ...with the Dial Option function B B B B Press 0 0 0 0 or 1 1 1 1 until 3 SID is displayed C C C C Press the OK key D D D D Enter the SID code with the number keys E E E E Press the OK key H H H H Press...

Page 110: ...nd press the OK key Checking the Transmission Result Turn on the printing of the Com munication Result Report if you want a report to be printed after every successful transmission See p 25 Printed Re...

Page 111: ...destinations the fax message has been sent to so far print the TX file list Automatic Redial If a fax message could not be trans mitted because the line was busy or an error occurred during transmis...

Page 112: ...In addition this function scans the orig inal faster than Immediate Transmis sion and is useful when you are in a hurry and need to use the original for another purpose Note You can switch this functi...

Page 113: ...if an original could not be stored Note File Reserve Report will not be printed with Parallel Memory Transmission Communication Result Report Switch 03 Bit 0 This report is printed when a Memo ry Tra...

Page 114: ...have a record of whether the trans mission was successful or not If the machine is set up not to print this re port and the fax message could not be successfully transmitted the error re port is prin...

Page 115: ...e current communication is ter minated Memory Reception The machine waits until all pages of the message have been received into memory before printing the message This method is used with Substitute...

Page 116: ...e and the current communication is ter minated Screening Out Messages from Anonymous Senders To help you screen out unwanted messages that may fill up your mem ory the machine can be programmed to onl...

Page 117: ...from the feeder Note If the function of Manual Recep tion is registered to the User Function Key press the User Function key and receive the message then go to H D D D D Make sure that the machine is...

Page 118: ...02 Bit 1 See p 58 User Parame ters Checkered Mark When this function is turned on a checkered mark is printed on the first page of fax messages to help you sep arate them Note You can turn this funct...

Page 119: ...ch page of the message can be split and printed on several sheets or reduced and printed on a single sheet For example When the paper size is A4 L this function splits the message if the message lengt...

Page 120: ...and 81 2 11 L installed and you re ceive a A5K size message check the A5K column of the table below The paper size at the top has the highest priority In this case since 81 2 11 L is a higher priority...

Page 121: ...Printing Options 33 4 Limitation The paper size used to print a received message may be different from the size of the sent original Reference p 31 Page Separation and Length Reduction...

Page 122: ...Reception Features 34 4...

Page 123: ...chine and a telephone but you wish to answer all calls yourself and decide whether they are fax messages or telephone calls See Chapter2 Reception Modes in the Basic Fea tures manual Reception Mode Us...

Page 124: ...ress the User Function key F1 to F3 you want to assign H H H H Press 0 0 0 0 or 1 1 1 1 to display the func tion name you want to assign Dial Option Use this function to attach various information to...

Page 125: ...on is reg istered The display changes for each as signed function Deleting a User Function Key To delete a User Function key per form the following procedure A A A A Press the User Tools key B B B B P...

Page 126: ...I I I I Press 0 0 0 0 or 1 1 1 1 to display None J J J J Press the OK key If you want to delete another User Function key repeat the above steps from step G K K K K Press the User Tools key The machin...

Page 127: ...k Dial List Speed Dial List and Group Dial List Quick Dial Label See Chapter 3 Quick Dial in the Basic Features manual User Function List See p 35 User Function Keys A A A A Press the User Tools key B...

Page 128: ...u make a mistake press the Cancel key and try again Printing the Group Dial List A A A A Press 0 0 0 0 or 1 1 1 1 until 3 Dial List is displayed B B B B Press the OK key C C C C Press 0 0 0 0 or 1 1 1...

Page 129: ...ote If you make a mistake press the Cancel key and try again Printing the User Function List A A A A Press 0 0 0 0 or 1 1 1 1 until 5 U Func tion List is displayed B B B B Press the OK key Note If you...

Page 130: ...Fea tures is displayed C C C C Press the OK key D D D D Press 0 0 0 0 or 1 1 1 1 until 3 Setup is displayed E E E E Press the OK key F F F F Press 0 0 0 0 or 1 1 1 1 until 2 Display Contrast is displa...

Page 131: ...layed C C C C Press the OK key D D D D Press 0 0 0 0 or 1 1 1 1 until 3 Setup is displayed E E E E Press the OK key F F F F Press 0 0 0 0 or 1 1 1 1 until 3 Date Time is displayed G G G G Press the OK...

Page 132: ...Facsimile User Tools 44 5 Q Q Q Q Press the OK key After Function Accepted flashes briefly in the display the next set ting is displayed R R R R Press the User Tools key to re turn to standby display...

Page 133: ...ls key B B B B Press 0 0 0 0 or 1 1 1 1 until 4 Fax Fea tures is displayed C C C C Press the OK key D D D D Press 0 0 0 0 or 1 1 1 1 until 3 Setup is displayed E E E E Press the OK key F F F F Press 0...

Page 134: ...y B B B B Press 0 0 0 0 or 1 1 1 1 until 4 Fax Fea tures is displayed C C C C Press the OK key D D D D Press 0 0 0 0 or 1 1 1 1 until 3 Setup is displayed E E E E Press the OK key F F F F Press 0 0 0...

Page 135: ...Press the User Tools key B B B B Press 0 0 0 0 or 1 1 1 1 until 4 Fax Fea tures is displayed C C C C Press the OK key D D D D Press 0 0 0 0 or 1 1 1 1 until 3 Setup is displayed E E E E Press the OK...

Page 136: ...Facsimile User Tools 48 5...

Page 137: ...Before us ing the fax machine users must enter the Personal Code This allows you to limit transmission to specified users p 63 Personal Codes 5 ID Code Allows you to register IDs required for various...

Page 138: ...gister the Memory Lock ID You can select to lock only messag es from Specified Users or you can select to lock messages from send ers other than from Specified Us ers See p 58 User Parameters switch 0...

Page 139: ...ified Sender repeat from step B Deleting a Specified Sender for Memory Lock You can delete Specified Senders for this function A A A A Press 0 0 0 0 or 1 1 1 1 to select 3 De lete Sender B B B B Press...

Page 140: ...ster or change a re ceiver or sender Limitation This function only works if the in coming message is from another party that has been programmed as a Specified Sender The Forwarding function does not...

Page 141: ...ing Station is displayed Press the OK key and then register a forwarding station by follow ing steps J to P on p 53 Regis tering Forwarding Stations K K K K Press the User Tools key to re turn to the...

Page 142: ...1 1 to select Yes R R R R Press the OK key To register another Specified Send er repeat the above steps from step N To register a different Forwarding Station press the Cancel key and repeat the above...

Page 143: ...t to edit another For warding Station press the Can cel key and repeat the above steps from step I N N N N Press the User Tools key to re turn to the standby display Editing a Specified Sender To edit...

Page 144: ...following procedure A A A A Press the User Tools key B B B B Press 0 0 0 0 or 1 1 1 1 until 4 Fax Fea tures is displayed C C C C Press the OK key D D D D Press 0 0 0 0 or 1 1 1 1 until 4 Key Op Tools...

Page 145: ...registered for a Forwarding Address Follow the steps below to print this list A A A A Press the User Tools key B B B B Press 0 0 0 0 or 1 1 1 1 until 4 Fax Fea tures is displayed C C C C Press the OK...

Page 146: ...d the left most is bit 7 The User Parameter switches are outlined below Bit Number 7 6 5 4 3 2 1 0 Bit Value 0 1 0 0 0 0 0 0 Switch Bit Item 1 0 00 3 2 1 Image density adjustment level home position t...

Page 147: ...0 Automatic printing of the Communication Result Re port Memory TX On Off 2 Automatic printing of the File Reserve Report Mem ory TX On Off 3 Automatic printing of the File Reserve Report Poll ing RX...

Page 148: ...g for Batch Transmission BATCH TRANSMISSION On Off 07 2 Parallel Memory Trans mission On Off 4 Assign the Tone key as the key on the operation panel TONE SWITCH BY AS TERISK KEY On Off 08 6 Forwarding...

Page 149: ...1 1 until 4 Fax Fea tures is displayed C C C C Press the OK key D D D D Press 0 0 0 0 or 1 1 1 1 until 4 Key Op Tools is displayed E E E E Press the OK key F F F F Press 0 0 0 0 or 1 1 1 1 until 3 Us...

Page 150: ...ss the User Tools key to re turn to the standby display Printing the User Parameter List Print this list to see the current User Parameter settings A A A A Press the User Tools key B B B B Press 0 0 0...

Page 151: ...register up to 10 Personal Codes Each Personal Code name can be up to 20 characters long Registering and Editing A A A A Press the User Tools key B B B B Press 0 0 0 0 or 1 1 1 1 until 4 Fax Fea ture...

Page 152: ...0 0 0 or 1 1 1 1 until 2 Delete is displayed I I I I Press the OK key J J J J Press 0 0 0 0 or 1 1 1 1 to display the Per sonal Code you want to delete K K K K Press the OK key The Personal Code is de...

Page 153: ...es it possible to monitor machine usage by user or department Preparation In order to use this function you need to register the Personal Code and turn this function on with the User Parameters before...

Page 154: ...uick Dial keys You can enter 0 to 9 by the num ber keys 0000 and FFFF can not be en tered Memory Lock ID This ID is required for printing a message received using the Memo ry Lock function See p 12 Pr...

Page 155: ...r Line Type is Tone if it was not set the Line Type to Pulse and dial a trial number If the connection was suc cessful your Line Type is Pulse Limitation If you do not correctly set the Line Type you...

Page 156: ...u have registered PSTN access number select the line to PABX on User Parameters Switch 13 Bit 0 To register an PSTN access number perform the following procedure A A A A Press the User Tools key B B B...

Page 157: ...ry regardless of whether for warding was successful or not Details of the forwarding opera tion are not printed in the Journal To transfer all of the messages cur rently stored in memory perform the f...

Page 158: ...some of your machine s settings if you request it A A A A Press the User Tools key B B B B Press 0 0 0 0 or 1 1 1 1 until 4 Fax Fea tures is displayed C C C C Press the OK key D D D D Press 0 0 0 0 o...

Page 159: ...out 12 hours through the main power switch being turned off a power cut or the power cable being removed contents of the Fax memory will be lost Lost items will include any fax messages stored in memo...

Page 160: ...Troubleshooting 72 7...

Page 161: ...e sure the connector is the correct type before you start By law in the United States you must program your phone number identifi cation your OWN FAX NUMBER into your machine before you can connect th...

Page 162: ...mitation When you use the handset or an optional external telephone with the On Hook Dial key for tele phone calls you can not talk with the other party without pressing the On Hook Dial or Clear Stop...

Page 163: ...49 6 Standard and Detail 216 600mm 8 5 23 7 Fine Maximum Scanning Size 216 1260mm 8 5 49 6 Standard and Detail 216 600mm 8 5 23 7 Fine Print Process Printing on standard paper using a laser Transmiss...

Page 164: ...dry before placing them in the machine Originals containing wet ink or correcting fluid will mark the exposure glass and affect the resulting image Sizes and weights of Recommended Originals Paper Si...

Page 165: ...0 2 around each edge of the original may not be sent There may be a difference in the size of the image when it is printed at the des tination Note The maximum scanning area on ADF is 1260mm 49 6 whe...

Page 166: ...of pages for all files 500 The number of destinations you can specify for one file 133 The number of destinations you can specify for all files 300 The number of Quick Dials you can register 16 The nu...

Page 167: ...art transmission or polling reception at an ap pointed time p 1 Sending at a Specific Time Send Later Fax Header Print You can add a Fax Header e g registered name to the message you send so it ap pea...

Page 168: ...now what files are stored in memory and the file numbers p 10 Printing a List of Files in Memory Print File List Printing a Stored Message Prints the contents of a fax that is stored in memory and has...

Page 169: ...User Function Keys Stores a frequently used func tion in a User Function Key F1 to F3 p 35 User Function Keys Reports Lists This function allows you to print various reports and lists manually You can...

Page 170: ...der and Own Fax Number Chapter3 Own Name Fax Header Own Fax Number in the Basic Features manual Fax Reset Timer You can select a period of time before this machine automati cally returns to the standb...

Page 171: ...ess on users must enter the Personal Code in order to transmit documents p 63 Personal Codes ID Code Registers the ID required for using Polling Recep tion and Memory Lock p 66 ID Code Line Type Regis...

Page 172: ...orwarding Station 55 Specified Sender 56 Specified Sender for Memory Lock 51 Display Contrast 42 81 Dual Access 24 E ECM Error Correction Mode 24 Editing Forwarding Station 54 Specified Sender 55 Erro...

Page 173: ...Quick Dial Label 39 Quick Dial List 39 Reports Lists 39 Specified Sender list 57 Speed Dial List 39 Stored Message 11 80 TX File List 39 User Function List 39 User Parameter List 83 Printing Options 3...

Page 174: ...on 28 Switches and Bits 58 T Telephone Directory 16 Telephone Line 73 Telephone Mode 29 Transmission Features 15 19 Transmission Options 1 Transmission Result Report Immediate Transmission 26 Troubles...

Page 175: ...om the network until the problem is resolved 8 This equipment cannot be used telephone company provided coin service Connection to Party Line Service is subject to state tariffs WHEN PROGRAMMING EMERG...

Page 176: ...Operating Instructions Facsimile Reference Printed in China UE USA B465 8607...

Reviews: