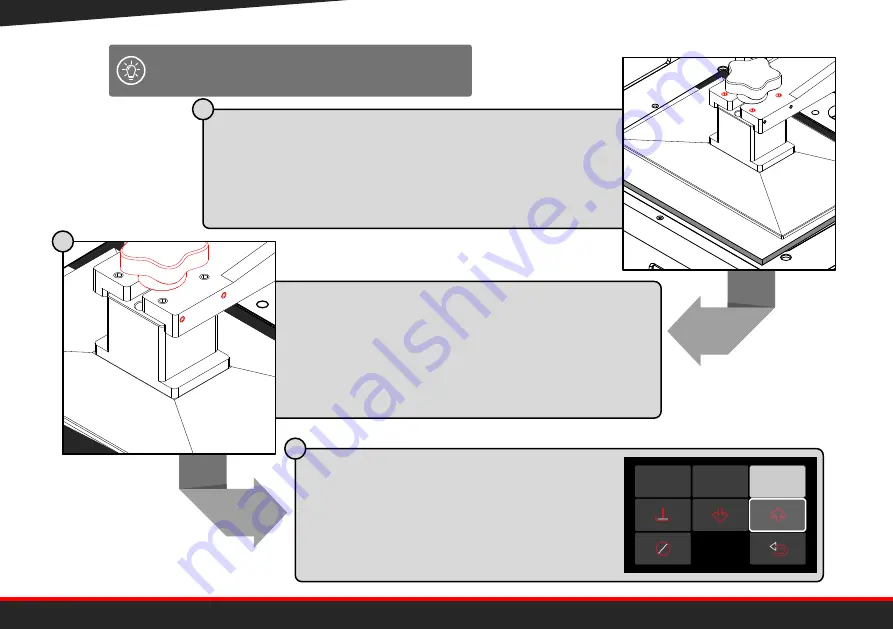
Once descended there will be space between the
bed and the alignment card. Tighten the 4
alignment screws around the hand dial till the
corners of the build platform are all equally
touching the alignment card.
6.
Adju
st th
e Alig
nm
ent s
crew
s till
4 co
rners
of th
e be
d
are
bala
nced
. W
hen
the
are
tight
en th
e 2
lock
ing
scre
ws
on e
ach
side
.
7.
Tigh
ten
the
red
hand
dial
on to
p of
the
build
platf
orm
.
8.
Lift
the
build
platf
orm
usin
g the
lift u
p
butto
n an
d
rem
ove
the
align
men
t car
d, to
plac
e the
resin
tank
back
in th
e prin
ter.
9.
Mak
e su
re to
secu
rely
faste
n
the
resin
tank
with
the
two
hand
scre
ws
prov
ided
. Clo
se th
e UV
prote
ction
lid.
10.
You’r
e no
w re
ady
for p
rintin
g.
1.
Turn
the
mac
hine
on. L
ift th
e UV
prote
ction
lid a
nd
rem
ove
the
resin
tank
usin
g the
2 sc
rew
s.
2.
Loos
en th
e 4
lock
ing
scre
ws
, 2 o
n ea
ch s
ide
of th
e
Z-ax
is arm
with
a M
3 he
x ke
y. Lo
osen
the
build
platf
orm
’s re
d ha
nd d
ial to
o.
3.
Sligh
tly lo
osen
the
4
align
men
t scr
ews
loca
ted
arou
nd th
e red
hand
dial
with
an M
4 he
x ke
y.
4.
Plac
e this
align
men
t car
d on
the
curin
g sc
reen
. Pre
ss
align
build
platf
orm
in th
e m
anua
l mo
ve m
enu.
5.
Ther
e w
ill be
a sp
ace
betw
een
the
build
platf
orm
and
the
align
men
t car
d. Tig
hten
each
of th
e
align
men
t
scre
ws
arou
nd th
e red
hand
dial
to clo
se th
at ga
p.
Alig
nm
ent
Guid
e
Alig
ning
the
build
platf
orm
for p
erfe
ct pr
intin
g
Furth
er in
form
atio
n in
the
gettin
g sta
rted
man
ual
Kee
p m
e fo
r futu
re
use
www.satori-tech.io
8 | page
After confirming the 4 corners of the bed are
balanced, tighten the 4 locking screws on
the side with an
M3
hex key.
Tighten the red hand dial on top of the build
platform.
Lift the bed up using the lift up button
and remove the alignment card, to
place the resin tank back in the printer.
Make sure to securely fasten the resin
tank with the two hand screws
provided.
D
F
The UV screen can be wiped between
prints with a dry, lint-free cloth.
0.10mm
1.00mm
10.00mm
7.
Mak
e su
re th
e alig
nm
ent g
uide
card
cove
rs th
e LC
D,
wait
for th
e Z-a
xis to
touc
h the
LCD
disp
lay.
8.
Chec
k if th
e ca
rd is
secu
rely
pres
sing
again
st th
e
LCD
disp
lay.
9.
Onc
e the
Z-ax
is ha
s be
en a
ligne
d, se
lect
the
“build
platf
orm
up”
butto
n, re
mov
e the
align
men
t guid
e
card
.
10.
Plac
e the
resin
tank
back
onto
the
LCD
pane
l, use
the
2 sc
rew
s to
fix th
e res
in ta
nk in
plac
e.
11.
Clos
e the
UV
prote
ction
lid.
1.
Turn
the
mac
hine
on.
2.
Lift t
he U
V pro
tectio
n lid
and
rem
ove
the
resin
tank
usin
g the
2 sc
rew
s.
3.
Mak
e su
re th
e bu
ild p
latfo
rm
is se
cure
ly fa
sten
ed to
the
Z-ax
is us
ing
the
red
hand
dial.
4.
Plac
e this
align
men
t guid
e ca
rd on
the
er LC
D
disp
lay.
5.
Navig
ate
on th
e tou
chsc
reen
to th
e To
ol bu
tton
.
6.
Sele
ct th
e alig
n be
d ico
n bu
tton
to ‘M
ove
Z-ax
is to
Alig
nm
ent
guid
e
Leve
lling
the
build
platf
orm
Kee
p m
e fo
r futu
re u
se
E
Summary of Contents for ST1600
Page 1: ...GETTING STARTED WITH THE ST1600 3D PRINTER FIRST PRINT ...
Page 2: ......
Page 24: ......


