background image

Software v3.0.9915

© Satmap Systems Ltd 2015 

12

The  unit  is  EGNOS/WAAS  enabled.  This  means 

users  in  Europe  and  North  America  are  able  to 

benefit  from  ‘differential’  GPS  when  one  of  the 

EGNOS/WAAS  satellites  is  in  view.  When  this 

service is available, the green signal crescents turn 

blue and accuracy is enhanced. 

Your position is shown as a blue dot in the centre of 

the screen. Once moving, a pointer appears on the 

blue circle, indicating the current direction of travel. 

As you move, a snail trail of red dots is laid down, 

indicating the path you have taken, as long as you 

have started the trip log. To change the red trail dot 

size may changed in the 

Settings Menu

.

The Active 12 logs your position once every second. 

The  rate  at  which  red  dots  are  displayed  depends 

on the map scale and the speed of travel. Dots are 

laid  down  so  an  appropriate  distance  is  rendered 

between them to create a clear track. A power saving 

option (in 

Advanced Power Control

), allows screen 

data to be set to update once every 4 seconds.

4.1.1  GPS MAP Screen

For  best  results  in  achieving  a  satellite  lock;The 

Active 12 should be pointed at clear sky. The unit can 

also  acquire  a  lock  through  glass,  i.e.  windows/car 

windshield.

Getting a GPS whilst moving may take longer. From 

a cold start, very large MapCard may slow the GPS 

lock time slightly.

To see the progress og the GPS lock set the screen 

to 

GPS STATUS

 using the 

Primary Screens

 button.

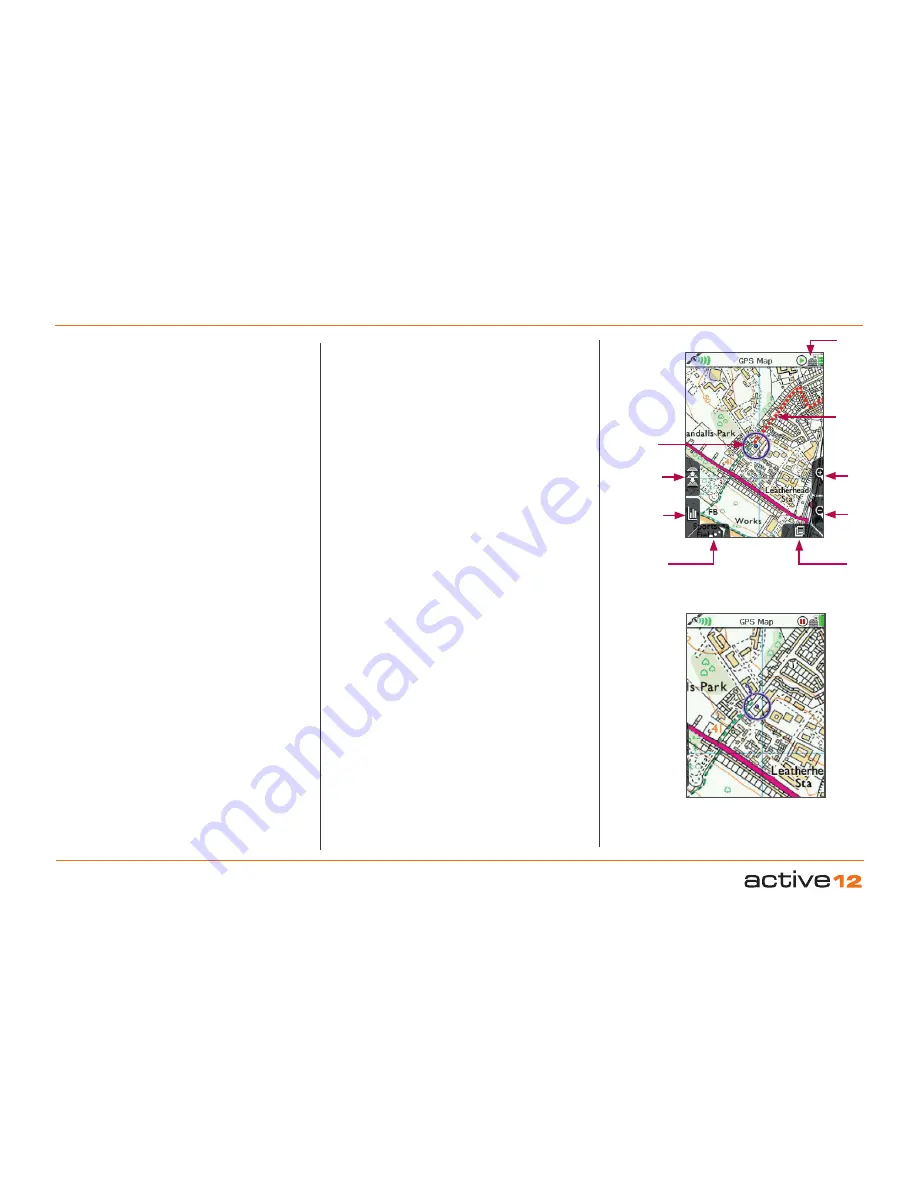
The primary purpose of the "GPS Map" screen is 

to display your own location in the centre of the 

screen (blue circle) and the mapping around you.

Buttons (from L to R):

Toggle  maps 

(Icon  is  three  layers  of  stacked 

mapping)  Toggle  between  available  maps  at  the 

same zoom level.

Databoxes. 

Toggle  between  none,  2  or  4  data 

boxes  on-screen.  Keep  on  toggling  and  the 

GPS 

MAP / ELEV

 dynamic elevation screens will appear.

North  Up/Trail  Up

Map  display  cycles  through 

North Up, Trail Up (Centre), and Trail Up (Low) 

Primary Screens. 

Scroll through primary screens

Zoom In / Out. 

Map scale is continuously displayed 

during zooming 

Note: Moving the joystick in the 

GPS 

MAP

  screen  will  take  you  into 

PLANNING

  mode.  To 

avoid this, lock your keypad.

A successful satellite lock (a ‘fix’) is indicated at the 

top left of the screen by the red cross changing to 

a green signal icon. The number of green crescents 

denotes the signal strength. A weak lock is indicated 

by a single crescent plus a ‘2D’ caption.

4.1  Screen 1: GPS MAP 

GPS MAP 

screen with 

function buttons

Blue pointer appears once you start 

moving to indicate direction of travel.

Toggle maps

Blue "You 

Are Here" 

pointer

Zoom 

In

Snail Trail

North Up/

Trail Up

Data boxes /    

Elevation

Graph 

Primary 

Screens

Zoom 

Out

Toggle 

icon

Summary of Contents for active12

Page 1: ...satmap com Full User Guide Software v3 0 9915...

Page 2: ...tooth 33 6 6 Elevation 36 6 7 Backlight 38 6 8 Screen Data Capture 39 6 9 Data Boxes 40 6 9 1 2 Data Box Layout 40 6 9 2 4 Data Box Layout upper 41 6 9 3 4 Data Box Layout lower 41 6 9 4 Options for 2...

Page 3: ...creen 84 14 3 Add Grid in a Specific Folder 85 14 4 Grid Details Screen 85 14 5 Edit Grid Menu 86 14 6 Rename Grid 87 14 7 Copy 87 14 8 Delete 87 14 9 Move to SD Card 87 14 10 Copy to SD Card 87 14 11...

Page 4: ...can be set to activate with 1 click or 2 click operation Backlight Boost Toggle Map Icon Battery Indicator On Off Planning Icon Replaceable Screen Cover 3 5 in 8 7cm Bright Hi Res HVGA 320x480 Screen...

Page 5: ...status icons shown in the top bar Screen name Memory Status Warning GPS Signal Lock Normal lock EGNOS WAAS lock No lock Trip Log Active Trip Log Inactive No GPS Lock iii Map Screen Layout Location Ico...

Page 6: ...ong battery life with numerous power management options Ability to plan routes on GPS and online Extensive range of international maps The Active 12 is latest model from Satmap Systems ultimate sports...

Page 7: ...k has been acquired the top left signal icon will change from a red x to green or blue crescents depending on the signal Satellite lock times vary It is important to remember that the accuracy of any...

Page 8: ...in an external waterproof jacket pocket or back pack outer pocket where there is a risk of a pool of water collecting at the bottom of the pocket and damaging the unit The interior of the unit should...

Page 9: ...is selected the unit is then set for the appropriate GPS position i e selecting English sets up the GPS default to Great Britain On Off Lock Button Keyboard Lock Power Off screen for Hibernate option...

Page 10: ...The record icon is shown as empty when there is no lock A red pause symbol indicates data logging is paused 3 7 PLANNING Mode Moving the joystick changes the screen from the GPS MAP screen to the PLAN...

Page 11: ...ic compass with direction indicator Calibrate Compass Orange tipped north indicator Bearing indication given here Pointer 6 COMPASS Your position on the map 1 GPS MAP Toggle maps Zoom In Data boxes Zo...

Page 12: ...may take longer From a cold start very large MapCard may slow the GPS lock time slightly To see the progress og the GPS lock set the screen to GPS STATUS using the Primary Screens button The primary p...

Page 13: ...card This will load your Map Packs screen Use the joystick to flip between maps and select View Map to access the desired GPS MAP screen To access the Map Packs screen at any point centre press the j...

Page 14: ...screen and then an addition 2 Data Boxes One last press will return to the GPS MAP screen and no data boxes 4 1 Screen 1 GPS MAP Cont 2 Data Boxes Toggle Maps 4 Data Boxes Toggle Data Boxes Zoom In Z...

Page 15: ...appear until you return to GPS MAP screen using the bottom left hand button GoTo mode The dynamic elelvation feature also works in conjunction with the GoTo point please see later chapter for activati...

Page 16: ...ue location icon is shown in the centre of the screen with North facing up on the map Use this mode to conserve battery power From the PLANNING screen if you wish to switch the map to North Up return...

Page 17: ...default location for that particular map There is a data box overlay which shows Grid reference format options are given in GPS Settings Position Display Format option Altitude for this location eleva...

Page 18: ...apPacks present on the SD card Maps Flicks you back into your previous map screen GPS MAP or PLANNING Primary Screens Pages forward to the TRIP LOG screen Add POI Will place a POI menu at the centre o...

Page 19: ...Software v3 0 9915 Satmap Systems Ltd 2015 19 4 1 Screen 3 POSITION INFO cont Map title Map title Map title...

Page 20: ...tton allows you to pause data logging during a journey e g pausing for a lunch break When Stop has been pressed the unit stops all data logging If you switch to the GPS MAP screen and continue moving...

Page 21: ...ecorded snail trial and can still be found in the Routes Menu like a route A track is likely to have many more waypoints than a pre planned route and consequently the files will be larger Note At the...

Page 22: ...f Interest and include Points of Interest POIs Areas AOIs and Lines LOIs GoTo and Marker Set GoTo point Marker either by coordinates or postcode GB only A GoTo point is a single leg route with a singl...

Page 23: ...nd a GPS compass and switches between the two at a preset speed Having both ensures you have the correct bearings at all times whether you are moving or stationary It is important that the unit is hel...

Page 24: ...hrough primary screens Note You need at least 1 POI or route on the map for the Pointer to work It does not work if you only have one Grid AOI or LOI There are 3 types of target to select from using t...

Page 25: ...vice Your device will always be at the top of the list Either centre press the joystick or the Select button to display the list of Routes that you have previously marked as Share To make an item shar...

Page 26: ...o Not Shared SHARED DATA Other buttons Bluetooth Devices this will hop to a screen where all Bluetooth devices can be observed including Bluetooth Smart Low Energy fitness sensors and other BT devices...

Page 27: ...u have a lock your current coordinates and elevation are shown As a guide a minimum of four satellites are needed to acquire a lock To access the GPS STATUS screen from the GPS MAP screen keep pressin...

Page 28: ...llow a very fast restart and GPS re aquisition Typically useful over a lunch break for instance After the specified period the GPS will do a full Power Off In Hibernate mode the Active 12 will not log...

Page 29: ...uages About At any point should you wish to exit a settings screen either press Map front left button to go to the GPS MAP PLANNING screen or press Back front right button Buttons Next Scroll through...

Page 30: ...Power Save profile could be set with very specific settings e g No backlight boost Backlight off after 30 seconds Backlight at 50 Map in North Up Please Note The current Active Profile cannot be delet...

Page 31: ...ng Press Done or centre press the joystick to return to SETTINGS MENU GPS lock will be maintained and the unit will continue to log your position To instantly re activate the screen press any button e...

Page 32: ...To save power select Advanced power saving mode and the screen will update every four seconds instead of every second In this mode Trail Up is disabled and the Backlight setting has a maximum value of...

Page 33: ...en allows you to see local devices and connect to Low Energy sensors Shared Data as above hops to the SHARED DATA screen Refresh kicks off a Bluetooth refresh scan to look for new devices nearby In th...

Page 34: ...r should flash blue grey and then turn solid blue when the connection is made Troubleshooting Very occasionally Bluetooth can be temperamental If a connection is not made on the first attempt deselect...

Page 35: ...the Active 12 After your activity save your data for later upload This is done via the TRIPLOG Menu Convert options Your data containing the HRM and cadence values will be stored in a TCX file e g My...

Page 36: ...he joystick left and right when it is highlighted by the orange background A selection can be made between Elevation from Maps GPS or Pressure The first two settings require no further action just pre...

Page 37: ...ht Use the joystick to scroll through and set the values Viewing Elevation Data On the GPS MAP screen the Data Boxes can be used to view your elevation data It is even possible to select all 3 types o...

Page 38: ...he red filter with a backlight setting below 10 Select Sun Filter then Normal to return to the daylight screen Sun Filter for strong sunlight Press the Red Filter button to access the Sun Filter optio...

Page 39: ...otos for use in a presentation Press and hold the Backlight Boost button for three seconds a camera icon briefly replaces the icons next to the battery i e Stop Record icon toggle icon A beep sounds t...

Page 40: ...x Layout MAIN MENU Settings 2 Data Box Layout For both the Left Box and the Right Box Use the joystick moving left right to select the desired option Press Done or centre press the joystick to return...

Page 41: ...boxes are shown on the GPS MAP screen To reach the GPS MAP screen from the SETTINGS MENU press Map front left button On the GPS MAP screen use the lower left side button to toggle between having 2 da...

Page 42: ...any unidentified point on the map rather than your simple forward speed Bearing Next WP Bearing to the next waypoint Distance Next WP Distance to the next waypoint ETA to Next Estimated Time of Arriva...

Page 43: ...Moving summary above Trip Time Total trip time See Time Moving summary above GPS Accuracy Accuracy of GPS within a certain distance Position as Lat Long Position is given in degrees latitude and longi...

Page 44: ...press the joystick to return to SETTINGS MENU OSGB grid references are given to 10 figures If you are working to 6 figure grid references set the last 2 digits of each number set to 0 GPS Used as Hea...

Page 45: ...g icon appears in 3 places in these cases on the status bar of every screen next to the Settings button in the MAIN MENU next to the Memory Status option in the SETTINGS MENU When a memory warning ico...

Page 46: ...are based if the average moving speed in the trip log Av Moving is zero i e you are stationary Once you are moving your ETA is taken from your average moving speed if you have a lock or recently had...

Page 47: ...ick moving left right to select from Degrees Cardinal points e g N NNE or mil radians Press Done or centre press the joystick to return to SETTINGS MENU Grid Magnetic Angle Use the joystick moving lef...

Page 48: ...he GPS compass over the electronic compass The GPS compass requires forward motion to provide a heading it will not work when static See GPS Settings section 7 09 to control when the GPS compass overr...

Page 49: ...ating memory on the unit so it is important to keep this selection to a minimum as it will slow down your unit Showing too many inactive routes could also freeze your unit Only show a few short inacti...

Page 50: ...This function applies to the GPS MAP or PLANNING screens Use the joystick to toggle between One Click Always show one click activates button instantly The screen button icons will stay displayed alwa...

Page 51: ...ost purposes however in certain conditions thickly wooded areas and near tall buildings the wheel speed data for bike riders will give a nore stable and accurate reading Sensor Unit Sends back wheel r...

Page 52: ...left right to switch between On POIs waypoints and route names shown on maps Off Names not shown on maps Press Done or centre press the joystick to return to SETTINGS MENU 6 21 Time Offset GPS MAP MA...

Page 53: ...About This screen gives details of the software version installed on your unit and Satmap contact details Press Done to return to the SETTINGS MENU To check for the latest software updates please 1 Do...

Page 54: ...uickly by holding the joystick up down Keep the joystick pressed up down until you reach the file you are looking for 7 2 Active and Inactive Routes There are three ways to activate a route Highlight...

Page 55: ...e or yellow with varying transparency depending on the active route colour chosen The default route colour is blue To follow a route you need to first activate it As you begin to follow the yellow blu...

Page 56: ...point button has 3 functions 1 To add a waypoint 2 To click on an existing waypoint and drag it to another location 3 To close the route i e connect the last waypoint to the start point if the last wa...

Page 57: ...t Press Next or use joystick to scroll down options Map Return to last map screen Edit Either press Edit button or centre press joystick to access alpha numeric keypad for labelling Note This button c...

Page 58: ...ments Highlight Edit Comments then either press the Edit button or centre press the joystick to access the keypad Operate the keypad to input comments describing the route and press Done when finished...

Page 59: ...p Delete green headed pin Edit Route on Map options Waypoint edit options Edit Name Highlight Edit Name and press Edit or centre press the joystick to access the keypad and rename the waypoint Edit Co...

Page 60: ...ancel is selected the screen will return to the ROUTES MENU 7 13 Copy MAIN MENU ROUTES MENU folder route Copy Press Copy to create a copy of the current route which will appear in the same folder 7 14...

Page 61: ...kground this means there is no suitable map at that scale to incorporate the entire route The route length is given in a window From this screen you can either examine details of the route via the Pro...

Page 62: ...celerated scrolling This is useful if you have a route with many waypoints and want to access information about a particular waypoint Press and hold the joystick left right until you reach the specifi...

Page 63: ...ont 7 18 ROUTE CARD Screen GPS MAP MAIN MENU ROUTES MENU folder route View Profile Card The ROUTE CARD screen gives a list of legs distance and bearing between 2 waypoints At the bottom of the screen...

Page 64: ...ders consist of groups of routes and help you manage your files by organizing for example your routes into different categories e g geocaches pubs walks etc If you are in a sub folder and want to go b...

Page 65: ...se the joystick to navigate around the keypad including going off the edge left right and up down Press Select or centre press the joystick for character selections Use Shift to access upper case and...

Page 66: ...TE MAP screen of any route shows your route on a map with details such as trip length and gives you access to the Profile screen Access the Nearby option which includes nearby routes and OOIs To bring...

Page 67: ...I Menu Create new POIs AOIs LOIs Grids and IOIs from the OOI Menu using the Add options Users can easily hide or show all OOIs on the Internal Storage and SD card and visibility can be set individuall...

Page 68: ...the Edit button once an OOI has been highlighted To edit visibility and set a new default icon for all OOIs within a specific folder instead of an individual OOI select the folder and use the Edit All...

Page 69: ...centre to indicate you are in edit mode on the Add POI screen Create a POI by either pressing the top left button or centre press the joystick in the desired location Use the lower left x button to r...

Page 70: ...stick left right to toggle between boxes Move the joystick up down to change the box entries Under the grid reference boxes are the conversions showing the initial grid references Once you begin chang...

Page 71: ...centre press the joystick to select entries The menu options on the Edit POI screen are as follows Rename Edit Description Edit Location by Map Edit Location by Grid Edit Warning Radius Edit Visibilit...

Page 72: ...haracters cannot be edited 11 10 Edit Location by Map GPS MAP MAIN MENU OOI Menu OOI Folders Select POI Edit Edit Location by Map You are in edit mode when a red cross appears inside the orange locato...

Page 73: ...MAIN MENU OOI Menu OOI Folders Select POI Edit Delete Press Delete or centre press the joystick to access a screen showing the option to delete the POI When Delete is selected the screen will go back...

Page 74: ...indicate you are in edit mode on the Add AOI screen You can plot points by either pressing the top left button or by centre pressing the joystick Use the lower left x button to remove points The area...

Page 75: ...green eye icon indicates the AOI is visible on the map When invisible the eye icon is highlighted in red with a red line through it Basic AOI detail 12 AOIs Areas of Interest cont AOI reference point...

Page 76: ...centre press the joystick to select entries The menu options on the Edit AOI screen are as follows Rename Edit Description Edit Location by Map Edit Visibility Edit Colour Edit Pattern Delete Move to...

Page 77: ...annot be edited 12 8 Edit Location by Map GPS MAP MAIN MENU OOI Menu OOI Folders SelectAOI Edit Edit Location by Map You are in edit mode when a red cross appears inside the orange locator circle Use...

Page 78: ...then press Delete or centre press the joystick to access a screen showing the option to delete the AOI When Delete is selected the screen will go back to the OOI Folders Pressing Cancel will take you...

Page 79: ...as a red cross in the centre to indicate you are in edit mode and on the Add LOI screen You can plot points by either pressing the top left button or by centre pressing the joystick Use the lower left...

Page 80: ...I usually close to the centre The highlighted green eye icon indicates the LOI is visible on the map When invisible the eye icon is highlighted in red with a red line through it Basic LOI detail LOI r...

Page 81: ...Select or centre press the joystick to select entries The menu options on the Edit LOI screen are as follows Rename Edit Description Edit Location by Map Edit Visibility Edit Colour Delete Move to SD...

Page 82: ...IT LOI menu The Edit Description option is only available if the existing description has 128 characters or less e g externally imported descriptions from geocaches etc with more than 128 characters c...

Page 83: ...e Highlight Delete then press Delete or centre press the joystick to access a screen showing the option to delete the LOI When either Delete or Cancel is selected the screen will go back to the EDIT L...

Page 84: ...fusion with the number 1 the letter I has been omitted You are able to change the colour and pattern of individual AOIs just like a regular AOI The grid appears on the PLANNING screen once created Mor...

Page 85: ...iption of grid Refers to the arbitrary reference point of the AOI within the grid usually top left corner of an AOI within a grid The highlighted green eye icon indicates the AOI is visible on the map...

Page 86: ...n using the keypad for labelling either press Select or centre press the joystick to select entries The menu options for a grid on the EDIT screen are as follows Rename Copy Delete Move to SD Card Cop...

Page 87: ...ht Delete then press Delete or centre press the joystick to access a screen showing the option to delete the grid When either Delete or Cancel is selected the screen will go back to the OOI Folders 14...

Page 88: ...T AOI menu options From the grid screen you will also be able to centre an AOI on the map or locate the nearest AOI to your current location Pressing the Show Details button will give you a descriptio...

Page 89: ...he Add IOI option from the OOI Menu and press Select or centre press the joystick This will take you straight to the keypad to prompt you to rename your IOI When an IOI is created it is called IOI 1 b...

Page 90: ...name or Edit Description you will bring up an on screen keypad When using the keypad for labelling either press Select or centre press the joystick to select entries The menu options on the Edit IOI s...

Page 91: ...ng the option to delete the IOI Pressing Delete will delete the IOI and take you back to the OOI Folders Pressing Cancel will take you back to the EDIT IOI menu Edit IOI name 15 9 Move to SD Card MAIN...

Page 92: ...r some units sold in the UK Clear Marker and GoTo Clear buttons are active once a point marker has been set Also accessible from the POSITION INFO screen 16 2 GoTo Marker Set By Coords Selecting one o...

Page 93: ...ditional elasticated front mesh provides further storage 17 4 Lanyard The Lanyard is 1 3m long branded with the Satmap logo and is adjustable to fit most requirements It has two fittings on each end a...

Page 94: ...5 94 The LiPol gives you a battery life of approximately 8 12 hours in Normal Power Mode 16 24 hours in Advanced Power Mode and 100 120 hours in Hibernate Mode 17 Accessories cont ProShield optional c...

Page 95: ...square or rectangle of a set size 18 7 Map Consolidation Many of our customers are finding that the Active 12 is so useful they are taking it everywhere with them As a result they are building up imp...

Page 96: ...anner and Route Share Network customers can create routes on their computer download them onto their Active 12 via SatSYNC and share them with other users This software is available online for select...

Page 97: ...istics Don t forget to press Start once you are ready to go again If you remain stationary for a longer period of time without pausing Stop the data logging trip statistics will be inaccurate Make a b...

Page 98: ...k and the trip log is recording TRIP LOG Start Check the snail trail is on by going to GPS MAP POSITION INFO via centre press Turn Trail On Here you can also adjust the size of the dots Software has b...

Page 99: ...ccurate compass bearings whilst stationary ETA Estimated Time of Arrival The ETA is calculated from the average moving speed if it is available see Trip Log Otherwise the set speed is used For example...

Page 100: ...ystem used by NATO countries It is derived from the UTM grid system but uses a different labelling convention It does not describe a point but rather an area Mil radians The military use mil radians s...

Page 101: ...ion along the earth s surface towards the geographic North Pole UTC also GMT and Zulu Time The worldwide standard for time is coordinated universal time abbreviated UTC This was formerly known as Gree...

Page 102: ...of any confusion the English text is the controlling language Please note Product specifications are liable to change without notice This device complies with part 15 of the FCC rules Operation is sub...

Page 103: ...satmap com Phone UK 44 0 845 873 0101 Email info satmap com...

Reviews: