background image

18

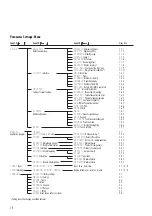
Parameter Settings: Menu

Level 1 

Level 2 

Level 3 

Menu code

Setup

Bal.Scal.

Ambient 

Ambient conditions

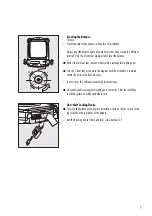
1. 1. 1.

Balance parameters

app.fil.

Application filter

1. 1. 2.

Stab.Rng. 

Stability range

1. 1. 3. 

Taring

Taring 

1

)

1. 1. 5

AutoZer. 

Auto zero

1. 1. 6

Wt.Unit

Basic weight unit

1. 1. 7.

Display

Display accuracy

1

)

1. 1. 8.

Cal./adj.  

Function of the (CAL) key 

1. 1. 9.

Cal.Unit. 

Weight unit for calibratio 

1

)

1. 1.11.

Interf.  

Interface

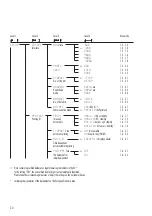
Baud

Baud rate 

1. 5. 1.

parity

Parity

1. 5. 2.

Stopbit

Number of stop bits

1. 5. 3.

handshk. 

Handshake mode

1. 5. 4.

databit

Number of data bits

1. 5. 5.

Dat.Rec. 

Output: SBI (ASCII) or printout

1. 5. 6.

Prnt.Out

Print 

(manual/automatic)

1. 6. 1. 

Settings for print function

StopAut.

Stop automatic printing

1. 6. 2. 

Tar./prt.

Tare balance after ind. print

1. 6. 4.

Prt.Init.

Printout of appl. parameters

1. 6. 5.

format

Line format for printout

1. 6. 6.

GLP

ISO/GLP-compliant printout

1. 6. 7. 

time 

12h/24h 

1. 6. 8.

date

-Format 

1. 6. 9. 

extras

Menu

1. 8. 1.

Additional functions

Signal

Acoustic signal (beep)

1. 8. 2.

Keys

Keypad

1. 8. 3.

ext. Keys.

Funktion external Keypad

1. 8. 4.

On Mode

Power-on mode

1. 8. 5.

Backlit

Display backlighting

1. 8. 6.

reset

menu 

Factory settings

1. 9. 1.

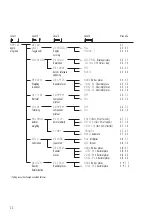
Applic.

Weigh

2. 1.

Application programs

Unit Toggle 

wt. unit

Disp.Dig.

Display accuracy 

1

)

2. 2. 2.

Count

Counting. 

Resolut. Resolution

2. 3. 1.

Ref.Updt. 

Autom. ref. sample updating

2. 3. 2.

Percent

Weighing in percent

Dec.Plcs

Decimal places

2. 4. 1.

Net-Tot

Net-total formulation

Comp.Prt. 

Printout of components

2. 5. 1.

Total

Totalizing

Comp.Pr

t. Printout of components

2. 6. 1.

AnimalW. 

Animal weighing

Activty. 

Animal activity

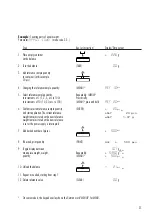
2. 7. 1

start

2. 7. 2.

Calc. 

Calculation

Method 

(operator)

2. 8. 1.

Dec.Plcs 

Decimal places

2. 8. 2.

Density 

Density determination

Dec.Plcs 

Decimal places

2. 9. 1.

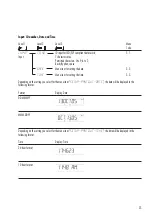
Input 

Input

ID no., Date, time

Input: ID no., date, time

3. 1./2./3.

Info 

Information

Version , Ser. No. , Model

Display software ver., serial no., model

4. 1./2./3.

Languag.

English

(factory setting)

5. 1.

Deutsch 

German

5. 2.

Franc.

French

5. 3.

Ital.

Italian

5. 4.

Espanol

Spanish

5. 5.

.

PyCCKV

1V

1

Russian

5. 6.

polski

Polish

5. 7.

Codes

Menu shows codes (not texts)

5. 8.

1

) Setting cannot be changed on verified balances

Summary of Contents for ACCULAB ATILON ATL-124

Page 1: ...25 ALT153 526 45 ALT153 I 678 45 ALT153 V 746 85 ALT423 625 25 ALT423 I 777 25 ALT423 V 845 65 ALT623 716 45 ALT623 I 868 45 ALT623 V 936 85 ALT822 572 05 ALT822 I 724 05 ALT822 V 792 45 ALT2202 625 25 ALT2202 I 777 25 ALT2202 V 845 65 ALT4202 701 25 ALT4202 I 853 25 ALT4202 V 921 65 ALT6202 792 45 ALT6202 I 944 45 ALT6202 V 1 012 85 ALT6201 663 25 ALT6201 I 815 25 ALT6201 V 883 65 ALT8201 708 85 ...

Page 2: ...h of a key available on all models standard on all models verified for legal metrology All models optionally available in versions verified at the factory Large easy to read backlit display Front level indicator for easy checking of the leveling status Numerous application programs with exceptionally easy operator guidance through the menu counting animal weighing weighing in percent calculation n...

Page 3: ...50 Yes Ex works 2 ATL 423 0 001 420 2 ATL 423 I 0 001 420 Yes 2 ATL 423 V 0 001 420 Yes Ex works 2 ATL 623 0 001 620 2 ATL 623 I 0 001 620 Yes 2 ATL 623 V 0 001 620 Yes Ex works 2 ATL 822 0 01 822 4 ATL 822 I 0 01 822 Yes 4 ATL 822 V 0 01 822 Yes Ex works 4 ATL 2202 0 01 2 200 3 ATL 2202 I 0 01 2 200 Yes 3 ATL 2202 V 0 01 2 200 Yes Ex works 3 ATL 4202 0 01 4 200 3 ATL 4202 I 0 01 4 200 Yes 3 ATL 4...

Page 4: ...98648 015 55 Operating Instructions ACCULAB ATILON Electronic Analytical and Precision Balances ...

Page 5: ... the Language 18 Parameter Settings Menu 19 Parameter Settings Overview 23 Input ID Number Date and Time 25 Application Programs 26 Counting 28 Weighing in Percent 30 Calculation 32 Animal Weighing Averaging 34 Net total Formulation 36 Totalizing 38 Density Determination 40 Mass Unit Conversion 2 Contents 43 ISO GLP compliant Printout Record 45 Data Interface 46 Troubleshooting Guide 47 Care and M...

Page 6: ...e connecting the cable check all pin assignments against the cabling diagrams and disconnect any lines that are assigned differently If there is visible damage to the equipment or power cord disconnect the equipment from power and lock it in a secure place to ensure that it cannot be used for the time being Connect only Acculab accessories as these are optimally designed for use with your Atilon b...

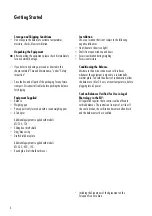
Page 7: ...ment supplied with models ATL 623 423 153 Round glass draft shield with cover Getting Started Installation Choose a location that is not subject to the following negative influences Heat heater or direct sunlight Drafts from open windows and doors Excessive vibration during weighing Excessive moisture Conditioning the Balance Moisture in the air can condense on cold surfaces whenever the equipment...

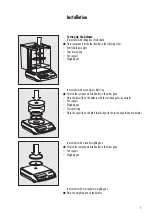
Page 8: ...ition the components listed below in the order given Place the lower lid on the balance with the raised edge facing upwards Pan support Weighing pan Glass draft ring Place the upper lid on the draft shield ring with the raised edge facing downwards Instruments with a round weighing pan Position the components listed below in the order given Pan support Weighing pan Instruments with a rectangular w...

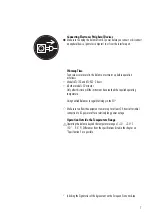
Page 9: ...lulab AC adapter with a wide input voltage range 100 to 240 V order no 6971966 and replaceable power cord 6900900 Europe 6900905 AUS 6900901 US CDN 6900902 ZA 6971945 UK 6971977 Argentina 6971973 India 6971978 China 6971980 Denmark 6971975 Israel 6971776 Italy Safety Precautions Plug in AC Adapter 6971412 6971413 The AC adapter rated to Class 2 can be plugged into any wall outlet without additiona...

Page 10: ...fter this time will the instrument have reached the required operating temperature Using Verified Balances in Legal Metrology in the EU Make sure to allow the equipment to warm up for at least 24 hours after initial connection to AC power or after a relatively long power outage Operation Outside the Temperature Range Operating the balance beyond the temperature range of 10 30 C 50 86 F Differences...

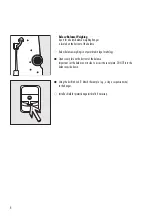
Page 11: ...is not permitted in legal metrology Open cover plate on the bottom of the balance Important set the balance on its side to access the cover plate DO NOT turn the balance upside down Using the built in hook 1 Attach the sample e g using a suspension wire to the hanger Install a shield for protection against drafts if necessary 8 1 ...

Page 12: ...2 front feet as shown in the diagram until the air bubble is centered within the circle of the level indicator In most cases this will require several adjustment steps On models with a rectangular weighing pan Lower the 2 rear feet until they touch the surface on which the balance rests Anti theft Locking Device To secure the balance at the place of installation fasten a chain or a lock to the lug...

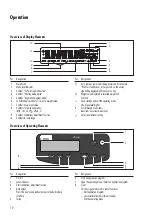
Page 13: ...lity icon after you turn on the power A will be displayed until you press a key 12 Weight value displayed in selected weight unit Symbols Save settings and exit the operating menu One menu level higher V Scroll through menu items Next item on current menu level Select a parameter setting Overview of Operating Elements Pos Designation 1 On off 2 Level indicator 3 Start calibration adjustment routin...

Page 14: ...truments in the EU The type approval certificate for verification applies only to non automatic weighing instruments For automatic operation with or without auxiliary measuring devices you must comply with the regulations applicable to the place of installation Before using the balance as a legal measuring instrument calibrate and adjust it at the place of use using the built in motorized calibrat...

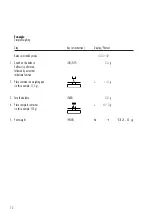
Page 15: ...0 32 30 1 Switch on the balance ON OFF 0 0 g Self test is performed followed by automatic initial tare function 2 Place container on weighing pan 11 5 g in this example 11 5 g 3 Tare the balance TARE 0 0 g 4 Place sample in container 132 0 g in this example 132 g 5 Print weight PRINT N 132 0 g ...

Page 16: ...tion adjustment CAL Einh gramm Kilogr or Pound not for verified models To block calibration adjustment Select Cal Adj blocked in the menu Close the menu access switch on the back of the balance External Calibration in Verified Balances When the balance is used in legal metrology external calibration is blocked as follows The setting of the menu access switch is locked see To block calibration adju...

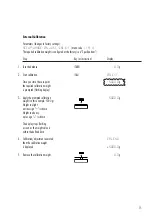
Page 17: ...9 4 The built in motorized calibration weight is applied and removed automatically for internal calibration Step Key or instruction Display 1 Tare the balance TARE 0 0 g 2 Start calibration CAL CAL Int g The built in weight is CAL RUN applied automaticallyg 3 Calibration adjustment executed CAL end g 4 The built in weight is removed 0 0 g ...

Page 18: ...L Cal Ext g Once you store the zero point 5000 0 g the required calibration weight is prompted flashing display 3 Apply the prompted calibration 5000 0 g weight in this example 5000 g Weight too light a minus sign is shown Weight too heavy a plus sign is shown The display stops flashing as soon as the weight value is within the defined limit 4 Calibration adjustment executed Cal end g then the cal...

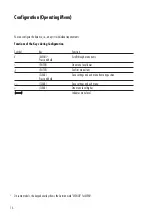
Page 19: ...U Scroll through menu items Press and hold ENTER One menu level lower ENTER Confirm menu item CLEAR Save settings and exit menu from any position Press and hold CLEAR Save settings and exit menu CLEAR One menu level higher Indicates menu level On some models the keypad overlay shows the German word MENUE for MENU Configuration Operating Menu ...

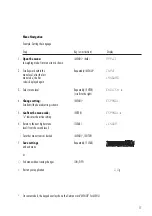
Page 20: ...l Repeatedly ENTER english o scrolls to the right 4 Change setting MENU Espanol Scroll until the desired setting is shown 5 Confirm the menu code ENTER Espanol o o indicates the active setting 6 Return to the next higher menu CLEAR Lengua level from the second level Set other menu items as desired MENU ENTER 7 Save settings Repeatedly CLEAR and exit menu or Exit menu without saving changes ON OFF ...

Page 21: ...ions Signal Acoustic signal beep 1 8 2 Keys Keypad 1 8 3 ext Keys Funktion external Keypad 1 8 4 On Mode Power on mode 1 8 5 Backlit Display backlighting 1 8 6 reset menu Factory settings 1 9 1 Applic Weigh 2 1 Application programs Unit Toggle wt unit Disp Dig Display accuracy 1 2 2 2 Count Counting Resolut Resolution 2 3 1 Ref Updt Autom ref sample updating 2 3 2 Percent Weighing in percent Dec P...

Page 22: ...it 1 1 3 3 ο 2 Digit 1 1 3 4 4 Digit 1 1 3 5 8 Digit1 1 1 3 6 Taring 1 W o Stb W o stability 1 1 5 1 Taring o W StAb After stability 1 1 5 2 AutoZer Off 1 1 6 1 Auto zero ο On 1 1 6 2 Wt Unit For list of units see 1 1 7 1 Basic weight Toggling between Weight unit Units 1 1 7 23 Disp Dig 1 ο All 1 1 8 1 Display Minus 1 1 1 8 2 accuracy Cal adj ο Cal ext External cal adj 1 1 1 9 1 Function of the Ca...

Page 23: ...ty 1 6 1 1 Printing fct manual ο Man With W stability 1 6 1 2 automatic Aut W o Autom w o stability 1 6 1 3 Aut With Autom w stability 1 6 1 4 StopAut Stop ο Off Not possible 1 6 2 1 automatic printing On Use print key PRINT 1 6 2 2 aut Cycl ο EachVAl 1 display update 1 6 3 1 Time dependent automautomatic printing Tar prt Tare ο off 1 6 4 1 the balance after On 1 6 4 2 individual printout 1 Note c...

Page 24: ...Day month year 1 6 9 1 mmm dd yy Month day year 1 6 9 2 Extras Menu ο CanEdit Can change settings 1 8 1 1 Additional Rd Only Read only 1 8 1 2 functions Signal Off 1 8 2 1 Acoustic signal ο On 1 8 2 2 Keys ο Free 1 8 3 1 Keypad Locked 1 8 3 2 ext Key ο print key 1 8 4 1 Function of the z tare key TARE 1 8 4 2 external switch cal key CAL 1 8 4 3 select key MENU 1 8 4 4 CF key CLEAR 1 8 4 5 enter ke...

Page 25: ... 1 1 Net total Component ο On 2 5 1 2 printout Total Comp Prt Off 2 6 1 1 Totalizing Component ο On 2 6 1 2 printout AnimalW Activty Calm fluct 2 of test obj 2 7 1 1 Animal Animal activity ο Active fluct 5 of test obj 2 7 1 2 weighing V Active fluct 20 of test obj 2 7 1 3 Start Manual 2 7 2 1 ο Auto Automatic 2 7 2 2 Calc Method ο Mul Multiplier 2 8 1 1 Calculation operator Div Divisor 2 8 1 2 Dec...

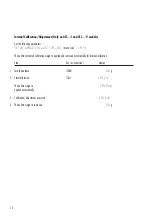
Page 26: ...nu item for setting the date 3 2 TIME Menu item for setting the time 3 3 Depending on the setting you select for the menu item SETUP PRNT OUT DATE the date will be displayed in the following format Format Display Date DD MMM YY MMM DD YY Depending on the setting you select for the menu item SETUP PRNT OUT TIME the time will be displayed in the following format Time Display Time 24 hour format 12 h...

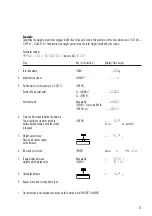
Page 27: ...ER FEB 08 8 Change setting MENU FEB 10 hold down key to automatically change the digit s MENU hold 9 Toggle between ENTER or FEB 10 Day Month Year positions CLEAR 10 Save setting when you reach the YEAR position ENTER datE 11 Select Time MENU ENTER 10 46 23 12 Change setting MENU 11 46 23 change the digit s MENU hold 13 Toggle between ENTER or 11 46 32 Hour Minute Second positions CLEAR 14 Set sec...

Page 28: ...s Text or Codes Languag English factory setting 5 1 Deutsch German 5 2 Franc French 5 3 ital Italian 5 4 Espanol Spanish 5 5 pyccKV 1V 1 Russian 5 6 polski Polish 5 7 codes Menu shows codes not texts 5 8 Application Programs Using Verified Balances as Legal Measuring Instruments in the EU All application programs can be selected on balances used as legal measuring instruments Calculated values are...

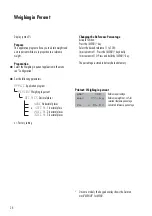
Page 29: ...omatic o Factory setting Changing the Reference Sample Quantity Activate function Press the MENU key Select the desired reference sample quantity 1 to 100 In increments of 1 Press the MENU key briefly In increments of 10 Press and hold the MENU key The quantity is stored in battery backed memory Reference Sample Updating Automatic reference sample updating optimizes the counting accuracy You can a...

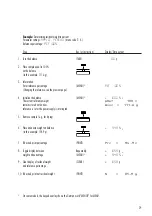
Page 30: ...c to 100 MENU press and hold ref 20pcs 6 Confirm selected reference sample quantity ENTER 20pcs and start application The current reference nRef 20 pcs weight remains stored until a new reference wRef 1 07 g weight remains stored until a new reference is set or the power supply is interrupted 7 Add desired number of pieces 500pcs 8 If desired print quantity PRINT Qnt 500 pcs 9 Toggle display betwe...

Page 31: ...ace 2 Dec Pl 2 decimal places 3 Dec Pl 3 decimal places o Factory setting Changing the Reference Percentage Activate function Press the MENU key Select the desired reference 1 to 100 In increments of 1 Press the MENU key briefly In increments of 10 Press and hold the MENU key The percentage is stored in battery backed memory Printout Weighing in percent pRef 100 Reference percentage Wxx 111 6 g Re...

Page 32: ...tialize the balance MENU 100 0 The current reference weight pRef 100 remains stored until a new Wxx 111 6 g reference is set or the power supply is interrupted 5 Remove sample e g for drying 6 Place unknown weight on balance 94 9 in this example 105 9 g 7 If desired print percentage PRINT Prc 94 9 8 Toggle display between Repeatedly 105 9 g weight and percentage MENU 94 9 9 Clear display of residu...

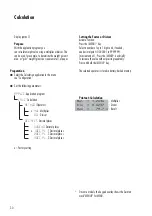
Page 33: ...lcs Decimal places None No Decimal places o 1Dec Pl 1 Decimal places 2Dec Pl 2 Decimal places 3Dec Pl 3 Decimal places o Factory setting Setting the Factor or Divisor Activate function Press the MENU key Select a number of up to 7 digits and if needed one decimal point 0 000001 to 9999999 In increments of 1 Press the MENU key briefly To increase the value without pressing repeatedly Press and hold...

Page 34: ...mple 0 06237 ENTER Position the decimal point 5 MENU __ 00000 2 ENTER Enter numerals Repeatedly __ 06000 MENU or press and hold ENTER etc __ 06237 4 Store the divisor and initialize the balance The current divisor remains stored in ENTER 0 0 o battery backed memory until the setting Div 0 6237 is changed 5 Weight per unit area 79 7 o Place an A4 sheet of paper on the balance 6 If desired print res...

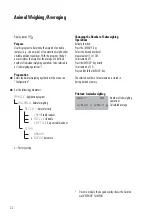
Page 35: ...gram AnimalW Animal weighing activty Animal activity Calm Stable readout o Active Unstable V Active Very unstable readout Start manual o Autom Automatic o Factory setting Changing the Number of Subweighing Operations Activate function Press the MENU key Select the desired number of measurement 1 to 100 In increments of 1 Press the MENU key briefly In increments of 10 Press and hold the MENU key Th...

Page 36: ...ements and start ENTER 0 0 g automatic animal weighing The number of measurements remains stored in battery backed memory until the setting is changed 6 Place first animal in bowl 888 The balance delays the start of measure 20 ments until the difference between 2 19 measurements meets the criterion 1 If you selected the manual start mode press ENTER 7 Read off the result 410 1 g G The result is di...

Page 37: ... Features Weigh up to 99 components from 0 to a defined total component weight Store component weights printout shows Comp xx with display zeroed automatically after value is stored and automatic printout Clear component memory following cancellation of the weighing sequence by pressing and printout of the total weight Toggling between component weight and total weight by pressing and holding MENU...

Page 38: ... 5 g 4 Store component data ENTER 0 0 g NET Comp 1 120 5 g 5 Add next component 70 5 g NET 6 Store component data ENTER 0 0 g NET Comp 2 70 5 g 7 Weigh in further components Repeat steps as desired 5 and 6 8 Fill to desired final value view MENU 191 0 g the current total weight value 9 Print total weight and clear CLEAR 2117 5 g the component memory T Comp 2117 5 g On some models the keypad overla...

Page 39: ...s Off o On o Factory setting Features Totalizing memory for up to 99 values Store component weights printout shows Comp xx with automatic printout Toggle display between the current individual weight value and the value in totalizing memory by pressing MENU Printout of the total of the individual component weights S Comp To close the application program and print the total weight press CLEAR Print...

Page 40: ... 380 g 3 Store value in memory ENTER 380 0 g Comp 1 380 0 g 4 Remove sample 0 0 g 5 Place the next sample on the balance in this example 575 g 575 0 g 6 Store value in memory ENTER 955 0 g 575 0 g Comp 2 575 0 g 7 View the value in totalizing memory ENTER 955 0 g G 8 Weigh in further components as desired Repeat steps 5 and 6 9 Print total weight and CLEAR 0 0 g clear the totalizing memory S Comp ...

Page 41: ...ed in the example below are not included with the balance Preparation Select the Density Determination application in the menu see Configuration Set the following parameters Applic Application program density Density determination dec plcs Decimal places none No decimal places o 1dec pl 1 decimal place o Factory setting Printout for Density Determination Wa 20 0 g Weight in air Wfl 15 0 g Weight i...

Page 42: ...nfirm Air display ENTER air 5 Determine the weight of the sample in air Place sample on the balance 20 0 g 6 Store value for weight in air ENTER 7 Remove sample from the balance water 8 Determine weight in liquid place sample in holder 9 Confirm water display ENTER 0 0 g 10 Immerse sample in liquid 15 0 g 11 Store value for weight in ENTER liquid view result and print 4 0 o Wa 20 0 g Wfl 15 0 g Rh...

Page 43: ...l decimal places minus1 Reduced by 1 place o Factory setting Features Set the basic unit and display accuracy in the Setup menu see Configuration Set the application weight units and display accuracies in the Application menu These settings are stored in battery backed memory The basic unit is active when the balance is powered up Mass Unit Conversion Printout for Wt Unit Toggling 100 0 g Weight w...

Page 44: ... next page 3 Confirm the weight unit pounds ENTER pound o 4 Select the next application ENTER KEINE o weight unit in this example Troy ounces Repeatedly see table on next page MENU troy oz 5 Confirm weight unit Troy ounces ENTER troy oz o 6 Select other application units if desired max 4 total otherwise confirm None by pressing 7 Save selection CLEAR 0 00 g Conversion 8 Place sample on balance 100...

Page 45: ...ns Grains 15 4323583500 GN 12 Peny Wt Pennyweights 0 64301493100 dwt 13 Milligr Milligrams 1000 00000000 mg 14 Pt P Lb Parts per pound 1 12876677120 o 15 Chn Tael Chinese taels 0 02645547175 tl 16 Mommes mommes 0 26670000000 m 17 Austr Ct Austrian carats 5 00000000000 Kt 18 Tola Tola 0 08573333810 o 19 Baht Baht 0 06578947436 b 20 Mesghal Mesghal 0 21700000000 o 21 Tons Tons 0 00000100000 t 22 Lb ...

Page 46: ...6 7 2 or ISO GLP compliant printout or record always on Setup Prnt Out GLP Alwayson menu code 1 6 7 3 Line format for printout include data ID codes 22 characters factory setting Setup Prnt Out Format 22Char menu code 1 6 6 2 Formats for time setup prnt 0ut time 24h menu code 1 6 8 1 or setup prnt oUt time 12h menu code 1 6 8 2 Formats for date setup prnt 0ut date dd mmm yy menu code 1 6 9 1 or se...

Page 47: ...eld for operator signature Blank line Dotted line ISO GLP compliant printout for external calibration adjustment Dotted line 17 Aug 2006 10 30 Date time beginning of measurement ACCULAB Balance manufacturer Mod ATL 8201 Model Ser no 10105352 Balance serial number Ver no 00 36 01 Software version ID 2690 923 ID Dotted line Cal Ext Test Calibration adjustment mode Set 5000 0 g Calibration weight Dif...

Page 48: ...ilized for printing out records of the results when you connect your balance to a Acculab data printer The record ing capability for printouts makes it easy for you to work in compliance with ISO GLP Data Interface Female Interface Connector 25 contact female connector RS 232 Pin 1 Signal ground Pin 2 Data output TxD Pin 3 Data input RxD Pin 4 Internal ground GND Pin 5 Clear to send CTS Pin 6 Not ...

Page 49: ...face port for printer Reset the menu factory settings output is blocked or Contact Acculab dealer err 02 Calibration parameter Calibrate only when zero not met e g is displayed balance not tared Press Tare to tare the balance load on weighing pan Unload the balance err 10 The Tare key is blocked when Press Clear to clear the tare there is data in the second tare memory and release the tare key mem...

Page 50: ... analytical balances remove and clean the weighing pan as follows Reach beneath the drip breeze and lift it carefully together with the pan support to avoid damaging the weighing system Make sure that no liquid enters the balance housing Cleaning Stainless Steel Surfaces Clean all stainless steel parts regularly Remove the stainless steel weighing pan and thoroughly clean it separately Use a damp ...

Page 51: ...sal facility The packaging is made of environmentally friendly materials that can be used as sec ondary raw materials The equipment including accessories and batteries does not belong in your regular household waste The EU legislation requires its Member States to collect elec trical and electronic equipment and dis posed of it separately from other unsorted municipal waste with the aim of recycli...

Page 52: ... calibration weight AC power source power AC adapter 230 V or 115 25 V requirements voltage frequency 15 to 20 48 60 Hz Power consumption VA maximum 16 typical 8 STNG6 Approx hours of operation with the YRB05Z rechargeable battery pack backlighting on h 35 Overview ...

Page 53: ...ng pan size mm 90 d Weighing chamber height mm 230 Dimensions W D H mm 230 303 330 Model ATL 623 ATL 423 ATL 153 ATL 623 I ATL 423 I ATL 153 I Weighing capacity g 620 420 150 Readability g 0 001 0 001 0 001 Tare range subtractive g 620 420 150 Repeatability g 0 001 0 001 0 001 std deviation Linearity g 0 002 0 002 0 003 Response time average s 1 1 1 3 Sensitivity drift within 10 to 30 C K 2 10 6 2...

Page 54: ...2 Operating temperature range 10 30 C 273 303 K 50 86 F Net weight approx kg 3 1 3 5 3 1 3 5 3 1 3 5 2 0 2 6 Weighing pan size mm 180 180 180 180 180 180 115 d Dimensions W D H mm 230 303 91 230 303 87 Model ATL 8201 ATL 6201 ATL 8201 I ATL 6201 I Weighing capacity g 8200 6200 Readability g 0 1 0 1 Tare range subtractive g 8200 6200 Repeatability std deviation g 0 1 0 1 Linearity g 0 3 0 1 0 3 0 1...

Page 55: ...32C connecting cable length 15 m 50 ft YSC01L15 Product Order No Density determination kit1 for ED224S ED124S YDK01LP Industrial AC adapter model ING2 protection rating IP65 in accordance with EN 60529 for 230 V 69 71899 for 120 V 69 71500 Data cable for connecting a computer with a USB port YCC01 USBM2 for computer connection 25 pin 7357312 for computer connection 9 pin 7357314 Adapter cable 6965...

Page 56: ...difications On request Sartorius will provide information on the minimum operating specifications in accordance with the Standards listed above for defined immunity to interference 73 23 EEC Electrical equipment designed for use within certain voltage limits Applicable European Standards EN 60950 Safety of information technology equipment including electrical business equipment EN 61010 Safety req...

Page 57: ......

Page 58: ......

Page 59: ...prior written permission of Acculab The status of the information specifications and illustrations in this manual is indicated by the date given below Acculab reserves the right to make changes to the technology features specifications and design of the equipment without notice Status May 2007 Acculab W1A000 KT Publication No WAT6002 e07051 ...

Reviews: