background image

27

The Sapling Company, Inc.
1633 Republic Road
Huntingdon Valley, PA 19006
USA

+1 215.322.6063 P.
+1 215.322.8498 F.
www.sapling-inc.com

Web Interface Programming

Log In

q


Password

  There are two levels of passwords that will enable the user to access features.  The first level is the user level programming that 

includes features like setting the time, date, adding and editing events and schedule changes.  The default password for the user level is 1111.  
It can be changed in the technician level. The technician level password is 6063 and gives you full access to all of the enabled features of the 
master clock.

w


Log In

  This button, when pressed, will attempt to log in to the master clock with the password that was entered in the field above.

e


Forgot Password

  This button, when pressed, will direct you to the tech support phone number.

After five minutes of inactivity once logged in, the master clock will automatically log the user out.

q
w

e

Summary of Contents for SMA 5000 Series

Page 1: ...SMA 5000 Series TalkBack Master Clock The Sapling Company Inc 1633 Republic Road Huntingdon Valley PA 19006 USA 1 215 322 6063 P 1 215 322 8498 F www sapling inc com Installation Manual V6 ...

Page 2: ...11 Once a day Pulse Using Clock 1 or Clock 2 System Connection 12 59 Minute Correction 13 58 Minute Corrections 1 4 13 National Time Rauland 14 Rauland Digital 14 Dukane Digital 15 Once a Day Pulse 15 Fire Alarm Interface Installation 16 Patch Cable Installation 16 GPS Antenna Installation 17 Setting Master Clock to GPS Mode 17 Setting the Time from the LED Display 18 Programming the SMA 5000 18 2...

Page 3: ...k Status Tech Level 33 Web Interface Programming TalkBack Settings Details Button 34 Web Interface Programming TalkBack Clock Pairing from Edit Add Clock Button 35 Web Interface Programming Synchronization 36 Web Interface Programming IP Settings 37 Web Interface Programming NTP Servers 38 Web Interface Programming IP Status 39 Web Interface Programming Clock Features 40 Web Interface Programming ...

Page 4: ...ng the template from the top right hole 4 Using a level and the LINE on the supplied template mark the center of the three remaining holes 5 Remove the template and drill out the three remaining holes and insert the anchors 6 Insert the two top screws into the anchors leaving 1 8 of thread exposed Unscrew the bottom wiring cover on the master clock 7 Line up the top keyholes on the back of the mas...

Page 5: ... 8498 F www sapling inc com 1 The master clock is 1U in size Install the threaded nuts in the desired location in the rack rails 2 Put the nylon washers on the two screws supplied 3 Line up the master clock with the threaded nut 4 Insert screws into the threaded nuts and tighten Rack Mount Installation ...

Page 6: ...he insulation on the White and Black wire 6 Put each wire into the supplied connector and tighten the screws The wiring label located on the wiring chassis indicates where to connect the wires Caution Do not plug in the power cord until the following steps are completed 1 The square knockout on the wiring chassis must be removed 2 The Heyco Bushing must be attached to the power cord as shown Use p...

Page 7: ...ng capabilities y GPS Connector This GPS connector is where the antenna for the GPS gets mounted to GPS option only u Power Input This power outlet is used to power up the SMA master clock NOTE This device contains a lithium battery Replace Battery With Varta Part No CR2032 Only Use Of Another Battery May Present A Risk Of Fire Or Explosion Batteries can be obtained and should be installed by the ...

Page 8: ...upplied in the mounting kit at the designated markings from step 1 4 Install the four anchors in the holes that were just drilled 5 Install the first two screws in the top holes leaving 1 8 of the thread exposed 6 Line up the top key slots over the screws and lock the master clock into place 7 Install the bottom screws through the wiring access panel and tighten into place 8 After all wiring is co...

Page 9: ...lic Road Huntingdon Valley PA 19006 USA 1 215 322 6063 P 1 215 322 8498 F www sapling inc com System Connections Wired Systems 2 Wire Digital Communication System Connection 110V EU 240V 110V EU 240V 18 19 24V SBD 3000 Series Wired Clock ...

Page 10: ...5 322 8498 F www sapling inc com System Connections Wired Systems RS485 Communication System Connection 240 24VAC 110 24V SBD 3200 3300 Series Wired Clock 240 24VAC 240 24VAC 240 24VAC Black White Black Yellow Orange White Black White 110 24 V SRM Series Analog Clock 110 24 V SRM Series Analog Clock ...

Page 11: ...22 6063 P 1 215 322 8498 F www sapling inc com System Connections Wired Systems Sync Wire Communication System Connection SBD 3300 Series Wired Clock 240 24V 240 24V 240 24V 240 24V Yellow Blue Black Yellow White Orange 110V 24V SAM Series Analog Clock 110V 24V SAM Series Analog Clock ...

Page 12: ... Huntingdon Valley PA 19006 USA 1 215 322 6063 P 1 215 322 8498 F www sapling inc com System Connections Wired Systems Once a day Pulse Using Clock 1 or Clock 2 System Connection Intercom paging system or other device Clock Circuit 24 23 or 27 28 ...

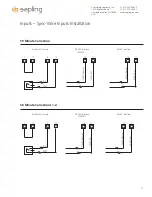
Page 13: ... F www sapling inc com Inputs Sync Wire Inputs Installation 59 Minute Correction 58 Minute Corrections 1 4 Dry Contact Closure Dry Contact Closure 110VAC Neutral 24VAC Neutral 110VAC Hot 24VAC Hot 110VAC Interface 110VAC Interface 24VAC Interface 24VAC Interface 240VAC 240VAC 7 17 N O COM 8 12 15 17 7 17 N O COM 8 12 24VAC Neutral 24VAC Hot 15 17 ...

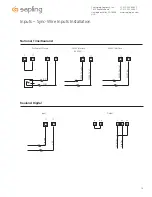
Page 14: ...ling Company Inc 1633 Republic Road Huntingdon Valley PA 19006 USA 1 215 322 6063 P 1 215 322 8498 F www sapling inc com Inputs Sync Wire Inputs Installation National Time Rauland Rauland Digital Dry Contact Closure 110VAC Interface 24VAC Interface 240VAC 7 17 N O COM 8 12 24VAC Neutral 24VAC Hot 15 17 ...

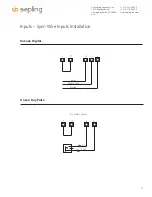
Page 15: ...lic Road Huntingdon Valley PA 19006 USA 1 215 322 6063 P 1 215 322 8498 F www sapling inc com Inputs Sync Wire Inputs Installation Dukane Digital Once a Day Pulse 7 17 14 13 8 Reset Minute Pulse Ground Dry Contact Closure 7 17 N O COM 8 12 ...

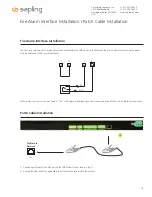
Page 16: ...ter clock that allows the user to interface the existing fire alarm with the Sapling SBT 3000 series digital clocks Patch Cable Installation When a relay closure occurs on pins 8 and 9 FirE will display on the digital slave clocks connected using RS485 or 2 wire digital communication 1 Connect a patch cable to the RJ45 port on the SMA Master Clock as shown in Fig 1 1 2 Connect the other end of the...

Page 17: ...ter clock will be located to the roof of the building allowing the GPS dome refer to Figure 1 1 to have a full 180 degrees view of the sky 2 Run cabling through piping and attach the end of the cabling to the bottom of the GPS dome via TNC connection 3 Screw GPS dome onto the top of the piping Be careful not to twist the cable Use teflon tape on the pipe threads to tighten seal and prevent water d...

Page 18: ...hour and or the bottom button the set the minute See Fig 2 1 Programming the SMA 5000 To enter programming mode press both the top and bottom button together simultaneously The top button advances through the options while the bottom button changes the option Fig 2 1 Option 1 Set Year Use the bottom button to scroll from 10 99 on the display and set the year Option 2 Set Month Use the bottom butto...

Page 19: ...tom button to scroll between 01 12 01 Data is transmitted every second 07 Data is transmitted every 2 minutes 02 Data is transmitted every 5 seconds 08 Data is transmitted every 5 minutes 03 Data is transmitted every 10 seconds 09 Data is transmitted every 10 minutes 04 Data is transmitted every 15 seconds 10 Data is transmitted every 15 minutes 05 Data is transmitted every 30 seconds 11 Data is t...

Page 20: ... once a day pulse Press the bottom button to scroll through 00 23 Option 22 Once a Day Pulse Set Minutes This option is only available if 8 is selected in option 20 for once a day pulse Press the bottom button to scroll through 00 59 Option 23 Once a Day Pulse Set Seconds This option is only available if 8 is selected in option 20 for once a day pulse Press the bottom button to scroll through 00 5...

Page 21: ... once a day pulse Press the bottom button to scroll through 00 23 Option 27 Once a Day Pulse Set Minutes This option is only available if 8 is selected in option 25 for once a day pulse Press the bottom button to scroll through 00 59 Option 28 Once a Day Pulse Set Seconds This option is only available if 8 is selected in option 25 for once a day pulse Press the bottom button to scroll through 00 5...

Page 22: ...o scroll through 00 23 00 Real Time Clock 08 Dukane 01 SNTP 09 Rauland Digital 02 59 Minute Correction 10 Wireless Repeater 03 58 Minute Correction 1 11 Once a Day Pulse 04 58 Minute Correction 2 12 GPS 05 58 Minute Correction 3 13 RS485 06 58 Minute Correction 4 07 National Time Rauland Selecting this allows access to options 34 36 Option 32 Setting the Time Zone Offset Press the bottom button to...

Page 23: ...ll appear on the right side if the master is receiving an Inter net Connection A 00 will appear on the right side if it is not receiv ing an Internet Connection This option is a read only option Option 45 Crossover Static IP option If the right side says off DHCP is being used if the user presses the bottom button the display will change to cr which means crossover mode In cross over mode DHCP is ...

Page 24: ...rom XX 58 00 to XX 59 00 The daily correction 5 a m 5 p m is twelve correction cycles sent to the relay each for 65 seconds on and 25 seconds off beginning at 5 05 00 to 5 22 35 3 58th minute 3 The hourly correction for 60 seconds every hour from XX 58 00 to XX 59 00 The daily correction 5 a m 5 p m is twelve correction cycles sent to the relay each for one minute on and two minutes off beginning ...

Page 25: ...D Display PM active Ethernet disconnected GPS error DHCP error SNTP error unused __________ _________ ______ _____ ___ _ When one of the following errors occurs one of the LED lights located above one of the six characters on the LED display will being to flash See figure below indicating the error each flashing light is associated with Error Codes ...

Page 26: ...en a web browser such as Internet Explorer or FireFox on a PC that s connected to the network 4 In the address bar type in 192 168 0 123 and press Enter This will access the log in screen 5 Once you are logged in follow the instructions on page 37 for entering a new IP address Accessing the Web Interface when using a crossover cable 1 Set option 45 to cr as described on page 23 2 If you are access...

Page 27: ...ing events and schedule changes The default password for the user level is 1111 It can be changed in the technician level The technician level password is 6063 and gives you full access to all of the enabled features of the master clock w Log In This button when pressed will attempt to log in to the master clock with the password that was entered in the field above e Forgot Password This button wh...

Page 28: ... in 24 hour format HH MM SS After typing in the desired time click the Submit button to set the time on the unit if there is no input connected w Date This field is where the current date is displayed The date can be edited by clicking within the field and typing in the desired date The date must be entered in mm dd yyyy format After typing in the desired time click the Submit button to set the da...

Page 29: ... Send RS485 Data Every These fields allow the user to set how often RS485 will be transmitted from the master clock r Bias Seconds This field allows the user to offset how many seconds off plus or minus the time will be when receiving an input This field can range between 0 9999 seconds t GMT Offset This field sets the positive or negative offset for GMT time For instance eastern time zone is a ne...

Page 30: ...d States Day of Month When this option is selected Daylight Saving Time can be chosen based on what date and time it begins and ends i e Daylight Saving Time can begin on March 28 at 2AM and end on November 1st at 2AM Day of Week in Month When this option is selected Daylight Saving Time can be chosen based on what week in what month and what time it begins and ends i e Daylight Saving Time can be...

Page 31: ...n the clock hasn t received a time synchronization within a predetermined amount of time which will be selected by the user in the box to the right t Master Restart When checked this will send an alert when the master clock has been restarted power cycled y Fire Alarm When checked this will send an email when a fire alarm has gone off and alerted the master clock u Clock Problem When checked this ...

Page 32: ...e system by determining how well each clock receives data e Date This column displays the last day that each clock communicated with the master clock r Battery Level This column is used to show the user the battery level of each clock t Mechanical Status This column shows any mechanical failure that a clock may have experienced If no mechanical issues are experienced the clock will state OK If the...

Page 33: ...ted The tiers are separated by their distance from the master clock i e tier 0 being the closest to the master clock tier 10 being the farthest y Battery Volt This column is used to show the user the battery level of each clock See figure 1 on page 42 for more details u Mechanical Status This column shows any mechanical failure that a clock may have experienced If no mechanical issues are experien...

Page 34: ...e tiers are separated by their distance from the master clock i e tier 0 being the closest tier 10 being the farthest y Battery Voltage This column is used to show the user the battery level of each clock 3 00 volts meaning the clock is operating on a full battery Refer to figure 1 on page 42 for details u Mechanical Status This column shows any mechanical failure that a clock may experience Pleas...

Page 35: ...ss meaning the clock is properly paired with the master clock or time out meaning the clock could not communicate with the master clock r Rename Clock Edit Clock Only To rename a clock first click in the Clock Name box and type the new name you wish to assign to that particular clock When the new clock name is typed into the Clock Name field click the Rename Clock button to assign the new name to ...

Page 36: ...oth a primary and secondary input 59 minute sync 58 minute 1 4 sync National Time Rauland Dukane Digital Rauland Digital and once a day Pulse An example of a configuration would be NTP being the primary input and 58 minute correction being a secondary input Setting the primary source to 59 minute sync and the secondary source to Dukane digital would be an incorrect configuration e Clock 1 Circuit ...

Page 37: ...ions however some modification may be needed for certain networks t DHCP This drop down list allows the user to turn DHCP on or off DHCP allows the master clock to look for an IP address on its own if the network has a DHCP server y Send Status to Monitor on Specified IP This setting allows the clock to send out its data in broadcast mode u Monitor IP Address This setting allows for the Monitor IP...

Page 38: ...he user to specify which NTP servers that the master clock will try to acquire time from Any server that is highlighted in red is not functioning after several tries e Rotate Servers This checkbox when checked allows the master clock to rotate through all the server addresses for constant time accuracy on a continual basis There must be two server addresses for this option to work r Submit This bu...

Page 39: ...address for the master clock e Board Serial Number The displays the serial number of the board inside master clock r Unit Build Date This displays the date the unit was built t Code Build Date This displays the date the software code was built y SVN Revision This displays the software version number u Device Name This displays the device name for the master clock i Paid Provisioned Features This d...

Page 40: ...gramming Clock Features q Display Format This drop down list allows the user to select whether they want 12 hour or 24 hour mode to be displayed on the LCD and LED w Submit This button when pressed will save all of the information to the master clock e Cancel This button when pressed will clear out any changes made and will not save any data q w e ...

Page 41: ...ved events and schedules e Download This button when pressed will download the selected file and reset the master clock with those events and schedules already configured r Upload TalkBack Technology This button when pressed will upload the current TalkBack settings for all TalkBack clocks and place it in a file for backup purposes t Choose File This button when pressed will allow the user to brow...

Page 42: ...as shifted for more than 5 seconds and after fast running corrected itself 2 Second hand is lost not detecting for more than 4 hours 3 Minute Hour hand is inaccurate by more than one 1 tick 1 4 minute 4 Minute Hour hand is lost not detecting for more than twelve 12 hours Figure 3 Mechanical Status 0 Second hand is inaccurate by two 2 seconds 1 Second hand is lost not detecting for more than four 4...

Page 43: ...ength options I have with the GPS cable When a master clock with the GPS Receiver is selected it comes with a 75 foot 22 8 meters GPS Antenna Cable as standard If needed the following GPS cable is available at an additional cost 150 foot 45 7 meters Special GPS Cable Part Number E ANT CBL150F 1 300 foot 91 4 meters Special GPS Cable Part Number E ANT CBL300F 1 Is there a Converter option like ther...

Page 44: ... isn t receiving a signal Check the antenna to make sure it is in an unobstructed area that is in complete view of the sky Also check to make sure the connections on each end of the cable are securely tightened Lastly verify that there are no kinks or breaks in the supplied GPS cable My sync wire system doesn t seem to be getting the correct time What should I do The clock 1 and clock 2 outputs co...

Page 45: ...paration between the equipment and receiver 3 Connect the equipment into an outlet on a circuit different from that to which the receiver is connected 4 Consult the dealer or an experienced radio TV technician for help Compliances FCC Statement Information to the user for U S only IC Statement for Canada only This Class B digital apparatus complies with Canadian ICES 003 CET appareil numérique de ...

Reviews: