background image

TAKING PICTURES WITHOUT USING THE
LCD MONITOR [

v

] [

x

] [

w

]

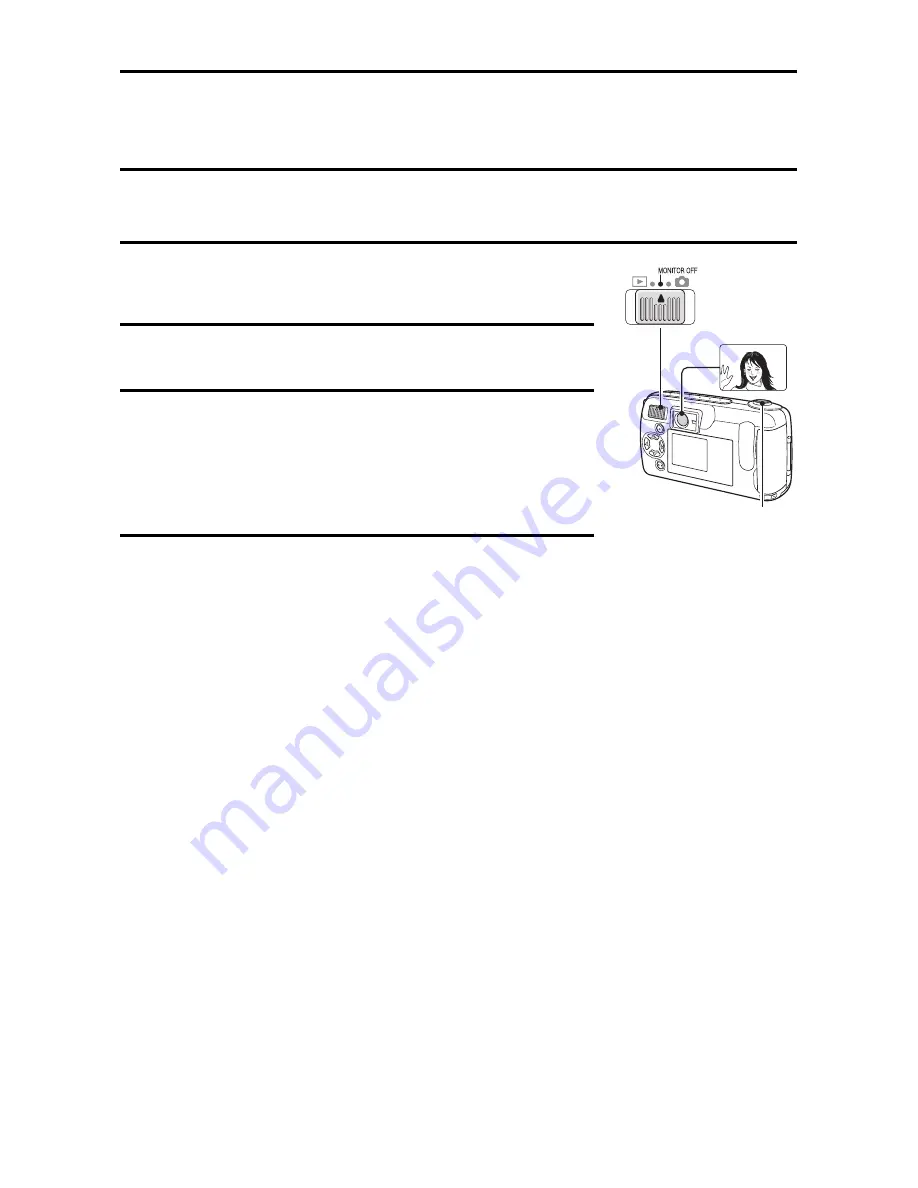
You can turn off the LCD monitor and take pictures using the viewfinder.
Turning off the LCD monitor saves battery power.

1

Open the lens cover and set the main switch
to [MONITOR OFF].

2

Point the camera at the subject.

3

Compose the image.

œ

Look through the viewfinder and aim the
camera so that the light-measuring area is in
the center of the subject.

4

Press the shutter release button.

Still image shooting mode

Ö

 see page 24, step 

3

.

Sequential shot shooting mode

Ö

 see page 27, step 

4

.

Video clip shooting mode

Ö

 see page 28, step 

2

.

Shutter release button

English

 40

Summary of Contents for VPC-R1

Page 1: ...ital camera Any information regarding only one of these products will be labeled as such Please read these instructions carefully before using the digital camera Make sure to read and understand the section USING YOUR DIGITAL CAMERA SAFELY AND CORRECTLY from pages 3 to 12 Keep this manual in a safe place for later reference ...

Page 2: ...at interference will not occur in a particular installation If this equipment does cause harmful interference to radio or television reception which can be determined by turning the equipment off and on the user is encouraged to try to correct the interference by one or more of the following measures œ Reorient or relocate the receiving antenna œ Increase the separation between the equipment and r...

Page 3: ...omplies with Part 15 of the FCC Rules Operation is subject to the following two conditions 1 this device may not cause harmful interference and 2 this device must accept any interference received including interference that may cause undesired operation FOR CANADIAN USERS œ This Class B digital apparatus complies with Canadian ICES 003 Declaration of Conformity English ii ...

Page 4: ...re subject to change without prior notice and therefore may differ from the contents of this manual œ Sanyo Electric shall not be held responsible for any problems resulting from the use of this digital camera œ Sanyo Electric declines all responsibility for damages due to improper use of the camera failure to adhere to the instructions given in this manual or repairs or changes done by those othe...

Page 5: ...ay help in certain situations CAUTION Points requiring special caution v Explanation for still images x Explanation for sequential shots w Explanation for video clips You can select different languages for the LCD monitor display see page 67 Please note however that the display examples and the indications in this manual are quoted only from the English version English iv ...

Page 6: ...SEQUENTIAL SHOTS 26 VIDEO CLIPS 28 B PLAYBACK 3 PLAYBACK MODES 29 PLAYING BACK STILL IMAGES 31 PLAYING BACK SEQUENTIAL SHOTS 32 PLAYING BACK VIDEO CLIPS 33 B SHOOTING APPLICATIONS SHOOTING SETTINGS SCREEN 35 ADJUSTING THE IMAGE QUALITY 37 TAKING PICTURES WITHOUT USING THE LCD MONITOR v x w 40 TAKING CLOSE UP PICTURES MACRO PHOTOGRAPHY v x w 41 USING THE SELF TIMER v x w 42 USING THE FLASH v 43 EXP...

Page 7: ...TO THE CARD 55 USING WITH A COMPUTER 56 PRESERVING THE RECORDED IMAGES 57 REQUESTING PRINTING 59 B SETTINGS CHECKS SETTING THE DATE AND TIME 61 SETTING THE OPERATION SOUND 65 CHANGING THE DISPLAY LANGUAGE 67 CHECKING THE REMAINING BATTERY CHARGE 69 CHECKING THE REMAINING NUMBER OF IMAGES AND RECORDING TIME 71 B APPENDICES TROUBLESHOOTING 72 SPECIFICATIONS 77 ICON INDEX 81 English 2 ...

Page 8: ...try to repair or open the digital camera yourself B Do not modify or open the cabinet œ High voltage circuits are inside and there is a high risk of fire or electric shock if they are touched Any internal check setting or repair should be performed by the dealer B Do not use while driving œ Do not capture images play back images or watch the LCD monitor while driving a vehicle Doing so may cause a...

Page 9: ...ric shock or other accident B Do not use during a storm œ To avoid the risk of being struck by lightning do not use the digital camera during a thunderstorm In particular if used in an open field you have an increased chance of being struck by lightning Quickly seek refuge in a place that will protect you from lightning B Do not place on an unstable surface œ The digital camera may fall resulting ...

Page 10: ...k of explosion œ Do not use the digital camera in a location where there is explosive gas or any other flammable material in the air Doing so may cause a fire or an explosion B Keep the digital camera out of the reach of children œ The following may happen if children play with the digital camera œ They may wrap the strap around their neck and suffocate œ They may swallow the batteries or other sm...

Page 11: ...s or throw them into a fire œ Do not allow metal objects to touch the terminals Do not carry loose with necklaces hairpins etc œ Do not transform open or modify œ Do not put in water or any liquid or get the terminals wet œ Do not remove or puncture the external wrapping œ Do not use if there is leaking swelling rising temperature discoloration or any other abnormal condition œ Keep out of the rea...

Page 12: ...s may be warm immediately after the digital camera is used If removing the batteries turn off the digital camera and allow the batteries to cool down before removing them œ If a battery is leaking and the electrolyte gets on your skin or clothing immediately rinse with clean water If the electrolyte gets into your eyes you risk losing your eyesight Immediately rinse your eyes with clean running wa...

Page 13: ...digital camera and keep the lens cover closed B Cautions during use and storage œ This digital camera is a precision instrument When using or storing the digital camera make sure to avoid the following locations to privent damage œ Places in direct sunlight œ Places where humidity and temperature are high œ Places that may get wet œ Places close to an air conditioner or heater œ Inside a car œ Pla...

Page 14: ... B Cautions concerning the CompactFlash œ Immediately after use the CompactFlash will be very hot Before removing the CompactFlash turn off the digital camera and wait for the temperature to cool down œ Keep out of the reach of children Young children may put the media in their mouth and choke or cause some other unexpected injury or accident For correct use of your digital camera B Cautions befor...

Page 15: ...als located in the battery compartment of the digital camera œ Do not touch the battery terminals or the terminals in the battery compartment of the digital camera with your bare hands Doing so will allow contaminants from your hands to adhere to the terminals and oxidize increasing the contact resistance If the contact resistance increases the usable life of the batteries will diminish B Cautions...

Page 16: ...reached the ambient temperature B Cautions concerning data storage œ It is recommended that any important data be copied onto a separate media such as a hard disk MO disk or CD R disk œ Data stored in the internal memory of this camera or on the CompactFlash may be lost or corrupted Sanyo Electric will not be held responsible for any damage or lost profits arising from the loss of data œ If the Co...

Page 17: ...an be easily generated œ Do not allow the edges of the CompactFlash card to become contaminated with foreign materials Gently wipe away any contamination with a soft dry cloth œ When not using the CompactFlash card put it back into the protective cover to protect it from damage due to static electricity œ Do not carry the CompactFlash card inside trouser pockets since it may become damaged when yo...

Page 18: ...k USING THE HAND STRAP Attach the supplied hand strap to the digital camera to aid in carrying Bend the looped end to slip it through the strap holder Other separately sold devices œ AC adaptor Model VAR G5EX E U AC adaptor for use with your digital camera œ CompactFlash Model KA DSM C32G 32 MB capacity CompactFlash memory card 13 English ...

Page 19: ...C Adapter sold separately 8 Macro switch 9 Lens cover Rear 1 MODE button 2 Main switch 3 Viewfinder 4 Standby indicator 5 Card slot cover 6 Strap holder 7 Battery compartment cover 8 LCD monitor 9 SET button F Arrow button œ During use the area around the LCD monitor may become warm This is normal and does not indicate a malfunction œ You may see some black and white dots in the LCD monitor This i...

Page 20: ...amera 1 Set the main switch to MONITOR OFF or Õ 2 Close the lens cover 3 Open the battery compartment cover on the bottom of the camera œ Slide the cover out then open it 4 Insert the batteries œ Make sure the polarity and of the batteries is as indicated 5 Close the battery compartment cover œ Slide the cover in the direction of the arrow until a click is heard 15 English ...

Page 21: ...AA size nickel metal hydride Ni MH batteries Sanyo HR 3USV x 4 œ AA size nickel cadmium Ni Cd batteries Sanyo N 3US x 4 œ Lithium batteries CR V3 x 2 Make sure the batteries are pointing in the correct direction when installed Remove the batteries when not using the camera for a long time œ A slight amount of battery power is still being used even when the camera is turned off It is recommended th...

Page 22: ...ng this camera Also to use a card that was formatted with a computer or another camera it is necessary to reformat it with this camera œ In this manual the word card is used to refer to the CompactFlash card Installing the Card 1 Set the main switch to MONITOR OFF or Õ Close the lens cover œ Check that the LCD monitor and standby indicator are off 2 Open the card slot cover on the side of the came...

Page 23: ...ay cause the data on the card to be lost Sanyo shall not be held responsible for any data that is damaged or lost in this manner HINT œ Inserting a memory card allows picture storage to and playback from that card the camera s internal memory is used for storage and playback when no card is installed When the camera is turned on without a card inserted º is displayed on the LCD monitor English 18 ...

Page 24: ...nd open the lens cover 2 Press the MODE button to show the following screen 3 Press j on the arrow button then press c to select the Ø icon 4 Press the SET button œ The Options screen appears 5 Press l to select REFORMAT Options screen 18 CLOCK SET LANGUAGE REFORMAT BEEP COPYTO CF 19 English ...

Page 25: ...ored on that card Since data which has been protected see page 51 will also be erased be sure to save important data to a PC hard disk before performing card reformatting HINT Reformatting with the main switch set to Ô œ Reformatting is also possible with the main switch set to Ô in step 1 In this case it is not necessary to open the lens cover To reformat the camera s internal memory œ Perform re...

Page 26: ... LCD monitor is used 2 Open the lens cover œ The power turns on and the standby indicator in the viewfinder lights green When playing back images 1 Set the main switch to Ô œ The power turns on and an image appears on the LCD monitor Turning the power Off 1 Set the main switch to MONITOR OFF or Õ 2 Close the lens cover œ The power turns off œ If the main switch was set to Õ the standby indicator a...

Page 27: ... œ Close and open the lens cover only in the shooting mode œ Press the shutter release button once œ Press the MODE button When in the playback mode you can also œ Move the main switch to another position then back to Ô NOTE To protect your camera s lens œ Although pictures can be viewed with the lens cover open closing the cover is recommended to protect the lens œ When using the AC adaptor sold ...

Page 28: ...over and set the main switch to Õ œ An image appears on the LCD monitor 2 Press the SET button œ If the Shooting Settings screen see page 35 appears press the MODE button to exit it œ Each time the SET button is pressed the shooting mode changes HINT œ You can also switch the shooting mode from the Shooting Settings screen see page 35 LCD monitor SET button 18 An icon indicating the set shooting m...

Page 29: ...elease button 1 Center the subject in the viewfinder press the shutter release button halfway and hold it there œ Camera settings such as the exposure are automatically set 2 Press the shutter release button all the way œ The picture is taken Correct hold Incorrect hold Keep your elbows close to your body A finger is blocking the lens Shutter release button LCD monitor Press halfway Press all the ...

Page 30: ...ed see page 65 To save battery consumption œ You can also take pictures without using the LCD monitor see page 40 To view a captured image immediately œ After taking a picture if you move the main switch to Ô you can view the image that was just captured on the LCD monitor Where are pictures stored œ Pictures are stored on the memory card if installed and otherwise to the camera s internal memory ...

Page 31: ...on œ The Shooting Settings screen is displayed 3 Select a mode from the sequential shot mode menu and press the SET button œ Use the c button to change the mode ø Standard sequential shot A AE shift sequential shot Dark screen underexposed Normal exposure Bright screen overexposed Standard sequential shot ø With the same exposure rate and at 0 5 second intervals 3 sequential shots are taken AE shi...

Page 32: ...automatically set 2 Press the shutter release button all the way œ Shooting starts œ When three pictures have been taken sequential shot shooting stops œ Refer to page 25 for important points to consider when capturing images CAUTION œ In the sequential shooting modes the flash cannot be used Shutter release button SET button LCD monitor Press halfway Press all the way 27 English ...

Page 33: ...2 Press the shutter release button all the way œ Shooting starts œ The K indicator and the remaining shooting time indicator appear on the LCD monitor during recording œ When the shutter release button is pressed again video clip shooting stops œ Refer to page 25 for important points to consider when capturing images CAUTION œ Sound recording is not possible with this camera 1 05 Shutter release b...

Page 34: ... video clips 1 Set the main switch to Ô œ An image appears on the LCD monitor 2 Press the MODE button œ The Playback Settings screen is displayed 3 Select the uppermost icon and press c on the arrow button to select the desired playback mode 4 Press the SET button œ The icon selected in step 3 moves to the left side of the screen and the playback mode setting is complete Playback Settings screen M...

Page 35: ...d file name 8 Resolution indicator Playback Settings screen 9 Compression rate indicator F Protect indicator G Print setting status H Remaining battery charge indicator I Date and time picture was taken B To exit the Playback Settings screen press the MODE button again HINT œ Magnified zoomed in images that have been saved as well as copied images are also viewed in still image playback mode œ Rem...

Page 36: ...age display playback 1 Set the playback mode to the still image playback mode see page 29 2 Press the MODE button œ The Playback Settings screen is displayed 3 Press the SET button œ The 9 image display appears œ Each image is displayed with its assigned image number 4 Use the arrow button to move the u mark to the desired image and press the SET button œ The selected image is displayed full scree...

Page 37: ...age is displayed with its folder number 5 Use the arrow button to move the u mark to the desired image and press the SET button œ The selected image is displayed full screen HINT œ To display a different sequential shot repeat steps 3 to 5 œ In step 2 with the Playback Settings Screen not displayed press j or l to change to the previous or following sequential shot respectively HELP When the 9 ima...

Page 38: ...ress the SET button again to resume playback œ Frame by frame playback Forward While the video clip playback is paused press c Reverse While the video clip playback is paused press d œ Fast playback 2x fast playback During normal playback press c Return to normal playback During fast playback press c œ Jump Jump to the start of the current video clip Press j Jump to the end of the current video cl...

Page 39: ... function Video clip 0001 Video clip 0002 Video clip 0003 Video clip start Video clip end SET button Play SET button Play G during Playback Jump to start of current video clip H during Playback Jump to end of current video clip H during Pause Jump to start of video clip 0002 SET button Play from start of video clip 0001 G Jump to start of video clip 0002 English 34 ...

Page 40: ...ings screen differs depending on the currently active shooting mode 1 Shooting mode menu v Still image icon x Sequential shot icon w Video clip icon Ø Options icon 2 Flash menu f Automatic flash icon d Forced flash icon j Flash off icon Red eye reduction mode icon MODE button LCD monitor 18 W T Video clip shooting mode Sequential shooting mode Still image shooting mode 35 English ...

Page 41: ...oom bar G Number of images remaining In the video clip shooting mode the remaining available recording time is shown as minutes seconds H K indicator only when in the video clip shooting mode I Macro indicator J Remaining battery charge indicator B To exit the Shooting Settings screen press the MODE button again HINT To change the shooting mode in the Shooting Settings screen 1 Press j or l on the...

Page 42: ...st the resolution to match your needs either for higher picture quality or for quantity 1 Display the Shooting Settings screen see page 35 2 Select the resolution menu 3 Select the desired resolution from the resolution menu œ Press c on the arrow button to select the resolution 1280 x 960 pixels icon still image sequential shot modes only 4 640 x 480 pixels icon still image sequential shot modes ...

Page 43: ...ata increases so the number of images that can be recorded decreases In a digital camera the common method to compensate for this is to compress the data This digital camera uses JPEG compression When JPEG compression is used and the image is returned to its original size an extremely small portion of the data is lost The higher the compression rate the more of the original image is lost For this ...

Page 44: ... Shooting Settings screen see page 35 2 Select the compression rate menu 3 Select the desired compression rate from the compression rate menu œ Press c on the arrow button to select the rate D Image data is stored at low compression high quality G Image data is stored at moderate compression normal quality 4 Press the SET button œ The selected compression rate is set B To exit the Shooting Setting...

Page 45: ...main switch to MONITOR OFF 2 Point the camera at the subject 3 Compose the image œ Look through the viewfinder and aim the camera so that the light measuring area is in the center of the subject 4 Press the shutter release button Still image shooting mode Ö see page 24 step 3 Sequential shot shooting mode Ö see page 27 step 4 Video clip shooting mode Ö see page 28 step 2 Shutter release button Eng...

Page 46: ...n switch is set to MONITOR OFF you can take pictures without using the LCD monitor see page 40 B To return to normal photography set the macro switch to its original position CAUTION œ Due to the distance between the viewfinder and the lens as the camera gets closer to the subject the image that is actually recorded becomes lower and more to the left in the viewfinder area Therefore it is recommen...

Page 47: ...t œ To exit the Shooting Settings screen press the MODE button 5 Take the picture œ When the shutter release button is pressed the self timer indicator lights for about 7 seconds after which it flashes for about 3 seconds and then the picture is taken HINT To stop the self timer œ Press the shutter release button while the self timer indicator is lit To restart it press the shutter release button ...

Page 48: ...graphy and 0 2 to 0 5 m for macro photography 1 Display the Shooting Settings screen for the still image shooting mode see page 35 2 Select the flash menu 3 Select the desired flash mode from the flash menu œ Press c on the arrow button to select the flash mode f automatic flash The camera will detect the brightness of the subject and use the flash or not as required d forced flash The flash opera...

Page 49: ...screen press the MODE button 5 Press the shutter release button œ If the main switch is set to MONITOR OFF you can take pictures without using the LCD monitor see page 40 HINT œ The flash mode setting is retained until you change it œ The flash does not operate for sequential shot or video clip photography HELP If the shutter button does not work œ While the flash is charging the standby indicator...

Page 50: ...e correction icon Ê œ The exposure correction bar appears 3 Press d or c on the arrow button to adjust the exposure œ Pressing d or c moves the pointer on the exposure correction bar to the left or right changing the exposure œ To exit the Shooting Settings screen press the MODE button 4 Take the picture 18 Exposure correction bar Make darker Make brighter Pointer 45 English ...

Page 51: ... position œ Moving the pointer away from the center position will change the exposure Shortcut for setting the exposure correction œ Any time the Shooting Settings screen is not shown and you press c or j on the arrow button the exposure correction icon appears allowing you to change the setting If the setting is not available the icon will not appear English 46 ...

Page 52: ... œ The zoom is canceled when the main switch is set to Ô or MONITOR OFF when the camera is turned off or when the pointer is moved furthest to the left œ The image quality will deteriorate slightly when the zoom is used Shortcut for setting the zoom œ Any time the Shooting Settings screen is not shown and you press d or l on the arrow button the zoom icon appears allowing you to change the setting...

Page 53: ...ess the MODE button to exit it 2 Press and hold j or l on the arrow button until the SLIDE SHOW indicator appears œ Images are played in succession at 4 second intervals j Images are displayed in reverse order l Images are displayed in the normal order 3 To stop the slide show œ Press the MODE SET or arrow button STOP appears and the slide show ends SLIDE SHOW STOP English 48 ...

Page 54: ...age is displayed œ The playback zoom indicator O appears on the LCD screen œ Press the SET button to magnify the image further œ You can press the arrow button to view different portions of the magnified image œ When the image is displayed at maximum magnification if you press the SET button again the image returns to its original size œ You can press the shutter release button to save the magnifi...

Page 55: ...ge 29 3 Select the copy icon l 4 Press the SET button œ The Copy screen appears YES Saves the displayed image as a still image EXIT Cancels the copy procedure and returns the display to the Playback Settings screen 5 Press the SET button œ PROCESSING appears and the display returns to the copy screen œ The image is copied and saved HINT œ After the image is copied the original image remains unchan...

Page 56: ...al shots are protected one frame at a time and video clips are protected one clip at a time 1 Display the image that you want to protect from accidental erasure 2 Display the Playback Settings screen see page 29 3 Select the protect icon É 4 Press the SET button œ The LOCK indicator appears YES The image data is locked and cannot be erased EXIT The protect setting is not changed and the display re...

Page 57: ...e erased if reformatting is performed see page 19 HINT To continue setting the protect mode for other image data œ After step 5 press d or c to display the desired image and repeat step 4 To cancel the protect mode for an image œ Display the image you wish to unlock and perform steps 2 to 5 The protect indicator disappears and the image is unlocked UNLOCK ª YES º EXIT English 52 ...

Page 58: ...ET button œ The Erase Mode Selection screen appears To erase still images ONE ERASE Erases one still image at a time GROUP ERASE Erases all the still images EXIT Returns to the Playback Settings screen To erase sequential shots ONE ERASE Erases one still image at a time GROUP ERASE Erases the entire folder for the sequential shot display the data for the other sequential shots remains EXIT Returns...

Page 59: ... erased and the display returns to the Erase Mode Selection screen 6 Select YES and press the SET button If ONE ERASE was selected œ ERASING appears while the data is being erased If GROUP ERASE was selected œ The Erase Confirmation screen appears once more Select YES and press the SET button to erase the data œ When all the data has been erased NO IMAGE appears on the screen HINT To continue eras...

Page 60: ...oting mode menu 3 Press the SET button œ The Options screen appears 4 Select COPY TO CF and press the SET button œ The Card Copy screen appears COPY Data will be copied to the card EXIT The data will not be copied 5 Select COPY and press the SET button œ Copying begins œ When copying has completed the display returns to the Options screen 18 Shooting mode menu CLOCK SET LANGUAGE REFORMAT BEEP COPY...

Page 61: ...yo Software Pack instruction manual for more information about software installation 1 Turn off your digital camera see page 21 2 Connect the camera plug of the dedicated USB interface cable to the camera and the computer plug to the computer 3 Open the camera lens cover HINT œ When the digital camera is connected to a computer no image is shown on the camera s LCD monitor To USB terminal To USB c...

Page 62: ...ermining file names are explained below œ Still image data Data format JPEG File name structure File name starts with SANY with extension jpg Ex SANYxxxx jpg xxxx represents the sequential number assigned to the recorded image œ Sequential shot image data Data format JPEG File name structure File name starts with SEQT with extension jpg Ex SEQTxxyy jpg xx represents the sequential shot folder numb...

Page 63: ...kTime 5 0 for Windows Macintosh is available on the included CD ROM Sanyo Software Pack 100SANDS 101SANDS 102SANDS SANY1001 jpg SANY1002 jpg SANY1999 jpg SANY2001 jpg SANY2002 jpg SANY0001 jpg SANY0002 jpg SANY0003 jpg SANY0004 jpg SANY0998 jpg SANY0999 jpg SEQT0001 VCLP VCLP0001 mov VCLP0002 mov SEQT0101 jpg SEQT0102 jpg SEQT0103 jpg ROOT Files will be stored in the 100SANDS folder until up to 99...

Page 64: ...re stored in the internal memory first copy the images to a card see page 55 and follow the steps below 1 Insert a card and display the still image you wish to have printed see page 31 2 Display the Playback Settings screen see page 29 3 Select the print icon n 4 Press the SET button œ The Print Setting screen appears STD PRINT To print one image on one sheet ALL CLEAR To clear the print settings ...

Page 65: ...on screen appears Select YES press the SET button and the print settings will be cleared NOTE œ This digital camera conforms to DPOF standards so if the card is taken to a shop that handles the DPOF standard you can specify using your digital camera the number of prints and whether to include the date on the prints œ The quality of the prints will differ depending on the print service and the prin...

Page 66: ... clock to 7 30 p m August 28 2002 1 Display the Shooting Settings screen œ The following steps can also be performed from the Playback Settings screen see page 29 2 Select Ø from the shooting mode menu 3 Press the SET button œ The Options screen appears 4 Select CLOCK SET and press the SET button œ The Clock Set screen appears œ The current date and time settings are shown 18 Shooting mode menu CL...

Page 67: ...UR Ö MINUTE order 1Press l on the arrow button to select the TIME indication 2Press the SET button œ The hour indication changes to orange j The number decreases l The number increases SET button or c Moves to the next item 3After the minute has been set press the SET button œ The display returns to the screen in step 1 CLOCK SET j 2001 06 01 l CLOCK SET 2002 08 28 00 00 ON Y M D EXIT CLOCK SET 20...

Page 68: ...e display changes in the reverse order œ If OFF is selected the date is not shown during playback 4After selecting the date display press the SET button œ The display returns to the screen in step 1 8 Select EXIT and press the SET button œ The date and time settings are completed and the display returns to the screen in step 3 CLOCK SET 2002 08 28 19 30 ON Y M D EXIT CLOCK SET j ON Y M D l CLOCK S...

Page 69: ...wish to correct 3 Press j or l on the arrow button to correct the indication 4 Press the SET button Check the clock after changing the batteries œ When you replace the batteries the internal clock setting is usually backed up for up to 15 minutes However depending on how long the batteries have been used in some cases the date and time setting may be cleared For this reason after changing the batt...

Page 70: ...ng mode menu 3 Press the SET button œ The Options screen appears 4 Select BEEP and press the SET button œ The Beep Sound Setting screen appears ALL A beep is heard when any button is pressed SHUTTER A beep is heard only when the shutter release button is pressed OFF The beep sound is turned off 5 Select the beep sound setting and press the SET button œ The beep sound is set and the display returns...

Page 71: ...HINT œ The beep sound setting is retained even if the main switch is set to Ô or MONITOR OFF or if the power is turned off œ The beep sound volume cannot be adjusted English 66 ...

Page 72: ...l setting French German Spanish 1 Display the Shooting Settings screen œ The following steps can also be performed from the Playback Settings screen see page 29 2 Select Ø from the shooting mode menu 3 Press the SET button œ The Options screen appears 18 Shooting mode menu CLOCK SET LANGUAGE REFORMAT BEEP COPYTO CF 67 English ...

Page 73: ...erman and Spanish 5 Select the language and press the SET button œ The display language is set and the display returns to the Options screen HINT œ The display language setting is retained even if the main switch is set to Ô or MONITOR OFF or if the power is turned off LANGUAGE ENGLISH FRANCAIS DEUTSCH ESPAÑOL English 68 ...

Page 74: ... If the main switch is set to Õ open the lens cover 2 Select any shooting or playback mode other than Ø œ The remaining battery charge is indicated in the lower right corner of the LCD monitor Battery indication Remaining charge No indication From full to about 1 4 full èç From about 1 2 full to less than 1 4 full êç Replace the batteries It will soon be impossible to take pictures When this statu...

Page 75: ...y charge œ The remaining battery indication is displayed as above only when alkaline batteries supplied are used The indication is not correctly displayed when Ni Cd or other batteries are used œ Battery life may differ even among batteries of the same type œ Battery consumption differs depending on the shooting conditions how many times the flash is used whether or not the LCD monitor is used and...

Page 76: ...er right of the LCD monitor for the video clip shooting mode œ The remaining number of images and video clips differs depending on the resolution and compression rate settings œ When the indication for the remaining number of images or video clips becomes 0 no more images can be recorded To record more images either replace the card with another one or save the recorded card data see page 57 and t...

Page 77: ...the AC adapter is connected to the camera the power saving feature will not activate for at least 30 minutes The picture is not taken when the shutter release button is pressed The power is not turned on 22 When the power save function is active press the MODE button or press the shutter release button once to restore the power The standby indicator is flashing the camera is preparing to take a pi...

Page 78: ...urces When used in cold weather the image may seem to leave traces as it moves A phenomenon due to the characteristics of the liquid crystals This is not a malfunction The dots appear on the LCD monitor screen but are not recorded in the image Shining red blue or green dots appear on the screen or small black dots are visible A phenomenon due to the characteristics of the liquid crystals This is n...

Page 79: ... is dirty 24 Clean the lens The image is too dark The flash was blocked by a finger or the like 24 Hold the camera correctly making sure the flash is not obstructed The subject was too far away 43 Take the picture within the effective flash range The subject was lit from behind Use the forced flash mode Correct the exposure 45 The image is too bright The forced flash mode was set 43 Select a flash...

Page 80: ...e image with the number was erased This is not a malfunction NO IMAGE appears There is no image for the selected mode 29 53 Select a playback mode for which images exist Vertical stripes are present in the image When sequential shots or video clips are taken of a bright subject vertical stripes may occur on the LCD monitor and recorded image This is not a malfunction MEMORY FULL appears There is n...

Page 81: ...ERROR is displayed A problem has occurred within the camera or card Try the following measures 1Remove the card and then install it again 2Remove the batteries and then install them again 3Remove the batteries wait about 1 hour and then install them again 4Install a different card If the SYSTEM ERROR message still appears after the above measures are performed take the camera to a dealer for servi...

Page 82: ...Movie Data storage media Internal memory 2MB for image storage about 1MB External memory CompactFlash Type I only Image sensor 1 2 8 inch frame transfer CCD image pickup elements about 1 360 000 pixels effective about 1 300 000 pixels progressive scan primary color filter Recording resolution 1 280 x 960 pixels still images and sequential shots only 640 x 480 pixels still images and sequential sho...

Page 83: ...ideo clip shooting modes 1 30 to 1 500 sec Sensitivity Auto equivalent to ISO20 to 100 Viewfinder Optical direct image viewfinder LCD monitor 1 5 inch low temperature polysilicon TFT color liquid crystal LCD monitor pixels Approx 110 000 pixels Flash working range 0 5m to 2 1m normal shooting 0 2m to 0 5m macro shooting Flash modes Auto flash forced flash flash off and red eye reduction Focus Pan ...

Page 84: ...ve use with separately sold AC adapter Battery Operation Shooting 980 images LCD monitor off images captured in 20 second intervals and flash used 1 in 3 times 350 images LCD monitor on images captured in 20 second intervals and flash used 1 in 3 times Playback 5 h 30 min LCD monitor on and continuous playback œ Until batteries run out when using a 32 MB CompactFlash card KA DSM C32G and batteries...

Page 85: ...G 15 505 Sequential shot D 2 2 3 80 G 3 3 3 125 4 D 3 10 3 334 G 3 15 3 505 Video clip 2 3 sec 15 sec 1 min 59 sec 0 7 sec 30 sec 4 min 38 sec One shooting Maximum no of images shooting time when the shutter release button is pressed once Total Maximum no of images shooting time that can be stored œ Even with cards of the same capacity the amount of data that can actually be stored may differ depe...

Page 86: ...ection icon 36 ï Zoom icon 36 Macro indicator 36 41 K Recording indicator 36 41 Playback mode display b Image information indicators 420 Resolution indicator 30 DG Compression indicator 30 Ñ Protect indicator 30 52 n Print setting status 30 59 O Playback zoom indicator 49 Camera condition indicators º No card icon 18 éç Remaining battery charge indicator 30 35 69 81 English ...

Page 87: ...SANYO Electric Co Ltd ...

Reviews: