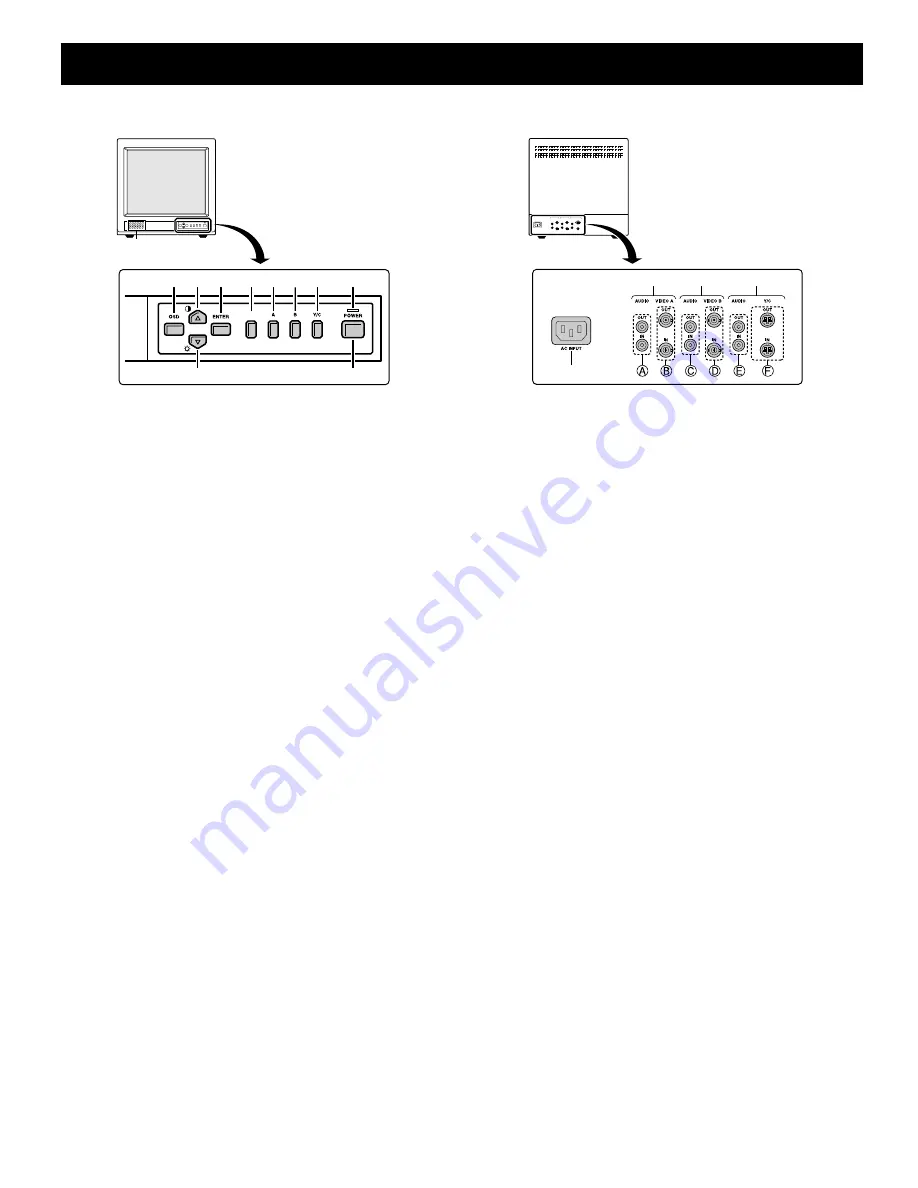
background image

PARTS NAMES

Front Panel

1

Speaker

When the monitor selector button (A, B or Y/C) is pressed,
the speaker lets you hear the sound from the unit which is
connected to the audio input terminals at the rear of the
monitor.

2

On-screen display button (OSD)

When this button is pressed, the menu screen appears on
the monitor screen.

3

Cursor (

l

) button (

ã

)

When this button is pressed, the cursor moves down. When
it reaches the bottom, it reappears at the top. In addition, this
button is used to make adjustment values smaller.

4

Cursor (

j

) button (

»

)

When this button is pressed, the cursor moves up. When it
reaches the top, it reappears at the bottom. In addition, this
button is used to make adjustment values larger.

5

Display selector button (ENTER)

If this button is pressed while a picture is on the monitor screen,
the screen changes to the adjustment screen. If the button is
pressed once more, the picture returns to the previous screen.

6

Underscan/overscan select button (SCAN)

The initial setting is for the normal screen (overscan). If the
SCAN button is pressed, the screen will become smaller
(underscan) than the normal screen. Change this setting in
cases such as when screen display characters are missing.
If the SCAN button is pressed once more, the normal screen
is displayed again.

7

Monitor A selector button (A)

When this button is pressed, the audio and video input
changes to the unit which is connected to the A terminals at
the rear of the monitor.

8

Monitor B selector button (B)

When this button is pressed, the audio and video input
changes to the unit which is connected to the B terminals at
the rear of the monitor.

9

Monitor Y/C selector button (Y/C)

When this button is pressed, the audio and video input
changes to the unit which is connected to the Y/C terminals
at the rear of the monitor.

F

Power indicator (POWER)

Lights when the power is on.

G

Power button (POWER)

Press this button to turn the power on and off.

Rear Panel

1

AC INPUT socket

Connect the AC power cord (supplied) securely to this
socket and to a wall outlet.

2

Rear A terminals (AUDIO/VIDEO A terminals)

When the monitor A selector button at the front of the
monitor is pressed, the audio and video signals from the unit
which is connected to these terminals can be monitored.

A

AUDIO OUT/IN terminals

B

VIDEO OUT/IN terminals

3

Rear B terminals (AUDIO/VIDEO B terminals)

When the monitor B selector button at the front of the
monitor is pressed, the audio and video signals from the unit
which is connected to these terminals can be monitored.

C

AUDIO OUT/IN terminals

D

VIDEO OUT/IN terminals

4

Rear Y/C terminals (AUDIO/VIDEO Y/C terminals)

When the monitor Y/C selector button at the front of the
monitor is pressed, the audio and video signals from the unit
which is connected to these terminals can be monitored.

E

AUDIO OUT/IN terminals

F

S-VIDEO OUT/IN terminals

Note: If there is no signal being input from the input

terminals selected (A, B or Y/C) at the rear of the
monitor, “NO SIGNAL” will be displayed.

2 4 5

6 7 8 9

F

3

G

1

SCAN

2

3

4

1

L8MAG/US (VMC-8614F GB) 2003. 10. 15

4

Summary of Contents for VMC-8614F - 14" Super High Resolution Color Monitor

Page 1: ... loop through Equipped with Y C input S VIDEO input terminal This terminal is used to input Y C separation signals S VIDEO signals Eight languages OSD MENU ENGLISH FRANCAIS DEUTSCH ESPAÑOL ITALIANO RUSSIAN CHINESE JAPANESE Horizontal resolution More than 800 TV lines PAL NTSC color system selected automatically Built in speaker Multi voltage 100 240 V ACCESSORY AC power cord Re attachable About th...

Page 2: ...C COMPLIANCE STATEMENT FCC INFORMATION THIS EQUIPMENT HAS BEEN TESTED AND FOUND TO COMPLY WITH THE LIMITS FOR A CLASS A DIGITAL DEVICE PURSUANT TO PART 15 OF THE FCC RULES THESE LIMITS ARE DESIGNED TO PROVIDE REASONABLE PROTECTION AGAINST HARMFUL INTERFERENCE WHEN THE EQUIPMENT IS OPERATED IN A COMMERCIAL ENVIRONMENT THIS EQUIPMENT GENERATES USES AND CAN RADIATE RADIO FREQUENCY ENERGY AND IF NOT I...

Page 3: ...you are unable to insert the plug into the outlet contact your electrician to replace your obsolete outlet Do not defeat the safety purpose of the grounding type plug 10 POWER CORDS Do not allow anything to rest on the power cord Do not locate video monitor or equipment where the cord will be abused by persons walking on it 11 HEED WARNINGS Follow all instructions marked on the video monitor or eq...

Page 4: ...ugging in the power cord Make sure you insert the plug of the power cord all the way in the power outlet Using the monitor with the power cord not fully plugged in may cause heat to generate and cause a fire Do not use the monitor with the power cord wound or tied up Heat may generate and cause a fire When using an extension cord be sure that the total current load of all equipment connected to it...

Page 5: ... terminals at the rear of the monitor 8 Monitor B selector button B When this button is pressed the audio and video input changes to the unit which is connected to the B terminals at the rear of the monitor 9 Monitor Y C selector button Y C When this button is pressed the audio and video input changes to the unit which is connected to the Y C terminals at the rear of the monitor F Power indicator ...

Page 6: ...e component it can be connected to either the A or B terminals at the rear of the monitor Monitor Video recorder Video camera Monitor Video recorder Video camera Monitor Video recorder To VIDEO A INPUT terminal Rear panel To Video input terminal To AUDIO A INPUT terminal Basic connections IN signal OUT signal To Audio input terminal To VIDEO B INPUT terminal To AUDIO B INPUT terminal To AUDIO inpu...

Page 7: ...r button Note If there is no signal being input from the input terminals selected A B or Y C at the rear of the monitor NO SIGNAL will be displayed 3 Menu screen operations 1 Press the OSD button The menu screen will be displayed The menu screen will only be displayed for about 13 seconds 2 Press the cursor l or j button The cursor will move up or down so that you can select the desired menu item ...

Page 8: ...buttons to adjust the tint of the picture NTSC only BRIGHTNESS adjustment 1 Select 3 BRIGHTNESS 75 and then press the ENTER button 2 Use the cursor l and j buttons to adjust the brightness of the picture CONTRAST adjustment 1 Select 4 CONTRAST 75 and then press the ENTER button 2 Use the cursor l and j buttons to adjust the contrast of the picture SHARPNESS adjustment 1 Select 5 SHARPNESS 75 and t...

Page 9: ...acters can be displayed on the screen Note The setting screen will disappear after approximately 13 seconds of no activity 1 Use the cursor l button to select CH B 2 Press the ENTER button and then use the cursor l j button to select A 3 Press the ENTER button and then use the cursor l j button to select B 4 Press the ENTER button and then use the cursor l j button to select C 5 Press the ENTER bu...

Page 10: ... Set the connected component correctly 5 Is the volume set to the minimum level Adjust the volume using the VOLUME setting screen 7 Is the audio cable disconnected Securely connect the audio cable 5 Shaking picture Is the monitor close to a device which is generating a strong magnetic field Move the device away from the monitor until the picture stabilizes No color color is incorrect or picture is...

Page 11: ...enu screen items Picture adjustment Adjustable COLOR TINT NTSC only BRIGHTNESS CONTRAST SHARPNESS Sound adjustment Adjustable speaker volume Language setting Eight languages English Francais Deutsch Espanol Italiano Russian Chinese and Japanese Title setting Title entry up to eight alphanumeric characters Overscan or underscan selection YES Speaker x1 impedance of 8 Ω Audio output 1 W Power source...

Page 12: ...ply to uncrating setup installation removal of the product for repair or reinstallation of the product after repair This warranty does not apply to repairs or replacements necessitated by any cause beyond the control of SFC including but not limited to any malfunction defect or failure caused by or resulting from unauthorized service or parts improper maintenance operation contrary to furnished in...

Reviews: